Rabbitmq入门到精通
1 消息队列介绍
1.1 介绍
消息队列就是基础数据结构中的“先进先出”的一种数据机构。想一下,生活中买东西,需要排队,先排的人先买消费,就是典型的“先进先出”。

1.2 MQ解决什么问题
MQ是一直存在,不过随着微服务架构的流行,成了解决微服务之间问题的常用工具。
两个服务相互调用,由于不在同一个内存空间,不能直接调用,需要通过网络来表达调用的语义和传达调用的数据。
有两种方式调用:restful(http协议),rpc(远程过程调用),不管用rpc或者restful来通信,都涉及到同步,异步。
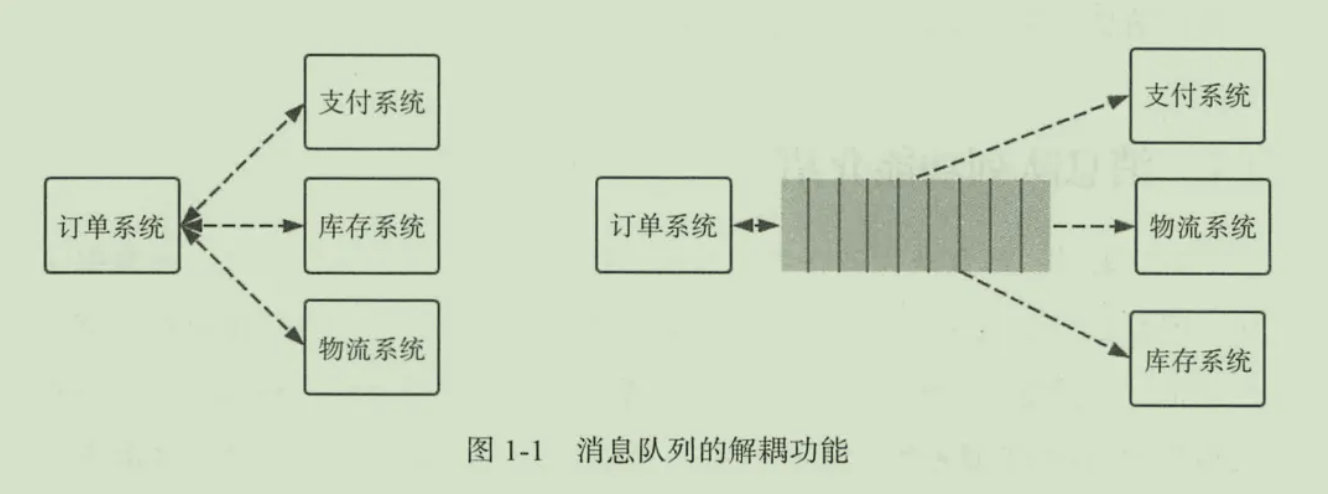
1.2.1 应用解耦
以电商应用为例,应用中有订单系统、库存系统、物流系统、支付系统。用户创建订单后,如果耦合调用库存系统、物流系统、支付系统,任何一个子系统出了故障,都会造成下单操作异常。
当转变成基于消息队列的方式后,系统间调用的问题会减少很多,比如物流系统因为发生故障,需要几分钟来修复。在这几分钟的时间里,物流系统要处理的内存被缓存在消息队列中,用户的下单操作可以正常完成。当物流系统恢复后,继续处理订单信息即可,用户感受不到物流系统的故障。提升系统的可用性。
1.2.2 流量削峰
举个栗子,如果订单系统最多能处理一万次订单,这个处理能力应付正常时段的下单时绰绰有余,正常时段我们下单一秒后就能返回结果。但是在高峰期,如果有两万次下单操作系统是处理不了的,只能限制订单超过一万后不允许用户下单。
使用消息队列做缓冲,我们可以取消这个限制,把一秒内下的订单分散成一段时间来处理,这样做,有些用户可能在下单十几秒后才能收到下单成功的操作,但是比不能下单的体验要好。
1.2.3 消息分发
多个服务对数据感兴趣,只需要监听同一类消息即可处理,即发布订阅。
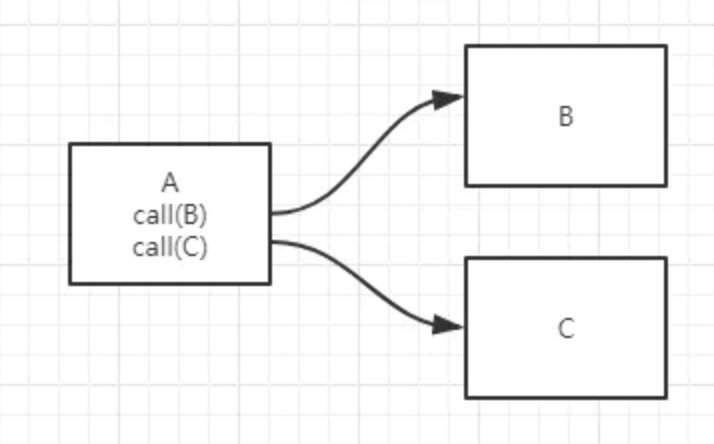
例如A产生数据,B对数据感兴趣。如果没有消息的队列,A每次处理完需要调用一下B服务。过了一段时间C对数据也感性,A就需要改代码,调用B服务,调用C服务。只要有服务需要,A服务都要改动代码。很不方便。
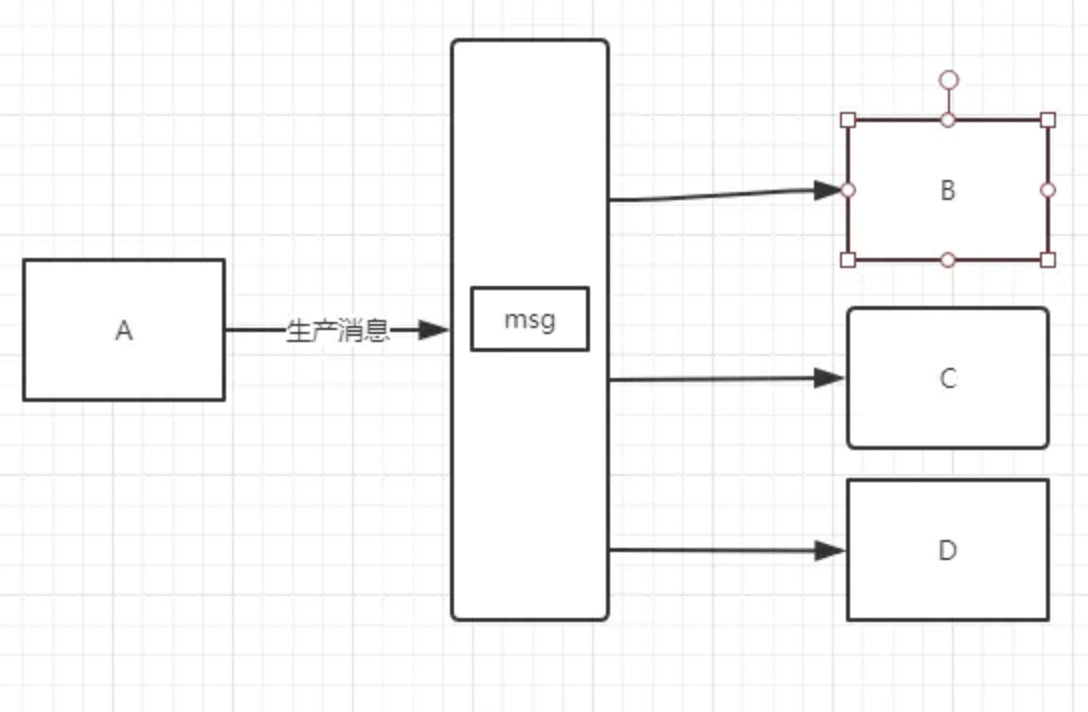
有了消息队列后,A只管发送一次消息,B对消息感兴趣,只需要监听消息。C感兴趣,C也去监听消息。A服务作为基础服务完全不需要有改动。
1.2.4 异步消息
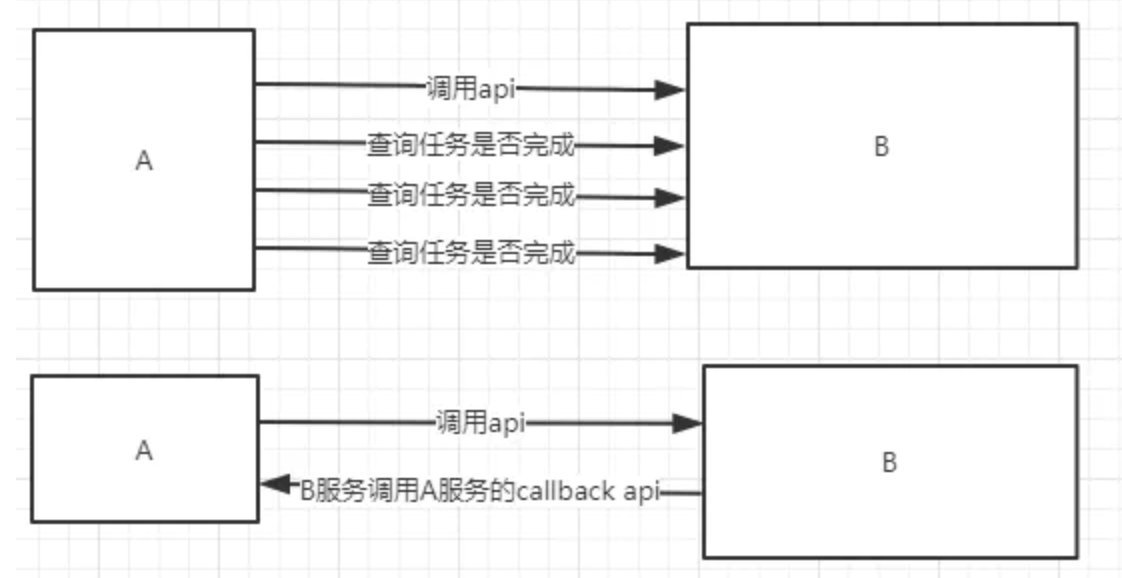
有些服务间调用是异步的,例如A调用B,B需要花费很长时间执行,但是A需要知道B什么时候可以执行完,以前一般有两种方式,A过一段时间去调用B的查询api查询(轮询)。或者A提供一个callback api,B执行完之后调用api通知A服务。这两种方式都不是很优雅。

使用消息队列,可以很方便解决这个问题,A调用B服务后,只需要监听B处理完成的消息,当B处理完成后,会发送一条消息给MQ,MQ会将此消息转发给A服务。这样A服务既不用循环调用B的查询api,也不用提供callback api。同样B服务也不用做这些操作。A服务还能及时的得到异步处理成功的消息。
1.3 常见消息队列及比较
RabbitMQ 与 Kafka 的比较:
# rabbitmq:吞吐量小(几百万条数据没问题),有消息确认机制(确认消费完了再删,kafka拿走就没了),适合订单等对消息可靠性有要求的数据。
# kafka:吞吐量高(大数据相关),注重高吞吐量,不注重消息的可靠性(适用电商记录巨量的日志信息),数据量特别大。
结论:
Kafka在于分布式架构,RabbitMQ基于AMQP协议来实现,RocketMQ/思路来源于kafka,改成了主从结构,在事务性可靠性方面做了优化。广泛来说,电商、金融等对事务性要求很高的,可以考虑RabbitMQ和RocketMQ,对性能要求高的可考虑Kafka。
2 Rabbitmq安装
官网:https://www.rabbitmq.com/getstarted.html
2.1 服务端原生安装
原生安装,开启web管理界面需要去配置文件中进行配置
# 安装配置epel源
# 安装erlang
yum -y install erlang
# 安装RabbitMQ
yum -y install rabbitmq-server

# 启动RabbitMQ,yum安装自动加入系统服务systemctl
systemctl start rabbitmq-server
2.2 服务端Docker安装
# docker官网拉取镜像,rabbitmq:management版本自动开启了web管理界面
docker pull rabbitmq:management

# docker启动容器
# 跟redis和mysql一样,rabbitmq也需要有用户操作数据,e环境变量配置用户和密码
# 端口映射,5672是rabbitmq的默认端口,15672是web管理界面的端口
docker run -di --name Myrabbitmq -e RABBITMQ_DEFAULT_USER=admin -e RABBITMQ_DEFAULT_PASS=admin -p 15672:15672 -p 5672:5672 rabbitmq:managemen
2.3 客户端安装
pip3 install pika2.4 设置用户和密码
命令行设置用户和密码,也可以在web管理页面设置
# 创建用户名和密码
rabbitmqctl add_user lqz 123

# 设置用户为administrator角色,为用户打上tag
rabbitmqctl set_user_tags lqz administrator

# 设置权限
rabbitmqctl set_permissions -p "/" root ".*" ".*" ".*"

# 重启rabbiMQ服务
systemctl restart rabbitmq-server

# 然后可以使用刚创建的用户远程连接rabbitmq server。
3 基于Queue实现生产者消费者模型
import Queue
import threading

message = Queue.Queue(10)

def producer(i):
    while True:
        message.put(i)

def consumer(i):
    while True:
        msg = message.get()

for i in range(12):
    t = threading.Thread(target=producer, args=(i,))
    t.start()

for i in range(10):
    t = threading.Thread(target=consumer, args=(i,))
    t.start()
4 基本使用(生产者消费者模型)
对于RabbitMQ来说,生产和消费不再针对内存里的一个Queue对象,而是某台服务器上的RabbitMQ Server实现的消息队列。
生产者
import pika

# 拿到连接对象
# 无密码
# connection = pika.BlockingConnection(pika.ConnectionParameters('10.0.0.200'))
# 有密码
credentials = pika.PlainCredentials("admin","admin")
connection = pika.BlockingConnection(pika.ConnectionParameters('10.0.0.200',credentials=credentials))

# 拿到channel对象,类似mysql的cousor对象
channel = connection.channel()
# 声明一个队列(创建一个队列)
channel.queue_declare(queue='hello') # 指定队列名字为hello

channel.basic_publish(exchange='',
                      routing_key='hello',  # 消息队列名称
                      body='hello world')   # 往'hello'队列放入一个字符串,通过web管理界面可以查看
print(" Sent 'Hello World!'")
# 关闭连接
connection.close()
消费者
import pika, sys, os

def main():
    # connection = pika.BlockingConnection(pika.ConnectionParameters(host='10.0.0.200'))  没密码
    credentials = pika.PlainCredentials("admin", "admin")
    connection = pika.BlockingConnection(pika.ConnectionParameters('10.0.0.200', credentials=credentials))
    channel = connection.channel()
    # 声明一个队列,如果消费者代码先起来,没有声明队列就会报错
    channel.queue_declare(queue='hello')

    def callback(ch, method, properties, body):
        print(" [x] Received %r" % body)

    channel.basic_consume(queue='hello', on_message_callback=callback, auto_ack=True)
    print(' [*] Waiting for messages. To exit press CTRL+C')

    # 消费者启动后夯住,队列中一旦放入东西,就从里面消费
    channel.start_consuming()

if __name__ == '__main__':
    try:
        main()
    except KeyboardInterrupt:
        print('Interrupted')
        try:
            sys.exit(0)
        except SystemExit:
            os._exit(0)
5 消息安全之ack(消息确认机制)
生产者代码不用改动,消费者代码需要如下调整:
def main():
    # connection = pika.BlockingConnection(pika.ConnectionParameters(host='10.0.0.200'))
    credentials = pika.PlainCredentials("admin", "admin")
    connection = pika.BlockingConnection(pika.ConnectionParameters('10.0.0.200', credentials=credentials))
    channel = connection.channel()

    channel.queue_declare(queue='hello')

    def callback(ch, method, properties, body):
        print(" [x] Received %r" % body)
        # 真正的消息处理完了(消费成功了),再发确认
        ch.basic_ack(delivery_tag=method.delivery_tag)
    ## auto_ack=False,不会自动回复确认消息,消息会一直存在队列
    ## auto_ack=True,自动回复确认消息,队列收到确认,就会自动把消费过的消息删除,消费成功与失败队列是不知道的
    channel.basic_consume(queue='hello', on_message_callback=callback, auto_ack=False)

    channel.start_consuming()

if __name__ == '__main__':
    main()
6 消息安全之durable(持久化)
之前声明的队列如果没有配置持久化参数,后面加上参数也无法持久化。
生产者
import pika

credentials = pika.PlainCredentials("admin","admin")
connection = pika.BlockingConnection(pika.ConnectionParameters('10.0.0.200',credentials=credentials))
channel = connection.channel()
# 声明一个队列(创建一个队列),durable=True支持队列持久化,队列必须是新的才可以
channel.queue_declare(queue='hello_new',durable=True)

channel.basic_publish(exchange='',
                      routing_key='hello_new',
                      body='hello world',
                      properties=pika.BasicProperties(
                          delivery_mode=2,  # make message persistent,支持消息持久化
                          ),
                      )
connection.close()
消费者
import pika, sys, os

def main():
    credentials = pika.PlainCredentials("admin", "admin")
    connection = pika.BlockingConnection(pika.ConnectionParameters('10.0.0.200', credentials=credentials))
    channel = connection.channel()

    channel.queue_declare(queue='hello_new',durable=True)

    def callback(ch, method, properties, body):
        print(" [x] Received %r" % body)
        ch.basic_ack(delivery_tag=method.delivery_tag)

    channel.basic_consume(queue='hello_new', on_message_callback=callback, auto_ack=False)

    channel.start_consuming()

if __name__ == '__main__':
    main()
7 闲置消费
正常情况如果有多个消费者,是按照顺序第一个消息给第一个消费者,第二个消息给第二个消费者,第三个消息给第一个消费者(假如两个消费者),轮着来
但是可能第一个消息的消费者处理消息很耗时,一直没结束,就可以让第二个消费者优先获得闲置的消息
生产者代码不用改动,消费者代码需要如下调整:
### 消费者1
import pika, sys, os

def main():
    credentials = pika.PlainCredentials("admin", "admin")
    connection = pika.BlockingConnection(pika.ConnectionParameters('10.0.0.200', credentials=credentials))
    channel = connection.channel()

    channel.queue_declare(queue='hello')

    def callback(ch, method, properties, body):
        import time
        time.sleep(50)  # 第一个消费者模拟消费耗时,第二个消费者闲置,一旦队列有消息都会被第二个消费者获取
        print(" [x] Received %r" % body)
        ch.basic_ack(delivery_tag=method.delivery_tag)

    channel.basic_qos(prefetch_count=1)  ##### 配置这段代码,谁闲置谁获取,没必要按照顺序一个一个来
    channel.basic_consume(queue='hello', on_message_callback=callback, auto_ack=False)
    channel.start_consuming()

if __name__ == '__main__':
    main()


###消费者2
import pika, sys, os

def main():
    credentials = pika.PlainCredentials("admin", "admin")
    connection = pika.BlockingConnection(pika.ConnectionParameters('10.0.0.200', credentials=credentials))
    channel = connection.channel()

    channel.queue_declare(queue='hello')

    def callback(ch, method, properties, body):
        print(" [x] Received %r" % body)
        ch.basic_ack(delivery_tag=method.delivery_tag)

    channel.basic_qos(prefetch_count=1)  ##### 配置这段代码,谁闲置谁获取,没必要按照顺序一个一个来
    channel.basic_consume(queue='hello', on_message_callback=callback, auto_ack=False)
    channel.start_consuming()

if __name__ == '__main__':
    main()
8 发布订阅
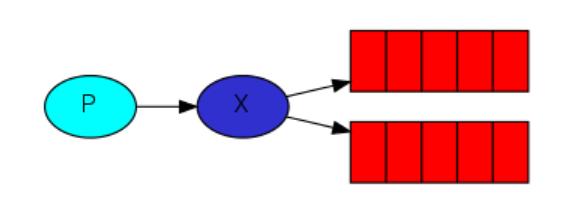
启动一个消费就会监听一个队列,生产者把消息传给exchange,通过exchange传递给每一个队列,从而实现发布一条消息,被多个消费者订阅。应用于社交网络,比如共同关注的人发布了动态,订阅者都能收到消息。
发布者
import pika

credentials = pika.PlainCredentials("admin", "admin")
connection = pika.BlockingConnection(pika.ConnectionParameters('10.0.0.200', credentials=credentials))
channel = connection.channel()

# 声明队列不用指定队列名字queue_declare,而是指定exchange
channel.exchange_declare(exchange='logs', exchange_type='fanout')

message = "info: Hello World!"
channel.basic_publish(exchange='logs', routing_key='', body=message)
print(" [x] Sent %r" % message)
connection.close()
订阅者(启动多次,会创建出多个队列,都绑定到了同一个exchange上)
import pika

credentials = pika.PlainCredentials("admin","admin")
connection = pika.BlockingConnection(pika.ConnectionParameters('10.0.0.200',credentials=credentials))
channel = connection.channel()

# exchange='logs', exchange(秘书)的名称
# exchange_type='fanout' , 秘书工作方式:将消息发送给所有的队列
channel.exchange_declare(exchange='logs',exchange_type='fanout')

# 没有指定队列名称,默认随机生成一个队列
result = channel.queue_declare(queue='',exclusive=True)
queue_name = result.method.queue
print(queue_name)

# 让exchange和queque进行绑定.
channel.queue_bind(exchange='logs',queue=queue_name)
print(' [*] Waiting for logs. To exit press CTRL+C')

def callback(ch, method, properties, body):
    print(" [x] %r" % body)

channel.basic_consume(queue=queue_name,on_message_callback=callback,auto_ack=True)

channel.start_consuming()
9 发布订阅高级
9.1 Routing(按关键字匹配)
指定routing_key关键字,朝指定的订阅者发布消息
发布者
import pika

credentials = pika.PlainCredentials("admin", "admin")
connection = pika.BlockingConnection(pika.ConnectionParameters('10.0.0.200', credentials=credentials))
channel = connection.channel()

# exchange工作方式设置为direct
channel.exchange_declare(exchange='logs2', exchange_type='direct')

message = "info: Hello World!"
channel.basic_publish(exchange='logs2', routing_key='m1', body=message) # 指定朝m1关键字的队列发布消息
print(" [x] Sent %r" % message)
connection.close()
订阅者
订阅者1只绑定了m2关键字,订阅者2绑定了m1, m2关键字,如发布者 routing_key只向m1关键字队列发布消息,则订阅者1收不到消息。
##### 订阅者1
import pika

credentials = pika.PlainCredentials("admin", "admin")
connection = pika.BlockingConnection(pika.ConnectionParameters('10.0.0.200', credentials=credentials))
channel = connection.channel()

channel.exchange_declare(exchange='logs2', exchange_type='direct')

result = channel.queue_declare(queue='', exclusive=True)
queue_name = result.method.queue
print(queue_name)

channel.queue_bind(exchange='logs2', queue=queue_name, routing_key='m2')
print(' [*] Waiting for logs. To exit press CTRL+C')

def callback(ch, method, properties, body):
    print(" [x] %r" % body)

channel.basic_consume(queue=queue_name, on_message_callback=callback, auto_ack=True)
channel.start_consuming()


##### 订阅者2
import pika

credentials = pika.PlainCredentials("admin", "admin")
connection = pika.BlockingConnection(pika.ConnectionParameters('10.0.0.200', credentials=credentials))
channel = connection.channel()

channel.exchange_declare(exchange='logs2', exchange_type='direct')

result = channel.queue_declare(queue='', exclusive=True)
queue_name = result.method.queue
print(queue_name)

channel.queue_bind(exchange='logs2', queue=queue_name, routing_key='m1')
channel.queue_bind(exchange='logs2', queue=queue_name, routing_key='m2')
print(' [*] Waiting for logs. To exit press CTRL+C')

def callback(ch, method, properties, body):
    print(" [x] %r" % body)

channel.basic_consume(queue=queue_name, on_message_callback=callback, auto_ack=True)
channel.start_consuming()
9.2 Topic(按关键字模糊匹配)
发布者
import pika

credentials = pika.PlainCredentials("admin", "admin")
connection = pika.BlockingConnection(pika.ConnectionParameters('10.0.0.200', credentials=credentials))
channel = connection.channel()

# exchange工作方式设置为topic
channel.exchange_declare(exchange='logs3', exchange_type='topic')

message = "info: Hello World!"
channel.basic_publish(exchange='logs3', routing_key='lqz.dd', body=message)
print(" [x] Sent %r" % message)
connection.close()
订阅者
# 号表示后面可以跟任意字符,* 号表示后面只能跟一个单词,如routing_key='lqz.dd',则两个订阅者都能匹配;如routing_key='lqz.dd.com'则只有订阅者2能够匹配
##### 订阅者1
import pika

credentials = pika.PlainCredentials("admin", "admin")
connection = pika.BlockingConnection(pika.ConnectionParameters('10.0.0.200', credentials=credentials))
channel = connection.channel()

channel.exchange_declare(exchange='logs3', exchange_type='topic')

result = channel.queue_declare(queue='', exclusive=True)
queue_name = result.method.queue
print(queue_name)

channel.queue_bind(exchange='logs3', queue=queue_name, routing_key='lqz.*')
print(' [*] Waiting for logs. To exit press CTRL+C')

def callback(ch, method, properties, body):
    print(" [x] %r" % body)

channel.basic_consume(queue=queue_name, on_message_callback=callback, auto_ack=True)
channel.start_consuming()


##### 订阅者2
import pika

credentials = pika.PlainCredentials("admin", "admin")
connection = pika.BlockingConnection(pika.ConnectionParameters('10.0.0.200', credentials=credentials))
channel = connection.channel()

channel.exchange_declare(exchange='logs3', exchange_type='topic')

result = channel.queue_declare(queue='', exclusive=True)
queue_name = result.method.queue
print(queue_name)

channel.queue_bind(exchange='logs3', queue=queue_name,routing_key='lqz.#')
print(' [*] Waiting for logs. To exit press CTRL+C')

def callback(ch, method, properties, body):
    print(" [x] %r" % body)

channel.basic_consume(queue=queue_name, on_message_callback=callback, auto_ack=True)
channel.start_consuming()
10 基于rabbitmq实现rpc
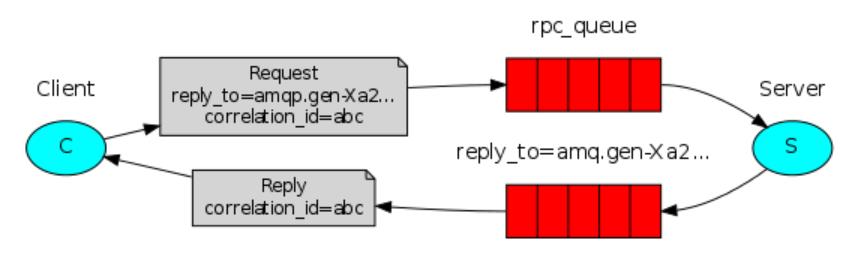
客户端调用服务端的一个方法,发送任务id和内容到队列中,服务端获取后,调用本地方法执行并把结果返回到队列,客户端再从队列获取结果。
服务端
import pika

credentials = pika.PlainCredentials("admin","admin")
connection = pika.BlockingConnection(pika.ConnectionParameters('10.0.0.200',credentials=credentials))
channel = connection.channel()

# 监听任务队列
channel.queue_declare(queue='rpc_queue')

# 服务端本地定义个fib函数(计算斐波那契数列的方法)
def fib(n):
    if n == 0:
        return 0
    elif n == 1:
        return 1
    else:
        return fib(n - 1) + fib(n - 2)

def on_request(ch, method, props, body):
    n = int(body)
    print(" [.] fib(%s)" % n)
    response = fib(n)
    # props.reply_to        要放结果的队列
    # props.correlation_id  任务id
    ch.basic_publish(exchange='',
                     routing_key=props.reply_to,
                     properties=pika.BasicProperties(correlation_id= props.correlation_id),
                     body=str(response))
    ch.basic_ack(delivery_tag=method.delivery_tag)

channel.basic_qos(prefetch_count=1)
channel.basic_consume( queue='rpc_queue', on_message_callback=on_request,)
print(" [x] Awaiting RPC requests")
channel.start_consuming()
客户端
import pika
import uuid

class FibonacciRpcClient(object):
    def __init__(self):
        self.credentials = pika.PlainCredentials("admin", "admin")
        self.connection = pika.BlockingConnection(pika.ConnectionParameters('10.0.0.200', credentials=credentials))
        self.channel = self.connection.channel()

        # 随机生成一个消息队列(用于接收结果)
        result = self.channel.queue_declare(queue='',exclusive=True)
        self.callback_queue = result.method.queue

        # 监听消息队列中是否有值返回,如果有值则执行 on_response 函数(一旦有结果,则执行on_response)
        self.channel.basic_consume(queue=self.callback_queue, on_message_callback=self.on_response, auto_ack=True)

    def on_response(self, ch, method, props, body):
        if self.corr_id == props.correlation_id:
            self.response = body

    def call(self, n):
        self.response = None
        self.corr_id = str(uuid.uuid4())
        # 客户端给服务端发送一个任务: 任务id = corr_id / 任务内容 = '30' / 用于接收结果的队列名称
        self.channel.basic_publish(exchange='',
                                   routing_key='rpc_queue',               # 服务端接收任务的队列名称
                                   properties=pika.BasicProperties(
                                         reply_to = self.callback_queue,  # 用于接收结果的队列
                                         correlation_id = self.corr_id,   # 任务ID
                                         ),
                                   body=str(n))
        while self.response is None:
            self.connection.process_data_events()

        return self.response

fibonacci_rpc = FibonacciRpcClient()
print(" [x] Requesting fib(30)")
response = fibonacci_rpc.call(30)  # 外界看上去,就像调用本地的call()函数一样
print(" [.] Got %r" % response)


【推荐】国内首个AI IDE,深度理解中文开发场景,立即下载体验Trae
【推荐】编程新体验,更懂你的AI,立即体验豆包MarsCode编程助手
【推荐】抖音旗下AI助手豆包,你的智能百科全书,全免费不限次数
【推荐】轻量又高性能的 SSH 工具 IShell:AI 加持,快人一步
· AI与.NET技术实操系列:向量存储与相似性搜索在 .NET 中的实现
· 基于Microsoft.Extensions.AI核心库实现RAG应用
· Linux系列:如何用heaptrack跟踪.NET程序的非托管内存泄露
· 开发者必知的日志记录最佳实践
· SQL Server 2025 AI相关能力初探
· 震惊!C++程序真的从main开始吗?99%的程序员都答错了
· winform 绘制太阳,地球,月球 运作规律
· 【硬核科普】Trae如何「偷看」你的代码?零基础破解AI编程运行原理
· 上周热点回顾(3.3-3.9)
· 超详细:普通电脑也行Windows部署deepseek R1训练数据并当服务器共享给他人