Blazor笔记-Form components
更新记录
注意:非教程。纯笔记,日常查询用的。需要教程的小伙伴找几本书看看即可哈哈,有Vue基础的话非常快,概念都是通的。非工作需要不建议深入学习Blazor,深入Vue吧,用的多,哈哈。完整目录地址:https://www.cnblogs.com/cqpanda/p/17596348.html
点击查看
2024年3月7日 发布。
2023年8月1日 迁移笔记到博客。
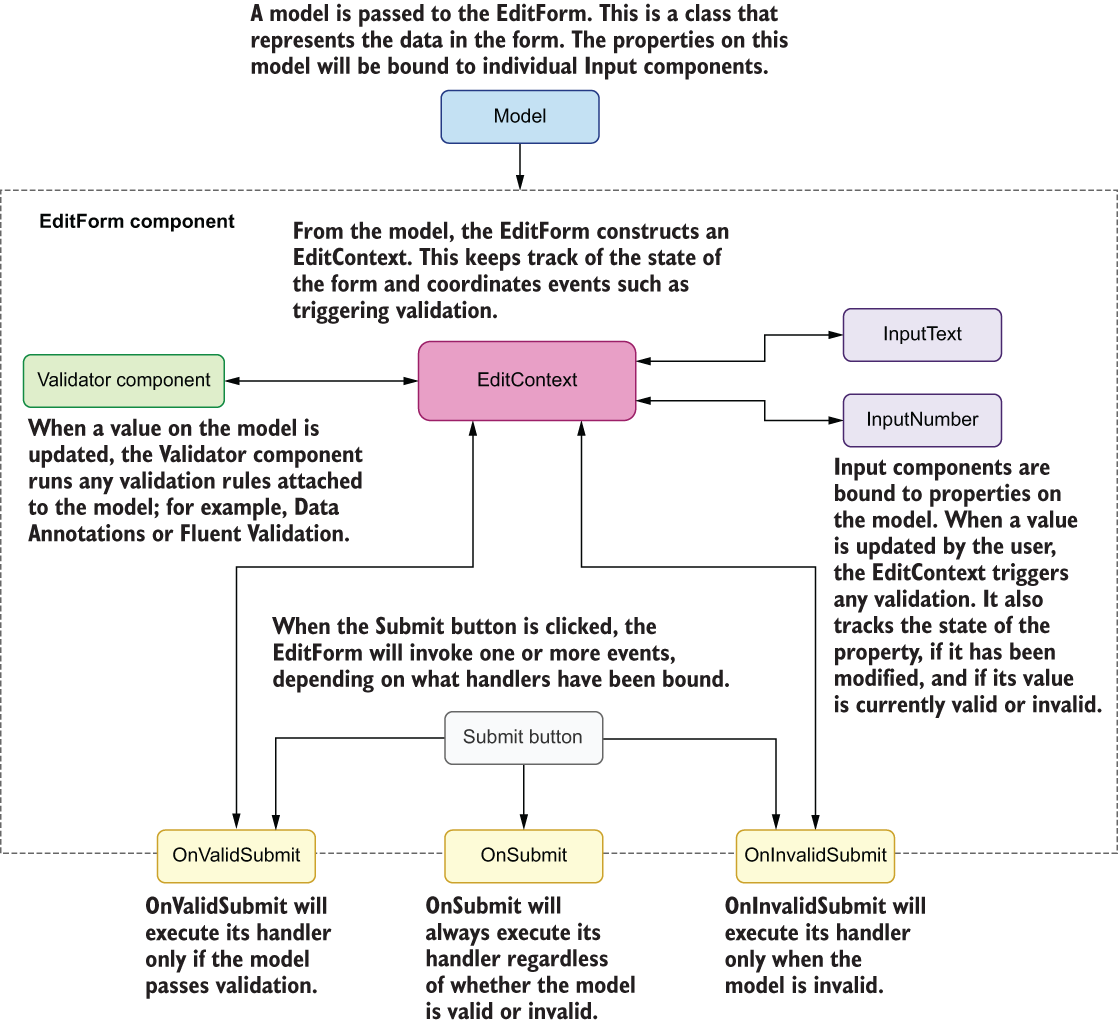
Forms
Handling user input with forms is the cornerstone of many common applications. Applications use forms to enable users to log in, to update a profile, to enter sensitive information, and to perform many other data-entry tasks. Blazor makes it easy to create and manage them using C#. With Blazor's data binding capabilities, form validation, and other features, you can quickly create dynamic and interactive forms that help users input and submit data.
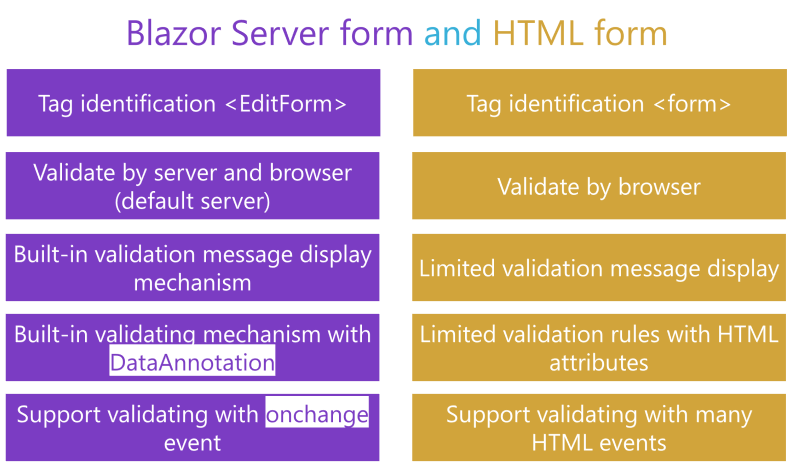
Blazor form and HTML form
EditForm is a component that is used to create forms in Blazor applications, while HTML form is a standard way of creating forms in HTML. The EditForm component in Blazor provides features such as form validation, disabling a form control, and data binding. It allows developers to easily create forms that are tightly integrated with their Blazor application.
Blazor Form components
EditForm
InputBase<>
InputCheckbox
InputDate<TValue>
InputNumber<TValue>
InputSelect<TValue>
InputText
InputTextArea
InputRadio
InputRadioGroup
ValidationMessage
ValidationSummary
对应关系:

EditForm
EditForm renders as a form tag, but it has a lot more functionalities.
<EditForm Model="BlazorFormModel" OnSubmit="_ => BlazorFormSubmitted = true">
    <fieldset>
        <legend>Blazor form</legend>
        <InputText @bind-Value="BlazorFormModel.BlazorFormResult" />
        <input type="submit" value="Submit" />
    </fieldset>
</EditForm>
<EditForm Model="personmodel" OnValidSubmit="validSubmit">
 ...
 <button type="submit">Submit</button>
</EditForm>

@code {
 Person personmodel = new Person();

 private Task validSubmit()
 {
   //Do database stuff
   return Task.CompletedTask;
 }
}
Form with Bind
<EditForm Model="FormModel" OnSubmit="HandleFormSubmit">
    <InputText @bind-Value="FormModel.InputText" />
    <button>Submit</button>
</EditForm>

@code {
public class SimpleBlazorFormModel
{
    public string InputText { get; set; } = "Blazor School";
}

public SimpleBlazorFormModel FormModel { get; set; } = new();

public void HandleFormSubmit()
{
   // Do something with the form data
}
}
Blazor form events
EditForm has the following events:
• OnValidSubmit gets triggered when the data in the form validates correctly (we will come back to validation in just a bit).
• OnInvalidSubmit gets triggered if the form does not validate correctly.
• OnSubmit gets triggered when the form is submitted, regardless of whether the form validates correctly or not. Use OnSubmit if you want to control the validation yourself.
InputBase<>
All the Blazor input classes derive from the InputBase class. It has a bunch of things we can use for all the input components
InputBase handles AdditionalAttributes, which means that if we add any other attributes to the tag, they will automatically get transferred to the output. This means that the components derived from this class can leverage any HTML attributes since they will be part of the output.
InputCheckbox
The InputCheckbox component will render as <input type="checkbox">
InputDate<TValue>
The InputDate component will render as <input type="date">. We can use DateTime and DateTimeOffset as values for the InputDate component.
There is no way to format the date; it will use the web browser’s current setting. This behavior is by design and is part of the HTML5 spec.
InputNumber<TValue>
The InputNumber component will render as <input type="number">. We can use Int32, Int64, Single, Double, and Decimal as values for the InputNumber component
InputSelect<TValue>
The InputSelect component will render as <select>. We will create InputSelect later in this chapter, so I won’t go into further detail here.
InputText
The InputText component will render as <input type="text">.
InputTextArea
The InputSelect component will render as <textarea>. In this chapter, we will build our own version of this control.
InputRadio
The InputRadio component will render as <input type="radio">.
InputRadioGroup
The InputRadioGroup component will render as <Input type="radio">.
InputFile
The InputFile component will render as <Input type="file">. This component will make it easier to get the file data. It will supply us with a stream for each file’s content.
ValidationMessage
<ValidationMessage For="@(() => model.Name)"/>
Binding elements
Binding to HTML elements
<input type="text" @bind="Variable"/>
<input type="text" @bind="Variable" @bind:event="oninput"/>
<input type="text" @bind:get="SomeText" @bind:set="SetAsync" />
<input type="text" @bind="SomeText" @bind:after="AfterAsync" />
<input type="text" @bind="SomeNumber" @bind:culture="GBCulture" />
<input type="text" @bind="SomeDate" @bind:format="MM/dd/yyyy" />
<input type="text" @bind="SomeDate" @bind:format="yyyy-MM-dd" />
Binding to components
<InputText @bind-Value="text" />
<InputText @bind-Value:get="text" @bind-Value:set="(value) => {text=value;}" />
<InputText @bind-Value:get="text" @bind-Value:set="Set" />
<InputText @bind-Value:get="text" @bind-Value:set="SetAsync" />
<InputText @bind-Value="text" @bind-Value:after="() => { }" />
<InputText @bind-Value="text" @bind-Value:after="After" />
<InputText @bind-Value="text" @bind-Value:after="AfterAsync" />
Disable a form control
Use the HTML disabled attribute
<InputText class="form-control" @bind-Value="FormModel.ExampleString" disabled="true" />
Use the Blazor @bind-disabled directive
<InputText class="form-control" @bind-Value="FormModel.ExampleString" @bind-disabled="DisableFormControl"/>

@code {
    public bool DisableFormControl { get; set; } = false;
    ...
}
表单验证使用Blazored.FluentValidation
安装包
https://github.com/Blazored/FluentValidation
dotnet add package Blazored.FluentValidation
在中引入命名空间
_Imports.razor
@using FluentValidation
@using Blazored.FluentValidation
基本使用(同步验证)
<EditForm Model="@_person" OnValidSubmit="@SubmitValidForm">
    <FluentValidationValidator />
    @*如果要集中显示验证错误信息*@
    <ValidationSummary />

    <div class="mb-3">
        <label for="Name" class="font-weight-bold text-secondary">姓名:</label>
        <InputText @bind-Value="@_person.Name" class="form-control" id="Name" />
        @*显示单个表单元素的错误信息*@
        <ValidationMessage For="@(() => _person.Name)" />
    </div>

    <div class="mb-3">
        <label for="Age" class="font-weight-bold text-secondary">年龄:</label>
        <InputNumber @bind-Value="@_person.Age" class="form-control" id="Age" />
        <ValidationMessage For="@(() => _person.Age)" />
    </div>

    <div class="mb-3">
        <label for="Email" class="font-weight-bold text-secondary">邮箱:</label>
        <InputText @bind-Value="@_person.EmailAddress" class="form-control" id="Email" />
        <ValidationMessage For="@(() => _person.EmailAddress)" />
    </div>

    <button type="submit" class="btn btn-primary" disabled="@(IsSending == true)">@((MarkupString)(IsSending == true ? "发送中" : "保存"))</button>
    <button type="reset" class="btn btn-warning">清空</button>
</EditForm>


@code {
    /// <summary>
    /// 是否发送中
    /// </summary>
    public bool IsSending { get; set; } = false;

    /// <summary>
    /// 需要验证的模型
    /// </summary>
    public class Person
    {
        public string Name { get; set; }

        public int Age { get; set; }

        public string EmailAddress { get; set; }
    }

    /// <summary>
    /// 模型验证规则设置
    /// </summary>
    public class PersonValidator : AbstractValidator<Person>
    {
        public PersonValidator()
        {
            RuleFor(p => p.Name).NotEmpty().WithMessage("名字是必须的啦");
            RuleFor(p => p.Name).MaximumLength(50).WithMessage("名字必须小于50个字符啦");
            RuleFor(p => p.Name).MinimumLength(5).WithMessage("名字必须大于于5个字符啦");
            RuleFor(p => p.Age).NotEmpty().WithMessage("年龄不可以为空");
            RuleFor(p => p.Age).GreaterThan(0).WithMessage("年龄必须大于0岁啦");
            RuleFor(p => p.Age).LessThanOrEqualTo(200).WithMessage("年龄必须小于200岁啦");
            RuleFor(p => p.EmailAddress).NotEmpty().WithMessage("邮箱地址不可以为空");
            RuleFor(p => p.EmailAddress).EmailAddress().WithMessage("必须提供一个有效的邮箱地址啦");
        }
    }

    private Person _person = new();

    private async Task SubmitValidForm()
    {
        IsSending = true;
        //flush changes
        await Task.Delay(1);

        //模拟处理中
        await Task.Delay(2000);
        Console.WriteLine(_person.Name);
        Console.WriteLine(_person.Age);
        Console.WriteLine(_person.EmailAddress);

        IsSending = false;
    }
}
禁用验证
默认情况下,会使用反射为所有的表单进行注入验证,可以设置禁用验证。
<FluentValidationValidator DisableAssemblyScanning="@true" />
基本使用(异步验证)(Async Validation)
<EditForm Model="@_person" OnValidSubmit="@SubmitValidForm">
    <FluentValidationValidator @ref="_fluentValidationValidator" />
    @*如果要集中显示验证错误信息*@
    <ValidationSummary />

    <div class="mb-3">
        <label for="Name" class="font-weight-bold text-secondary">姓名:</label>
        <InputText @bind-Value="@_person.Name" class="form-control" id="Name" />
        @*显示单个表单元素的错误信息*@
        <ValidationMessage For="@(() => _person.Name)" />
    </div>

    <div class="mb-3">
        <label for="Age" class="font-weight-bold text-secondary">年龄:</label>
        <InputNumber @bind-Value="@_person.Age" class="form-control" id="Age" />
        <ValidationMessage For="@(() => _person.Age)" />
    </div>

    <div class="mb-3">
        <label for="Email" class="font-weight-bold text-secondary">邮箱:</label>
        <InputText @bind-Value="@_person.EmailAddress" class="form-control" id="Email" />
        <ValidationMessage For="@(() => _person.EmailAddress)" />
    </div>

    <button type="submit" class="btn btn-primary" disabled="@(IsSending == true)">@((MarkupString)(IsSending == true ? "发送中" : "保存"))</button>
    <button type="reset" class="btn btn-warning">清空</button>
</EditForm>


@code {
    /// <summary>
    /// 是否发送中
    /// </summary>
    public bool IsSending { get; set; } = false;

    /// <summary>
    /// 验证器的引用
    /// </summary>
    private FluentValidationValidator? _fluentValidationValidator;

    /// <summary>
    /// 需要验证的模型
    /// </summary>
    public class Person
    {
        public string Name { get; set; }

        public int Age { get; set; }

        public string EmailAddress { get; set; }
    }

    /// <summary>
    /// 模型验证规则设置
    /// </summary>
    public class PersonValidator : AbstractValidator<Person>
    {
        public PersonValidator()
        {
            RuleFor(p => p.Name).NotEmpty().WithMessage("名字是必须的啦");
            RuleFor(p => p.Name).MaximumLength(50).WithMessage("名字必须小于50个字符啦");
            RuleFor(p => p.Name).MinimumLength(5).WithMessage("名字必须大于于5个字符啦");
            RuleFor(p => p.Age).NotEmpty().WithMessage("年龄不可以为空");
            RuleFor(p => p.Age).GreaterThan(0).WithMessage("年龄必须大于0岁啦");
            RuleFor(p => p.Age).LessThanOrEqualTo(200).WithMessage("年龄必须小于200岁啦");
            RuleFor(p => p.EmailAddress).NotEmpty().WithMessage("邮箱地址不可以为空");
            RuleFor(p => p.EmailAddress).EmailAddress().WithMessage("必须提供一个有效的邮箱地址啦");
        }
    }

    private Person _person = new();

    private async Task SubmitValidForm()
    {
        IsSending = true;
        //flush changes
        await Task.Delay(1);
        if (await _fluentValidationValidator!.ValidateAsync())
        {
            //模拟处理中
            await Task.Delay(2000);
            Console.WriteLine(_person.Name);
            Console.WriteLine(_person.Age);
            Console.WriteLine(_person.EmailAddress);
        }

        IsSending = false;
    }
}
本文来自博客园,作者:重庆熊猫,转载请注明原文链接:https://www.cnblogs.com/cqpanda/p/17596415.html

 浙公网安备 33010602011771号