SpringBoot整合Mybatis 环境搭建
到 https://start.spring.io/ 上生成一个springBoot项目,引入到Eclipse中

修改pom.xml,添加需要的依赖项
我本机用到的依赖:
        <dependency>
            <groupId>org.springframework.boot</groupId>
            <artifactId>spring-boot-starter</artifactId>
        </dependency>

        <dependency>
            <groupId>org.springframework.boot</groupId>
            <artifactId>spring-boot-starter-test</artifactId>
            <scope>test</scope>
        </dependency>

        <dependency>
            <groupId>org.apache.tomcat</groupId>
            <artifactId>tomcat-servlet-api</artifactId>
            <version>8.5.61</version>
            <scope>provided</scope>
        </dependency>

        <dependency>
            <groupId>org.springframework.boot</groupId>
            <artifactId>spring-boot-starter-tomcat</artifactId>
            <scope>provided</scope>
        </dependency>

        <dependency>
            <groupId>org.springframework.boot</groupId>
            <artifactId>spring-boot-starter-web</artifactId>
            <exclusions>
                <exclusion>
                    <groupId>org.springframework.boot</groupId>
                    <artifactId>spring-boot-starter-tomcat</artifactId>
                </exclusion>
            </exclusions>
        </dependency>

        <dependency>
            <groupId>mysql</groupId>
            <artifactId>mysql-connector-java</artifactId>
        </dependency>

        <dependency>
            <groupId>org.mybatis.spring.boot</groupId>
            <artifactId>mybatis-spring-boot-starter</artifactId>
            <version>1.3.2</version>
        </dependency>
主要是SpringBoot、jdbc、mysql的依赖,test的可以不需要,其余随意
修改配置文件:
application.properties:
spring.datasource.url=jdbc:mysql://localhost:3306/demo?useUnicode=true&characterEncoding=utf-8&useSSL=true&serverTimezone=UTC
spring.datasource.username=root
spring.datasource.password=1234
spring.datasource.type=com.example.demo.entity
mybatis.mapper-locations=classpath:mapping/*Mapper.xml
也可以使用yml配置:
删除原来的application.properties , 新建application.yml和 对应的 application-{profile}.yml文件 ,使用active来指定使用哪一个yml文件:
application.yml:
spring:
  profiles:
    active: dev
application-dev.yml
server:
  port: 8080

spring:
  datasource:
    username: root
    password: chen6484
    url: jdbc:mysql://localhost:3306/demo?useUnicode=true&characterEncoding=utf-8&useSSL=true&serverTimezone=UTC
    driver-class-name: com.mysql.cj.jdbc.Driver

mybatis:
 #配置mapper映射文件的扫描路径
  mapper-locations: classpath:mapping/*Mapper.xml
  type-aliases-package: com.example.demo.entity
可以添加多个 application-{profile}.yml 来配置多个环境,使用active:{profile}来指定加载哪一个配置文件。
这里用 active: dev 设置了使用 application-dev.yml 这个文件;
可以添加多个yml配置文件来区分测试环境、开发环境、生产环境
创建controller、 service、 mapper、 mapper.xml、entity

entity:
package com.example.demo.entity;

public class Student {

    private int Id;

    private String name;

    private int age;

    public int getId() {
        return Id;
    }

    public void setId(int id) {
        Id = id;
    }

    public String getName() {
        return name;
    }

    public void setName(String name) {
        this.name = name;
    }

    public int getAge() {
        return age;
    }

    public void setAge(int age) {
        this.age = age;
    }

    @Override
    public String toString()  {
        return "Student{" +
                "id=\"" + Id +'\"'+
                ", name=\"" + name + '\"' +
                ", age=\"" + age + '\"'+
                '}';
    }

}
StudentController:
package com.example.demo.controller;

import org.springframework.beans.factory.annotation.Autowired;
import org.springframework.web.bind.annotation.GetMapping;
import org.springframework.web.bind.annotation.PathVariable;
import org.springframework.web.bind.annotation.RequestMapping;
import org.springframework.web.bind.annotation.RestController;

import com.example.demo.service.StudentService;

@RestController
@RequestMapping("/Student")
public class StudentController {

    @Autowired
    StudentService studetnService ;

    @RequestMapping("GetStudent/{id}")
    public String GetStudent(@PathVariable int id) {
        return studetnService.Sel(id).toString();
    }
}
* 注: 如果使用了{xxx}占位符,那么要使用 @PathVariable注解,表示将URL中占位符参数{xxx}绑定到处理器类的方法形参中@PathVariable(“xxx“),否则会报错误:
Optional int parameter 'xxx' is present but cannot be translated into a null value due to being declared as a primitive type. Consider declaring it as object wrapper for the corresponding primitive type.

StudentMapper:
package com.example.demo.mapper;

import org.springframework.stereotype.Repository;

import com.example.demo.entity.Student;

@Repository
public interface StudentMapper {
    Student Sel(int id);
}
StudentService:
package com.example.demo.service;

import org.springframework.beans.factory.annotation.Autowired;
import org.springframework.stereotype.Service;

import com.example.demo.entity.Student;
import com.example.demo.mapper.StudentMapper;

@Service
public class StudentService {

    @Autowired
    StudentMapper mapper ;

    public Student Sel(int id ) {
        return mapper.Sel(id);
    }

}
新建xml配置文件:
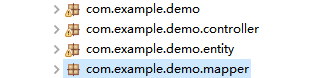
在src/main/recources/文件夹,新建mapping文件夹
(这里的文件夹名字、xml文件名,要和上面配置的mapper-locations 保持一致,否则扫描不到 ,
比如这里配置了mapping/*Mapper.xml,那么文件夹名字需要为mapper, XML映射文件名字需要以Mapper结尾)
StudentMapper.xml:
这里面的namespace、type、resultType也要对应
<?xml version="1.0" encoding="UTF-8"?>
<!DOCTYPE mapper PUBLIC "-//mybatis.org//DTD Mapper 3.0//EN" "http://mybatis.org/dtd/mybatis-3-mapper.dtd">
<mapper namespace="com.example.demo.mapper.StudentMapper">

    <resultMap id="BaseResultMap" type="com.example.demo.entity.Student">
        <result column="id" jdbcType="INTEGER" property="id" />
        <result column="name" jdbcType="VARCHAR" property="name" />
        <result column="age" jdbcType="INTEGER" property="age" />
    </resultMap>

    <select id="Sel" resultType="com.example.demo.entity.Student">
        select * from student where id = #{id}
    </select>
</mapper>
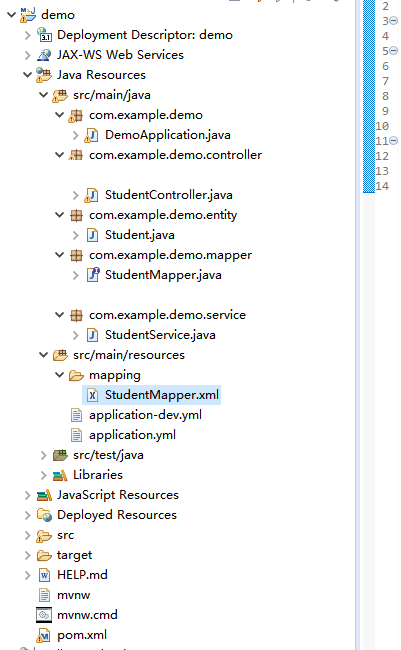
此时的项目结构:
到启动类中配置@MapperScan:
package com.example.demo;

import org.mybatis.spring.annotation.MapperScan;
import org.springframework.boot.SpringApplication;
import org.springframework.boot.autoconfigure.SpringBootApplication;
import org.springframework.boot.builder.SpringApplicationBuilder;
import org.springframework.boot.web.servlet.support.SpringBootServletInitializer;

@MapperScan("com.example.demo.mapper") //给出需要扫描的mapper文件路径
@SpringBootApplication
public class DemoApplication  {
    public static void main(String[] args) {
        SpringApplication.run(DemoApplication.class, args);
    }
}
(上面这样是本机运行的,如果发布用的话,再继承SpringBootServletInitializer:)
package com.example.demo;

import org.mybatis.spring.annotation.MapperScan;
import org.springframework.boot.SpringApplication;
import org.springframework.boot.autoconfigure.SpringBootApplication;
import org.springframework.boot.builder.SpringApplicationBuilder;
import org.springframework.boot.web.servlet.support.SpringBootServletInitializer;

@MapperScan("com.example.demo.mapper") //给出需要扫描的mapper文件路径
@SpringBootApplication
public class DemoApplication extends SpringBootServletInitializer  {


    public static void main(String[] args) {
        SpringApplication.run(DemoApplication.class, args);
    }
    @Override
    protected SpringApplicationBuilder configure(SpringApplicationBuilder application)
    {
        return  application.sources(DemoApplication.class);
    }
}
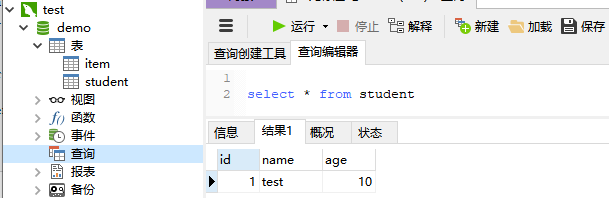
最后到MySql中建表和测试数据:
启动项目,浏览器输入 http://localhost:8080/Student/GetStudent/1 看一下结果:
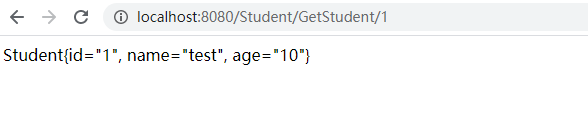
测试成功搭建成功