SpringMVC 学习 八 SSM环境搭建(一) web.xml配置
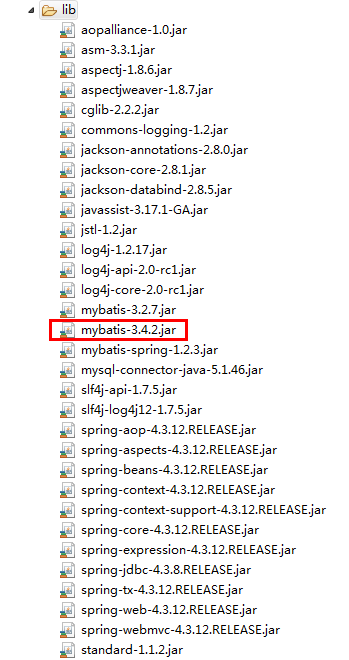
第一步:导入jar包
注意包的兼容性,以后采用maven会好很多

第二步:配置web.xml
在web.xml中,主要的配置内容有以下几点
(1)spring容器配置文件的位置
<!-- spring配置文件位置 -->
  <context-param>
      <param-name>contextConfigLocation</param-name>
      <param-value>classpath:applicationContext.xml</param-value>
  </context-param>
(2)配置监听器,在项目一启动就创建spring的容器,这个监听器实现了ServletContextListener接口
<!-- 配置监听器,在项目一启动就创建spring的容器
      这个监听器实现了ServletContextListener接口
   -->
  <listener>
      <listener-class>org.springframework.web.context.ContextLoaderListener</listener-class>
  </listener>
(3)springMVC的前端控制器 DispatcherServlet
 <!-- springMVC的前端控制器 DispatcherServlet-->
  <servlet>
      <servlet-name>springMVC</servlet-name>
      <servlet-class>org.springframework.web.servlet.DispatcherServlet </servlet-class>
     <!-- 修改springMVC配置文件的路径和名称 -->
      <init-param>
          <param-name>contextConfigLocation</param-name>
          <param-value>classpath:springmvc.xml</param-value>
      </init-param>
      <!-- 配置DispatcherServlet自启动 -->
      <load-on-startup>1</load-on-startup>
  </servlet>

  <servlet-mapping>
      <servlet-name>springMVC</servlet-name>
      <url-pattern>/</url-pattern>
  </servlet-mapping>
(4)设置请求的过滤器
<!-- 设置请求的过滤器 -->
  <filter>
      <filter-name>encoding</filter-name>
      <filter-class>org.springframework.web.filter.CharacterEncodingFilter</filter-class>
      <init-param>
          <param-name>encoding</param-name>
          <param-value>utf-8</param-value>
      </init-param>
  </filter>
  <filter-mapping>
      <filter-name>encoding</filter-name>
      <url-pattern>/*</url-pattern>
  </filter-mapping>
最后完成的web.xml
<?xml version="1.0" encoding="UTF-8"?>
<web-app xmlns:xsi="http://www.w3.org/2001/XMLSchema-instance" xmlns="http://xmlns.jcp.org/xml/ns/javaee" xsi:schemaLocation="http://xmlns.jcp.org/xml/ns/javaee http://xmlns.jcp.org/xml/ns/javaee/web-app_3_1.xsd" id="WebApp_ID" version="3.1">
  <display-name>SSM</display-name>
  <!-- spring配置文件位置 -->
  <context-param>
      <param-name>contextConfigLocation</param-name>
      <param-value>classpath:applicationContext.xml</param-value>
  </context-param>
  <!-- 配置监听器,在项目一启动就创建spring的容器
      这个监听器实现了ServletContextListener接口
   -->
  <listener>
      <listener-class>org.springframework.web.context.ContextLoaderListener</listener-class>
  </listener>

  <!-- springMVC的前端控制器 DispatcherServlet-->
  <servlet>
      <servlet-name>springMVC</servlet-name>
      <servlet-class>org.springframework.web.servlet.DispatcherServlet </servlet-class>
     <!-- 修改springMVC配置文件的路径和名称 -->
      <init-param>
          <param-name>contextConfigLocation</param-name>
          <param-value>classpath:springmvc.xml</param-value>
      </init-param>
      <!-- 配置DispatcherServlet自启动 -->
      <load-on-startup>1</load-on-startup>
  </servlet>

  <servlet-mapping>
      <servlet-name>springMVC</servlet-name>
      <url-pattern>/</url-pattern>
  </servlet-mapping>

  <!-- 设置请求的过滤器 -->
  <filter>
      <filter-name>encoding</filter-name>
      <filter-class>org.springframework.web.filter.CharacterEncodingFilter</filter-class>
      <init-param>
          <param-name>encoding</param-name>
          <param-value>utf-8</param-value>
      </init-param>
  </filter>
  <filter-mapping>
      <filter-name>encoding</filter-name>
      <url-pattern>/*</url-pattern>
  </filter-mapping>

</web-app>


