pixi.js 图像资源(svg)转纹理
当Pixi使用WebGL去调用GPU渲染图像时,需要先将图像转化为GPU可以处理的版本。而能够被GPU处理的图像就叫做纹理,在pixi中使用纹理缓存来存储和引用所有纹理。通过将纹理分配给精灵,再将精灵添加到舞台上,从而显示图像。
图像转化为纹理的方式
1. app的loader对象
Pixi强大的loader对象可以加载任何种类的图像资源,并保存在纹理缓存中。后续如果需要继续获取纹理,就不用再重复加载图像,直接从缓存中获取即可,减轻GPU内存占用。
app.loader
  .add("imgs/1.jpg")
  .load(setup);

function setup() {
  //This code will run when the loader has finished loading the image
  let sprite = new PIXI.Sprite(app.loader.resources["imgs/1.jpg"].texture);
  app.stage.add(spirte)
}
2. Pixi的Texture类型
Pixi的Texture类型,实现了加载图像的静态方法。
static from(source: string | HTMLImageElement | HTMLCanvasElement | HTMLVideoElement | PIXI.BaseTexture, options?: any, strict?: boolean): PIXI.Texture;
从允许的参数类型可以看出,我们可以通过直接传入图像地址、img标签、canvas标签、video标签,将图像转化为纹理。
- 通过图像链接加载
var texture = PIXI.Texture.from("imgs/1.jpg");
var sprite = new PIXI.Sprite(PIXI.utils.TextureCache["imgs/1.jpg"]);
app.stage.addChild(sprite);
根据链接加载图像,更推荐这种方式,可以捕获到图像加载失败
ps:其实fromURL(),内部调用的还是from()
 PIXI.Texture.fromURL(data)
.then((texture) => {
    const spirte = new PIXI.Sprite(texture);
    app.stage.addChild(spirte);
})
.catch((e) => {
    console.log("load error", e);
});
- 通过标签加载
var img = document.getElementById("img");
var texture = PIXI.Texture.from(img);
var sprite = new PIXI.Sprite(texture)
app.stage.addChild(sprite)
将SVG Dom节点转为纹理
如果只是单纯的把svg作为一个单独的外部文件,其实只要按照上面两种转换纹理的方式,传入svg图像链接就可以实现了。但是如果这个svg是在同一个html页上的dom节点呢?这时候还能将其转为纹理吗?答案是可以的。
注意观察Texture.from()的参数,可以传入图像的链接。那么base64编码后的图像地址,按理来说也可以。所以只要将页面上的svg节点,转化为base64编码即可。
function getSvgBase64(id) {
    var svg = document.getElementById(id)
    return "data:image/svg+xml;base64," +  window.btoa(svg.outerHTML);
}
关键代码:window.btoa() 创建一个base64编码的字符串,解码方法 window.atob()。
源码解析
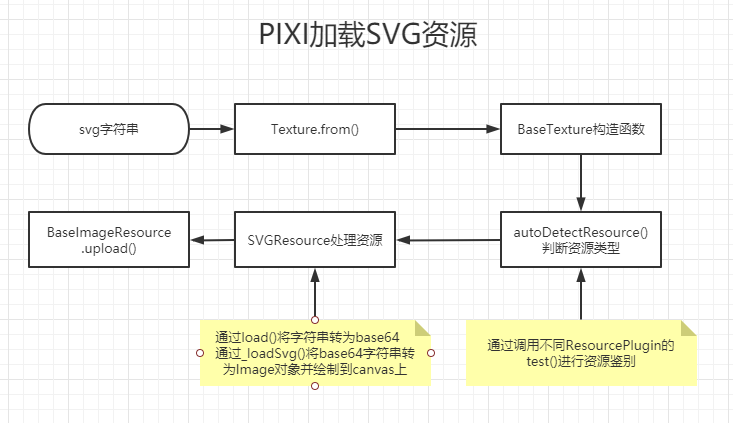
首先,从Texture.from()开始入手,我们具体看看pixi是如何加载图像纹理的。
在from方法中有这么一句话texture = new Texture(new BaseTexture(source, options));。所有的Texture对应的还有一个BaseTexture,他们之间的关系可以这么解释
BaseTexture : The base texture source to create the texture from
接下来看一下 BaseTexture类的构造函数,其中调用了autoDetectResource()方法,在这个方法中真正的对资源进行了检测分类,并根据不同类型的资源调用不同的资源插件(ResourcePlugin)。
function autoDetectResource(source: unknown, options?: IAutoDetectOptions): Resource
{
    if (!source)
    {
        return null;
    }

    let extension = '';
    if (typeof source === 'string')
    {
        // search for file extension: period, 3-4 chars, then ?, # or EOL
        const result = (/\.(\w{3,4})(?:$|\?|#)/i).exec(source);
        if (result)
        {
            extension = result[1].toLowerCase();
        }
    }

    for (let i = INSTALLED.length - 1; i >= 0; --i)
    {
        const ResourcePlugin = INSTALLED[i];
        if (ResourcePlugin.test && ResourcePlugin.test(source, extension))
        {
            return new ResourcePlugin(source, options);
        }
    }
    throw new Error('Unrecognized source type to auto-detect Resource');
}
INSTALLED在index.ts中已经初始化注入所有的ResourcePlugin
INSTALLED.push(
    ImageResource,
    ImageBitmapResource,
    CanvasResource,
    VideoResource,
    SVGResource,
    BufferResource,
    CubeResource,
    ArrayResource
);
在这里可以看到,pixi中有一个SVGResource,我们就以这个为例继续深入看下内部的处理机制。
简化版SVGResource类:
export class SVGResource extends BaseImageResource
{
    constructor(sourceBase64: string, options?: ISVGResourceOptions)
    {
        //...
        super(document.createElement('canvas'));
        if (options.autoLoad !== false)
        {
            this.load();
        }
    }

    load(): Promise<SVGResource>
    {
        // Convert SVG inline string to data-uri
        if ((/^\<svg/).test(this.svg.trim()))
        {
            if (!btoa)
            {
                throw new Error('Your browser doesn\'t support base64 conversions.');
            }
            (this as any).svg = `data:image/svg+xml;base64,${btoa(unescape(encodeURIComponent(this.svg)))}`;
        }

        this._loadSvg();
        return this._load;
    }

    /**
     * Loads an SVG image from `imageUrl` or `data URL`.
     *
     * @private
     */
    private _loadSvg(): void
    {
        const tempImage = new Image();

        BaseImageResource.crossOrigin(tempImage, this.svg, this._crossorigin);
        tempImage.src = this.svg;//将base64编码的Svg字符串,创建为Image对象

        tempImage.onload = (): void =>
        {
            // Draw the Svg to the canvas
            canvas
                .getContext('2d')
                .drawImage(tempImage, 0, 0, svgWidth, svgHeight, 0, 0, width, height);

        };
    }

    static test(source: unknown, extension?: string): boolean
    {
        // url file extension is SVG
        return extension === 'svg'
            // source is SVG data-uri
            || (typeof source === 'string' && (/^data:image\/svg\+xml(;(charset=utf8|utf8))?;base64/).test(source))
            // source is SVG inline
            || (typeof source === 'string' && source.indexOf('<svg') === 0);
    }

}
看完这里就差不多明白了,对于传入的Source来说,当在autoDetectResource()中通过test()方法检测到资源为SVG格式后,将其转换为Base64字符串(也就是说直接传入拼接好的svg字符串也是可以被解析的~),然后再load为Image对象,加载到临时canvas中。最后再通过BaseImageResource的upload()调用GPU输出图像资源。
总结
一步步了解一个东西过程还是很有意思的,每走一步都会有新的发现。事实上还是有很多东西没有搞懂,就留着以后去发现了。


【推荐】国内首个AI IDE,深度理解中文开发场景,立即下载体验Trae
【推荐】编程新体验,更懂你的AI,立即体验豆包MarsCode编程助手
【推荐】抖音旗下AI助手豆包,你的智能百科全书,全免费不限次数
【推荐】轻量又高性能的 SSH 工具 IShell:AI 加持,快人一步
· 10年+ .NET Coder 心语,封装的思维:从隐藏、稳定开始理解其本质意义
· .NET Core 中如何实现缓存的预热?
· 从 HTTP 原因短语缺失研究 HTTP/2 和 HTTP/3 的设计差异
· AI与.NET技术实操系列:向量存储与相似性搜索在 .NET 中的实现
· 基于Microsoft.Extensions.AI核心库实现RAG应用
· TypeScript + Deepseek 打造卜卦网站:技术与玄学的结合
· 阿里巴巴 QwQ-32B真的超越了 DeepSeek R-1吗?
· 【译】Visual Studio 中新的强大生产力特性
· 10年+ .NET Coder 心语 ── 封装的思维:从隐藏、稳定开始理解其本质意义
· 【设计模式】告别冗长if-else语句:使用策略模式优化代码结构