web前后端交互,nodejs
手机赚钱怎么赚,给大家推荐一个手机赚钱APP汇总平台:手指乐(http://www.szhile.com/),辛苦搬砖之余用闲余时间动动手指,就可以日赚数百元
web前后端交互
前后端交互可以采用混合式,比如:
<?php //首先在这里写好相关的调用代码 function OutputTitle(){ echo 'TestPage'; } function OutputContent(){ echo 'Hello!'; } //然后再下面调用相关函数就可以了 ?> <!DOCTYPE html> <html> <head> <title><?php OutputTitle(); ?></title> </head> <body> <span><?php OutputContent(); ?></span> </body> </html>示例2:
<!DOCTYPE html PUBLIC "-//W3C//DTD XHTML 1.0 Transitional//EN" "http://www.w3.org/TR/xhtml1/DTD/xhtml1-transitional.dtd">
<html xmlns="http://www.w3.org/1999/xhtml">
<head>
<meta http-equiv="Content-Type" content="text/html; charset=gb2312" />
<title>图书信息显示</title>
<link rel="stylesheet" type="text/css" href="css/font.css">
</head>
<body topmargin="0" leftmargin="0" bottommargin="0">
<table width="703" border="0" align="center" cellpadding="0" cellspacing="0">
<tr>
<td bgcolor="#EF5E0F" ><table width="703" border="0" align="center" cellpadding="0" cellspacing="1">
<tr>
<td height="25" colspan="5" bgcolor="#FFFFFF"> </td>
</tr>
<tr>
<td width="187" height="25" bgcolor="#F39A40"><div align="center">书名</div></td>
<td width="173" bgcolor="#F39A40"><div align="center">作者</div></td>
<td width="101" bgcolor="#F39A40"><div align="center">价格</div></td>
<td width="131" bgcolor="#F39A40"><div align="center">出版社</div></td>
<td width="105" bgcolor="#F39A40"><div align="center">出版时间</div></td>
</tr>
<?php
$conn=mysql_connect("localhost","root","root");
mysql_select_db("db_book",$conn);
mysql_query("set names gb2312");
$sql=mysql_query("select * from db_book order by id desc",$conn);
$info=mysql_fetch_array($sql);
if($info==false)
{
echo "暂无图书信息!";
}
else
{
do
{
?>
<tr>
<td height="25" bgcolor="#FFFFFF"><div align="center"><?php echo $info[bookname];?></div></td>
<td height="25" bgcolor="#FFFFFF"><div align="center"><?php echo $info[author];?></div></td>
<td height="25" bgcolor="#FFFFFF"><div align="center"><?php echo $info[price];?></div></td>
<td height="25" bgcolor="#FFFFFF"><div align="center"><?php echo $info[bookpublic];?></div></td>
<td height="25" bgcolor="#FFFFFF"><div align="center"><?php echo $info[pubtime];?></div></td>
</tr>
<?php
}while($info=mysql_fetch_array($sql));
}
?>
</table></td>
</tr>
</table>
</body>
</html>
还可以使用模板,比如php+Smarty模板:
test1.html:
<!DOCTYPE html>
<html>
<head>
<meta charset="utf-8">
<title>smarty test1</title>
</head>
<body>
它的名字叫{$name}
</body>
</html>
<html>
<head>
<meta charset="utf-8">
<title>smarty test1</title>
</head>
<body>
它的名字叫{$name}
</body>
</html>
test1.php:
<?php
require './libs/Smarty.class.php';
$smarty=new Smarty();
$name='刘二狗';
$smarty->assign( 'name' , $name );
$smarty->display('./test1.html');
require './libs/Smarty.class.php';
$smarty=new Smarty();
$name='刘二狗';
$smarty->assign( 'name' , $name );
$smarty->display('./test1.html');
但是现在流行的模式是前后端分离(比如web service),后台提供http api,返回json数据供前端动态解析显示
nodejs
nodejs是用js写服务端代码的框架(功能相当于php,jsp),与php不同,nodejs可以自己启动http服务,php要依赖apache等web服务器
NPM是随同NodeJS一起安装的包管理工具,能解决NodeJS代码部署上的很多问题,常见的使用场景有以下几种:
- 允许用户从NPM服务器下载别人编写的第三方包到本地使用。
- 允许用户从NPM服务器下载并安装别人编写的命令行程序到本地使用。
- 允许用户将自己编写的包或命令行程序上传到NPM服务器供别人使用。
mac默认安装了nodejs和npm
一个简单的后台实例,还有配套的与后台进行交互的简单网页。
页面端使用了jQuery进行控制,
后台使用nodejs作为操控语言,使用express执行网络操作
页面端使用了jQuery进行控制,
后台使用nodejs作为操控语言,使用express执行网络操作
整个工程结构如下:
根目录--------------
    |-package.json
    |-test.js
    |-public
        |-main.html
        |-add.html
Nodejs端,名字为test.js
// file name :test.js
var express = require('express');
var app = express();
var bodyParse = require('body-parser')
var cookieParser = require('cookie-parser') ;
app.use(cookieParser()) ;
app.use(bodyParse.urlencoded({extended:false})) ;
// 处理根目录的get请求
app.get('/',function(req,res){
res.sendfile('public/main.html') ;
console.log('main page is required ');
}) ;
// 处理/login的get请求
app.get('/add', function (req,res) {
res.sendfile('public/add.html') ;
console.log('add page is required ') ;
}) ;
// 处理/login的post请求
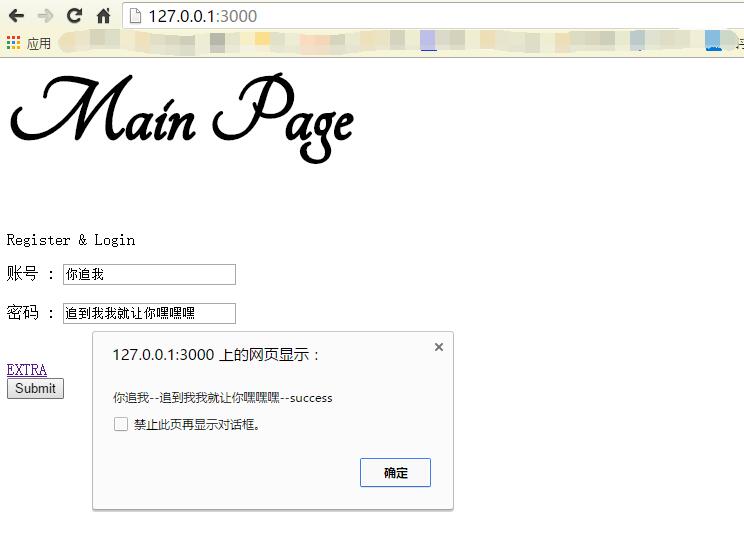
app.post('/login',function(req,res){
name=req.body.name ;
pwd=req.body.pwd ;
console.log(name+'--'+pwd) ;
res.status(200).send(name+'--'+pwd) ;
});
// 监听3000端口
var server=app.listen(3000) ;main.html的代码如下
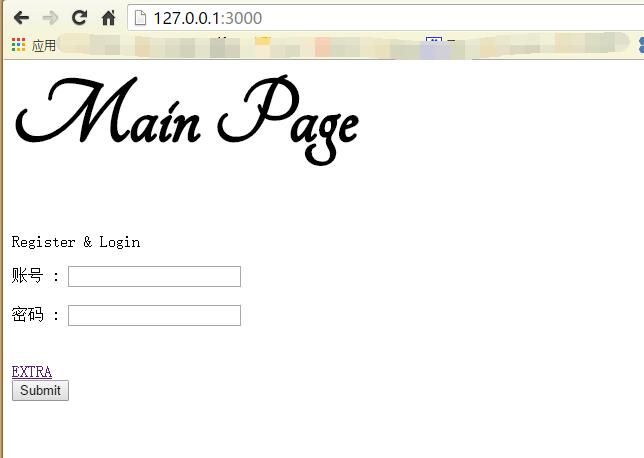
<html> <link rel="stylesheet" type="text/css" href="http://fonts.useso.com/css?family=Tangerine|Inconsolata|Droid+Sans"> <style> div#test{ font-family: 'Tangerine',serif; font-size: 48px; } p#link1{ font-family: 'Tangerine',serif; } </style> <script src="//cdn.bootcss.com/jquery/2.2.1/jquery.min.js"></script> </head> <body> <div id="test"> <h1>Main Page</h1> </div> <p>Register & Login</p> <form action="test.jsp" method="post"> 账号 : <input type="text" id="name" /> <br/><br/> 密码 : <input type="text" id="pwd" /> <br/><br/>       <div><a href="/add" id="add">EXTRA</a></div> <input type="button" value="Submit" id="x"> </form> </body> <script type="text/javascript"> var after_login=function(data,status){ if (status=='success'){ alert(data+'--'+status) ; } else alert('login refused') ; } $(document).ready(function(){ $("#x").click(function(){ var name = $("#name").val() ; var pwd = $("#pwd").val() ; $.post('http://127.0.0.1:3000/login', { name : name , pwd : pwd }, // function(data,status){ // alert(data+'--'+status) ; // } after_login ); // $.get('add',function(data,status){ // document.write(data) ; // }) ; }); }); </script> </html>
add.html的代码如下
<!DOCTYPE html>
<html>
<head lang="en">
<meta charset="UTF-8">
<title>嘿</title>
</head>
<body>
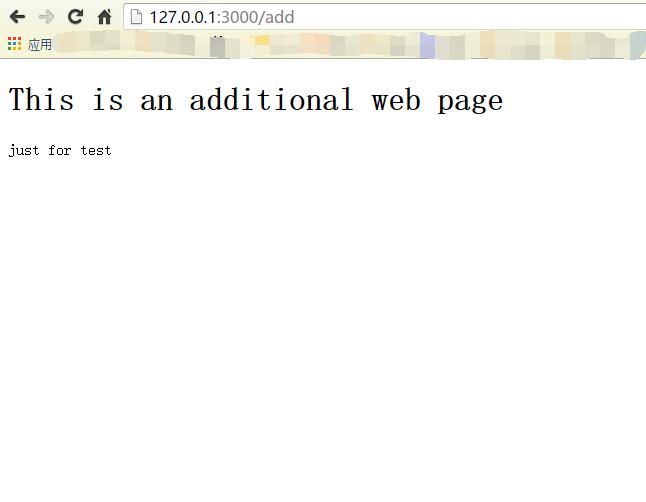
<h1>This is an additional web page</h1>
<p>just for test</p>
</body>
</html>启动项目:
cd 到项目目录,输入 node test.js,运行服务器
打开浏览器,输入127.0.0.1:3000,可得到如下页面
输入账号和密码,能得到弹出窗口,里面是服务器的返回值
点击EXTRA页面,能得到二级页面