


Spring,Struts2,MyBatis,Activiti,Maven,H2,Tomcat集成(一)——Maven,Tomcat,Spring集成
1、 创建Maven Web工程
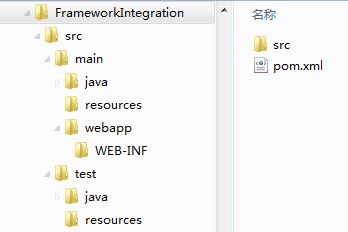
(1) 磁盘上创建Maven工程所需要的文件夹结构如下;
(2) 在与src同级目录中创建pom.xml文件;
<project xmlns="http://maven.apache.org/POM/4.0.0" xmlns:xsi="http://www.w3.org/2001/XMLSchema-instance"
  xsi:schemaLocation="http://maven.apache.org/POM/4.0.0 http://maven.apache.org/maven-v4_0_0.xsd">
  <modelVersion>4.0.0</modelVersion>
  <groupId>com.coshaho</groupId>
  <artifactId>FrameIntegration</artifactId>
  <packaging>war</packaging>
  <version>0.0.1-SNAPSHOT</version>
  <name>FrameIntegration Maven Webapp</name>
  <url>http://maven.apache.org</url>

</project>
(3) Eclipse导入新建的Maven工程;
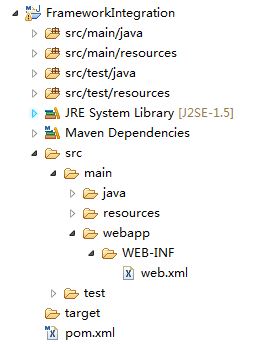
(4) 在WEB-INF目录下创建web.xml文件。
<!DOCTYPE web-app PUBLIC
 "-//Sun Microsystems, Inc.//DTD Web Application 2.3//EN"
 "http://java.sun.com/dtd/web-app_2_3.dtd" >

<web-app version="3.0" xmlns="http://java.sun.com/xml/ns/javaee"
     xmlns:xsi="http://www.w3.org/2001/XMLSchema-instance"
     xsi:schemaLocation="http://java.sun.com/xml/ns/javaee
     http://java.sun.com/xml/ns/javaee/web-app_3_0.xsd">

  <display-name>Framework Integration Web Application</display-name>

</web-app>
2、 集成Tomcat
(1) 在pom.xml文件中添加如下配置;
  <!-- 将Web项目自动部署到tomcat服务器的相关 配置信息-->
  <build>
    <!-- 将WebProject项目打包成WebProject.war自动部署到tomcat服务器的webapps目录下面 -->
    <finalName>FrameIntegrationWeb</finalName>
    <resources>
      <resource>
        <directory>src/main/java</directory>
        <includes>
          <include>**/*.properties</include>
          <include>**/*.xml</include>
        </includes>
        <!-- 是否替换资源中的属性-->
        <filtering>false</filtering>
      </resource>
      <resource>
        <directory>src/main/resources</directory>
      </resource>
      <resource>
        <directory>src/main/webapp</directory>
      </resource>
    </resources>

    <plugins>
      <plugin>
        <groupId>org.codehaus.cargo</groupId>
        <artifactId>cargo-maven2-plugin</artifactId>
        <version>1.2.3</version>
        <configuration>
          <container>
            <!-- 指明使用的tomcat服务器版本 -->
            <containerId>tomcat7x</containerId>
            <!--指明tomcat服务器的安装目录 -->
            <home>D:/software/apache-tomcat-7.0.64</home>
          </container>
          <type>existing</type>
          <home>D:/software/apache-tomcat-7.0.64</home>
          <properties>
            <!-- 监听端口配置;方便远程调试 -->
            <cargo.jvmargs>
              -Xdebug
              -Xrunjdwp:transport=dt_socket,server=y,suspend=n,address=8989
            </cargo.jvmargs>
          </properties>
        </configuration>
        <executions>
          <execution>
            <id>cargo-run</id>
            <phase>install</phase>
            <goals>
              <goal>run</goal>
            </goals>
          </execution>
        </executions>
      </plugin>
    </plugins>
  </build>
(2) src/main/webapp目录下添加index.jsp文件;
<html>
<body>
<h2>Web is started successfully!</h2>
</body>
</html>
(3) 测试Tomcat集成效果,eclipse中Run As->Maven install,前台访问http://localhost:8080/FrameIntegrationWeb。
3、 集成spring
(1) 添加Maven依赖(先添加最小依赖包);
<!-- spring4 -->
<!-- spring-core包含spring-core,logging -->
<dependency>
<groupId>org.springframework</groupId>
<artifactId>spring-core</artifactId>
<version>4.1.4.RELEASE</version>
</dependency>

<!-- spring-context包含spring-context, aop, beans, expression, aopalliance -->
<dependency>
<groupId>org.springframework</groupId>
<artifactId>spring-context</artifactId>
<version>4.1.4.RELEASE</version>
</dependency>
<!-- 用于单元测试 -->
<dependency>
<groupId>junit</groupId>
<artifactId>junit</artifactId>
<version>4.12</version>
<scope>test</scope>
</dependency>
(2) 在src/main/resources目录下配置spring.xml文件;
<?xml version="1.0" encoding="UTF-8"?>
<beans xmlns="http://www.springframework.org/schema/beans"
xmlns:xsi="http://www.w3.org/2001/XMLSchema-instance"
xmlns:context="http://www.springframework.org/schema/context"
xsi:schemaLocation="http://www.springframework.org/schema/beans
http://www.springframework.org/schema/beans/spring-beans-3.0.xsd
http://www.springframework.org/schema/context
http://www.springframework.org/schema/context/spring-context-3.0.xsd">
    <!-- 自动扫描com.coshaho.learn下面所有class文件 (自动注入) -->
    <context:component-scan base-package="com.coshaho.learn"/>
</beans>
(3) web.xml文件中配置spring监听器;
<listener>
<listener-class>org.springframework.web.context.ContextLoaderListener</listener-class>
</listener>
<context-param>
<param-name>contextConfigLocation</param-name>
  <param-value>classpath:spring.xml</param-value>
</context-param>
(4) spring测试,写如下测试类并进行单元测试。
a. HelloWorldServiceI.java
package com.coshaho.learn.service;

public interface HelloWorldServiceI
{
    String sayHello();
}
b. HelloWorldServiceImpl.java
package com.coshaho.learn.service.impl;

import org.springframework.stereotype.Service;

import com.coshaho.learn.service.HelloWorldServiceI;

@Service("helloWorldServiceImpl")
public class HelloWorldServiceImpl implements HelloWorldServiceI
{
    public String sayHello()
    {
        return "Hello world, spring!";
    }
}
c. SpringTest.java
package com.coshaho.learn.service.test;

import org.junit.Test;
import org.springframework.context.ApplicationContext;
import org.springframework.context.support.ClassPathXmlApplicationContext;

import com.coshaho.learn.service.HelloWorldServiceI;

public class SpringTest
{
    @Test
    public void helloWorldTest()
    {
        @SuppressWarnings("resource")
        ApplicationContext context = new ClassPathXmlApplicationContext("classpath:spring.xml");
        HelloWorldServiceI helloWorld = (HelloWorldServiceI)context.getBean("helloWorldServiceImpl");
        System.out.println(helloWorld.sayHello());
    }

}
d. Eclipse Run As->Junit Test
