OpenCV程序:OCR文档扫描
一、文档扫描
代码
import cv2 import numpy as np #==============================计算输入图像的四个顶点的坐标============================== def order_points(pts): rect = np.zeros((4, 2), dtype="float32") #一共4个坐标 #----------按顺序找到对应坐标0123分别是左上、右上、右下、左下---------- #计算左上、右下 s = pts.sum(axis=1) rect[0] = pts[np.argmin(s)] rect[2] = pts[np.argmax(s)] #计算右上、左下 diff = np.diff(pts, axis=1) rect[1] = pts[np.argmin(diff)] rect[3] = pts[np.argmax(diff)] return rect #==============================变换坐标============================== def four_point_transform(img, pts): #获取四个输入坐标点 src = order_points(pts) (tl, tr, br, bl) = src #计算输入的w值 width1 = np.sqrt(((br[0] - bl[0]) ** 2) + ((br[1] - bl[1]) ** 2)) #下边长 width2 = np.sqrt(((tr[0] - tl[0]) ** 2) + ((tr[1] - tl[1]) ** 2)) #上边长 maxWidth = max(int(width1), int(width2)) #计算输入的h值 height1 = np.sqrt(((tr[0] - br[0]) ** 2) + ((tr[1] - br[1]) ** 2)) #右边长 height2 = np.sqrt(((tl[0] - bl[0]) ** 2) + ((tl[1] - bl[1]) ** 2)) #左边长 maxHeight = max(int(height1), int(height2)) #交换后对应坐标位置 dst = np.array([[0, 0], [maxWidth - 1, 0], [maxWidth - 1, maxHeight - 1], [0, maxHeight - 1]], dtype="float32") #左上顶点(0,0)、右上顶点(w,0)、右下顶点(w,h)、左下顶点(0,h) #透视变换 M = cv2.getPerspectiveTransform(src, dst) #计算变换矩阵:src表示输入图像的四个顶点的坐标;dst表示输出图像四个顶点的坐标 warped = cv2.warpPerspective(img, M, (maxWidth, maxHeight)) #透视变换 #返回变换后结果 return warped #==============================图像缩放============================== def resize(img, width=None, height=None): #通过给定的height计算比例,基于比例计算w (h,w)= img.shape[:2] if width is None and height is None: return img if width is None: r=height/float(h) dsize=(int(w * r), height) else: r=width/float(w) dsize=(width, int(h * r)) resized=cv2.resize(img, dsize, interpolation= cv2.INTER_AREA) #缩小图像:dsize表示输出图像大小;interpolation= cv2.INTER_AREA表示以区域插值方式缩小图像 return resized #==============================主函数============================== #--------------------0.预处理-------------------- img=cv2.imread("111.jpg") #读取图像 ratio= img.shape[0] / 500.0 #计算变换比例 imgcopy=img.copy() #拷贝原图像 img=resize(imgcopy, height=500) #给定height计算比例 #--------------------1.边缘检测-------------------- gray=cv2.cvtColor(img, cv2.COLOR_BGR2GRAY) #转为灰度图像 gray=cv2.GaussianBlur(gray,(5,5),0) #高斯滤波去除噪音 edge=cv2.Canny(gray, 75, 200) #检测边缘 #展示边缘检测 cv2.imshow("Original image", img) cv2.imshow("Edge", edge) #--------------------2.轮廓检测-------------------- cnts=cv2.findContours(edge.copy(), cv2.RETR_LIST, cv2.CHAIN_APPROX_SIMPLE)[0] #查找图像轮廓:RETR_LIST表示对检测到的轮廓不建立等级关系;CHAIN_APPROX_SIMPLE表示只保留该方向的终点坐标(矩形只需要4个点来表示) cnts=sorted(cnts,key=cv2.contourArea,reverse=True) #将检测到的所有轮廓进行排序:cv2.contourArea表示轮廓面积; reverse=True表示从大到小排序 #遍历轮廓 for c in cnts: peri=cv2.arcLength(c,True) #计算轮廓长度:c是轮廓;True表示轮廓是封闭的 approx=cv2.approxPolyDP(c,0.02*peri,True) #构造指定精度的逼近多边形曲线:0.02*peri表示精度,表示原始轮廓的边界点与逼近多边形边界之间的最大距离,这里的精度是长度的2%; True表示逼近多边形是封闭的 #近似到4个点(矩形)的时候即为所求外轮廓 if len(approx)==4: theContour=approx break #展示轮廓检测 cv2.drawContours(img, [theContour], -1, (0, 255, 0), 2) #绘制轮廓边缘 cv2.imshow("Outline", img) #--------------------3.透视变换-------------------- #把得到的四个点还原到原始图像 warped=four_point_transform(imgcopy, theContour.reshape(4, 2) * ratio) #二值处理 warped=cv2.cvtColor(warped,cv2.COLOR_BGR2GRAY) #转为灰度图像 ref=cv2.threshold(warped,100,255,cv2.THRESH_BINARY)[1] #阈值化处理:warped表示要进行阈值分割的图像;100表示设定的阈值;255表示当参数为THRESH_BINARY类型时设定的最大值;cv2.THRESH_BINARY代表二值化阈值处理 cv2.imwrite("scan.jpg",ref) #储存处理完的图片 #展示透视变换 cv2.imshow("Scanned image",resize(ref,height=650)) cv2.waitKey(0) cv2.destroyAllWindows()
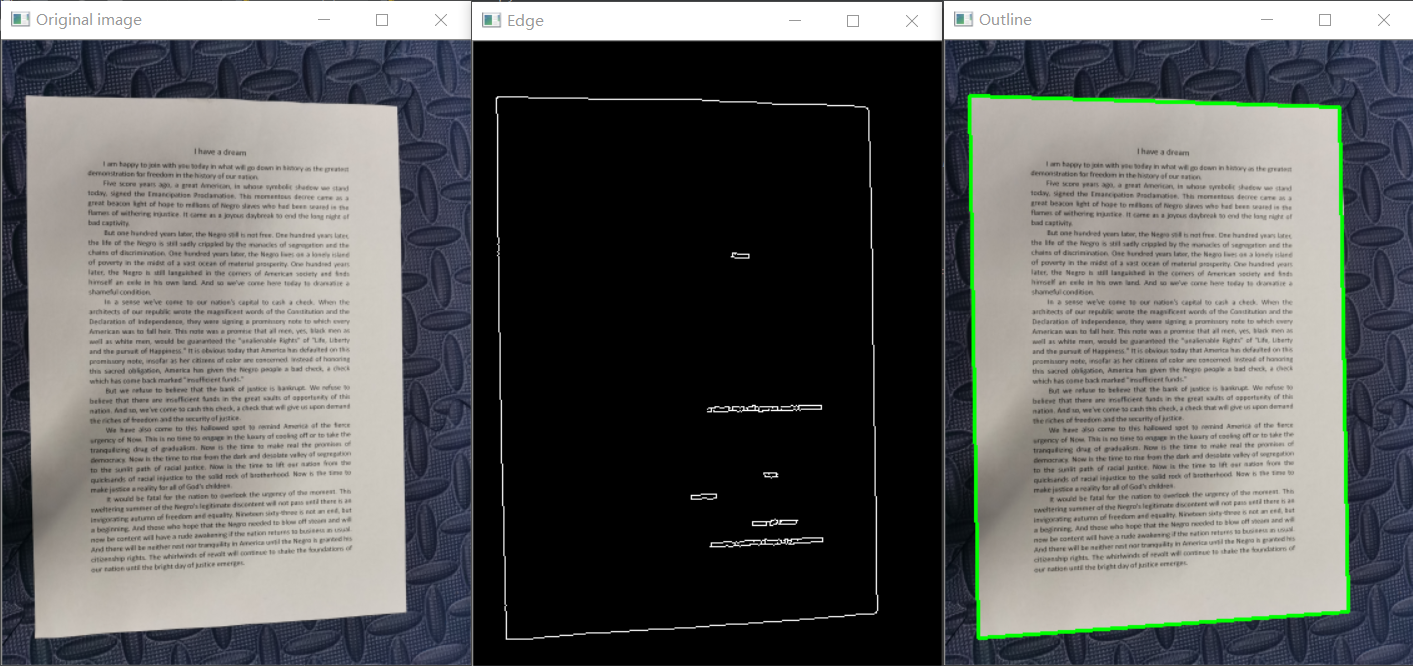
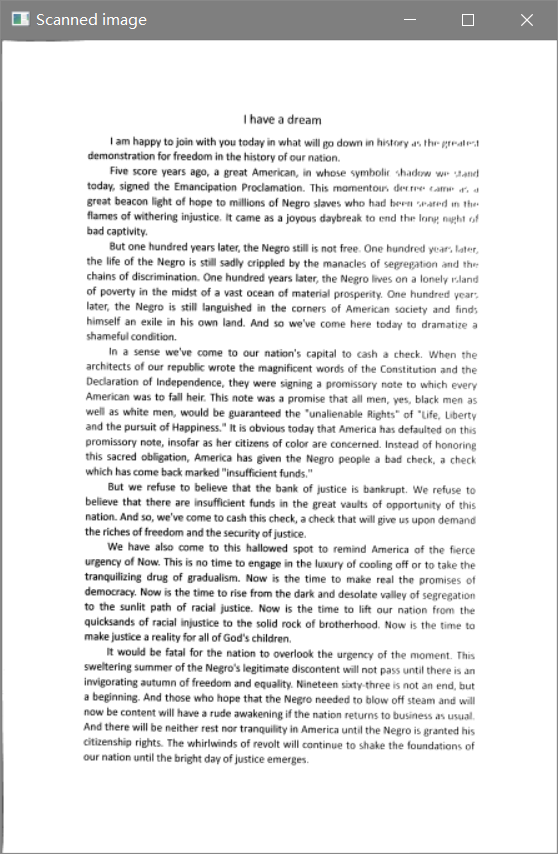
运行结果


程序分析
本程序主要实现对拍摄的文档文件转变为扫描版文档文件,其主步骤分为边缘检测、轮廓检测、透视变换。
(1)边缘检测
首先将拍摄的图像转换为灰度图像,并进行高斯滤波处理除去噪音点,然后通过cv2.Canny函数进行边缘检测。
(2)轮廓检测
使用cv2.findContours函数查找图像轮廓,此时查找到的轮廓有多个。然后用sorted函数对检测到的轮廓按照面积大小进行排序,再用for循环遍历排序好的所有轮廓,使用函数cv2.approxPolyDP构造指定精度的逼近多边形曲线,以获得最外侧轮廓。
(3)透视变换
通过自定义函数four_point_transform使拍摄的文档从随机角度转变为规矩的角度,然后对处理过的图片二值处理,使其变为扫描版样式,最后储存处理完的图像。
二、OCR文字扫描
代码
from PIL import Image import pytesseract #开源的OCR识别工具 import cv2 import os image=cv2.imread("scan.jpg") #读取文件 gray=cv2.cvtColor(image,cv2.COLOR_BGR2GRAY) #转为灰度图像 #二值化操作或滤波操作处理图像 preprocess="blur" if preprocess=="thresh": #二值化操作 gray=cv2.threshold(gray,0,255,cv2.THRESH_BINARY|cv2.THRESH_OTSU)[1] if preprocess=="blur": #滤波操作 gray=cv2.medianBlur(gray,3) filename="{}.png".format(os.getpid()) cv2.imwrite(filename,gray) text=pytesseract.image_to_string(Image.open(filename)) #用Image工具包读取数据 print(text) os.remove(filename)
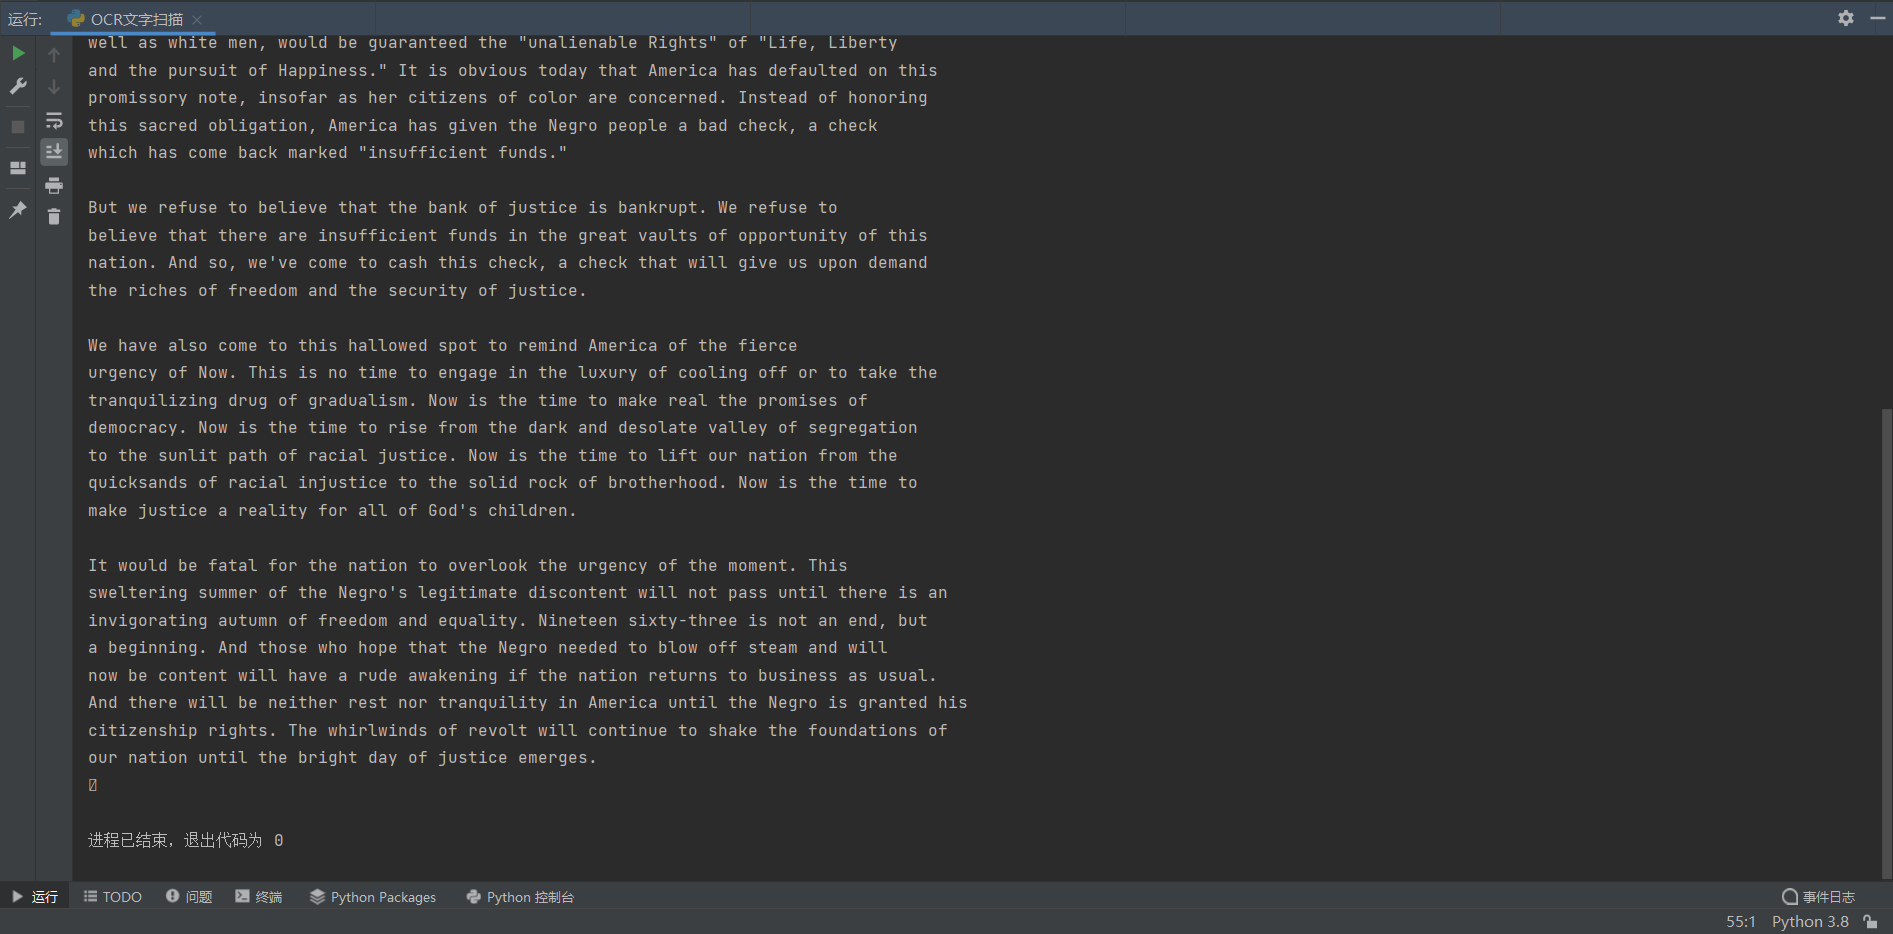
运行结果


程序分析
本程序需要使用开源的pytesseract程序包,该程序包是开源的OCR识别工具,默认只支持识别英文。该程序对上一步文档扫描程序得到的扫描版文档进行OCR识别,再用PIL模块中的Image工具包读取通过pytesseract识别后的数据,最后print出结果。
很高兴本文对你有用(*^_^*),如需转载请记得标明出处哟(☆▽☆):
本文来自博客园,作者:雪与锄,原文链接:https://www.cnblogs.com/corianderfiend/p/16583135.html


【推荐】国内首个AI IDE,深度理解中文开发场景,立即下载体验Trae
【推荐】编程新体验,更懂你的AI,立即体验豆包MarsCode编程助手
【推荐】抖音旗下AI助手豆包,你的智能百科全书,全免费不限次数
【推荐】轻量又高性能的 SSH 工具 IShell:AI 加持,快人一步