[MVC] 剖析 NopCommerce 的 Theme 机制
2012-12-28 09:32 Zork 阅读(4148) 评论(4) 编辑 收藏 举报前言
目前开源的CMS、Blog或者电子商务站点,他们都有一个共同的亮点,无疑就是可任意切换皮肤,并且定制和扩展能力都非常强。在这方面PHP可以说做的是最好的。那么我们如何能够在我们的ASP.NET MVC站点下面实现任意切换皮肤呢?我立马想到最近流行的NopCommerce—开源的 ASP.NET MVC 电子商务站点。它提供了强大的换肤功能,可通过一键切换皮肤。那接下来,我们就一起去寻找换肤的秘诀,让我们的ASP.NET MVC站点也具有一键换肤的功能吧。让我们的ASP.NET MVC 站点可以随意 变 变 变!
换肤试用
先试用下Nop站点的换肤效果吧,打开Nop的源码,下载地址:http://nopcommerce.codeplex.com, 按照官方的Theme制作方法:http://www.nopcommerce.com/docs/72/designers-guide.aspx,拷贝默认的皮肤DarkOrange,并做相应处理。此处略去500字…

运行站点,首先呈现的是默认皮肤:

切换成我们刚才制作的皮肤:

换肤后的思考?
我们刚才制作皮肤的时候,将默认的皮肤文件夹下所有的文件拷贝到新的皮肤文件夹下面,并做了样式和HTML结构的修改。Nop应该是根据客户选择的皮肤定位到相应的皮肤文件夹下面,去找到View并加载出来。那实现换肤功能的关键就是: 根据用户选择的皮肤,ASP.NET MVC动态定位到皮肤文件夹下的View,并呈现出来。
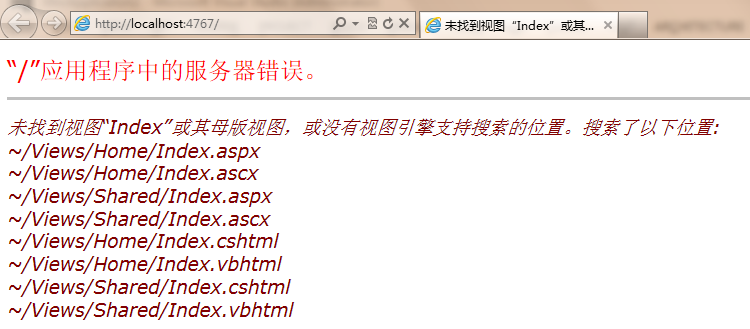
做过ASP.NET MVC开发的朋友都知道,如果在Controller里面新建一个Action,但View不存在,页面肯定会报如下错误:

从异常信息可以看出,ASP.NET MVC内部有一种加载View的机制。如果我们能够扩展这种内部的加载View的机制,去按照我们的自定义逻辑根据不同的皮肤加载不同的View,那我们的站点就能够实现换肤功能了。实现这个功能的核心就是IViewEngine,资料介绍:http://www.cnblogs.com/answercard/archive/2011/05/07/2039809.html。该接口定义如下:
/// <summary>
/// Defines the methods that are required for a view engine.
/// </summary>
public interface IViewEngine
{
    /// <summary>
    /// Finds the specified partial view by using the specified controller context.
    /// </summary>
    ViewEngineResult FindPartialView(ControllerContext controllerContext, string partialViewName, bool useCache);
    /// <summary>
    /// Finds the specified view by using the specified controller context.
    /// </summary>
    ViewEngineResult FindView(ControllerContext controllerContext, string viewName, string masterName, bool useCache);
    /// <summary>
    /// Releases the specified view by using the specified controller context.
    /// </summary>
    /// <param name="controllerContext">The controller context.</param><param name="view">The view.</param>
    void ReleaseView(ControllerContext controllerContext, IView view);
}
深入Nop,找到幕后黑手
那我们就到Nop的源代码中去寻找 IViewEngine 的实现类,看看运气如何? 运气不错,找到了3个Themeable****ViewEngine. 从名字就可以断定该类是用来实现Theme的。

(Tips: 借助Reshareper可轻松的查找某个接口的实现类,此外Reshareper还有其它的高级功能,谁用谁知道…)
先看看离接口IViewEngine最近的类—ThemeableVirtualPathProviderViewEngine,该类重写了FindView 和 FindPartialView 2个方法。我们以FindView为例进行研究吧,实际上FindPartialView跟FindView都差不多。
public override ViewEngineResult FindView(ControllerContext controllerContext, string viewName, string masterName, bool useCache)
{
    var mobileDeviceHelper = EngineContext.Current.Resolve<IMobileDeviceHelper>();
    bool useMobileDevice = mobileDeviceHelper.IsMobileDevice(controllerContext.HttpContext)
        && mobileDeviceHelper.MobileDevicesSupported()
        && !mobileDeviceHelper.CustomerDontUseMobileVersion();

    string overrideViewName = useMobileDevice ?
        string.Format("{0}.{1}", viewName, _mobileViewModifier)
        : viewName;

    ViewEngineResult result = FindThemeableView(controllerContext, overrideViewName, masterName, useCache, useMobileDevice);
    // If we're looking for a Mobile view and couldn't find it try again without modifying the viewname
    if (useMobileDevice && (result == null || result.View == null))
        result = FindThemeableView(controllerContext, viewName, masterName, useCache, false);
    return result;
}
查找View的重担放到了内部方法FindThemeableView中完成的,看看该方法的实现吧:
protected virtual ViewEngineResult FindThemeableView(ControllerContext controllerContext, string viewName, string masterName, bool useCache, bool mobile)
{
    string[] strArray;
    string[] strArray2;
    if (controllerContext == null)
    {
        throw new ArgumentNullException("controllerContext");
    }
    if (string.IsNullOrEmpty(viewName))
    {
        throw new ArgumentException("View name cannot be null or empty.", "viewName");
    }
    var theme = GetCurrentTheme(mobile);
    string requiredString = controllerContext.RouteData.GetRequiredString("controller");
    string str2 = this.GetPath(controllerContext, this.ViewLocationFormats, this.AreaViewLocationFormats, "ViewLocationFormats", viewName, requiredString, theme, "View", useCache, mobile, out strArray);
    string str3 = this.GetPath(controllerContext, this.MasterLocationFormats, this.AreaMasterLocationFormats, "MasterLocationFormats", masterName, requiredString, theme, "Master", useCache, mobile, out strArray2);
    if (!string.IsNullOrEmpty(str2) && (!string.IsNullOrEmpty(str3) || string.IsNullOrEmpty(masterName)))
    {
        return new ViewEngineResult(this.CreateView(controllerContext, str2, str3), this);
    }
    if (strArray2 == null)
    {
        strArray2 = new string[0];
    }
    return new ViewEngineResult(strArray.Union<string>(strArray2));
}
这段代码读起来有点费力,又一次告诉大家命名的重要性,当然你不想让别人看懂你的代码那就是另外一回事哈。str2实际上是ViewPath,str3是MasterPagePath。其中内部方法GetPath是用来获取View的实际路径。我们来研究下GetPath的参数吧,其中最关键的是属性ViewLocationFormats和AreaViewLocationFormats。由于ThemeableVirtualPathProviderViewEngine是抽象类,我们看看派生自该类的ThemeableRazorViewEngine吧:
 View Code
public ThemeableRazorViewEngine()
{
    AreaViewLocationFormats = new[]
                                  {
                                      //themes
                                      "~/Areas/{2}/Themes/{3}/Views/{1}/{0}.cshtml",
                                      "~/Areas/{2}/Themes/{3}/Views/{1}/{0}.vbhtml",
                                      "~/Areas/{2}/Themes/{3}/Views/Shared/{0}.cshtml",
                                      "~/Areas/{2}/Themes/{3}/Views/Shared/{0}.vbhtml",

                                      //default
                                      "~/Areas/{2}/Views/{1}/{0}.cshtml",
                                      "~/Areas/{2}/Views/{1}/{0}.vbhtml",
                                      "~/Areas/{2}/Views/Shared/{0}.cshtml",
                                      "~/Areas/{2}/Views/Shared/{0}.vbhtml"
                                  };

    AreaMasterLocationFormats = new[]
                                    {
                                        //themes
                                        "~/Areas/{2}/Themes/{3}/Views/{1}/{0}.cshtml",
                                        "~/Areas/{2}/Themes/{3}/Views/{1}/{0}.vbhtml",
                                        "~/Areas/{2}/Themes/{3}/Views/Shared/{0}.cshtml",
                                        "~/Areas/{2}/Themes/{3}/Views/Shared/{0}.vbhtml",


                                        //default
                                        "~/Areas/{2}/Views/{1}/{0}.cshtml",
                                        "~/Areas/{2}/Views/{1}/{0}.vbhtml",
                                        "~/Areas/{2}/Views/Shared/{0}.cshtml",
                                        "~/Areas/{2}/Views/Shared/{0}.vbhtml"
                                    };

    AreaPartialViewLocationFormats = new[]
                                         {
                                             //themes
                                            "~/Areas/{2}/Themes/{3}/Views/{1}/{0}.cshtml",
                                            "~/Areas/{2}/Themes/{3}/Views/{1}/{0}.vbhtml",
                                            "~/Areas/{2}/Themes/{3}/Views/Shared/{0}.cshtml",
                                            "~/Areas/{2}/Themes/{3}/Views/Shared/{0}.vbhtml",

                                            //default
                                            "~/Areas/{2}/Views/{1}/{0}.cshtml",
                                            "~/Areas/{2}/Views/{1}/{0}.vbhtml",
                                            "~/Areas/{2}/Views/Shared/{0}.cshtml",
                                            "~/Areas/{2}/Views/Shared/{0}.vbhtml"
                                         };

    ViewLocationFormats = new[]
                              {
                                    //themes
                                    "~/Themes/{2}/Views/{1}/{0}.cshtml",
                                    "~/Themes/{2}/Views/{1}/{0}.vbhtml",
                                    "~/Themes/{2}/Views/Shared/{0}.cshtml",
                                    "~/Themes/{2}/Views/Shared/{0}.vbhtml",

                                    //default
                                    "~/Views/{1}/{0}.cshtml",
                                    "~/Views/{1}/{0}.vbhtml",
                                    "~/Views/Shared/{0}.cshtml",
                                    "~/Views/Shared/{0}.vbhtml",


                                    //Admin
                                    "~/Administration/Views/{1}/{0}.cshtml",
                                    "~/Administration/Views/{1}/{0}.vbhtml",
                                    "~/Administration/Views/Shared/{0}.cshtml",
                                    "~/Administration/Views/Shared/{0}.vbhtml",
                              };

    MasterLocationFormats = new[]
                                {
                                    //themes
                                    "~/Themes/{2}/Views/{1}/{0}.cshtml",
                                    "~/Themes/{2}/Views/{1}/{0}.vbhtml",
                                    "~/Themes/{2}/Views/Shared/{0}.cshtml",
                                    "~/Themes/{2}/Views/Shared/{0}.vbhtml",

                                    //default
                                    "~/Views/{1}/{0}.cshtml",
                                    "~/Views/{1}/{0}.vbhtml",
                                    "~/Views/Shared/{0}.cshtml",
                                    "~/Views/Shared/{0}.vbhtml"
                                };

    PartialViewLocationFormats = new[]
                                     {
                                         //themes
                                        "~/Themes/{2}/Views/{1}/{0}.cshtml",
                                        "~/Themes/{2}/Views/{1}/{0}.vbhtml",
                                        "~/Themes/{2}/Views/Shared/{0}.cshtml",
                                        "~/Themes/{2}/Views/Shared/{0}.vbhtml",

                                        //default
                                        "~/Views/{1}/{0}.cshtml",
                                        "~/Views/{1}/{0}.vbhtml",
                                        "~/Views/Shared/{0}.cshtml",
                                        "~/Views/Shared/{0}.vbhtml",

                                        //Admin
                                        "~/Administration/Views/{1}/{0}.cshtml",
                                        "~/Administration/Views/{1}/{0}.vbhtml",
                                        "~/Administration/Views/Shared/{0}.cshtml",
                                        "~/Administration/Views/Shared/{0}.vbhtml",
                                     };

    FileExtensions = new[] { "cshtml", "vbhtml" };
}
看到这里你是否了解有些明白了?这里就是定义的查找View的路径的模版,程序(Nop和MVC默认实现都是相同的策略)会按照顺序依次查找View是否存在。
再来看看GetPath的实现吧:
 View Code
protected virtual string GetPath(ControllerContext controllerContext, string[] locations,
            string[] areaLocations, string locationsPropertyName, string name,
            string controllerName, string theme, string cacheKeyPrefix,
            bool useCache, bool mobile, out string[] searchedLocations)
{
    searchedLocations = _emptyLocations;
    if (string.IsNullOrEmpty(name))
    {
        return string.Empty;
    }
    string areaName = GetAreaName(controllerContext.RouteData);

    //little hack to get nop's admin area to be in /Administration/ instead of /Nop/Admin/ or Areas/Admin/
    if (!string.IsNullOrEmpty(areaName) && areaName.Equals("admin", StringComparison.InvariantCultureIgnoreCase))
    {
        //admin area does not support mobile devices
        if (mobile)
        {
            searchedLocations = new string[0];
            return string.Empty;
        }
        var newLocations = areaLocations.ToList();
        newLocations.Insert(0, "~/Administration/Views/{1}/{0}.cshtml");
        newLocations.Insert(0, "~/Administration/Views/{1}/{0}.vbhtml");
        newLocations.Insert(0, "~/Administration/Views/Shared/{0}.cshtml");
        newLocations.Insert(0, "~/Administration/Views/Shared/{0}.vbhtml");
        areaLocations = newLocations.ToArray();
    }

    bool flag = !string.IsNullOrEmpty(areaName);
    List<ViewLocation> viewLocations = GetViewLocations(locations, flag ? areaLocations : null);
    if (viewLocations.Count == 0)
    {
        throw new InvalidOperationException(string.Format(CultureInfo.CurrentCulture, "Properties cannot be null or empty.", new object[] { locationsPropertyName }));
    }
    bool flag2 = IsSpecificPath(name);
    string key = this.CreateCacheKey(cacheKeyPrefix, name, flag2 ? string.Empty : controllerName, areaName, theme);
    if (useCache)
    {
        var cached = this.ViewLocationCache.GetViewLocation(controllerContext.HttpContext, key);
        if (cached != null)
        {
            return cached;
        }
    }
    if (!flag2)
    {
        return this.GetPathFromGeneralName(controllerContext, viewLocations, name, controllerName, areaName, theme, key, ref searchedLocations);
    }
    return this.GetPathFromSpecificName(controllerContext, name, key, ref searchedLocations);
}
这里明显使用了缓存,所以大家不用担心每次读取View都要依次去进行IO操作去查找View引起的性能问题。
最后我们再来看看GetPathFromGeneralName的具体实现吧:
 View Code
protected virtual string GetPathFromGeneralName(ControllerContext controllerContext,
    List<ViewLocation> locations, string name, string controllerName, string areaName,
    string theme, string cacheKey, ref string[] searchedLocations)
{
    string virtualPath = string.Empty;
    searchedLocations = new string[locations.Count];
    for (int i = 0; i < locations.Count; i++)
    {
        string str2 = locations[i].Format(name, controllerName, areaName, theme);
        if (this.FileExists(controllerContext, str2))
        {
            searchedLocations = _emptyLocations;
            virtualPath = str2;
            this.ViewLocationCache.InsertViewLocation(controllerContext.HttpContext, cacheKey, virtualPath);
            return virtualPath;
        }
        searchedLocations[i] = str2;
    }
    return virtualPath;
}
该方法会将参数Theme、Controller和Action传入上文提到的View路径模版,生成实际的路径,如果文件不存在,继续尝试下一个View路径模版。直到找到View存在的实际路径。
偷梁换柱,让MVC使用自定义的ViewEngine
Nop是通过在Global文件的事件Application_Start中注入以下代码:
//remove all view engines
ViewEngines.Engines.Clear();
//except the themeable razor view engine we use
ViewEngines.Engines.Add(new ThemeableRazorViewEngine());
总结
到这里,你是否已经知道了Nop实现Theme的奥秘?但又觉得过于复杂?其实Nop实现Theme的同时,还为Mobile和Admin管理后台做了很多特殊处理,所以代码看起来有点乱。那我们就来自己动手打造一个轻量级的ThemeViewEngine吧。预知后事,且听下回分解。
下一篇:[ASP.NET MVC 下打造轻量级的 Theme 机制]


