
Welcome to YARP - 4.限流 (Rate Limiting)
目录
Welcome to YARP - 1.认识YARP并搭建反向代理服务
- 2.1 - 配置文件(Configuration Files)
- 2.2 - 配置提供者(Configuration Providers)
- 2.3 - 配置过滤器(Configuration Filters)
介绍
反向代理可用于在将请求代理到目标服务器之前对请求进行速率限制(限流)。这可以减少目标服务器上的负载,增加一层保护,并确保在应用程序中实施一致的策略。
此功能仅在使用 .NET 7.0 或更高版本时可用 ,因为YARP是基于.NET开发的,只有.NET 7才支持了 限流功能,YARP直接可以拿来用。
默认限流功能是关闭的。而开启限流会应用到所有的路由,限流中间件: app.UseRateLimiter() ,这将应用到项目的所有路由上。
示例:
using Microsoft.AspNetCore.RateLimiting;
using System.Threading.RateLimiting;

var builder = WebApplication.CreateBuilder(args);

// Add services to the container.
builder.Services.AddRateLimiter(_ => _
    .AddFixedWindowLimiter(policyName: "customPolicy", options =>
    {
        options.PermitLimit = 1;
        options.Window = TimeSpan.FromSeconds(2);
        //options.QueueProcessingOrder = QueueProcessingOrder.OldestFirst;
        //options.QueueLimit = 2;
    }));

builder.Services.AddReverseProxy()
    .LoadFromConfig(builder.Configuration.GetSection("ReverseProxy"));

var app = builder.Build();

app.UseRouting();
app.UseRateLimiter();
app.MapReverseProxy();

app.Run();
以上代码含义:
- 调用 AddRateLimiter 来将速率限制服务添加到服务集合。
- 调用
AddFixedWindowLimiter来创建策略名为"customPolicy"的固定窗口限制器,并进行如下设置: - 将 PermitLimit 设置为 1,将时间 Window 设置为 2。 允许每 2 秒的窗口最多 1 个请求。
- QueueProcessingOrder 重命名为 OldestFirst。
- 将 QueueLimit 设置为 2。
- 调用 UseRateLimiter 来启用速率限制。
配置
Rate Limiter policies 可以通过 RouteConfig.RateLimiterPolicy 为每个路由指定,并且可以从 Routes 配置文件的部分进行绑定。与其他路由属性一样,可以在不重新启动代理的情况下修改和重新加载此属性。策略名称不区分大小写。
示例:
{
  "ReverseProxy": {
    "Routes": {
      "route1" : {
        "ClusterId": "cluster1",
        "RateLimiterPolicy": "customPolicy",
        "Match": {
          "Hosts": [ "localhost" ]
        },
      }
    },
    "Clusters": {
      "cluster1": {
        "Destinations": {
          "cluster1/destination1": {
            "Address": "http://localhost:5011/"
          }
        }
      }
    }
  }
}
RateLimiter policies 是 YARP 使用 ASP.NET Core 的概念。YARP 只是提供上述配置来为每个路由指定一个策略,其余部分由现有的 ASP.NET Core 速率限制中间件处理。
这里就要赞叹一下 YARP 的设计了,所有的功能都是作为 .NET的中间件提供的,让 .NET 开发者很容易上手。而且可扩展性也是 YARP 的最大优势。
示例:
app.UseRouting();
app.UseRateLimiter();
app.MapReverseProxy();
在使用速率限制终结点特定的 API 时,必须在
UseRouting之后调用UseRateLimiter。 当仅调用全局限制器时,可以在UseRouting之前调用UseRateLimiter。
效果展示
我们创建三个项目,一个是YARP代理服务,一个是真实的服务 web api项目,一个是客户端控制台 模拟调用。限流的配置就按上面说的配置,配置在代理服务上。web api上面也可以配,但是基本上都配代理服务,让浏览在代理层就被拦截掉。

Server代码:
var builder = WebApplication.CreateBuilder(args);

// Add services to the container.
// Learn more about configuring Swagger/OpenAPI at https://aka.ms/aspnetcore/swashbuckle
builder.Services.AddEndpointsApiExplorer();
builder.Services.AddSwaggerGen();

var app = builder.Build();

// Configure the HTTP request pipeline.
if (app.Environment.IsDevelopment())
{
    app.UseSwagger();
    app.UseSwaggerUI();
}


app.MapGet("/api", () =>
{
    return "hello i am api server";
});

app.Run();
代码很简单,就提供一个路由为 "api" 接口供客户端调用。
Client 代码:
string apiUrl = "http://localhost:5057/api"; // API地址
int totalCalls = 10; // 总共的调用次数

using (HttpClient client = new())
{
    for (int callCount = 0; callCount < totalCalls; callCount++)
    {
        HttpResponseMessage response = await client.GetAsync(apiUrl);

        if (response.IsSuccessStatusCode)
        {
            string result = await response.Content.ReadAsStringAsync();
            Console.WriteLine($"Call {callCount + 1}: {result}");
        }
        else
        {
            Console.WriteLine($"Call {callCount + 1} failed: {response.StatusCode}");
        }
    }
}

Console.WriteLine("All calls completed.");
Console.ReadKey();
循环调用接口10次,按照上述先流的配置,2秒内只允许有一个请求,那么接下来的9个请求应该都是失败的。
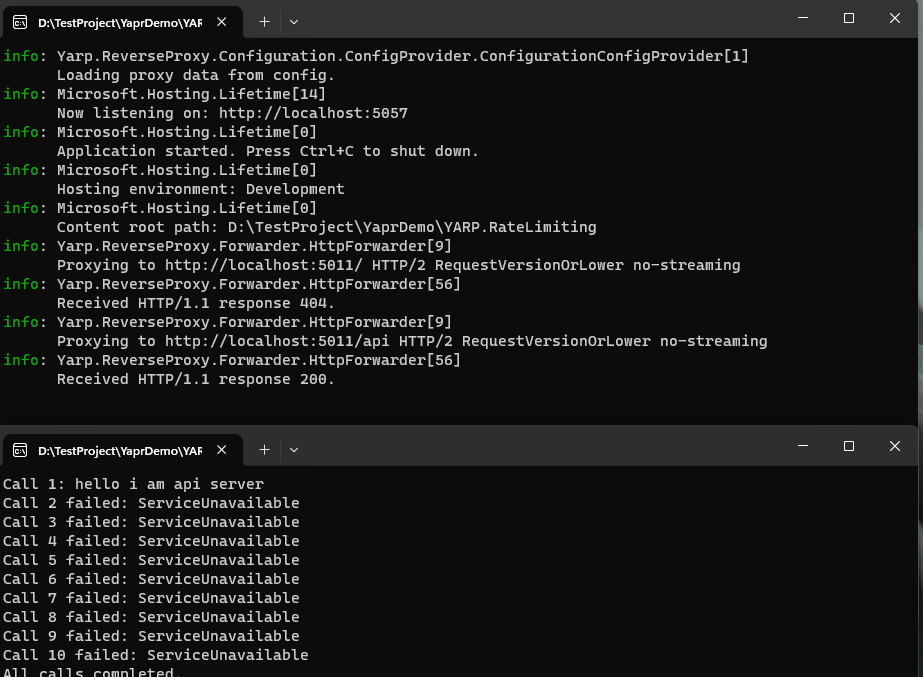
可以看到只有第一次请求成功了,其他的请求全部失败了。而且YARP 的代理输出也显示只代理了一次,其他流量并没有打真实的服务器。
禁用Rate Limiting
在路由 RateLimiterPolicy 的参数中指定值 disable 意味着速率限制器中间件不会对此路由应用任何策略,即使是默认策略。
总结
本章我们使用YARP对代理服务进行了限流操作。但是这个功能是.NET 自身提供的,而且支持很多种限流规则,这里就不展开叙述了,想了解的同学可以翻看微软文档-限流。如果有时间我们把 YARP 整完,在单独对某些功能拿出来细聊。本章源码已上传GitHub
下篇文章我们继续讲如何使用YARP 的 身份验证和授权 功能

 浙公网安备 33010602011771号