Centos7.6搭建ELK日志分析系统
一、前言:
日志分析是我们运维解决系统故障、发现问题的主要手段。为了可以集中管理多台服务器的日志记录,开源实时日志分析ELK平台应用而生,ELK由Elasticsearch、Logstash和Kibana三个开源工具组成,这三个工具可以分别部署在不同的服务器上,并且相互关联,不过需要收集哪台服务器的日志,就须在该服务器上部署Logstash。更多相关介绍,请移步至Elastic官网。
ELK的工作原理如下(懂得其中原理,才可部署一个高可用的ELK平台):
Logstash收集APPServer(应用服务器)产生的log,并存放到Elasticsearch群集中,而Kibana则从Elasticsearch群集中查询数据生成图表,在返回给browser(浏览器)。简单来说,进行日志处理分析,一般需要以下几个步骤:
1、Logstash将日志进行集中化管理。
2、Logstash将日志进行集中化管理。
3、Elasticsearch对格式化后的数据进行索引和存储。
4、Kibana对前端数据的展示。
二、搭建ELK平台:
| 操作系统 | 主机名/IP地址 | 软件安装 |
| Centos 7.6 | lb01/192.168.11.61 |
Elasticsearch Kibana |
| Centos 7.6 | lb02/192.168.11.62 | Elasticsearch |
| Centos 7.6 | lb/192.168.11.60 | Logstash/apache/nginx |
| Centos 7.6 | lb03/192.168.11.63 | filebeat |
所有节点关闭防火墙、Selinux、配置java环境变量;
lb01 节点:
[root@lb01 ~]# hostname   #查看主机名
lb01
[root@lb01 ~]# cat /etc/hosts   #更改本地解析文件,添加如下两行
127.0.0.1   localhost localhost.localdomain localhost4 localhost4.localdomain4
::1         localhost localhost.localdomain localhost6 localhost6.localdomain6
192.168.11.61 lb01  # 添加
192.168.11.62 lb02  # 添加
[root@lb01 ~]# java -version  #检查Java环境
openjdk version "1.8.0_181"
OpenJDK Runtime Environment (build 1.8.0_181-b13)
OpenJDK 64-Bit Server VM (build 25.181-b13, mixed mode)
lb01 节点:
[root@lb02 ~]# hostname   #查看主机名
lb02
[root@lb02 ~]# cat /etc/hosts   #更改本地解析文件,添加如下两行
127.0.0.1   localhost localhost.localdomain localhost4 localhost4.localdomain4
::1         localhost localhost.localdomain localhost6 localhost6.localdomain6
192.168.11.61 lb01  # 添加
192.168.11.62 lb02  # 添加
[root@lb02 ~]# java -version  #检查Java环境
openjdk version "1.8.0_181"
OpenJDK Runtime Environment (build 1.8.0_181-b13)
OpenJDK 64-Bit Server VM (build 25.181-b13, mixed mode)
二、安装Elasticsearch
lb01 节点配置:
[root@lb01 ~]# cd /usr/local/
[root@lb01 local]# rpm -ivh elasticsearch-6.4.0.rpm
[root@lb01 local]# vim /etc/elasticsearch/elasticsearch.yml
#修改如下,注意删除注释符号
cluster.name: my-elk-cluster                #群集名字
node.name: lb01                                #节点名字
path.data: /data/elk_data                     #数据存放路径
path.logs: /var/log/elasticsearch/         #日志存放路径
bootstrap.memory_lock: false             #在启动的时候不锁定内存
network.host: 0.0.0.0                          #提供服务绑定的IP地址,0.0.0.0代表所有地址
http.port: 9200                                      #侦听端口
discovery.zen.ping.unicast.hosts: ["lb01", "lb02"]             #群集发现通过单播实现
[root@lb01 local]# mkdir -p /data/elk_data          #创建数据存放目录
[root@lb01 local]# chown -R elasticsearch:elasticsearch /data/elk_data/     #更改属主及属组
[root@lb01 local]# chown -R elasticsearch:elasticsearch /var/log/elasticsearch/
[root@lb01 local]# systemctl start elasticsearch.service              #启动服务
[root@lb01 local]# netstat -tunlp | grep java
 tcp6       0      0 :::9200                 :::*                    LISTEN      19296/java
tcp6       0      0 :::9300                 :::*                    LISTEN      19296/java
lb02 节点配置:
[root@lb02 ~]# cd /usr/local/
[root@lb02 local]# rpm -ivh elasticsearch-6.4.0.rpm
[root@lb02 local]# vim /etc/elasticsearch/elasticsearch.yml
#修改如下,注意删除注释符号
cluster.name: my-elk-cluster                #群集名字
node.name: lb02                                #节点名字
path.data: /data/elk_data                     #数据存放路径
path.logs: /var/log/elasticsearch/         #日志存放路径
bootstrap.memory_lock: false             #在启动的时候不锁定内存
network.host: 0.0.0.0                          #提供服务绑定的IP地址,0.0.0.0代表所有地址
http.port: 9200                                      #侦听端口
discovery.zen.ping.unicast.hosts: ["lb01", "lb02"]             #群集发现通过单播实现
[root@lb02 local]# mkdir -p /data/elk_data          #创建数据存放目录
[root@lb02 local]# chown -R elasticsearch:elasticsearch /data/elk_data/     #更改属主及属组
[root@lb02 local]# chown -R elasticsearch:elasticsearch /var/log/elasticsearch/
[root@lb02 local]# systemctl start elasticsearch.service              #启动服务
[root@lb02 local]# netstat -tunlp | grep java
 tcp6       0      0 :::9200                 :::*                    LISTEN      19296/java
tcp6       0      0 :::9300                 :::*                    LISTEN      19296/java
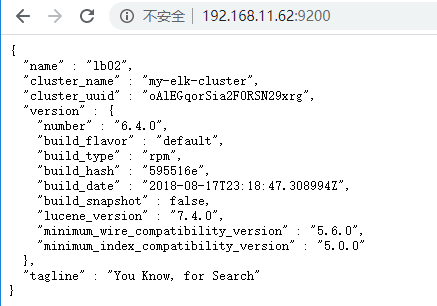
3、查看节点信息:
lb01节点信息:
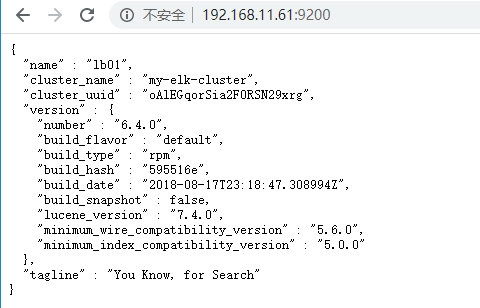
lb02节点信息:
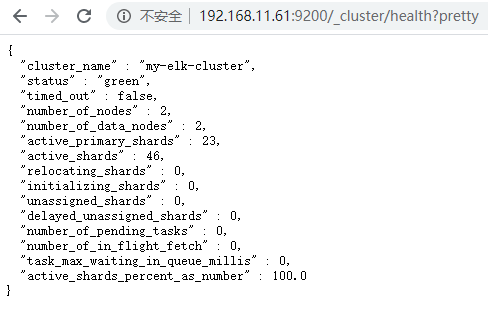
访问http://192.168.11.61:9200/_cluster/health?pretty 查看群集的健康状态:
访问http://192.168.11.61:9200/_cluster/state?pretty 查看群集的状态信息:

通过以上方式查看群集状体对我们显示的并不友好,可以通过安装Elasticsearch-head插件,可以更方便的管理群集:
在lb01安装Elasticsearch-head插件:
方法一、
导入node-v8.2.1.tar.gz phantomjs-2.1.1-linux-x86_64.tar.bz2 安装包
安装node:
tar zxvf node-v8.2.1.tar.gz
cd node-v8.2.1/
./configure && make && make install
安装phantomjs:
tar jxvf phantomjs-2.1.1-linux-x86_64.tar.bz2
cd phantomjs-2.1.1-linux-x86_64/bin/
cp phantomjs /usr/local/bin/
导入es-head程序包并解压:
unzip master.zip –d /usr/local/
cd elasticsearch-head/
npm install
npm run start &
查看端口状态:(端口默认9100)
netstat –anpt | grep 9100
方法二、(本次采用此方法)
git clone git://github.com/mobz/elasticsearch-head.git
cd elasticsearch-head
npm install
npm run start &
netstat –anpt | grep 9100
方法三、
拉取镜像: docker push mobz/elasticsearch-head:5
启动镜像: docker run -p 9100:9100 mobz/elasticsearch-head:5
web访问测试: http://IP:9100
[root@lb01 local]# cd /usr/local/elasticsearch-head
[root@lb01 elasticsearch-head]# vim /etc/elasticsearch/elasticsearch.yml
#编辑主配置文件,在任意位置添加如下两行:
http.cors.enabled: true                #添加该行,开启跨域访问支持
http.cors.allow-origin: "*"             #添加该行,跨域访问允许的域名地址
[root@node1 elasticsearch-head]# systemctl restart elasticsearch       #重启服务
[root@node1 elasticsearch-head]# npm run start &
#设置服务后台启动,如果前台启动,一旦关闭中断,服务也将关闭。
#并且启动服务时,必须在解压后的elasticsearch-head下启动服务,
#进程会读取该目录下的一个文件,否则可能启动失败。
[root@lb01 elasticsearch-head]# netstat -tunlp | grep 9100
tcp        0      0 0.0.0.0:9100            0.0.0.0:*               LISTEN      25339/grunt
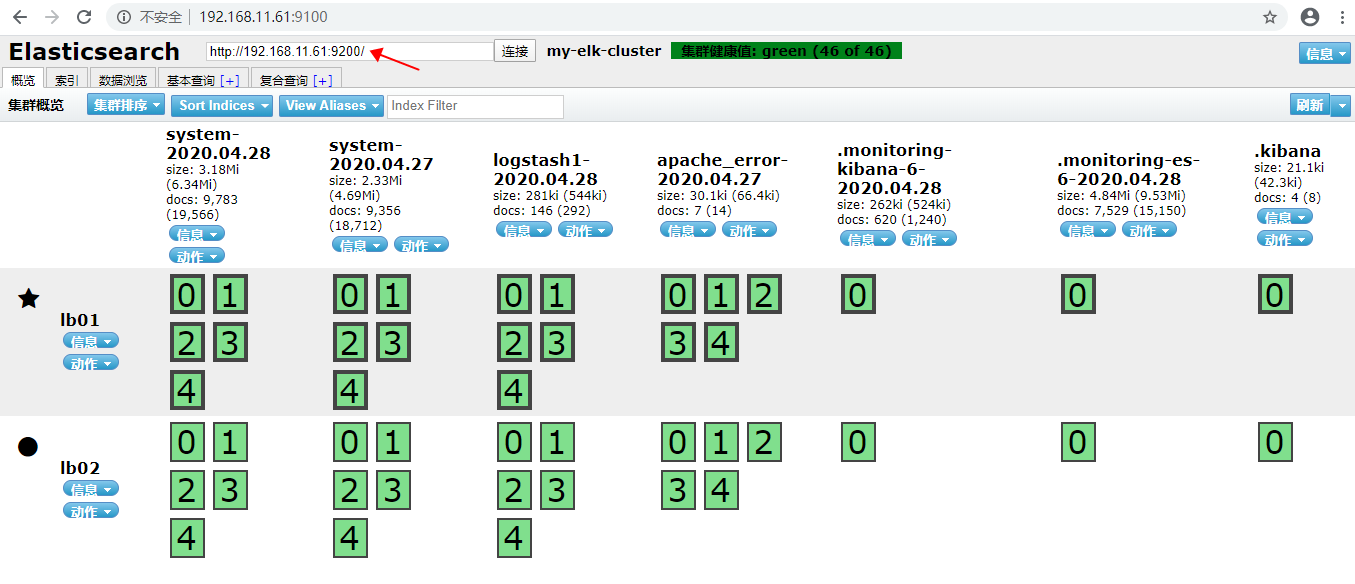
现在就可以通过浏览器访问http://192.168.1.1:9100 去查看群集信息了,如下:
4、安装Kibana(可单独安装在一台服务器上,此处安装在lb01节点上面):
[root@lb01 local]# rpm -ivh kibana-6.4.0-x86_64.rpm
[root@lb01 local]# systemctl enable kibana
[root@lb01 local]# vim /etc/kibana/kibana.yml
server.port: 5601          #Kibana打开的端口
server.host: "0.0.0.0"               #Kibana侦听的地址,0.0.0.0代表该主机上的所有地址
elasticsearch.url: "http://192.168.1.1:9200"                   #和Elasticsearch建立连接
kibana.index: ".kibana"                      #在Elasticsearch中添加.kibana索引
[root@lb01 local]# systemctl start kibana                   #启动Kibana
5、配置apache、logstash服务
[root@lb ~]# yum -y install httpd
[root@lb ~]# systemctl start httpd
[root@lb ~]# cd /usr/local
[root@lb local]# rpm -ivh logstash-6.4.0.rpm
[root@lb ~]# systemctl enable logstash.service
[root@lb ~]# cd /etc/logstash/conf.d/               #切换至指定路径
[root@lb conf.d]# vim apache_log.conf        #编辑采集apache日志文件和系统日志
#以下就以系统日志为例做解释,其余的照着来就行,格式都差不多
input {
      file{
        path => "/var/log/messages"             #指定要收集的日志文件
        type => "system"  #指定类型为system,可以自定义,type值和output{ } 中的type对应即可
        start_position => "beginning"       #从开始处收集
        }
      file{
        path => "/etc/httpd/logs/access_log"
        type => "access"
        start_position => "beginning"
         }
       file{
        path => "/etc/httpd/logs/error_log"
        type => "error"
        start_position => "beginning"
          }
       }
output {
        if [type] == "system" {           #如果type为system,
           elasticsearch {                  #就输出到Elasticsearch服务器
             hosts => ["192.168.11.61:9200"]               #Elasticsearch监听地址及端口
             index => "system-%{+YYYY.MM.dd}"           #指定索引格式
                }
             }
        if [type] == "access" {
  elasticsearch {
             hosts => ["192.168.11.61:9200"]
             index => "apache_access-%{+YYYY.MM.dd}"
               }
             }
        if [type] == "error" {
          elasticsearch {
             hosts => ["192.168.11.61:9200"]
             index => "apache_error-%{+YYYY.MM.dd}"
             }
          }
        }
#写完保存退出即可。
[root@lb conf.d]# chmod o+r /var/log/messages           #赋予该目录其他人的读权限
[root@lb conf.d]#  ln -s /usr/share/logstash/bin/logstash /usr/local/bin/
#创建命令软连接
[root@lb conf.d]# systemctl start logstash             #启动服务
[root@lb conf.d]# logstash -f apache_log.conf &    #指定刚才编写文件为Logstash的配置文件,并且在后台运行
6、创建索引:
1、通过浏览器访问 http://192.168.11.61:9100 查看索引是否创建:

关于索引,有几个很重要的概念:
索引:类似于关系数据库中的“库”;
Type(编写Logstash时指定的type):类似于关系数据库中的“表”;
刚才创建的索引,在我标记红框中,可以看到lb01和lb02对应的位置,都有绿色背景的0、1、2、3、4、5表示是该索引被分为了5个分片,其中因为在Logstash中指定的Elasticsearch服务器是lb01,所以lb01的分片是主分片,lb02会自动同步lb01的分片,lb02的分片为备份分片,称为副本,用来提供数据冗余及负载分担。默认情况下,Elasticsearch自动对索引请求进行负载分担。
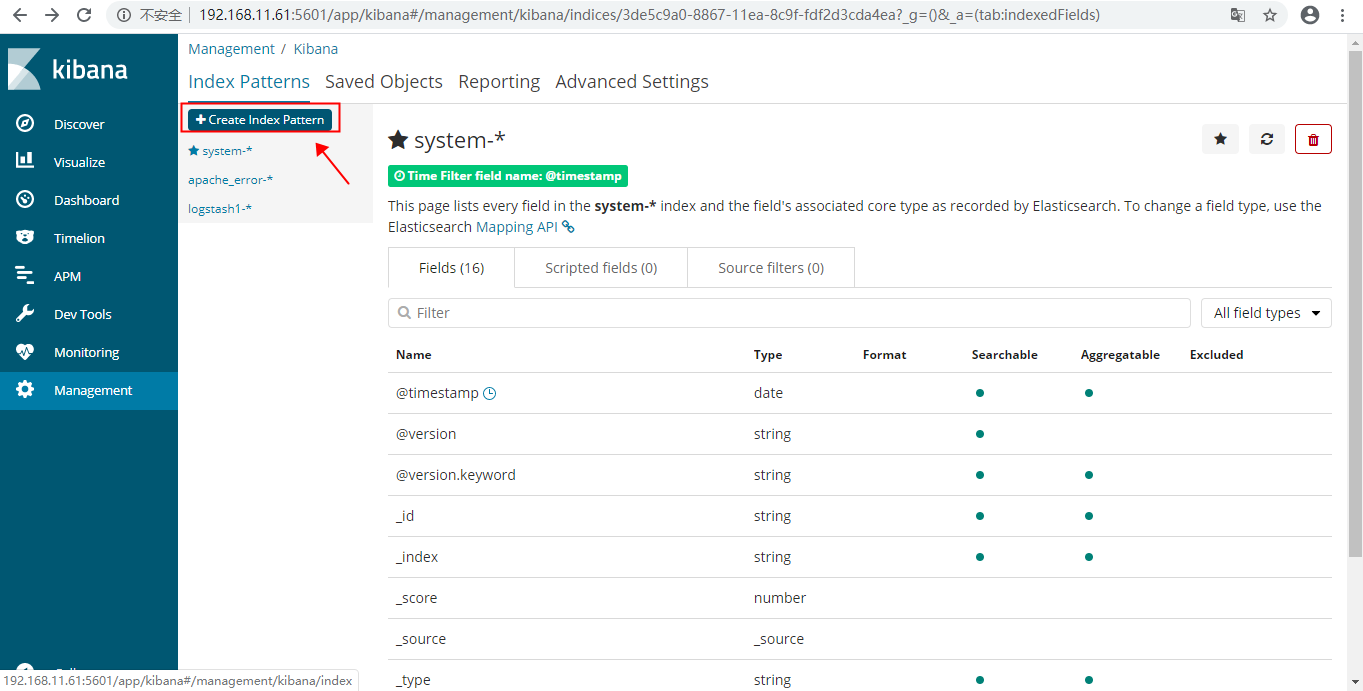
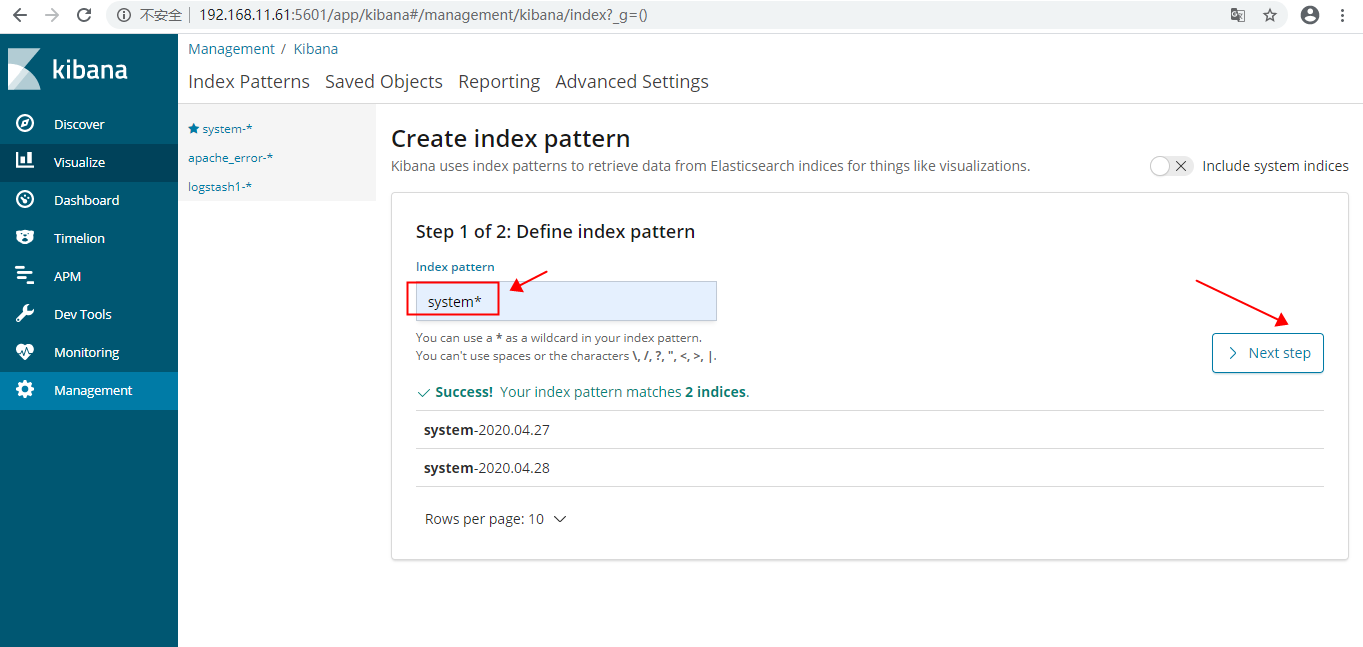
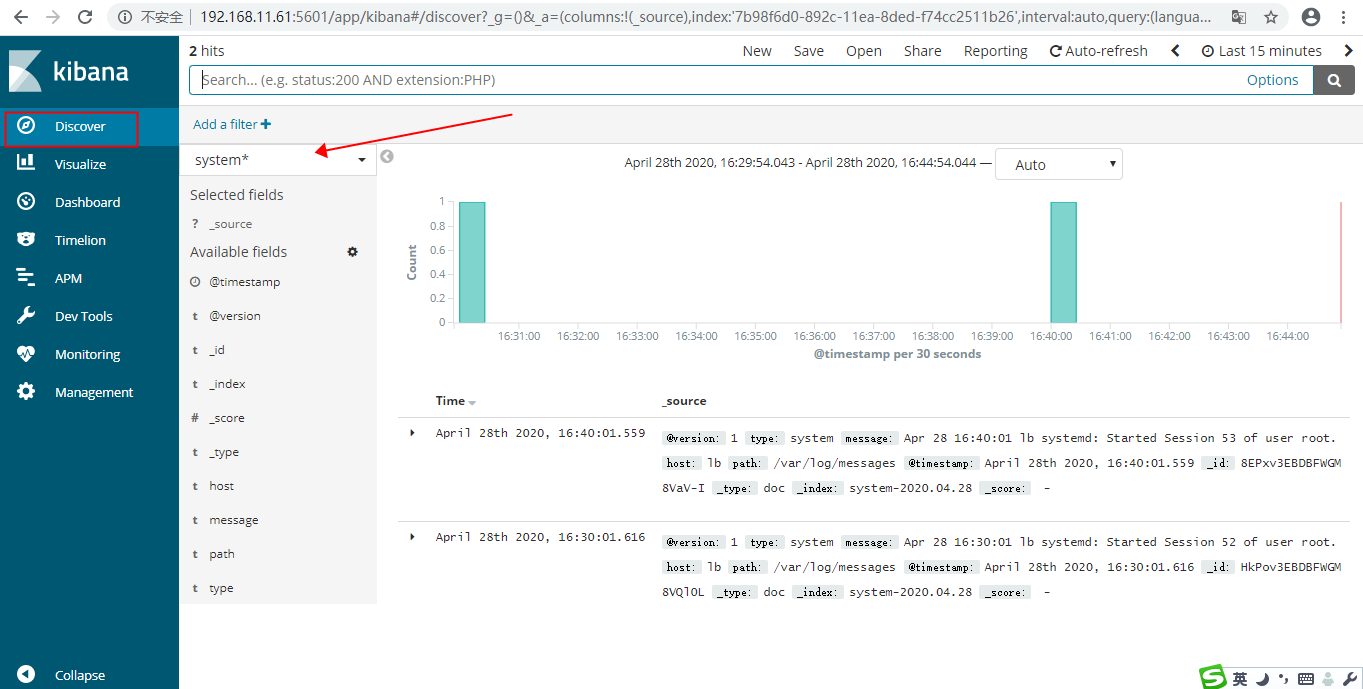
现在访问http://192.168.11.61:5601 登录到Kibana,添加索引:


7、下面讲解如何收集syslog日志;
[root@lb ~]# vim /etc/logstash/conf.d/syslog.conf  # 加入如下内容
input {  # 定义日志源
  syslog {
    type => "system-syslog"  # 定义类型
    port => 10514    # 定义监听端口
  }
}
output {  # 定义日志输出
  stdout {
    codec => rubydebug  # 将日志输出到当前的终端上显示
  }
}
检测配置文件是否有错:
[root@lb ~]# cd /etc/logstash/conf.d/ #进入安装目录
./logstash --path.settings /etc/logstash/ -f /etc/logstash/conf.d/syslog.conf --config.test_and_exit
Configuration OK  # 为ok则代表配置文件没有问题
命令说明:
--path.settings 用于指定logstash的配置文件所在的目录
-f 指定需要被检测的配置文件的路径
--config.test_and_exit 指定检测完之后就退出,不然就会直接启动了
配置kibana服务器的ip以及配置的监听端口:
[root@lb conf.d]# vim /etc/rsyslog.conf
#### RULES ####
*.* @192.168.11.61:10514

重启rsyslog,让配置生效:
[root@lb conf.d]# systemctl restart rsyslog
配置logstash
以上只是测试的配置,这一步我们需要重新改一下配置文件,让收集的日志信息输出到es服务器中,而不是当前终端:
[root@lb conf.d]# vim /etc/logstash/conf.d/syslog.conf
input {  # 定义日志源
  syslog {
    type => "system-syslog"  # 定义类型
    port => 10514    # 定义监听端口
  }
}
output {  # 定义日志输出
   elasticsearch {
     hosts => ["192.168.11.61:9200"]  # 定义es服务器的ip
     index => "system-syslog-%{+YYYY.MM}" # 定义索引
  }
}
同样的需要检测配置文件有没有错:
[root@lb conf.d]# cd /etc/logstash/conf.d/
[root@lb conf.d]# ./logstash --path.settings /etc/logstash/ -f /etc/logstash/conf.d/syslog.conf --config.test_and_exit
Configuration OK  #表示通过检测正常
文件夹权限设置
[root@lb ~]# chown logstash /var/log/logstash/logstash-plain.log
[root@lb ~]# chown -R logstash /var/lib/logstash/
[root@lb ~]# systemctl restart logstash
修改监听端口
[root@lb ~]# vim /etc/logstash/logstash.yml
http.host: "192.168.11.60"  #改成本机IP地址
[root@lb ~]# systemctl restart logstash
[root@lb ~]# netstat -tunlp | egrep "10514|9600"
tcp6       0      0 :::10514                :::*                    LISTEN      9556/java
tcp6       0      0 192.168.11.60:9600      :::*                    LISTEN      9556/java
udp        0      0 0.0.0.0:10514           0.0.0.0:*                           9556/java
kibana上查看日志
logstash服务器的搭建之后,回到kibana服务器上查看日志,执行以下命令可以获取索引信息:
[root@lb01 ~]# curl '192.168.11.61:9200/_cat/indices?v'
health status index
green  open   .kibana                         -8Yy0C2GQWOgNQxnAdSlug   1   1          7            0    108.4kb         54.2kb
green  open   system-2020.04.30               __WslC-GRxOxoXHFwuK5Mg   5   1     158982            0     29.9mb         14.9mb
如上,可以看到,在logstash配置文件中定义的system-syslog索引成功获取到了,证明配置没问题,logstash与es通信正常。
获取指定索引详细信息:
[root@lb01 ~]# curl -XGET '192.168.11.61:9200/system-syslog-2020.04?pretty'
如果日后需要删除索引的话,使用以下命令可以删除指定索引:
[root@lb01 ~]# curl -XDELETE 'localhost:9200/system-syslog-2020.04'
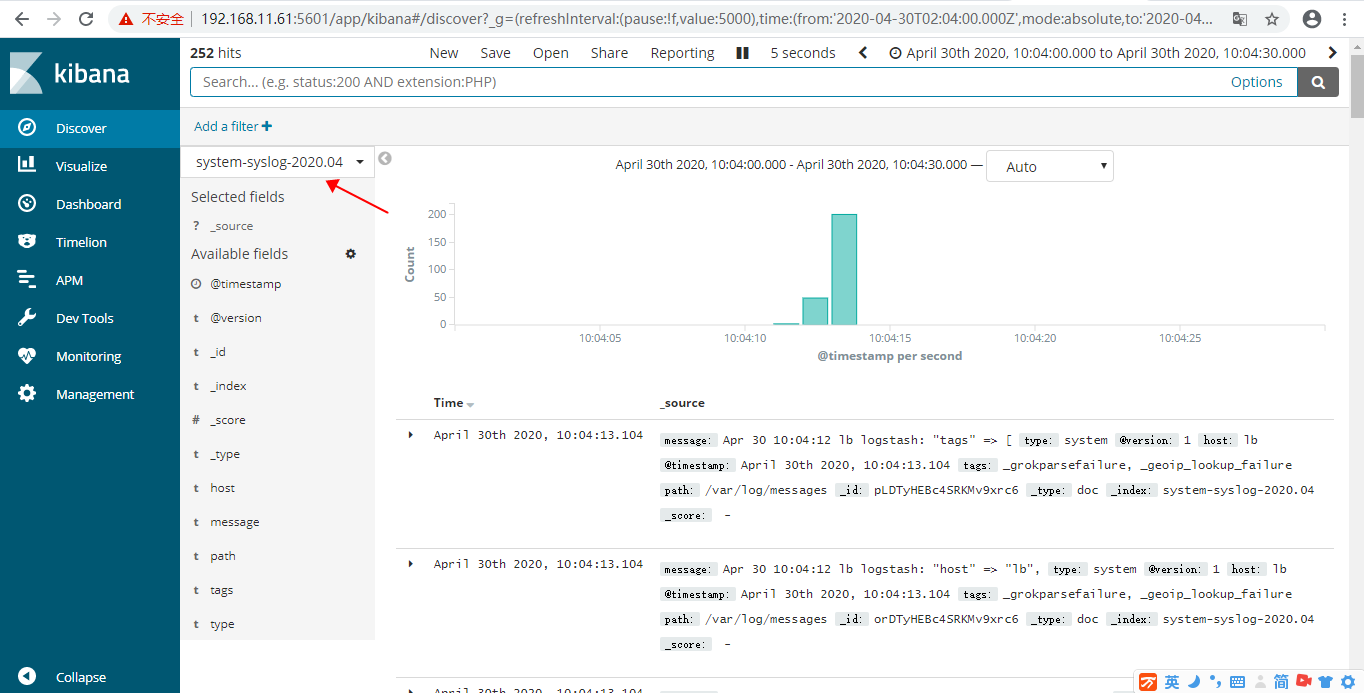
es与logstash能够正常通信后就可以去配置kibana了,浏览器访问192.168.77.128:5601,到kibana页面上配置索引:
8、logstash收集nginx日志
和收集syslog一样,首先需要编辑配置文件,这一步在logstash服务器上完成:
[root@lb ~]# vim /etc/logstash/conf.d/nginx.conf

input {
  file {  # 指定一个文件作为输入源
    path => "/tmp/elk_access.log"  # 指定文件的路径
    start_position => "beginning"  # 指定何时开始收集
    type => "nginx"  # 定义日志类型,可自定义
  }
}
filter {  # 配置过滤器
    grok {
        match => { "message" => "%{IPORHOST:http_host} %{IPORHOST:clientip} - %{USERNAME:remote_user} \[%{HTTPDATE:timestamp}\] \"(?:%{WORD:http_verb} %{NOTSPACE:http_request}(?: HTTP/%{NUMBER:http_version})?|%{DATA:raw_http_request})\" %{NUMBER:response} (?:%{NUMBER:bytes_read}|-) %{QS:referrer} %{QS:agent} %{QS:xforwardedfor} %{NUMBER:request_time:float}"}  # 定义日志
的输出格式
    }
    geoip {
        source => "clientip"
    }
}
output {
    stdout { codec => rubydebug }
    elasticsearch {
        hosts => ["192.168.11.61:9200"]
        index => "nginx-test-%{+YYYY.MM.dd}"
  }
}
同样的编辑完配置文件之后,还需要检测配置文件是否有错:
[root@lb conf.d]# ./logstash --path.settings /etc/logstash/ -f /etc/logstash/conf.d/nginx.conf --config.test_and_exit
检查完毕之后,进入你的nginx虚拟主机配置文件所在的目录中,新建一个虚拟主机配置文件:
[root@lb ~]# cd /usr/local/nginx/conf/vhost/
[root@lb ~]# vim elk.conf
server {
      listen 80;
      server_name elk.test.com;

      location / {
          proxy_pass      http://192.168.77.128:5601;
          proxy_set_header Host   $host;
          proxy_set_header X-Real-IP      $remote_addr;
          proxy_set_header X-Forwarded-For $proxy_add_x_forwarded_for;
      }

      access_log  /tmp/elk_access.log main2;
}
配置nginx的主配置文件,因为需要配置日志格式,在 log_format combined_realip 那一行的下面增加以下内容:
[root@lb ~]# vim /usr/local/nginx/conf/nginx.conf
log_format main2 '$http_host $remote_addr - $remote_user [$time_local] "$request" '
                      '$status $body_bytes_sent "$http_referer" '
                      '"$http_user_agent" "$upstream_addr" $request_time';
完成以上配置文件的编辑之后,检测配置文件有没有错误,没有的话就reload重新加载:
[root@lb ~]# nginx -t
[root@lb ~]# nginx -s reload
访问成功后,查看生成的日志文件:
[root@lb ~]#  ls /tmp/elk_access.log
/tmp/elk_access.log
[root@lb ~]#  wc -l !$
wc -l /tmp/elk_access.log
60 /tmp/elk_access.log    #nginx的访问日志已经生成
[root@lb ~]# systemctl restart logstash
重启完成后,在es服务器上检查是否有nginx-test开头的索引生成:
[root@lb01 ~]# curl '192.168.11.61:9200/_cat/indices?v'
health status index                           uuid                   pri rep docs.count docs.deleted store.size pri.store.size
green  open   .kibana                         -8Yy0C2GQWOgNQxnAdSlug   1   1          7            0    108.4kb         54.2kb
green  open   nginx-test-2020.04.29           SAsQdgVPTkSI82OIr0jrYg   5   1      27458            0      6.2mb          3.1mb
#可以看到,nginx-test索引已经生成了
这时候可以进入kibana的web页面进行索引的配置;

9、使用beats采集日志
之前也介绍过beats是ELK体系中新增的一个工具,它属于一个轻量的日志采集器,以上我们使用的日志采集工具是logstash,但是logstash占用的资源比较大,没有beats轻量,所以官方也推荐使用beats来作为日志采集工具。而且beats可扩展,支持自定义构建。
在 192.168.11.63 上安装filebeat,filebeat是beats体系中用于收集日志信息的工具
[root@lb03 ]# cd /usr/local
[root@lb03 local]# rpm -ivh filebeat-6.4.0-x86_64.rpm
安装完成之后编辑配置文件:
[root@lb03 local]# vim /etc/filebeat/filebeat.yml
filebeat.prospectors:
- type: log
   #enabled: false 这一句要注释掉
   paths:
      - /var/log/messages  # 指定需要收集的日志文件的路径

#output.elasticsearch:  # 先将这几句注释掉
  # Array of hosts to connect to.
#  hosts: ["localhost:9200"]

output.console:  # 指定在终端上输出日志信息
  enable: true
配置完成之后,执行以下命令,看看是否有在终端中打印日志数据,有打印则代表filebeat能够正常收集日志数据:
[root@lb03 local]# filebeat -c /etc/filebeat/filebeat.yml
以上的配置只是为了测试filebeat能否正常收集日志数据,接下来我们需要再次修改配置文件,将filebeat作为一个服务启动:
[root@lb03 local]# vim /etc/filebeat/filebeat.yml
#output.console:  把这两句注释掉
#  enable: true

# 把这两句的注释去掉
output.elasticsearch:
  # Array of hosts to connect to.
  hosts: ["192.168.11.61:9200"]  # 并配置es服务器的ip地址
修改完成后启动filebeat服务
[root@lb03 local]# systemctl start filebeat
启动成功后,到es服务器上查看索引,可以看到新增了一个以filebeat开头的索引,这就代表filesbeat和es能够正常通信了:
[root@lb01 ~]# curl '192.168.11.61:9200/_cat/indices?v'
health status index                           uuid                   pri rep docs.count docs.deleted store.size pri.store.size
green  open   filebeat-6.4.0-2020.04.30       Pj8aoYx0TS68g5CKMuOWwg   3   1       8411            0      2.5mb          1.2mb
现在可以通过kibana进行添加索引,查看日志
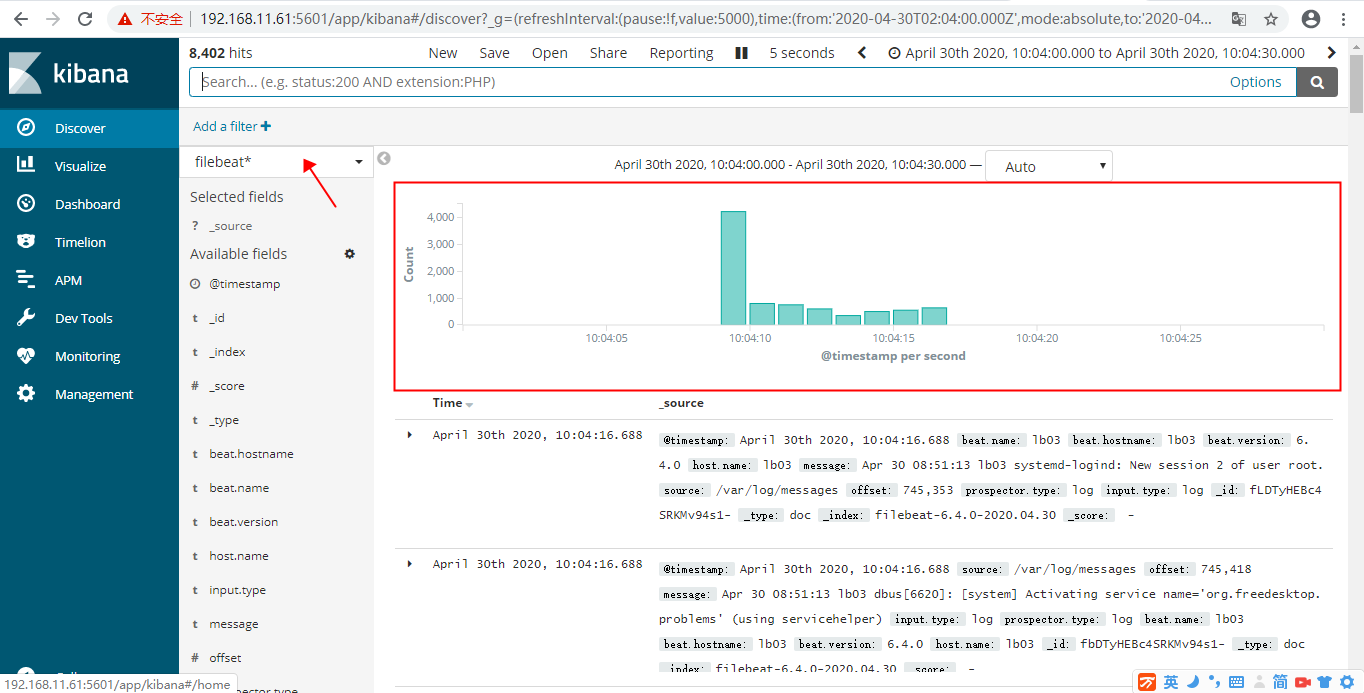
以上这就是如何使用filebeat进行日志的数据收集,可以看到配置起来比logstash要简单,而且占用资源还少。


 浙公网安备 33010602011771号