

Swagger使用简介
在之前开发时,前端人员总是说:“调好的参数怎么改了?接口不通了,能不能说一下”
我说:“1.文档不够详情,我怎么返回你所想要的数据 2.我改完接口也告诉你了 3.这样吧!我以后改接口直接告诉你调式”
后来我看了一篇文章,既可以解决前后端的矛盾,也可以提高工作效率 这就是Swagger
一:swagger是什么?
二:为什么使用swagger?
三:如何搭建一个swagger?
四:在项目中如何集成swagger?
五:是那个用swagger需要注意的问题
六:总结
一:Swagger是什么?
Swagger是一款RESTFUL接口的文档在线自动生成+功能测试功能软件。Swagger是一个规范和完整的框架,用于生成、描述、调用和可视化RESTfu风格的web服务。目标是使客户端和文件系统作为服务器一同样的速度来更新文件的方法,参数和模型紧密集成到服务器。这个解释简单点来讲就是说,swagger是一款可以根据restful风格生成的接口开发文档,并且支持做测试的一款中间软件。
二:为什么使用swagger?
1.对于后端开发人员来说
- 不用再手写Wiki接口拼大量参数,避免手写错误
- 对代码侵入性低,采用全注解的方式,开发简单
- 方法参数名修改、新增、减少参数都可以直接生效,不用手动维护
- 缺点:增加了开发成本,写接口还得再写一套参数配置
2.对前端开发来说
- 后端只需要定义好接口,会自动生成文档,接口功能、参数一目了然
- 联调方便,如果出了问题,直接测试接口,实时检查参数和返回值,就可以快速定位是前端还是后端的问题
3.对于测试
- 但对于测试没有前端界面UI的功能,可以直接用它来测试接口
- 操作简单,不用了解具体代码就可以操作
三:如何搭建一个swagger?
- 在引入swagger的依赖,目前推荐使用2.7.0版本的,因为2.6.0版本有bug,而其他版本有没有经验验证
①引入swagger 依赖库
<!--swagger-->
<dependency>
<groupId>io.springfox</groupId>
<artifactId>springfox-swagger2</artifactId>
<version>2.7.0</version>
</dependency>
<dependency>
<groupId>io.springfox</groupId>
<artifactId>springfox-swagger-ui</artifactId>
<version>2.7.0</version>
</dependency>
②springboot整合swagger
@Configuration
@EnableSwagger2
public class SwaggerConfig {

    @Bean
    public Docket productApi(){
        return new Docket(DocumentationType.SWAGGER_2).
                apiInfo(apiInfo()).
                select().
                apis(RequestHandlerSelectors.withMethodAnnotation(ApiOperation.class)).//添加ApiOpentaion注解的被扫描
                paths(PathSelectors.any()).
                build();
    }

    private ApiInfo apiInfo(){
        return new ApiInfoBuilder().
                title("swagger和springboot整合").
                description("swagger的api文档").
                version("1.0").build();
    }
}

swagger的注解:
swagger的核心在于注解,接下来就着重说一下swagger的注解
| 注解名称 | 注解含义 |
注解使用地方 |
注解参数 | 参数含义 |
| @EnableSwagger2 | 开启swagger注解 | 配置类上 | 无 | 无 |
| @Api | 标识swagger识别的类 | Controller类上 |
value tags description
|
url的路径值 如果设置这个值、value的值会被覆盖 对api资源的描述
|
| @ApiIgore | 屏蔽显示某个Controller,开启后在swagger上不会显示 | COntroller类上 | value | 值 |
| @ApiOperation | 标识swagger识别的方法 | Controller类中的方法 |
value tags description basePath position produces consumes protocols authorizations hidden response responseContainer httpMethod code extensions notes |
url的路径值 如果设置这个值、value的值会被覆盖 对api资源的描述 基本路径可以不配置 如果配置多个Api 想改变显示顺序位置 For example,"application/json,application/xml" For example,"application/json,application/xml" Possible values:http,https,ws,wss 高级特性认证时配置 配置为true将在文档中隐藏 返回的对象 这些对象是有效的“List”,“Set”or “Map”,其他无效 “GET”、“HEAD”、“POST”、“PUT”、“DELETE”、“OPTIONS”and "PATCh" http的状态码 默认200 扩展属性 用于提示内容 |
| @ApiImpliciParam | 修饰方法中的参数 | 用在@ApiImplicitParams注解中对,指定一个请求参数的各个方面 |
paramType name value dataType required defaultValue |
参数放在哪个地方 参数代表的含义 参数名称 参数类型,有String/int,无用 是否必要 参数的默认值 |
| @ApiImpliciParams | 修饰方法中的参数 |
用在方法上包含一组参数说明 |
@ApiImpliciParam | ApiImpliciParam的数组集合 |
| @ApiResponse |
修饰方法的返回值 |
方法上或方法的参数上 |
code message class |
方法返回值状态码 方法返回值信息 方法返回class |
| @ApiResponses |
响应集配置 |
方法上或参数上 | @ApiResponse | ApiResponse的数组集合 |
| @ApiParam | 映射方法上的参数 | 方法的参数上 |
name value defaultValue allowableValues required access allowMutiple hidden example |
属性名称 属性值 默认属性值 可以不配置 是否属性必填 不过多描述 默认为false 隐藏该属性 举例子 |
|
@ApiModel |
用于类,表示对类进行说明,用于参数用实体类接受 | 类上 |
value description |
类名 描述 |
| @ApiModelProperty | 标识一个类的属性 | 类的字段上 |
value name dateType required example hidden |
字段说明 重写属性名字 重写属性类型 是否必填 举例子 隐藏 |
四:在项目中如何集成swagger?
①在controller中使用注解
import io.swagger.annotations.*;
import org.springframework.web.bind.annotation.PostMapping;
import org.springframework.web.bind.annotation.RequestMapping;
import org.springframework.web.bind.annotation.RequestParam;
import org.springframework.web.bind.annotation.RestController;

@RestController
@Api(value = "测试TTestController",tags = {"测试访问接口"})
@RequestMapping("test")

public class TTestController {

    @ApiOperation(value = "添加测试数据")
    @PostMapping("/insertInfo")
    @ApiResponses(value = {
            @ApiResponse(code = 1000,message = "成功"),
            @ApiResponse(code = 1001,message = "失败"),
            @ApiResponse(code = 1002,message = "缺少参数",response = TestUser.class)
    })
    public String insertInfo(@ApiParam("用户名字") @RequestParam("userName") String userName,
                             @ApiParam(value = "年龄",allowEmptyValue = true) @RequestParam("age") Integer age){
        String username = userName;
        Integer Age = age;
        return username+age.toString();
    }
}
import io.swagger.annotations.ApiModel;
import io.swagger.annotations.ApiModelProperty;

@ApiModel(value = "testUser",description = "用户")
public class TestUser {

    @ApiModelProperty(value = "用户名字", name = "userName", dataType = "String")
    private String userName;

    private Integer age;

    public Integer getAge() {
        return age;
    }

    public void setAge(Integer age) {
        this.age = age;
    }

    public String getUserName() {
        return userName;
    }

    public void setUserName(String userName) {
        this.userName = userName;
    }
}
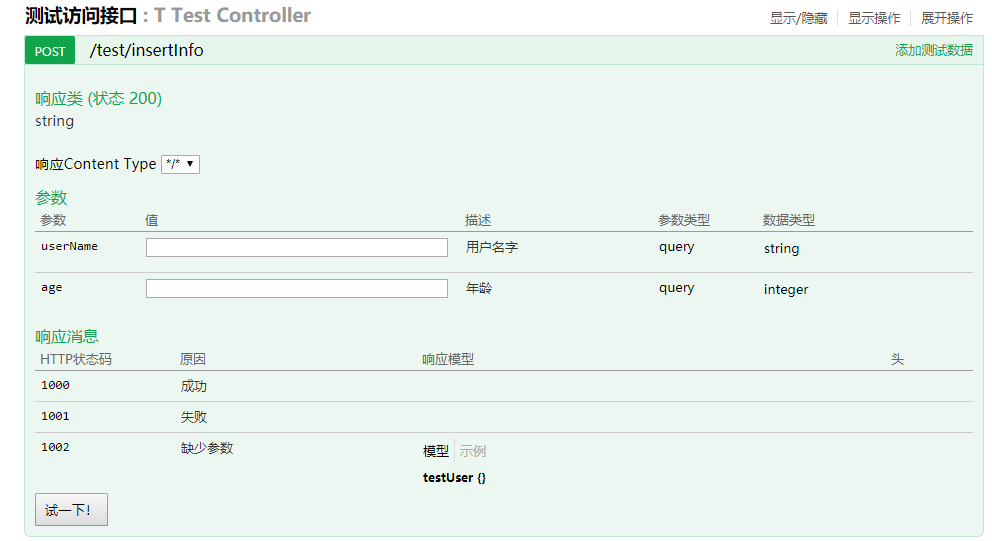
②访问本地链接
http://localhost:8080/swagger-ui.html
五:是那个用swagger需要注意的问题
①:对于只有一个HttpServletRequest参数的方法,如果参数小于5个,推荐使用 @ApiImplicitParams的方式单独封装每一个参数;如果参数大于5个,采用定义一个对象去封装所有参数的属性,然后使用@APiParam的方式
②默认的访问地址:ip:port/swagger-ui.html#/,但是在shiro中,会拦截所有的请求,必须加上默认访问路径(比如项目中,就是
ip:port/context/swagger-ui.html#/),然后登陆后才可以看到
③在GET请求中,参数在Body体里面,不能使用@RequestBody。在POST请求,可以使用@RequestBody和@RequestParam,如果使用@RequestBody,对于参数转化的配置必须统一
④ controller必须指定请求类型,否则swagger会把所有的类型(6种)都生成出来
⑤: swagger在生产环境不能对外暴露,可以使用@Profile({“dev”, “prod”,“pre”})指定可以使用的环境
六:总结
swagger作为一款辅助性的工具,能大大提升我们的和前端的沟通效率,接口是一个非常重要的传递数据的媒介,每个接口的签名、方法参数都非常重要。一个良好的文档非常重要,如果采用手写的方式非常容易拼写错误,而swagger可以自动化生成参数文档,这一切都加快了我们的沟通效率。并且可以替代postman的作用。实在是开发编程必备良品啊。

 浙公网安备 33010602011771号