Tomcat中的设计模式
摘要:本文主要介绍了Tomcat中使用的设计模式。
今天我们来聊聊Tomcat运用到的设计模式。通过阅读之前的源码我们了解到Tomcat中使用了很多设计模式,例如我们在看代码中提到的工厂,模版等设计模式。今天这篇文章我们来总结下Tomcat中使用的常见的设计模式,通过学习Tomcat中使用设计模式的方式能给我们以后的程序设计中提供一定的借鉴作用。最后需要提一下,我们这篇文章只关注Tomcat内部对于设计模式的使用,并不会花大量笔墨讲述设计模式的原理思想,读者可自己查询相关设计模式的资料。
工厂模式
工厂模式可以参考这篇文章:http://www.cnblogs.com/zhouqiang/archive/2012/07/20/2601365.html
示例一:
在Tomcat启动的过程中,调用Connector组件的startInternal()方法:
//代码清单1
protocolHandler.start();
继续深入
//代码清单2
endpoint.start();
继续深入
//代码清单3
 bind();
我们查看bind()方法:
//代码清单4
 @Override
public void bind() throws Exception {

    // Initialize thread count defaults for acceptor
    if (acceptorThreadCount == 0) {
        acceptorThreadCount = 1;
    }
    // Initialize maxConnections
    if (getMaxConnections() == 0) {
        // User hasn't set a value - use the default
        setMaxConnections(getMaxThreadsExecutor(true));
    }

    if (serverSocketFactory == null) {
        if (isSSLEnabled()) {
			//11 获取serverSocket的工厂类
            serverSocketFactory =
                handler.getSslImplementation().getServerSocketFactory(this);
        } else {
			//11 获取serverSocket的工厂类
            serverSocketFactory = new DefaultServerSocketFactory(this);
        }
    }

    if (serverSocket == null) {
        try {
            if (getAddress() == null) {
				//22  调用工厂类创建实例
                serverSocket = serverSocketFactory.createSocket(getPort(),
                        getBacklog());
            } else {
				//22  调用工厂类创建实例
                serverSocket = serverSocketFactory.createSocket(getPort(),
                        getBacklog(), getAddress());
            }
        } catch (BindException orig) {
            String msg;
            if (getAddress() == null)
                msg = orig.getMessage() + " <null>:" + getPort();
            else
                msg = orig.getMessage() + " " +
                        getAddress().toString() + ":" + getPort();
            BindException be = new BindException(msg);
            be.initCause(orig);
            throw be;
        }
    }

}
可以看到Tomcat在启动的过程中关于SeverSocket的生成使用的是工厂生成的而不是自己new出来的。实际上这些socket就是后期tomcat接收请求时的socket。我们再看一个例子。
示例二:
Tomcat在处理请求的时候,当请求到达StandardWrapperValve的invoke()方法中,在调用指定的servelt实例之前,先创建对应servlet的filterChain,代码如下:
//代码清单5
 //获取工厂实例
 ApplicationFilterFactory factory = ApplicationFilterFactory.getInstance();
//使用工厂实例创建 filterChain实例
 ApplicationFilterChain filterChain = factory.createFilterChain(request, wrapper, servlet);
模版模式
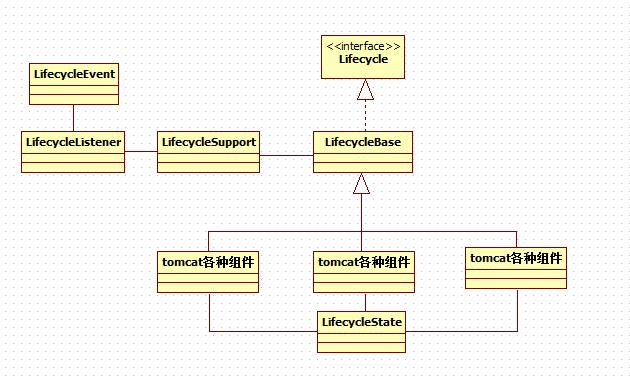
在讲解Tomcat中组件的生命周期管理的相关文章中,我们了解到Lifecycle接口的相关类图如下:

相关文章链接:http://www.cnblogs.com/coldridgeValley/p/5816406.html
我们都知道Tomcat在启动的过程中主要的两个方法init()和start(),这里我们以start()为例,LifecycleBase类中的start()方法:
 //代码清单6
  /**
 * {@inheritDoc}
 */
@Override
public final synchronized void start() throws LifecycleException {

	//1111111
    if (LifecycleState.STARTING_PREP.equals(state) || LifecycleState.STARTING.equals(state) ||
            LifecycleState.STARTED.equals(state)) {

        if (log.isDebugEnabled()) {
            Exception e = new LifecycleException();
            log.debug(sm.getString("lifecycleBase.alreadyStarted", toString()), e);
        } else if (log.isInfoEnabled()) {
            log.info(sm.getString("lifecycleBase.alreadyStarted", toString()));
        }

        return;
    }

    if (state.equals(LifecycleState.NEW)) {
        init();
    } else if (state.equals(LifecycleState.FAILED)) {
        stop();
    } else if (!state.equals(LifecycleState.INITIALIZED) &&
            !state.equals(LifecycleState.STOPPED)) {
        invalidTransition(Lifecycle.BEFORE_START_EVENT);
    }

    setStateInternal(LifecycleState.STARTING_PREP, null, false);

    try {
		//2222222222
        startInternal();
    } catch (Throwable t) {
        // This is an 'uncontrolled' failure so put the component into the
        // FAILED state and throw an exception.
        ExceptionUtils.handleThrowable(t);
        setStateInternal(LifecycleState.FAILED, null, false);
        throw new LifecycleException(sm.getString("lifecycleBase.startFail", toString()), t);
    }
	//33333333
    if (state.equals(LifecycleState.FAILED)) {
        // This is a 'controlled' failure. The component put itself into the
        // FAILED state so call stop() to complete the clean-up.
        stop();
    } else if (!state.equals(LifecycleState.STARTING)) {
        // Shouldn't be necessary but acts as a check that sub-classes are
        // doing what they are supposed to.
        invalidTransition(Lifecycle.AFTER_START_EVENT);
    } else {
		//4444444444
        setStateInternal(LifecycleState.STARTED, null, false);
    }
}
可以看到首先每个组件都会调用start()方法,都会调用到上面贴出来的LifecycleBase类中的start()方法。在标注1到标注2的地方可以看出都是一些通用的方法,例如日志的记录,组件状态的检查。但是每个子组件又会根据启动做一些自己特殊的动作,所以在标注2的地方调用了startInternal()方法。我们查看startInternal()方法:
//代码清单7
protected abstract void startInternal() throws LifecycleException;
这个是一个抽象方法,是需要子类去实现的,所以子类调用start()方法,最终调用的子类的实现的startInternal()方法。而标注3到最后也都是一些公共的方法。所以我们来总结Tomcat中的模版设计模式就是把公共的动作抽象到父类中,在父类的方法中调用一些抽象方法,而这些抽象方法留给子类去实现,从而完成公共动作和特殊动作的分离。
观察者模式
我们继续上一个模版设计模式的代码继续看,也就是代码清单6标注4的地方的代码:
//代码清单8
//4444444444
setStateInternal(LifecycleState.STARTED, null, false);
继续查看其代码:
//代码清单9
private synchronized void setStateInternal(LifecycleState state,
        Object data, boolean check) throws LifecycleException {

    if (log.isDebugEnabled()) {
        log.debug(sm.getString("lifecycleBase.setState", this, state));
    }

    if (check) {
        // Must have been triggered by one of the abstract methods (assume
        // code in this class is correct)
        // null is never a valid state
        if (state == null) {
            invalidTransition("null");
            // Unreachable code - here to stop eclipse complaining about
            // a possible NPE further down the method
            return;
        }

        // Any method can transition to failed
        // startInternal() permits STARTING_PREP to STARTING
        // stopInternal() permits STOPPING_PREP to STOPPING and FAILED to
        // STOPPING
        if (!(state == LifecycleState.FAILED ||
                (this.state == LifecycleState.STARTING_PREP &&
                        state == LifecycleState.STARTING) ||
                (this.state == LifecycleState.STOPPING_PREP &&
                        state == LifecycleState.STOPPING) ||
                (this.state == LifecycleState.FAILED &&
                        state == LifecycleState.STOPPING))) {
            // No other transition permitted
            invalidTransition(state.name());
        }
    }

    this.state = state;
    String lifecycleEvent = state.getLifecycleEvent();
    if (lifecycleEvent != null) {
		//1111111
        fireLifecycleEvent(lifecycleEvent, data);
    }
}
继续查看标注1的地方:
//代码清单10
protected void fireLifecycleEvent(String type, Object data) {
    lifecycle.fireLifecycleEvent(type, data);
}
最终调用的是LifecycleSupport类的fireLifecycleEvent()方法:
//代码清单11
 public void fireLifecycleEvent(String type, Object data) {

    LifecycleEvent event = new LifecycleEvent(lifecycle, type, data);
    LifecycleListener interested[] = listeners;
    for (int i = 0; i < interested.length; i++)
        interested[i].lifecycleEvent(event);

 }
也就是在Tomcat的组件生命周期状态只要一变化,Tomcat就会通知改组件的所有的观察者,把状态变化通知到所有的观察者,看是否有观察者对相关组件的状态变化感兴趣。
责任链模式
我们在讲解Tomcat内部的Pipeline 机制的时候写过这样一篇文章: http://www.cnblogs.com/coldridgeValley/p/5816414.html
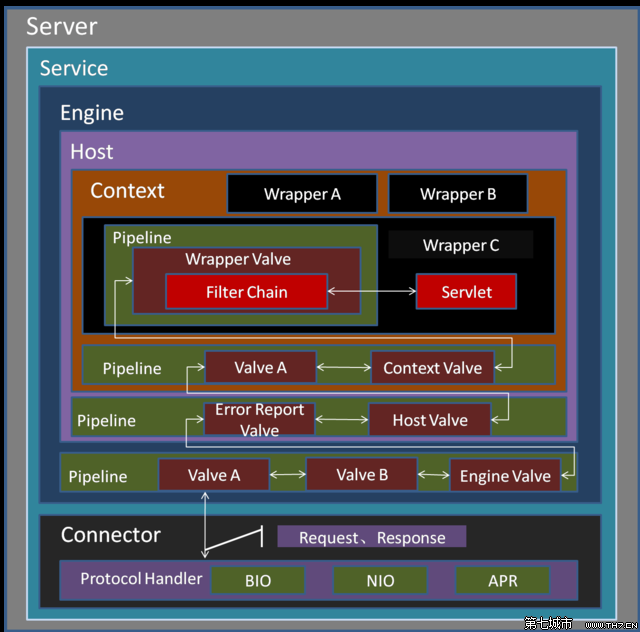
在这篇文章中,我们引用过如下一张图片

当时我们讲解Pipeline的时候使用这张图片主要是为了介绍Valve这个概念。其实如果读过之前的关于Tomcat处理Http请求的文章(http://www.cnblogs.com/coldridgeValley/p/6234629.html),那么我们可以清楚的从这张图上看到整个Http请求被处理的流程。
- 请求被
Connector组件接收,创建Request和Response对象。 Connector将Request和Response交给Container,先通过Engine的pipeline组件流经内部的每个Valve。- 请求流转到
Host的pipeline组件中,并且经过内部Valve的过滤。 - 请求流转到
Context的pipeline组件中,并且经过内部的Valve的过滤。 - 请求流转到
Wrapper的pipeline组件中,并且经过内部的Valve的过滤。 Wrapper内部的WrapperValve创建FilterChain实例,调用指定的Servlet实例处理请求。- 返回
可以从以上流程中看到这个是一个标准的责任链模式,请求经过一个组件过滤后到下一个组件,每个组件只处理自己相关的事务。
外观模式
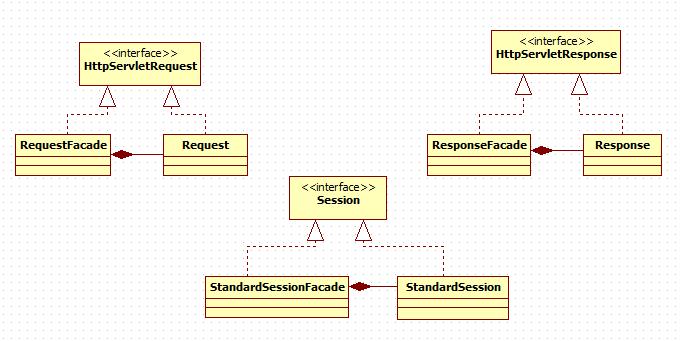
外观设计模式又叫门面设计模式,外观模式主要功能是封装了子系统的具体实现,提供统一的外观类给外部系统,这样当子系统内部实现发生变化的时候,不会影响到外部系统。
Tomcat内部使用了大量的外观设计模式。

从上图可以看到,request,response,session等常用类都使用了外观设计模式。我们以我们常用的session类说明。
我们都知道我们在写servlet的时候,使用session的方式是request.getSession(),首先我们这里的request具体的类是RequestFacade,我们查看getSession()方法:
//代码清单12
    @Override
public HttpSession getSession() {

    if (request == null) {
        throw new IllegalStateException(
                        sm.getString("requestFacade.nullRequest"));
    }

    return getSession(true);
}

/**
 * The wrapped request.
 */
protected Request request = null;


@Override
public HttpSession getSession(boolean create) {

    if (request == null) {
        throw new IllegalStateException(
                        sm.getString("requestFacade.nullRequest"));
    }

    if (SecurityUtil.isPackageProtectionEnabled()){
        return AccessController.
            doPrivileged(new GetSessionPrivilegedAction(create));
    } else {
		//111
        return request.getSession(create);
    }
}
可以在标注1的地方看到,方法最后是委托给了request,而request是Request的实例。继续查看Request类的getSession()方法。
//代码清单13
@Override
public HttpSession getSession(boolean create) {
	//1111
    Session session = doGetSession(create);
    if (session == null) {
        return null;
    }
	//2222
    return session.getSession();
}
doGetSession方法我们就不查看了,之前在讲解Session相关的文章中查看过了,在标注1的地方,我们可以看到返回的是session对象,而Session是接口,他的默认标准实现类是StandardSession,在标注2的地方又调用了该类的getSession()方法,所以我们查看下StandardSession类的getSession()方法。
//代码清单14
/**
 * Return the <code>HttpSession</code> for which this object
 * is the facade.
 */
@Override
public HttpSession getSession() {

    if (facade == null){
        if (SecurityUtil.isPackageProtectionEnabled()){
            final StandardSession fsession = this;
            facade = AccessController.doPrivileged(
                    new PrivilegedAction<StandardSessionFacade>(){
                @Override
                public StandardSessionFacade run(){
                    return new StandardSessionFacade(fsession);
                }
            });
        } else {
            facade = new StandardSessionFacade(this);
        }
    }
    return (facade);

}
可以很清楚的看到,最后返回的是StandardSessionFacade对象,我们查看下该类的构造函数:
//代码清单15
    /**
 * Construct a new session facade.
 *
 * @param session The session instance to wrap
 */
public StandardSessionFacade(StandardSession session) {
    super();
    this.session = session;
}


/**
 * Wrapped session object.
 */
private HttpSession session = null;
Tomcat使用外观设计模式主要是为了保证主要类的安全,防止程序员使用核心类的不需要暴露出去的功能。


