AmpliGraph 使用记录
参考官方文档:https://docs.ampligraph.org/en/1.4.0/index.html
由于笔者的电脑装最新的 Ampligrah 2.0 时总会报错,所以先装的老版本 1.4。
后面为了和小组成员统一环境,又装到最新的 2.0 版本了。
AmpliGraph 1.4
安装:
conda、CUDA 和 CUDnn 的安装略。
参考 https://docs.ampligraph.org/en/1.4.0/install.html
conda create --name ampligraph python=3.7
conda activate ampligraph
conda install tensorflow-gpu==1.5
pip install ampligraph
运行 example
python 运行 https://docs.ampligraph.org/en/1.4.0/examples.html 中的 Train and evaluate an embedding model 的 example:
example
import numpy as np
from ampligraph.datasets import load_wn18
from ampligraph.latent_features import ComplEx
from ampligraph.evaluation import evaluate_performance, mrr_score, hits_at_n_score

def main():

    # load Wordnet18 dataset:
    X = load_wn18()

    # Initialize a ComplEx neural embedding model with pairwise loss function:
    # The model will be trained for 300 epochs.
    model = ComplEx(batches_count=10, seed=0, epochs=20, k=150, eta=10,
                    # Use adam optimizer with learning rate 1e-3
                    optimizer='adam', optimizer_params={'lr':1e-3},
                    # Use pairwise loss with margin 0.5
                    loss='pairwise', loss_params={'margin':0.5},
                    # Use L2 regularizer with regularizer weight 1e-5
                    regularizer='LP', regularizer_params={'p':2, 'lambda':1e-5},
                    # Enable stdout messages (set to false if you don't want to display)
                    verbose=True)

    # For evaluation, we can use a filter which would be used to filter out
    # positives statements created by the corruption procedure.
    # Here we define the filter set by concatenating all the positives
    filter = np.concatenate((X['train'], X['valid'], X['test']))

    # Fit the model on training and validation set
    model.fit(X['train'],
              early_stopping = True,
              early_stopping_params = \
                      {
                          'x_valid': X['valid'],       # validation set
                          'criteria':'hits10',         # Uses hits10 criteria for early stopping
                          'burn_in': 100,              # early stopping kicks in after 100 epochs
                          'check_interval':20,         # validates every 20th epoch
                          'stop_interval':5,           # stops if 5 successive validation checks are bad.
                          'x_filter': filter,          # Use filter for filtering out positives
                          'corruption_entities':'all', # corrupt using all entities
                          'corrupt_side':'s+o'         # corrupt subject and object (but not at once)
                      }
              )


    # Run the evaluation procedure on the test set (with filtering).
    # To disable filtering: filter_triples=None
    # Usually, we corrupt subject and object sides separately and compute ranks
    ranks = evaluate_performance(X['test'],
                                 model=model,
                                 filter_triples=filter,
                                 use_default_protocol=True, # corrupt subj and obj separately while evaluating
                                 verbose=True)

    # compute and print metrics:
    mrr = mrr_score(ranks)
    hits_10 = hits_at_n_score(ranks, n=10)
    print("MRR: %f, Hits@10: %f" % (mrr, hits_10))
    # Output: MRR: 0.886406, Hits@10: 0.935000

if __name__ == "__main__":
    main()
笔者的电脑 TensorFlow 会报错:
ImportError: cannot import name ‘trace‘ from ‘tensorflow.python.profiler
百度一下,发现 https://blog.csdn.net/xiaoqiaoliushuiCC/article/details/123337109
得知是 tensorflow-estimator 与 tensorflow 的版本不匹配。
在 ampligraph 虚拟环境下运行:
conda install tensorflow-estimator=1.15
即解决问题。
笔者笔记本的独显为 NVIDIA GeForce RTX 2060 ,一个 epoch 的训练大概耗时1s。
最后训练出来的指标为:
MRR: 0.878728, Hits@10: 0.932500
loss 可视化:
参考
https://docs.ampligraph.org/en/1.4.0/generated/ampligraph.latent_features.TransE.html#ampligraph.latent_features.TransE.init
中对fit 参数的解释。
按下图操作
然后在浏览器打开 http://localhost:6006/ 即可。
ampligraph 默认吧每个epoch 的 loss 添加加到了 Tensorboard 中。
如果设置了周期检查指标,指标也被添加到 Tensorboard 中。
下图即为上文中 example 的 loss 变化图。

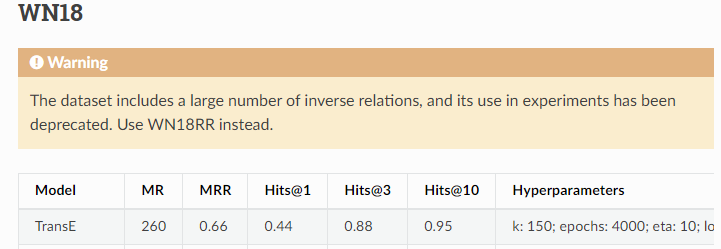
transE 跑 WN18
参数参考:
https://docs.ampligraph.org/en/1.4.0/experiments.html
初始化 model 的超参数代码如下:
    model = TransE(k=350, eta=30, epochs=4000, batches_count=150, seed=0,
                   embedding_model_params={'norm': 1, 'normalize_ent_emb': False},
                   optimizer='adam', optimizer_params={'lr': 0.0001},
                   loss='multiclass_nll', loss_params={},
                   regularizer="LP", regularizer_params={'p' : 3, 'lambda' : 0.0001},
                   initializer='xavier', initializer_params={'uniform': False}, verbose=True)
由于时间不够,先 epochs=4000/10=400
然后每 40 epochs 用 hits10 criteria valid 一次
得到效果如下:


MRR: 0.583311, Hits@10: 0.940900
官方文档给出 epochs = 4000 的 criteria 如下
AmpliGraph 2.0
安装见官方文档:
https://docs.ampligraph.org/en/2.0.0/install.html
如果遇到问题,一般是依赖的库的版本不对,去网上搜搜指令装即可。
2.0 把 model 的 init 和 fit 部分拆分成了几步,使得代码更加美观(当然内部可能代码重构了)。
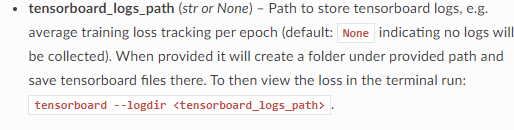
有点不好的地方是2.0 中的 fit 的 tensorboard_logs_path 不见了,如果需要用 tensorboard,要额外写代码。
AmpliGraph 2.0 提供了 compat 库,用于跑 1.X 的代码,
详细见:
https://docs.ampligraph.org/en/2.0.0/ampligraph.latent_features.html#module-ampligraph.compat
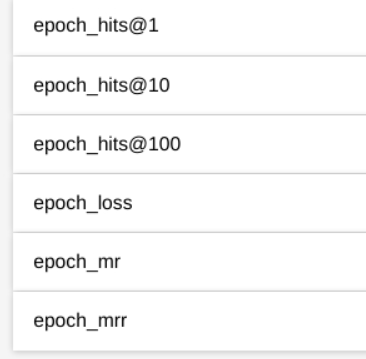
这样就可以用 tensorboard_logs_path, 2.0 的 tensorboard 中多添加了几个观测量:
下面是一个参考用法:
TransE on WN18
import numpy as np
from ampligraph.datasets import load_wn18
from ampligraph.compat import TransE
from ampligraph.compat import evaluate_performance
from ampligraph.evaluation import mrr_score, hits_at_n_score
from ampligraph.utils import save_model, restore_model
import tensorflow as tf

# Loaders for Custom Knowledge Graphs
'''
def load_dataset(PATH_TO_FOLDER):
    return {
        'train' : load_from_csv(PATH_TO_FOLDER, "train.txt"),
        'test' : load_from_csv(PATH_TO_FOLDER, "test.txt"),
        'valid' : load_from_csv(PATH_TO_FOLDER, "valid.txt")
    }
X = load_dataset(r"./WN18")
'''

# load Wordnet18 dataset:
X = load_wn18()

# Initialize a ComplEx neural embedding model: the embedding size is k,
# eta specifies the number of corruptions to generate per each positive,
# scoring_type determines the scoring function of the embedding model.
model = TransE(k=350, eta=30, epochs=1, batches_count=150, seed=0,
            embedding_model_params={'norm': 1, 'normalize_ent_emb': False},
            optimizer='adam', optimizer_params={'lr': 0.0001},
            loss='multiclass_nll', loss_params={},
            regularizer="LP", regularizer_params={'p' : 3, 'lambda' : 0.0001},
            initializer='xavier', initializer_params={'uniform': False}, verbose=True)

# For evaluation, we can use a filter which would be used to filter out
# positives statements created by the corruption procedure.
# Here we define the filter set by concatenating all the positives
filter = {'test' : np.concatenate((X['train'], X['valid'], X['test']))}

model.fit(X['train'],
        tensorboard_logs_path = "tensorboardLogsPath_transE_WN18",
        verbose = True,
        early_stopping = True,
        early_stopping_params = \
                {
                    'x_valid': X['valid'],       # validation set
                    'criteria':'hits10',         # Uses hits10 criteria for early stopping
                    'burn_in': 0,              # early stopping kicks in after 100 epochs
                    'check_interval':40,         # validates every 20th epoch
                    'stop_interval':100,           # stops if 5 successive validation checks are bad.
                    'x_filter': filter,          # Use filter for filtering out positives
                    'corruption_entities':'all', # corrupt using all entities
                    'corrupt_side':'s+o'         # corrupt subject and object (but not at once)
                }
        )


ranks = evaluate_performance(X['test'],
                                model=model,
                                filter_triples=filter,
                                verbose=True)

# compute and print metrics:
mrr = mrr_score(ranks)
hits_10 = hits_at_n_score(ranks, n=10)
print("MRR: %f, Hits@10: %f" % (mrr, hits_10))


example_name = "transE_WN18.pkl"
save_model(model, model_name_path=example_name)

old_model = restore_model(model_name_path=example_name)
对已经保存的Model,使用 restore 读取后,跑evaluate会发现 data_shape 缺失,需要补充。

 浙公网安备 33010602011771号