coding++:maven根据不同的运行环境,打包不同的配置文件
1、使用maven管理项目中的依赖,非常的方便。同时利用maven内置的各种插件,在命令行模式下完成打包、部署等操作,可方便后期的持续集成使用。
2、但是每一个maven工程(比如web项目),开发人员在开发时,会使用一种配置文件,比如数据库配置,而测试环境可能使用另一种配置文件。
3、打包完成后,手动调整配置文件,工作重复度很高,因此查找方法,实现“maven根据不同的运行环境,打包不同的配置文件”的目的。
pom.xml中增加插件:
主要关注标红的插件maven-resources-plugin,以及标红的配置部分。
注意:目前经过测试,发现resources目录文件拷贝会在validation阶段之后compile阶段之前执行,为了保证指定环境的配置文件在resources目录拷贝之后执行,使用compile阶段;
overwrite设置为true,强制覆盖原有文件。
使用maven-resources-plugin插件,在compile阶段实现指定目录中配置文件的拷贝操作。
<build>
    <finalName>Lantech</finalName>
    <plugins>
        <plugin>
            <groupId>org.apache.maven.plugins</groupId>
            <artifactId>maven-compiler-plugin</artifactId>
            <version>3.1</version>
            <configuration>
                <source>${java.version}</source>
                <target>${java.version}</target>
                <encoding>UTF-8</encoding>
            </configuration>
        </plugin>
        <!-- 不同环境的配置文件选择 (也可忽略此插件:因为小编目前没发现有啥用)-->
        <plugin>
            <groupId>org.apache.maven.plugins</groupId>
            <artifactId>maven-resources-plugin</artifactId>
            <version>2.6</version>
            <executions>
                <execution>
                    <id>copy-resources</id>
                    <phase>compile</phase>
                    <goals>
                        <goal>copy-resources</goal>
                    </goals>
                    <configuration>
              <!-- 覆盖原有文件 -->
              <overwrite>true</overwrite>
                        <outputDirectory>${project.build.outputDirectory}</outputDirectory>
                        <!-- 也可以用下面这样的方式(指定相对url的方式指定outputDirectory) <outputDirectory>target/classes</outputDirectory> -->
                        <!-- 待处理的资源定义 -->
                        <resources>
                            <resource>
                                <!-- 指定resources插件处理哪个目录下的资源文件 -->
                                <directory>src/main/resources/${package.environment}</directory>
                                <filtering>false</filtering>
                            </resource>
                        </resources>
                    </configuration>
                    <inherited>true</inherited>
                </execution>
            </executions>
        </plugin>
    </plugins>
    <resources>
        <resource>
            <directory>src/main/java</directory>
            <includes>
                <include>**/*.properties</include>
                <include>**/*.xml</include>
            </includes>
            <filtering>true</filtering>
        </resource>
        <resource>
            <directory>src/main/resources</directory>
            <includes>
                <include>**/*.properties</include>
                <include>**/*.xml</include>
            </includes>
            <filtering>true</filtering>
        </resource>
    </resources>
</build>
pom.xml中增加profiles配置(必写)
使用profiles可为maven命令执行时,激活不同的变量,并依据此变量同上述的插件配合,完成指定目录中配置文件拷贝操作。
<profiles>
    <profile>
        <id>dev</id>
        <properties>
            <package.environment>dev</package.environment>
            <com.send.ip>39.105.100.186</com.send.ip>
        </properties>
    </profile>
    <profile>
        <id>test</id>
        <properties>
            <package.environment>test</package.environment>
            <com.send.ip>39.105.100.187</com.send.ip>
        </properties>
    </profile>
    <profile>
        <id>product</id>
        <!-- 是否默认 true表示默认-->
        <activation>
            <activeByDefault>true</activeByDefault>
        </activation>
        <properties>
            <package.environment>product</package.environment>
            <com.send.ip>39.105.100.189</com.send.ip>
        </properties>
</profile>
执行打包命令:
mvn clean package
mvn clean package -Pdev
mvn clean package -Ptest
mvn clean package -Pproduct
执行命令,指定-P参数,启用指定的profile。
项目中测试:
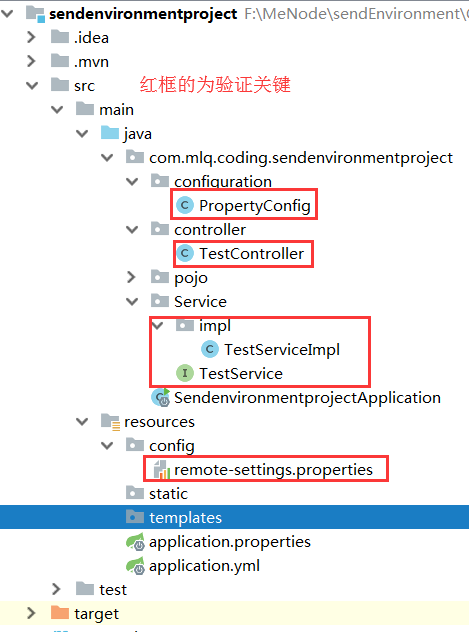
PropertyConfig:引入 *.properties 文件
package com.mlq.coding.sendenvironmentproject.configuration;

import org.springframework.context.annotation.Configuration;
import org.springframework.context.annotation.ImportResource;
import org.springframework.context.annotation.PropertySource;

@Configuration
@PropertySource(ignoreResourceNotFound = true, value = {"classpath:config/remote-settings.properties"})
//@ImportResource({"classpath:dubbo/*.xml"})
public class PropertyConfig {
}
TestController:访问测试
package com.mlq.coding.sendenvironmentproject.controller;

import com.mlq.coding.sendenvironmentproject.Service.TestService;
import org.springframework.beans.factory.annotation.Autowired;
import org.springframework.web.bind.annotation.RequestMapping;
import org.springframework.web.bind.annotation.RestController;

@RestController
public class TestController {

    @Autowired
    private TestService testService;

    @RequestMapping("/iptest")
    public void ipTest() {
        testService.show();
    }

}
TestService:测试接口
package com.mlq.coding.sendenvironmentproject.Service;

public interface TestService {

    void show();

}
TestServiceImpl:测试接口实现
package com.mlq.coding.sendenvironmentproject.Service.impl;

import com.mlq.coding.sendenvironmentproject.Service.TestService;
import org.springframework.beans.factory.annotation.Value;
import org.springframework.stereotype.Service;

@Service
public class TestServiceImpl implements TestService{

    //获取配置文件中的 ip
    @Value("${com.send.test.ip}")
    private String IP;

    @Override
    public void show() {
        System.out.println("返回参数为:{}"+IP);
    }
}
remote-settings.properties:获取不同环境下的 ip
############################################
# system config
############################################
# @com.send.ip@ 是在pom文件中配置的
com.send.test.ip=@com.send.ip@

 浙公网安备 33010602011771号