Shiro官方快速入门10min例子源码解析框架2-Session
Shiro自身维护了一套session管理组件,它可以独立使用,并不单纯依赖WEB/Servlet/EJB容器等环境,使得它的session可以任何应用中使用。
2-Session)主要介绍在quickstart例子中从获取Subject后,由初始化获取Session并写入读出session参数的完整过程。
同样,本篇本文使用的是shiro 1.3.2版本,配合源码最佳~
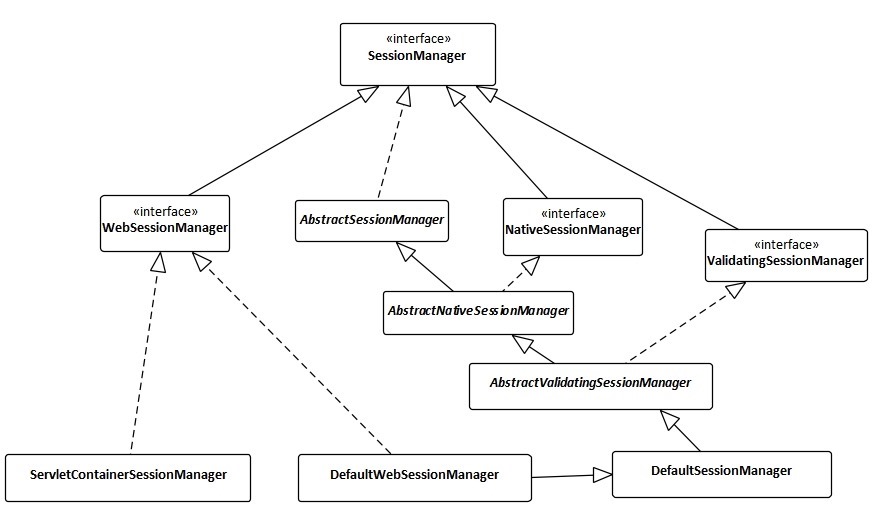
Shiro自身提供了SessionManager的三种实现来支持不同的模式
DefaultSessionManager:Shiro自身维护的session,可在普通应用环境使用
DefaultWebSessionManager:独立提供在shiro-web包中,继承SessionManager,并额外支持WEB相关方法
ServletContainerSessionManager:使用Servlet容器提供Session管理,提供少量额外方法
在samples-quickstart例子中使用到的是DefaultSessionManager。
篇1(Shiro官方快速入门10min例子源码解析框架1-初始化)中,1.2节DefaultSecurityManager是DefaultSessionManager的子类,在初始化DefaultSecurityManager时一同初始化DefaultSessionManager
在获取到Subject后,继续看samples-quickstart的代码如何获取和设置Session
Subject currentUser = SecurityUtils.getSubject();
2.1下一步是获取Session,调用Subject的getSession方法
Session session = currentUser.getSession();
DelegatingSubject中,getSession()若无参数,则调用getSession(true),如果不需要Shiro 的Session功能可以调用getSession(false),
public Session getSession() {
        return getSession(true);
    }
调用DelegatingSubject.getSession(true),前半部分是日志,及isSessionCreationEnabled()判断(默认为ture)
public Session getSession(boolean create) {
        if (log.isTraceEnabled()) {
            log.trace("attempting to get session; create = " + create +
                    "; session is null = " + (this.session == null) +
                    "; session has id = " + (this.session != null && session.getId() != null));
        }

        if (this.session == null && create) {

            //added in 1.2:
            if (!isSessionCreationEnabled()) {
                String msg = "Session creation has been disabled for the current subject.  This exception indicates " +
                        "that there is either a programming error (using a session when it should never be " +
                        "used) or that Shiro's configuration needs to be adjusted to allow Sessions to be created " +
                        "for the current Subject.  See the " + DisabledSessionException.class.getName() + " JavaDoc " +
                        "for more.";
                throw new DisabledSessionException(msg);
            }

            log.trace("Starting session for host {}", getHost());
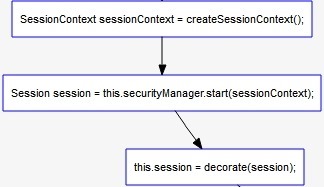
            SessionContext sessionContext = createSessionContext();
            Session session = this.securityManager.start(sessionContext);
            this.session = decorate(session);
        }
        return this.session;
    }
主要在后半部分sessionContext、session获取,及decorate过程
2.1.1获取默认空白sessonContext,其为map的子类,
2.1.2构建session将sessionContext绑定到其中
2.1.3包装session
2.1.2调用SessionsSecurityManager.start 其中sessionManager是DefaultSessionManager的实例
public Session start(SessionContext context) throws AuthorizationException {
        return this.sessionManager.start(context);
    }
其调用父类AbstractNativeSessionManager中的start方法
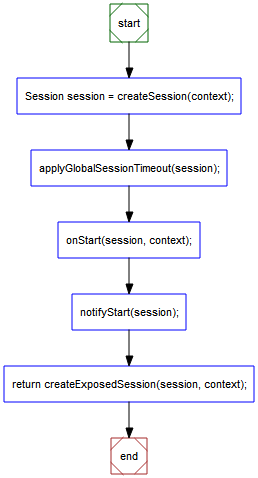
public Session start(SessionContext context) {
        Session session = createSession(context);
        applyGlobalSessionTimeout(session);
        onStart(session, context);
        notifyStart(session);
        //Don't expose the EIS-tier Session object to the client-tier:
        return createExposedSession(session, context);
    }
2.1.2.1构建Session
2.1.2.2设置session过期时间
2.1.2.3onStart操作,作为session监听器点(本例无监听器
2.1.2.4调用监听器onStart(本例无监听器
2.1.2.5创建
2.1.2.1继而AbstractNativeSessionManager.createSession()调用AbstractValidatingSessionManager.createSession() 启用session的验证功能,
protected Session createSession(SessionContext context) throws AuthorizationException {
        enableSessionValidationIfNecessary();
        return doCreateSession(context);
    }
继续调用DefaultSessionManager.doCreateSession(),DefaultSessionManager调用newSessionInstance,
protected Session doCreateSession(SessionContext context) {
        Session s = newSessionInstance(context);
        if (log.isTraceEnabled()) {
            log.trace("Creating session for host {}", s.getHost());
        }
        create(s);
        return s;
    }
获得SimpleSessionFactory工厂后构建调用SimpleSessionFactory.createSession()
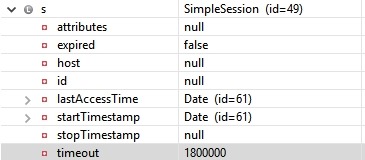
此时session中只有时间戳、session失效时间等信息
继而调用DefaultSessionManager.create() 持久化session(由于例子中未设置外部DAO则使用的是MemorySessionDAO实例
protected void create(Session session) {
        if (log.isDebugEnabled()) {
            log.debug("Creating new EIS record for new session instance [" + session + "]");
        }
        sessionDAO.create(session);
    }
这一步中会 为session生成一个UUID作为sessionID,并保存到session中,调用storeSession()将session 及其ID保存在MemorySessionDAO实例中的一个ConcurrentMap sessions中
protected Serializable doCreate(Session session) {
        Serializable sessionId = generateSessionId(session);
        assignSessionId(session, sessionId);
        storeSession(sessionId, session);
        return sessionId;
    }
最后成功返回session
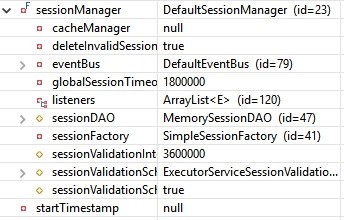
2.1.2.2依据全局session过期时间设置session并更新到sessionDAO
protected void applyGlobalSessionTimeout(Session session) {
        session.setTimeout(getGlobalSessionTimeout());
        onChange(session);
    }
2.1.2.5
将SimpleSession转化为外部可用的DelegatingSession
protected Session createExposedSession(Session session, SessionContext context) {
        return new DelegatingSession(this, new DefaultSessionKey(session.getId()));
    }
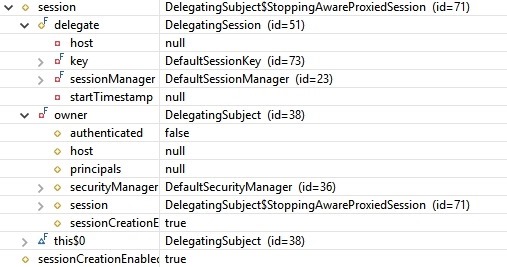
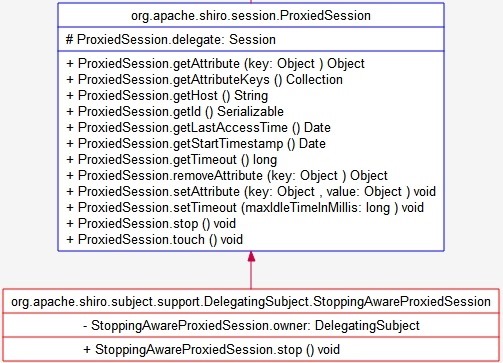
2.1.3将session包装成统一的StoppingAwareProxiedSession,后续通过委托操作session内的方法
protected Session decorate(Session session) {
        if (session == null) {
            throw new IllegalArgumentException("session cannot be null");
        }
        return new StoppingAwareProxiedSession(session, this);
    }
最后各处返回得到session
2.2在session中插入值
session.setAttribute("someKey", "aValue");
调用StoppingAwareProxiedSession父类方法ProxiedSession.setAttribute(),其中
public void setAttribute(Object key, Object value) throws InvalidSessionException {
        delegate.setAttribute(key, value);
    }
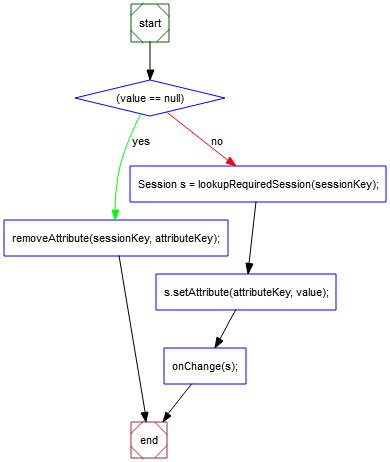
继而调用DelegatingSession.setAttribute(),其中调用并调用AbstractNativeSessionManager.setAttribute(),参数sessionKey为当前DelegatingSession的sessionKey
public void setAttribute(SessionKey sessionKey, Object attributeKey, Object value) throws InvalidSessionException {
        if (value == null) {
            removeAttribute(sessionKey, attributeKey);
        } else {
            Session s = lookupRequiredSession(sessionKey);
            s.setAttribute(attributeKey, value);
            onChange(s);
        }
    }
2.2.1判断来值是否为空
2.2.2.1
lookupRequiredSession(sessionKey)经过一系列过程,获得sessionId,依据sessionId由sessionDAO从DAO中获取simplesession实例
2.2.2.2空则删除对应的session参数
2.2.3获得的session设置参数
2.2.4sessionDAO中更新session
2.2在session中查找值
String value = (String) session.getAttribute("someKey");
调用StoppingAwareProxiedSession父类方法ProxiedSession.getAttribute(),
public Object getAttribute(Object key) throws InvalidSessionException {
        return delegate.getAttribute(key);
    }
与setAttribute()类似,从DAO中依据由sessionKey得到的sessionID获得SimpleSession的实例,再调用其getAttribute方法获得参数
public Object getAttribute(SessionKey sessionKey, Object attributeKey) throws InvalidSessionException {
        return lookupRequiredSession(sessionKey).getAttribute(attributeKey);
    }
至此一个简单的Session获取及参数写入读取便完成了
参考:
http://shiro.apache.org/10-minute-tutorial.html
http://shiro.apache.org/session-management.html
http://www.apache.org/dyn/closer.cgi/shiro/1.3.2/shiro-root-1.3.2-source-release.zip
转载请注明作者及来源:https://www.cnblogs.com/codflow/



 浙公网安备 33010602011771号