uniapp专题学习(二)
前言
书接上回,我们学习了uniapp的基本概念、用处、vue语法在uniapp中的使用、page.json的全局配置和局部配置以及组件的使用。本节我们将继续学习uniapp组件。
uniapp组件学习
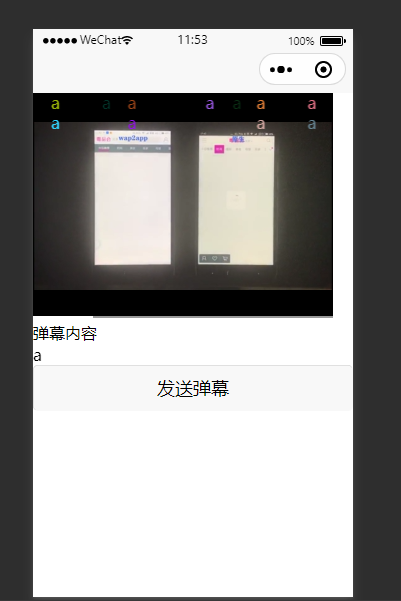
viedo
视频播放组件。
常用属性:src、autoplay、loop、muted,详情请查看viedo组件
案例代码:
<template>
	<view>
		<view class="page-body">
			<view class="page-section">
				<video id="myVideo" src="https://web-assets.dcloud.net.cn/unidoc/zh/wap2appvsnative.mp4" @error="videoErrorCallback" :danmu-list="danmuList"
				    enable-danmu danmu-btn controls>
                                </video>

				<view class="uni-list">
					<view class="uni-list-cell">
						<view>
							<view class="uni-label">弹幕内容</view>
						</view>
						<view class="uni-list-cell-db">
							<input @blur="bindInputBlur" class="uni-input" type="text" placeholder="在此处输入弹幕内容" />
						</view>
					</view>
				</view>
				<view class="btn-area">
					<button @tap="bindSendDanmu" class="page-body-button" formType="submit">发送弹幕</button>
				</view>
			</view>
		</view>
	</view>
</template>


<script>
	export default {
		data() {
			return {
				title: 'video',
				src: '',
				inputValue: '',
				danmuList: [{
						text: '第 1s 出现的弹幕',
						color: '#ff0000',
						time: 1
					},
					{
						text: '第 3s 出现的弹幕',
						color: '#ff00ff',
						time: 3
					}
				]
			}
		},
		onReady: function (res) {
			this.videoContext = uni.createVideoContext('myVideo')
		},
		methods: {
			bindInputBlur: function (e) {
				this.inputValue = e.target.value
			},
			bindButtonTap: function () {
				var that = this
				uni.chooseVideo({
					sourceType: ['album', 'camera'],
					maxDuration: 60,
					camera: ['front', 'back'],
					success: function (res) {
						this.src = res.tempFilePath
					}
				})
			},
			bindSendDanmu: function () {
				this.videoContext.sendDanmu({
					text: this.inputValue,
					color: this.getRandomColor()
				})
			},
			videoErrorCallback: function (e) {
				console.log('视频错误信息:')
				console.log(e.target.errMsg)
			},
			getRandomColor: function () {
				const rgb = []
				for (let i = 0; i < 3; ++i) {
					let color = Math.floor(Math.random() * 256).toString(16)
					color = color.length == 1 ? '0' + color : color
					rgb.push(color)
				}
				return '#' + rgb.join('')
			}
		}
	}
</script>

<style lang="scss">

</style>
运行效果:
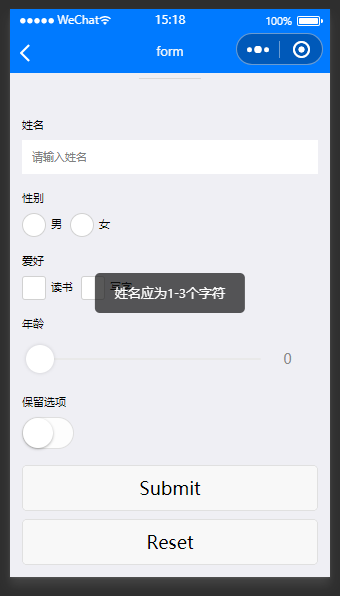
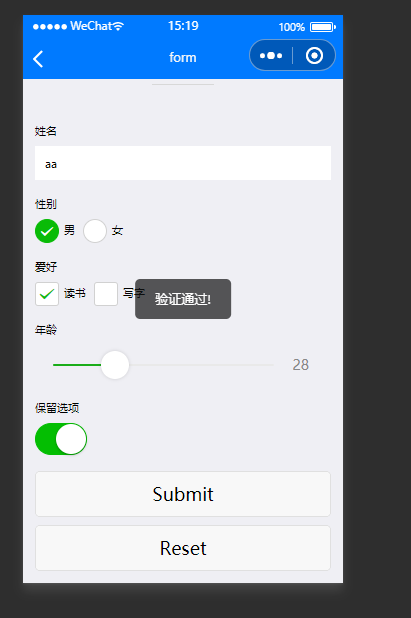
form
表单,将组件内的用户输入的<switch> <input> <checkbox> <slider> <radio> <picker> 提交。
案例代码:
<template>
	<view>
		<page-head title="form"></page-head>
		<view class="uni-padding-wrap uni-common-mt">
			<form @submit="formSubmit" @reset="formReset">
				<view class="uni-form-item uni-column">
					<view class="title">姓名</view>
					<input class="uni-input" name="nickname" placeholder="请输入姓名" />
				</view>
				<view class="uni-form-item uni-column">
					<view class="title">性别</view>
					<radio-group name="gender">
						<label>
							<radio value="男" /><text>男</text>
						</label>
						<label>
							<radio value="女" /><text>女</text>
						</label>
					</radio-group>
				</view>
				<view class="uni-form-item uni-column">
					<view class="title">爱好</view>
					<checkbox-group name="loves">
						<label>
							<checkbox value="读书" /><text>读书</text>
						</label>
						<label>
							<checkbox value="写字" /><text>写字</text>
						</label>
					</checkbox-group>
				</view>
				<view class="uni-form-item uni-column">
					<view class="title">年龄</view>
					<slider value="20" name="age" show-value></slider>
				</view>
				<view class="uni-form-item uni-column">
					<view class="title">保留选项</view>
					<view>
						<switch name="switch" />
					</view>
				</view>
				<view class="uni-btn-v">
					<button form-type="submit">Submit</button>
					<button type="default" form-type="reset">Reset</button>
				</view>
			</form>
		</view>
	</view>
</template>
<script>
	export default {
		check : function (data, rule){
			for(var i = 0; i < rule.length; i++){
				if (!rule[i].checkType){return true;}
				if (!rule[i].name) {return true;}
				if (!rule[i].errorMsg) {return true;}
				if (!data[rule[i].name]) {this.error = rule[i].errorMsg; return false;}
				switch (rule[i].checkType){
					case 'string':
						var reg = new RegExp('^.{' + rule[i].checkRule + '}$');
						if(!reg.test(data[rule[i].name])) {this.error = rule[i].errorMsg; return false;}
					break;
					case 'int':
						var reg = new RegExp('^(-[1-9]|[1-9])[0-9]{' + rule[i].checkRule + '}$');
						if(!reg.test(data[rule[i].name])) {this.error = rule[i].errorMsg; return false;}
						break;
					break;
					case 'between':
						if (!this.isNumber(data[rule[i].name])){
							this.error = rule[i].errorMsg;
							return false;
						}
						var minMax = rule[i].checkRule.split(',');
						minMax[0] = Number(minMax[0]);
						minMax[1] = Number(minMax[1]);
						if (data[rule[i].name] > minMax[1] || data[rule[i].name] < minMax[0]) {
							this.error = rule[i].errorMsg;
							return false;
						}
					break;
					case 'betweenD':
						var reg = /^-?[1-9][0-9]?$/;
						if (!reg.test(data[rule[i].name])) { this.error = rule[i].errorMsg; return false; }
						var minMax = rule[i].checkRule.split(',');
						minMax[0] = Number(minMax[0]);
						minMax[1] = Number(minMax[1]);
						if (data[rule[i].name] > minMax[1] || data[rule[i].name] < minMax[0]) {
							this.error = rule[i].errorMsg;
							return false;
						}
					break;
					case 'betweenF':
						var reg = /^-?[0-9][0-9]?.+[0-9]+$/;
						if (!reg.test(data[rule[i].name])){this.error = rule[i].errorMsg; return false;}
						var minMax = rule[i].checkRule.split(',');
						minMax[0] = Number(minMax[0]);
						minMax[1] = Number(minMax[1]);
						if (data[rule[i].name] > minMax[1] || data[rule[i].name] < minMax[0]) {
							this.error = rule[i].errorMsg;
							return false;
						}
					break;
					case 'same':
						if (data[rule[i].name] != rule[i].checkRule) { this.error = rule[i].errorMsg; return false;}
					break;
					case 'notsame':
						if (data[rule[i].name] == rule[i].checkRule) { this.error = rule[i].errorMsg; return false; }
					break;
					case 'email':
						var reg = /^\w+([-+.']\w+)*@\w+([-.]\w+)*\.\w+([-.]\w+)*$/;
						if (!reg.test(data[rule[i].name])) { this.error = rule[i].errorMsg; return false; }
					break;
					case 'phoneno':
						var reg = /^1[0-9]{10,10}$/;
						if (!reg.test(data[rule[i].name])) { this.error = rule[i].errorMsg; return false; }
					break;
					case 'zipcode':
						var reg = /^[0-9]{6}$/;
						if (!reg.test(data[rule[i].name])) { this.error = rule[i].errorMsg; return false; }
					break;
					case 'reg':
						var reg = new RegExp(rule[i].checkRule);
						if (!reg.test(data[rule[i].name])) { this.error = rule[i].errorMsg; return false; }
					break;
					case 'in':
						if(rule[i].checkRule.indexOf(data[rule[i].name]) == -1){
							this.error = rule[i].errorMsg; return false;
						}
					break;
					case 'notnull':
						if(data[rule[i].name] == null || data[rule[i].name].length < 1){this.error = rule[i].errorMsg; return false;}
					break;
				}
			}
			return true;
		},
		data() {
			return {
			}
		},
		methods: {
			formSubmit: function(e) {
				console.log('form发生了submit事件,携带数据为:' + JSON.stringify(e.detail.value))
                //定义表单规则
                var rule = [
                    {name:"nickname", checkType : "string", checkRule:"1,3",  errorMsg:"姓名应为1-3个字符"},
                    {name:"gender", checkType : "in", checkRule:"男,女",  errorMsg:"请选择性别"},
                    {name:"loves", checkType : "notnull", checkRule:"",  errorMsg:"请选择爱好"}
                ];
                //进行表单检查
                var formData = e.detail.value;
                var checkRes = check(formData, rule);
                if(checkRes){
                    uni.showToast({title:"验证通过!", icon:"none"});
                }else{
                    uni.showToast({ title: graceChecker.error, icon: "none" });
                }
			},
			formReset: function(e) {
				console.log('清空数据')
			}

		}
	}
</script>

<style>
	.uni-form-item .title {
		padding: 20rpx 0;
	}
</style>
案例效果:
navigator
页面跳转。
该组件类似HTML中的<a>组件,但只能跳转本地页面。目标页面必须在pages.json中注册。
该组件的功能有API方式,另见:https://uniapp.dcloud.io/api/router?id=navigateto
案例代码:
<navigator url="../index/index"  open-type="navigate">跳转index页面</navigator>
<navigator url="../viedo/viedo" open-type="redirect">跳转viedo页面</navigator>
<navigator url="../viedo/viedo" open-type="switchTab">跳转viedo页面</navigator>
<navigator url="../list/list" open-type="reLaunch">跳转list页面</navigator>
Tips:
- open-type="navigate" 保留当前页面,跳转到应用内的某个页面,使用
uni.navigateBack可以返回到原页面。 - open-type="redirect" 关闭当前页面,跳转到应用内的某个页面。
- open-type="switchTab" 关闭所有页面,打开到应用内的某个页面。
- open-type="reLaunch" 跳转到 tabBar 页面,并关闭其他所有非 tabBar 页面。(tabBar页面指的是首页下面的导航页面)
另外一种跳转方式还有js方式的页面跳转:
toPage(){
	uni.navigateTo({
		url: 'pages/test?id=1',
		events: {
			// 为指定事件添加一个监听器,获取被打开页面传送到当前页面的数据
			acceptDataFromOpenedPage: function(data) {
			console.log(data)
			},
			someEvent: function(data) {
			console.log(data)
			}
			...
		},
		success: res=> {
			console.log(res)
		}
	})
}
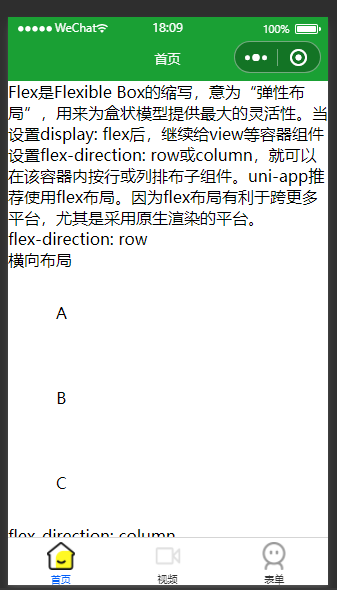
tabBar
如果应用是一个多 tab 应用,可以通过 tabBar 配置项指定一级导航栏,以及 tab 切换时显示的对应页。
在 pages.json 中提供 tabBar 配置,不仅仅是为了方便快速开发导航,更重要的是在App和小程序端提升性能。在这两个平台,底层原生引擎在启动时无需等待js引擎初始化,即可直接读取 pages.json 中配置的 tabBar 信息,渲染原生tab。具体的属性配置请查看属性说明。
案例代码:
"tabBar": {
		"color": "#333",
		"selectedColor": "#015FF9",
		"list": [
			{
				"text": "首页",
				"pagePath": "pages/index/index",
				"iconPath": "static/shouye.png",
				"selectedIconPath": "static/shouye-xuanzhong.png"
			},
			{
				"text": "视频",
				"pagePath": "pages/viedo/viedo",
				"iconPath": "static/video.png",
				"selectedIconPath": "static/videoxuanzhong.png"
			},
			{
				"text": "表单",
				"pagePath": "pages/form/form",
				"iconPath": "static/wode.png",
				"selectedIconPath": "static/wode-xuanzhong.png"
			}
		]
	}
页面效果:

 浙公网安备 33010602011771号