机器学习-自适应学习率和损失函数的反向传播神经网络BPNN
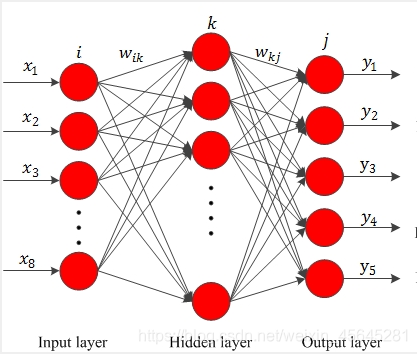
问题背景:多分类问题,输入参数为8组特征值,采用Excel表格导入,输出参数为5种不同的分类结果。数据量为1000组左右,训练组与测试组保持为7:3。
BP神经网络模型:隐藏层计算为10层,达到最大准确率,且时间较短。

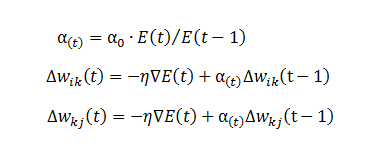
学习率更新公式:

损失函数更新公式:

有几个超参数需要提前设置好,根据自己的问题背景环境。
import numpy as np
import datetime
import xlrd
import matplotlib.pyplot as plt
from sklearn.metrics import roc_curve

def noramlization(data):
    minVals = data.min(0)
    maxVals = data.max(0)
    ranges = maxVals - minVals
    normData = (data - minVals)/ranges
    return normData

# 0.读入数据
def load_excel(path):
    result_array=[]
    # 读取初始数据
    data = xlrd.open_workbook(path)
    table = data.sheet_by_index(0)
    # table.nrows表示总行数
    for i in range(table.nrows):
        # 读取每行数据,保存在line里面,line是list
        line = table.row_values(i)
        # 将line加入到result_array中,result_array是二维list
        result_array.append(line)
    # 将result_array从二维list变成数组
    result_array = np.array(result_array)
    return result_array


# 1.初始化参数
def initialize_parameters(n_x, n_h, n_y):
    np.random.seed(2)

    # 权重和偏置矩阵
    w1 = np.random.rand(n_h, n_x) * 0.1
    #b1 = np.random.rand(n_h, 1)
    b1 = np.zeros(shape=(n_h, 1))
    w2 = np.random.rand(n_y, n_h) * 0.1
    #b2 = np.random.rand(n_y, 1)
    b2 = np.zeros(shape=(n_y, 1))

    # 通过字典存储参数
    parameters = {'w1': w1, 'b1': b1, 'w2': w2, 'b2': b2}
    return parameters

#  更新权重和阈值
def update_temp(parameters):
    w1 = parameters['w1']
    b1 = parameters['b1']
    w2 = parameters['w2']
    b2 = parameters['b2']

    temp = {'w1': w1, 'b1': b1, 'w2': w2, 'b2': b2}

    return temp

def update_wb(parameters,temp):
    w1 = parameters['w1']
    b1 = parameters['b1']
    w2 = parameters['w2']
    b2 = parameters['b2']
    temp_w1 = temp['w1']
    temp_b1 = temp['b1']
    temp_w2 = temp['w2']
    temp_b2 = temp['b2']
    m1 = w1- temp_w1
    n1 = b1- temp_b1
    m2 = w2 - temp_w2
    n2 = b2 - temp_b2
    update_para = {'m1': m1, 'n1': n1, 'm2': m2, 'n2': n2}

    return update_para

# 2.前向传播
def forward_propagation(X, parameters):
    w1 = parameters['w1']
    b1 = parameters['b1']
    w2 = parameters['w2']
    b2 = parameters['b2']

    # 通过前向传播来计算a2
    z1 = np.dot(w1, X) + b1     # 这个地方需注意矩阵加法:虽然(w1*X)和b1的维度不同,但可以相加
    a1 = np.tanh(z1)           # 使用tanh作为第一层的激活函数
    z2 = np.dot(w2, a1) + b2

    # exp = np.exp(z2)
    # sum_exp = np.sum(np.exp(z2), axis=0, keepdims=True)
    # a2 = exp / sum_exp

    a2 = 1 / (1 + np.exp(-z2))  # 使用sigmoid作为第二层的激活函数
    # 通过字典存储参数
    cache = {'z1': z1, 'a1': a1, 'z2': z2, 'a2': a2}

    return a2, cache


# 3.计算代价函数
def compute_cost(a2, Y, parameters):
    m = Y.shape[1]      # Y的列数即为总的样本数
    # 采用交叉熵(cross-entropy)作为代价函数
    logprobs = np.multiply(np.log(a2), Y) + np.multiply((1 - Y), np.log(1 - a2))
    #logprobs = np.multiply(np.log(a2), Y)
    cost = - np.sum(logprobs) / m
    return cost


# 4.反向传播(计算代价函数的导数)
def backward_propagation(parameters, cache, X, Y):
    m = Y.shape[1]

    w2 = parameters['w2']

    a1 = cache['a1']
    a2 = cache['a2']

    # 反向传播,计算dw1、db1、dw2、db2
    dz2 = a2 - Y
    dw2 = (1 / m) * np.dot(dz2, a1.T)
    #print(dw2.shape)
    db2 = (1 / m) * np.sum(dz2, axis=1, keepdims=True)
    dz1 = np.multiply(np.dot(w2.T, dz2), 1 - np.power(a1, 2))
    dw1 = (1 / m) * np.dot(dz1, X.T)
    db1 = (1 / m) * np.sum(dz1, axis=1, keepdims=True)
    grads = {'dw1': dw1, 'db1': db1, 'dw2': dw2, 'db2': db2}

    return grads

def update_learn(learning_rate,i,num_iterations):
    learning=learning_rate*(1-i/num_iterations)
    return learning


# 5.更新参数
def update_parameters(parameters, grads,update_para,learning_rate,k):
    w1 = parameters['w1']
    b1 = parameters['b1']
    w2 = parameters['w2']
    b2 = parameters['b2']

    dw1 = grads['dw1']
    db1 = grads['db1']
    dw2 = grads['dw2']
    db2 = grads['db2']

    m1 = update_para['m1']
    n1 = update_para['n1']
    m2 = update_para['m2']
    n2 = update_para['n2']

    # 更新参数
    w1 = w1 - dw1 * learning_rate + m1 * k*0.9
    b1 = b1 - db1 * learning_rate + n1 * k*0.9
    w2 = w2 - dw2 * learning_rate + m2 * k*0.9
    b2 = b2 - db2 * learning_rate + n2 * k*0.9

    parameters = {'w1': w1, 'b1': b1, 'w2': w2, 'b2': b2}

    return parameters


# 建立神经网络
def nn_model(X, Y, n_h, n_input, n_output, num_iterations=10000, print_cost=False):
    np.random.seed(3)

    n_x = n_input           # 输入层节点数
    n_y = n_output          # 输出层节点数

    # 1.初始化参数
    learning_rate=0.1
    parameters = initialize_parameters(n_x, n_h, n_y)
    temp = update_temp(parameters)
    cost_list=[]
    grads_list=[]
    j = 1
    # 梯度下降循环
    for i in range(0, num_iterations):
        learning=update_learn(learning_rate,i,num_iterations)
        # 2.前向传播
        a2, cache = forward_propagation(X, parameters)
        # 3.计算代价函数
        cost = compute_cost(a2, Y, parameters)
        cost_list.append(cost)
        # 4.反向传播
        grads = backward_propagation(parameters, cache, X, Y)
        # 5.更新参数
        update_para = update_wb(parameters, temp)
        k=1
        if j==i:
            temp=update_temp(parameters)
            j=j+1
            k=cost/ttt
        ttt = cost
        parameters = update_parameters(parameters, grads, update_para,learning_rate=learning,k=k)
        grads_list.append(k)
        # 每1000次迭代,输出一次代价函数
        if print_cost and i % 1000 == 0:
            print('迭代第%i次,代价函数为:%f' % (i, cost))
    plt.plot(cost_list)
    #plt.plot(grads_list)
    return parameters,cost_list


# 对模型进行测试
def predict(parameters, x_test, y_test):
    w1 = parameters['w1']
    b1 = parameters['b1']
    w2 = parameters['w2']
    b2 = parameters['b2']

    z1 = np.dot(w1, x_test) + b1
    a1 = np.tanh(z1)

    z2 = np.dot(w2, a1) + b2
    # exp = np.exp(z2)
    # sum_exp = np.sum(np.exp(z2), axis=0, keepdims=True)
    # a2 = exp / sum_exp
    a2 = 1 / (1 + np.exp(-z2))

    # 结果的维度
    n_rows = y_test.shape[0]
    n_cols = y_test.shape[1]

    # 预测值结果存储
    output = np.empty(shape=(n_rows, n_cols), dtype=int)

    # 取出每条测试数据的预测结果
    for i in range(n_cols):
        # 将每条测试数据的预测结果(概率)存为一个行向量
        temp = np.zeros(shape=n_rows)
        for j in range(n_rows):
            temp[j] = a2[j][i]

        # 将每条结果(概率)从小到大排序,并获得相应下标
        sorted_dist = np.argsort(temp)
        length = len(sorted_dist)

        # 将概率最大的置为1,其它置为0
        for k in range(length):
            if k == sorted_dist[length - 1]:
                output[k][i] = 1
            else:
                output[k][i] = 0

    print('预测结果:')
    print(output)
    print('真实结果:')
    print(y_test)

    count = 0
    for k in range(0, n_cols):
        if output[0][k] == y_test[0][k] and output[1][k] == y_test[1][k] and output[2][k] == y_test[2][k]\
                and output[3][k] == y_test[3][k] and output[4][k] == y_test[4][k]:
            count = count + 1

    acc = count / int(y_test.shape[1]) * 100
    print('准确率:%.2f%%' % acc)
    return output,acc


def cross_validation():
    pass


if __name__ == "__main__":
    # 读取数据
    data_normal = load_excel('E:/exp/1.xlsx')
    data_sunken = load_excel('E:/exp/2.xlsx')
    data_undercut = load_excel('E:/exp/3.xlsx')
    data_pore = load_excel('E:/exp/4.xlsx')
    data_burnthrough = load_excel('E:/exp/5.xlsx')
    #test_weld = load_excel('E:/exp/test.xlsx')
    # 生成数据集
    y11 = np.array([1,0,0,0,0])
    y1 = np.tile(y11,(data_normal.shape[0],1))
    #y11 = np.zeros((data_normal.shape[0], 1))
    c1 = np.concatenate((data_normal, y1), axis=1)

    y22 = np.array([0,1,0,0,0])
    y2 = np.tile(y22,(data_sunken.shape[0],1))
    #y2 = np.ones((data_sunken.shape[0], 1)) * 1
    c2 = np.concatenate((data_sunken, y2), axis=1)

    y33 = np.array([0,0,1,0,0])
    y3 = np.tile(y33,(data_undercut.shape[0],1))
    #y3 = np.ones((data_undercut.shape[0], 1)) * 2
    c3 = np.concatenate((data_undercut, y3), axis=1)
    y44 = np.array([0,0,0,1,0])
    y4 = np.tile(y44,(data_pore.shape[0],1))
    #y4 = np.ones((data_pore.shape[0], 1)) * 3
    c4 = np.concatenate((data_pore, y4), axis=1)

    y55 = np.array([0,0,0,0,1])
    y5 = np.tile(y55,(data_burnthrough.shape[0],1))
    #y5 = np.ones((data_burnthrough.shape[0], 1)) * 4
    c5 = np.concatenate((data_burnthrough, y5), axis=1)
#######load samples##
    # np.random.shuffle(c1)
    # np.random.shuffle(c2)
    # np.random.shuffle(c3)
    # np.random.shuffle(c4)
    # np.random.shuffle(c5)
    # yuan = np.concatenate((c1[:75,:], c2[:75,:], c3[:75,:], c4[:75,:], c5[:75,:]), axis=0)
#########
    #all_data=load_excel('E:/temp.xlsx')
    all_data = np.concatenate((c1, c2, c3, c4, c5), axis=0)
    np.random.shuffle(all_data)
    # train_data_x1 = all_data[:1089, :8].T
    # train_data_y1 = all_data[:1089, 8:13].T
    # train_data_x2 = all_data[1218:, :8].T
    # train_data_y2 = all_data[1218:, 8:13].T
    # train_data_x=np.concatenate((train_data_x1,train_data_x2),axis=1)
    # train_data_y = np.concatenate((train_data_y1, train_data_y2), axis=1)
    train_data_x = all_data[:812, :8].T
    train_data_y = all_data[:812, 8:13].T  # 训练集
    # #test_data_x=test_weld[:,:8].T
    # #test_data_y=test_weld[:,8:13].T
    test_data_x = all_data[812:, :8].T
    test_data_y = all_data[812:, 8:13].T  # 测试集
    # test_data_x = all_data[1089:1218, :8].T
    # test_data_y = all_data[1089:1218, 8:13].T
    train_data_y = train_data_y.astype('uint8')
    train_data_x=noramlization(train_data_x)
    test_data_x=noramlization(test_data_x)

    # 开始训练
    start_time = datetime.datetime.now()
    # 输入8个节点,隐层10个节点,输出5个节点,迭代10000次
    parameters,result= nn_model(train_data_x, train_data_y, n_h=13, n_input=8, n_output=5, num_iterations=10000, print_cost=True)
    end_time = datetime.datetime.now()
    print("用时:" + str((end_time - start_time).seconds) + 's' + str(round((end_time - start_time).microseconds / 1000)) + 'ms')

    # 对模型进行测试
    test_data_y = test_data_y.astype('uint8')
    #o,t=predict(parameters, train_data_x, train_data_y)
    p,acc=predict(parameters, test_data_x,test_data_y)
    #np.savetxt('E:/exp/weld detect/result_test.txt',yuan)
    #np.savetxt('E:/exp/weld detect/result_predict.txt', p.T)
损失函数:

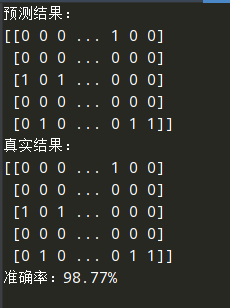
准确率:


 浙公网安备 33010602011771号