状态模式-将状态和行为封装成对象
公号:码农充电站pro
主页:https://codeshellme.github.io
本篇文章来介绍状态模式(State Design Pattern),状态模式常用来实现状态机,状态机常用在游戏开发等领域。
1,状态模式
状态模式的定义为:允许对象在内部状态改变时,改变它的行为,对象看起来好像改变了它的类。
状态模式将状态和行为封装成对象,不同的对象有着不同的行为。对象的状态会因某个行为的发生而改变,对象的状态一旦改变,那么对象的行为也会发生改变。
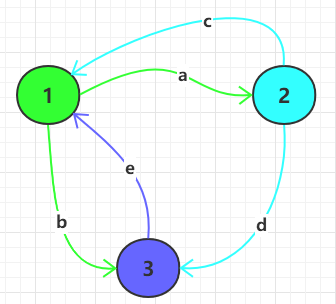
对象的状态和行为,可以用下面这个图来解释。假如一个事物有三种状态 1,2,3,状态之间的转换关系如下:

在上面的状态转换图中,每种状态对应着不同的行为:
- 状态 1:有两种行为
a和b- 状态 1 经过
a行为可转换到状态 2 - 状态 1 经过
b行为可转换到状态 3
- 状态 1 经过
- 状态 2:有两种行为
c和d- 状态 2 经过
c行为可转换到状态 1 - 状态 2 经过
d行为可转换到状态 3
- 状态 2 经过
- 状态 3:有一种行为
e- 状态 3 经过
e行为可转换到状态 1
- 状态 3 经过
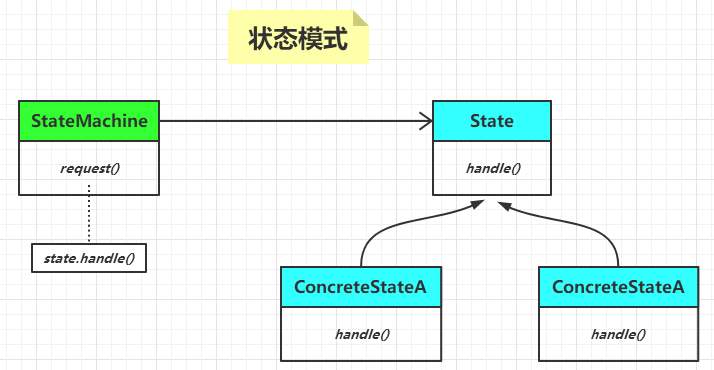
状态模式的类图如下:

State 接口定义了状态可能拥有的所有行为,每个具体的状态都实现了这个接口,这样就使得状态之间可以互相替换。
每个具体状态对 State 接口中的每个行为的实现是不一样的,这就相当于每个具体状态的行为是不一样的。
StateMachine 是一个状态机,它拥有着一个状态对象,这个状态对象会不断的改变。
2,游戏需求
假设我们要为一款游戏中的角色编写状态转换的程序,并且游戏角色有积分:

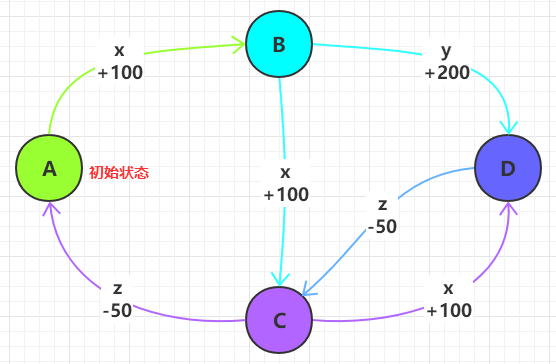
该游戏中的角色共有 4 种状态 A,B,C,D,共有 3 种操作 x,y,z:
- 状态 A:只能进行 x 操作,转化到状态 B
- 状态 A 为初始状态
- 状态 B:有两种操作:
- x 操作:转化到状态 C
- y 操作:转化到状态 D
- 状态 C:有两种操作
- x 操作:转化到状态 D
- z 操作:转化到状态 A
- 状态 D:只能进行 z 操作,转化到状态 C
积分变化:
- 操作 x 会使角色增加
100积分 - 操作 y 会使角色增加
200积分 - 操作 z 会使角色减少
50积分
3,编写代码
下面我们使用状态模式来编写角色的状态转换程序。
首先根据状态模式的类图,我们需要有一个 State 接口,该接口包含角色所有的操作,并且包含一个状态机的引用。
这里我将 State 作为一个抽象类,每个操作的默认实现是 do nothing,每个具体状态可以根据自己的需要进行覆盖。
代码如下:
abstract class State {
    protected String stateName;
    protected RoleStateMachine machine;

    void x() {
        // do nothing
    }

    void y() {
        // do nothing
    }

    void z() {
        // do nothing
    }

    // 获取当前状态名
    public String getStateName() {
        return stateName;
    }
}
接下来编写角色状态机类,代码中也都写了注释:
class RoleStateMachine {
    private State currentState; // 当前状态
    private int score;          // 积分

    public RoleStateMachine() {
        this.score = 0; // 初始积分为 0
        // 初始状态为 A
        this.currentState = new StateA(this);
    }

    // 当发生某个操作时需要转化到相应的状态
    // 用该方法进行设置
    public void setCurrentState(State state) {
        currentState = state;
    }

    // 获取当前状态
    public String getCurrentState() {
        return currentState.getStateName();
    }

    // 获取积分
    public int getScore() {
        return score;
    }

    // 增加积分
    public void addScore(int score) {
        this.score += score;
    }

    // 减少积分
    public void delScore(int score) {
        this.score -= score;
    }

    // 状态机中也包含状态中的所有操作
    // 每个操作都委托给当前状态的相应操作来完成

    public void x() {
        currentState.x();
    }

    public void y() {
        currentState.y();
    }

    public void z() {
        currentState.z();
    }
}
下面编写 4 个状态类,每个状态类都继承 State 接口,并且每个状态类中要持有一个状态机的引用,由构造函数引入:
class StateA extends State {
    public StateA(RoleStateMachine machine) {
        this.machine = machine;
        this.stateName = "StateA";
    }

    public void x() {
        machine.addScore(100);
        machine.setCurrentState(new StateB(machine));
    }
}

class StateB extends State {
    public StateB(RoleStateMachine machine) {
        this.machine = machine;
        this.stateName = "StateB";
    }

    public void x() {
        machine.addScore(100);
        machine.setCurrentState(new StateC(machine));
    }

    public void y() {
        machine.addScore(200);
        machine.setCurrentState(new StateD(machine));
    }
}

class StateC extends State {
    public StateC(RoleStateMachine machine) {
        this.machine = machine;
        this.stateName = "StateC";
    }

    public void x() {
        machine.addScore(100);
        machine.setCurrentState(new StateD(machine));
    }

    public void z() {
        machine.delScore(50);
        machine.setCurrentState(new StateA(machine));
    }
}

class StateD extends State {
    public StateD(RoleStateMachine machine) {
        this.machine = machine;
        this.stateName = "StateD";
    }

    public void z() {
        machine.delScore(50);
        machine.setCurrentState(new StateC(machine));
    }
}
4,测试代码
下面来测试代码:
RoleStateMachine role = new RoleStateMachine();

// 初始状态为 StateA,积分为 0
assert role.getCurrentState().equals("StateA");
assert role.getScore() == 0;

role.y(); // 在状态 A 进行 y 操作

// 在状态 A 时,没有 y 操作
// 所以如果进行 y 操作,状态和积分都保持不变
assert role.getCurrentState().equals("StateA");
assert role.getScore() == 0;

role.x(); // 在状态 A 进行 x 操作
assert role.getCurrentState().equals("StateB");
assert role.getScore() == 100;

role.y(); // 在状态 B,进行 y 操作
assert role.getCurrentState().equals("StateD");
assert role.getScore() == 300;

role.z(); // 在状态 D,进行 z 操作
assert role.getCurrentState().equals("StateC");
assert role.getScore() == 250;

role.z(); // 在状态 C,进行 z 操作
assert role.getCurrentState().equals("StateA");
assert role.getScore() == 200;

System.out.println("Test OK.");
注意,使用 Java assert 时,记得用 -ea 参数打开断言功能。
我将完整的代码放在了这里,供大家参考。
5,总结
状态模式将状态和行为封装成对象,不同的状态有着不同的行为。这种设计使得处理状态转换这一类的逻辑变得非常有条理,而且不易出错。
(本节完。)
推荐阅读:
欢迎关注作者公众号,获取更多技术干货。


 浙公网安备 33010602011771号