antd vue表格合并按钮、样式列
官方给出的表格行列合并示例:https://www.antdv.com/components/table-cn/。
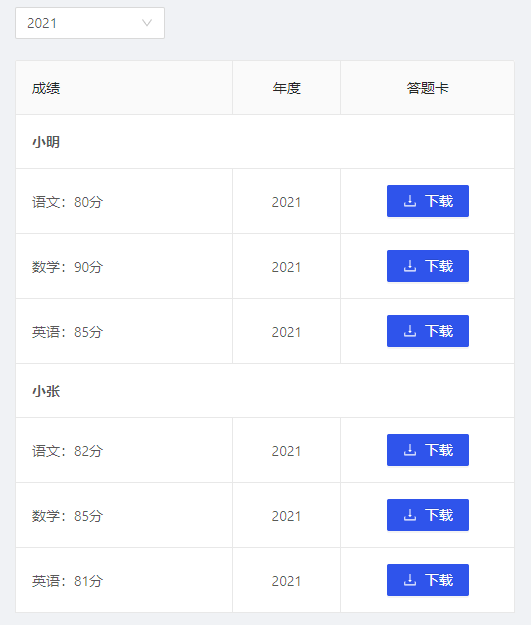
示例中仅演示了合并纯文本列,本文分享一下带按钮、样式的列如何合并。
Demo效果:
原本按钮是使用插槽方式写的,由于需要合并,就模仿官方示例改写为customRender,要点在于:columns定义在data、变量使用{ }而非{{ }}、点击事件触发。整体代码如下:
<template>
  <div>
    <a-select v-model="selectedYear" defaultValue="" placeholder="选择年度" style="width: 150px;">
      <a-select-option v-for="(item, index) in yearOptions" :value="item" :key="index">
        {{ item }}
      </a-select-option>
    </a-select>
    <br />
    <div style="width: 500px;">
      <a-table :columns="columns" :dataSource="dataSource" bordered rowKey="id">
      </a-table>
    </div>

  </div>
</template>

<script>

export default {
  name: 'History',
  data () {
    return {
      selectedYear: undefined,
      yearOptions: ['2021', '2020', '2019', '2018'],
      columns: [
        {
          title: '成绩',
          dataIndex: 'name',
          width: '20%',
          customRender: (text, record, index) => {
            if (index === 0 || index === 4) {
              return {
                children: (<div style="font-weight: bold;">{text}</div>),
                attrs: { colSpan: 3 }
              }
            }
            return text
          }
        },
        {
          title: '年度',
          width: '10%',
          align: 'center',
          customRender: (value, record, index) => {
            const obj = {
              children: this.selectedYear,
              attrs: {}
            }
            if (index === 0 || index === 4) {
              obj.attrs.colSpan = 0
            }
            return obj
          }
        },
        {
          title: '答题卡',
          align: 'center',
          customRender: (value, record, index) => {
            const obj = {
              children: (<a-button type="primary" icon="download" onclick={() => { this.download(record) }}> 下载 </a-button>),
              attrs: {}
            }
            if (index === 0 || index === 4) {
              obj.attrs.colSpan = 0
            }
            return obj
          }
        }
      ],
      dataSource: [
        { id: 1, name: '小明' },
        { id: 2, name: '语文:80分' },
        { id: 3, name: '数学:90分' },
        { id: 4, name: '英语:85分' },
        { id: 5, name: '小张' },
        { id: 6, name: '语文:82分' },
        { id: 7, name: '数学:85分' },
        { id: 8, name: '英语:81分' }
      ]
    }
  },
  mounted () {
    this.init()
  },
  methods: {
    init () {
      this.selectedYear = this.yearOptions[0]
    },
    download () {
      setTimeout(() => {
        this.$message.success('下载完成')
      }, 1000)
    }
  }
}
</script>
补充:
时间:2021年8月8日13点06分
今日再次遇到了a-table的合并需求,对customRender的使用有了新的理解。
示例:
      {
          title: '备注说明',
          dataIndex: 'content',
          customRender: (text, record, index) => {
            const obj = {
              children: <div domPropsInnerHTML={text}></div>,
              attrs: {}
            }
            if (index === 0) {
              obj.attrs.rowSpan = 2
            }
            if (index === 1) {
              obj.attrs.rowSpan = 0
            }
            return obj
          }
        }
由于ant-design是基于 React 的前端框架,所以antd of vue中很容易发现有许多react语法的踪迹,如JSX。
从示例可以发现,obj.children对标签的用法与vue使用标签的方式有所不同,比如绑定变量、监听事件。如果想实现v-for、v-html等效果,应同步参考react用法:map、domPropsInnerHTML。

 浙公网安备 33010602011771号