vue2 项目也想使用vite打包的便捷?
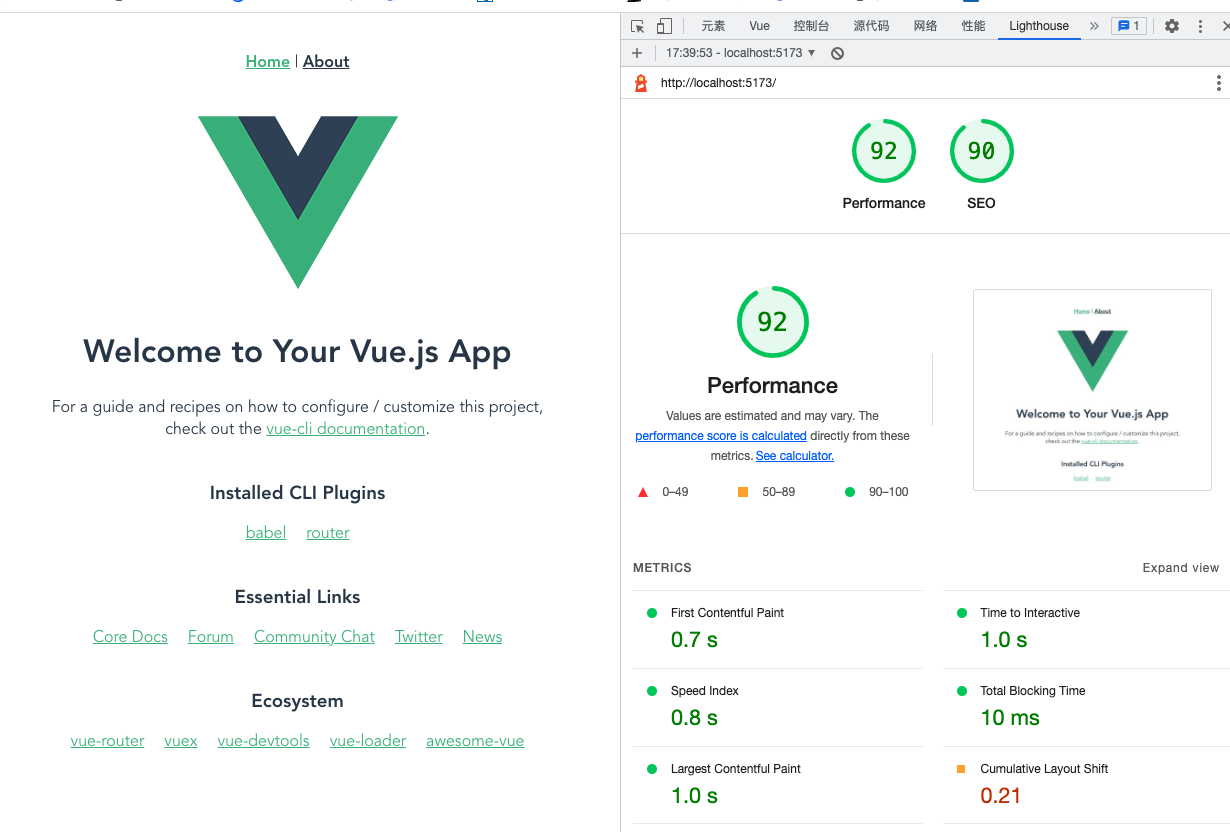
首先 很多项目正在更新迭代,vue2项目同学也知道vite打包速度 开发模式飞快 ,我们先来看一组差距。贴个图
这是vite构建的vue2的初始化项目性能
这是默认vue2构建的初始化的vue2项目性能
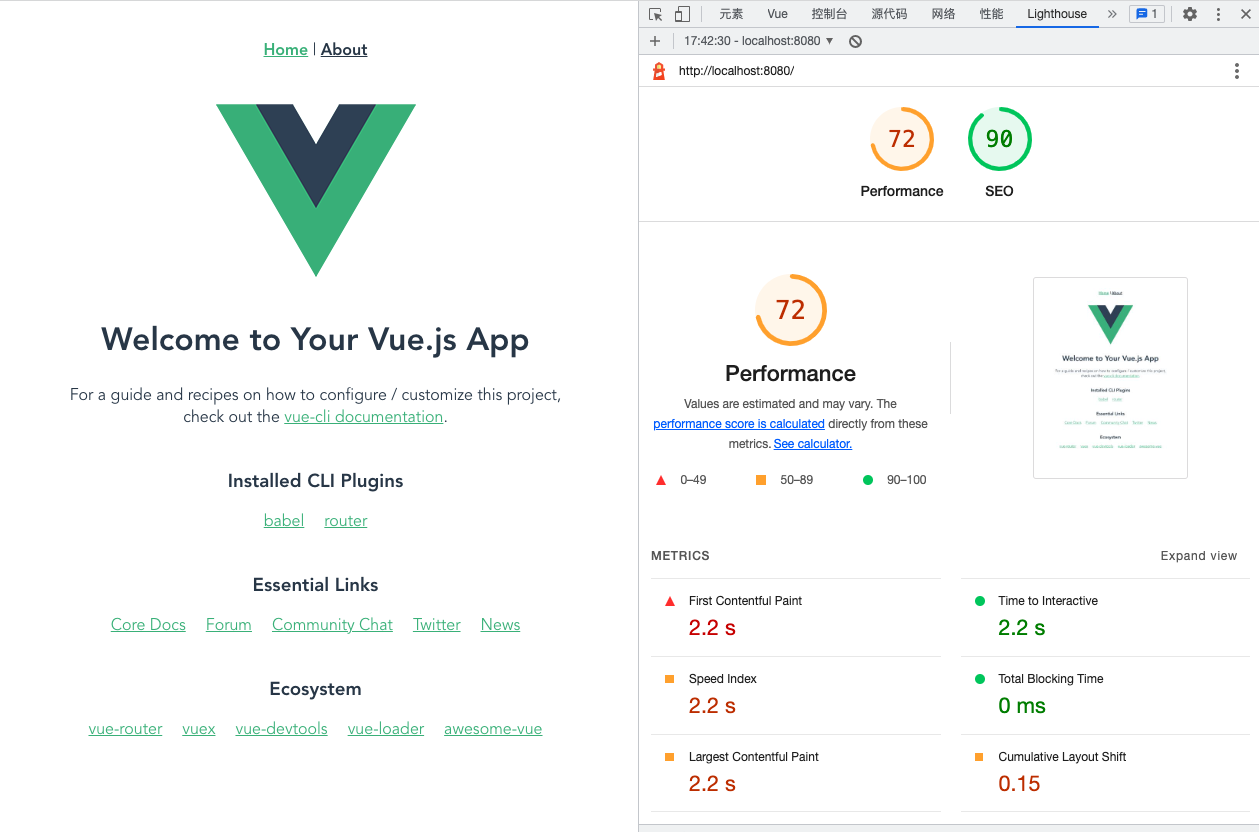
明显差距很大,下面正入主题👇🏻
一、首先我们想在vue2中直接使用vite,也是可以的,来看教程
.
1. 安装插件(一个vite必备,第二个是为了兼容vue2) npm i -D vite vite-plugin-vue2
2.将public中的index.html拉出来,放在最外层,与package.json同级
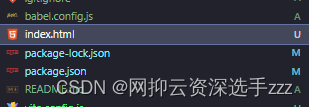
3.在index.html中引入

4.router中的index.js修改base

5.创建vite.config.js(没有则需要新建)
import { createVuePlugin } from "vite-plugin-vue2";
import {defineConfig, loadEnv} from 'vite'
import viteCompression from 'vite-plugin-compression';
import requireTransform from 'vite-plugin-require-transform';
const CWD = process.cwd();

export default defineConfig(({ mode }) => {
    return {
        plugins: [
            createVuePlugin({
                vueTemplateOptions: {},
            }),
            requireTransform({
                fileRegex:/.js$|.ts$|.tsx$|.vue$/
                //   fileRegex:/.js$|.jsx$|.vue$/
            }),
            viteCompression({
                verbose: true,
                disable: false,
                threshold: 10240, // 大于100k的文件进行压缩
                algorithm: 'gzip',
                ext: '.gz',
            }),
        ],
        resolve: {
            extensions: [".vue", ".mjs", ".js", ".ts", ".jsx", ".tsx", ".json"],
            alias: [
                {
                    find: "@",
                    replacement: "/src",
                },
                {
                    find: "components",
                    replacement: "/src/components",
                },
            ],
        },
        build: {
            commonjsOptions: {
                transformMixedEsModules: true // require可以使用
            },
            rollupOptions: {
                output: {
                    manualChunks(id) {
                        if (id.includes('node_modules')) {
                            return id.toString().split('node_modules/')[1]
                                .split('/')[0].toString();
                        }
                    }
                }
            },
            cssCodeSplit: true, //  如果设置为false,整个项目中的所有 CSS 将被提取到一个 CSS 文件中
            sourcemap: true, // 构建后是否生成 source map 文件。如果为 true,将会创建一个独立的 source map 文件
            target: 'modules', // 设置最终构建的浏览器兼容目标。默认值是一个 Vite 特有的值——'modules'  还可设置为 'es2015' 'es2016'等
            chunkSizeWarningLimit: 550, // 单位kb  打包后文件大小警告的限制 (文件大于此此值会出现警告)
            assetsInlineLimit: 4096, // 单位字节(1024等于1kb) 小于此阈值的导入或引用资源将内联为 base64 编码,以避免额外的 http 请求。设置为 0 可以完全禁用此项。
            minify: 'terser', // 'terser' 相对较慢,但大多数情况下构建后的文件体积更小。'esbuild' 最小化混淆更快但构建后的文件相对更大。
            terserOptions: {
                compress: {
                    drop_console: true, // 生产环境去除console
                    drop_debugger: true, // 生产环境去除debugger
                },
            }
        },
        base: './',
        optimizeDeps: {
            // lodash-es 是vite自带的引用,optimizeDeps代表预构建;
            // 默认情况下,不在 node_modules 中的,链接的包不会被预构建,include代表强制预构建
            // include: ['element-plus', 'lodash-es'],
        },
        server: {
            host: '0.0.0.0',
            port: '8888',
            open: true,
            cors: true, // 允许跨域
            proxy: {
                //     '/mdsserver': {
                //         target: loadEnv(mode, CWD).VITE_BASE_URL, // 一般都有后面的mdsserver路径,所以去掉。直接用前面的域名就更全面
                //         changeOrigin: true,
                //         secure: false,
                //         rewrite: path => path.replace(/^\/mdsserver/, '') // 重写 api 为 空,就是去掉它
                //     },
                '/apinhy': {
                    target: loadEnv(mode, CWD).VITE_BASE_URL,
                    changeOrigin: true,
                    secure: false,
                    rewrite: (path) => path.replace(/^\/apinhy/, '')
                }
            }
        },
        // css: {
        //   preprocessorOptions: {
        //     // 覆盖掉element-plus包中的主题变量文件
        //     scss: {
        //       additionalData: `@use "@/styles/element/index.scss" as *;`,
        //     },
        //   },
        // },
    }
})
6.修改package.json中的运行与打包命令
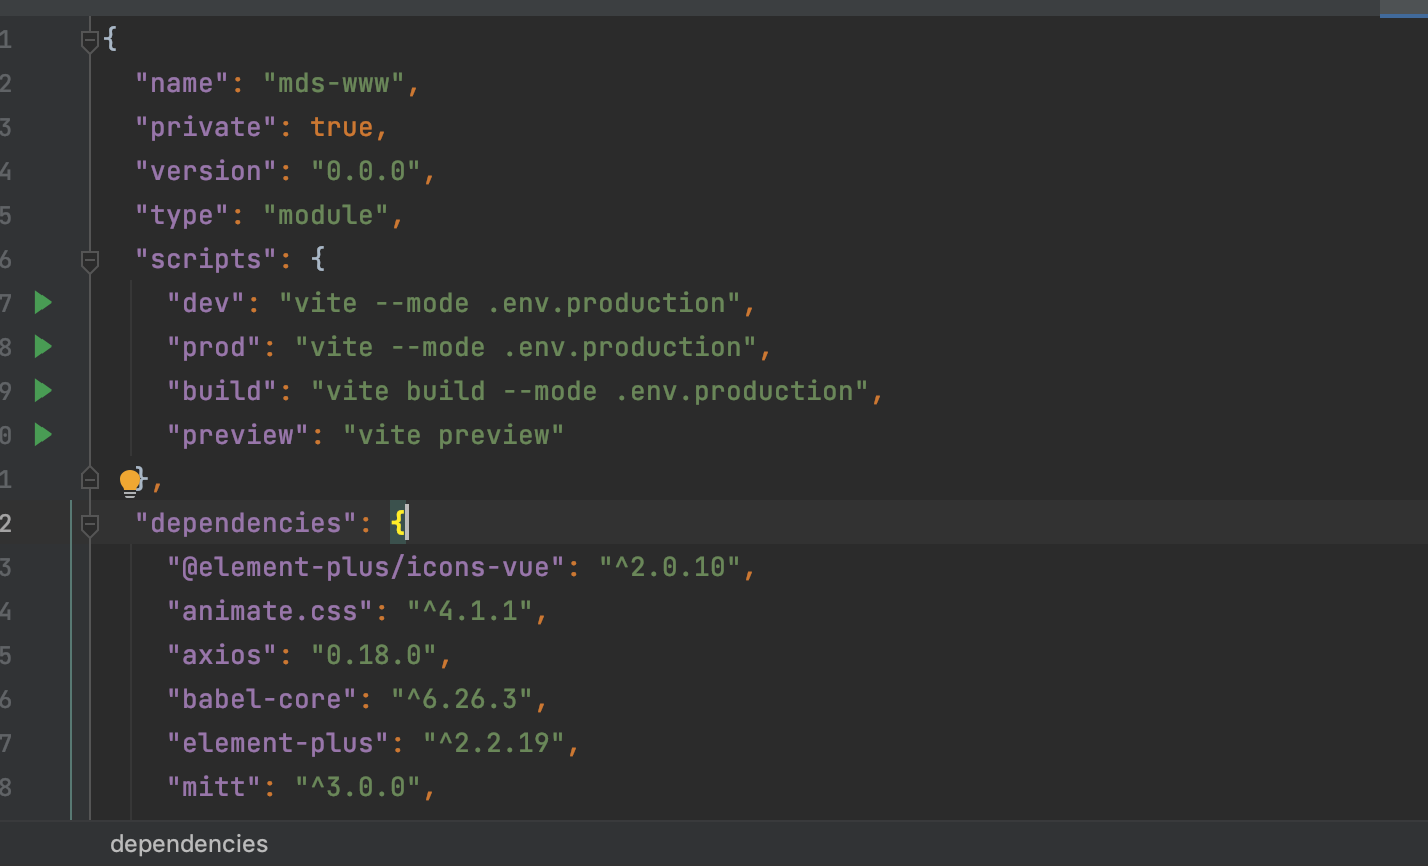
–host后面是自己的本地端口号 如果不想明确或报错 请使用vite --host就行 去掉后面端口号
注意: 很多小伙伴是用的node14版本安装的vue项目,这么旧一般vite是不支持的,建议至少切换到14.19.0这个版本。
可以使用nvm切换node版本,实验没问题,再全局升级node版本 也是兼容旧项目的哦
————————————————————————————————————————————————————
如果配置了多环境的同学看过来
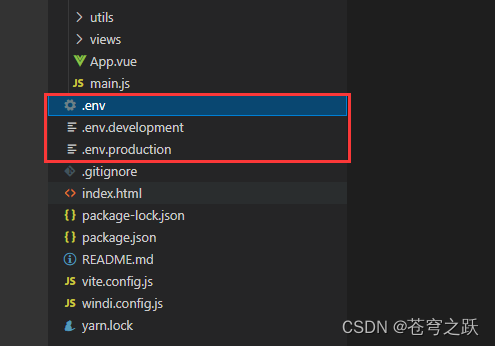
1.根目录新建三个文件:分别对应基本环境.env(始终加载)、开发环境.env.development(npm run dev 加载 )、.env.production生产环境(build加载)【如果env与development冲突,则后者覆盖前者】
开发环境
VITE_BASE_URL='localhost:8088/java'
生产环境
VITE_BASE_URL='xxxxxx'
【注意:只有以VITE开头的参数才会暴露出去】
2.使用:
console.log(import.meta.env)

疑难杂症一:很多小伙伴说 vue2 里面有node-sass 不支持迁移到vite 其实不用担心啦
sass提供了变量 (variables)、嵌套 (nested rules)、混合 (mixins)、导入 (inline imports) 等高级功能,强化了css的功能,编写css更便捷,功能更强大
- 安装sass
以前用vue-cli的时候,还要安装sass-loader、node-sass什么的,安装的时候还会遇到各种问题,但是vite其实安装sass就可以了,很简单
npm install --save-dev sass
但如果老项目使用的是less的话,目前我的less和less-loader都存在,使用vite也可以跑起来
"less": "^3.0.4",
"less-loader": "^5.0.0",
- 编写全局css变量/全局mixin
// 全局变量 / globalVar.scss
$font-size-normal: 32px;

$bg-color: #1989fa;
// 全局mixin / globalMixin.scss
@mixin box-shadow($bulr: 20px, $color: #1989fa7a) {
    -webkit-box-shadow: 0px 0px $bulr $color;
    -moz-box-shadow: 0px 0px $bulr $color;
    box-shadow: 0px 0px $bulr $color;
}
3.vite引入并使用
//全局引入
css: {
    preprocessorOptions: {
      scss: {
        /**如果引入多个文件,可以使用
       * '@import "@/assets/scss/globalVariable1.scss";
       * @import"@/assets/scss/globalVariable2.scss";'
      **/
        additionalData: '@import "@/style/globalVar.scss";',
      }
    }
  },

//按需引入并使用
<style scoped lang="scss">
@import "@/style/globalMixin.scss";
.test{
  width: 650px;
  height: 60px;
  font-size: $font-size-normal;
  background-color: $bg-color;
  @include box-shadow;
}
</style>
通过以上3步就可以在vite中使用sass了
疑难杂症二: 有很多小伙伴说 require 函数用不了了
咱们在vue2中是不存在require is not defined问题的,那是因为webpack帮我们解决了,开发时在内部对其了转换
为什么非要使用require语法?因为require语法有时候确实蛮好用的啊,咱们在vue2中可以通过require语法,定义变量,动态获取一些静态资源
vite却不能使用,确实有点点的难受,最近刚发现了一种开发时依赖插件vite-plugin-require-transform,那就试一下吧
npm i vite-plugin-require-transform --save-dev
然后vite.config.js中配置
import { defineConfig } from 'vite'
import requireTransform from 'vite-plugin-require-transform'

export default defineConfig({
  plugins: [
    requireTransform({
      fileRegex: /.js$|.vue$/
    }),
  ],
});
使用:
<img class="img" :src="require('@/assets/login/login-bg.jpg')" alt="">
而 :src="require(@/assets/login/login-bg.jpg)" 是报错的
模板字符串的都不行,变量更不用写了,这次换个写法,同样也是不行
唉,有点失望,,,,真不知道出这个插件的意义在哪,这也不实用啊,跟webpack那个require差的有点儿远啊,这个插件就是将代码从 require 语法转换为 import ,但是我发现还不如import好用的,倒不如直接使用import了,都知道存在即合理,哈哈哈哈,就仅仅只为了解决require is not defined而出现吗
原因是process.env已经被移除了,要在vite.config.ts 中增加define: { 'process.env': {} }就好了。
import { defineConfig } from 'vite'
import vue from '@vitejs/plugin-vue'
// https://vitejs.dev/config/
export default defineConfig({
plugins: [
vue()
],
define: {
'process.env': {}
}
})
解惑: 网上都说vite要比webpack快
但个人感受,默认情况下, vite项目的启动确实比webpack快,但如果某个界面是首次进入,且依赖比较多/比较复杂的话,那就会比较慢了。
这篇文章就是用来记录,关于vite慢的相关问题与可能的解决方案
为什么说vite快?为什么说vite慢?
只说vite快那太过笼统,但vite项目的启动确实是快(注意这里的启动是指命令行启动完毕,不是指启动完之后首页加载完毕)
启动完之后,你打开首页,你可能就不一定觉得vite快了(我之前就时常在自我怀疑,是不是我vite的打开方式不对,怎么这么慢????),如果依赖的资源比较多,那速度有时慢的感人
可以简单的认为,vite之所以启动快,是因为vite启动时并不会像webpack一样对所有代码进行编译/打包/压缩, 他只会对一小部分代码进行一些简单的处理,剩余的工作都交给浏览器,以及运行时进行依赖分析,动态打包,动态引入
具体原因/原理可见:vite原理与实践记录
对vite慢的分析与尝试解决
vite启动快的原理,也导致了他在加载依赖项很多,很复杂的页面时,页面打开慢。因为他要进行一系列的动态分析/动态资源引入/动态编译。
vite慢的表现
vite的慢的时候,会有什么表现呢?
从web开发者工具的network选项卡中,会看到请求了很多资源
终端(CMD)中也会显示, 类似这样的文字:
[vite] new dependencies found: axios, updating...
[vite] ? dependencies updated, reloading page...
界面会被强制刷新一次
表现如下图
如下两篇文章也是对vite慢的记录,以及一定的分析:
vite首次启动加载慢
Vite 解决项目刷新慢问题
对于vite慢有没有解决办法?
慢的主要原因是vite需要动态的解析依赖,并打包,引入。其中打包又可能是慢中之慢。
VITE官网:依赖优化选项可能的原因找到了,那就看vite官方有没有提及解决办法,还好官方文档中有提及这个,只是写的不详细:VITE官网:依赖优化选项
解决方案
总之就是通过添加类似如下的配置,让vite在启动之初就对某些资源进行预打包,尽量避免后续的动态打包,示例配置如下
点击查看代码
vite.config.ts

{
   optimizeDeps: {
      include: [
        'vue',
        'map-factory',
        'element-plus/es',
        'element-plus/es/components/form/style/index',
        'element-plus/es/components/radio-group/style/index',
        'element-plus/es/components/radio/style/index',
        'element-plus/es/components/checkbox/style/index',
        'element-plus/es/components/checkbox-group/style/index',
        'element-plus/es/components/switch/style/index',
        'element-plus/es/components/time-picker/style/index',
        'element-plus/es/components/date-picker/style/index',
        'element-plus/es/components/col/style/index',
        'element-plus/es/components/form-item/style/index',
        'element-plus/es/components/alert/style/index',
        'element-plus/es/components/breadcrumb/style/index',
        'element-plus/es/components/select/style/index',
        'element-plus/es/components/input/style/index',
        'element-plus/es/components/breadcrumb-item/style/index',
        'element-plus/es/components/tag/style/index',
        'element-plus/es/components/pagination/style/index',
        'element-plus/es/components/table/style/index',
        'element-plus/es/components/table-column/style/index',
        'element-plus/es/components/card/style/index',
        'element-plus/es/components/row/style/index',
        'element-plus/es/components/button/style/index',
        'element-plus/es/components/menu/style/index',
        'element-plus/es/components/sub-menu/style/index',
        'element-plus/es/components/menu-item/style/index',
        'element-plus/es/components/option/style/index',
        '@element-plus/icons-vue',
        'pinia',
        'axios',
        'vue-request',
        'vue-router',
        '@vueuse/core',
      ],
    }
}
配置完之后,vite的启动也会和原来有点不同, 终端(CMD)中会多出Pre-bundling dependencies的信息
最终解决方案
上面的解决方案,确实可以解决vite慢的问题,但每个项目都要进行这么一通配置,还是比较繁琐的,还好有开发者,写了相应插件来避免人工写这一堆配置
NPM: vite-plugin-optimize-persist
插件使用
npm i -D vite-plugin-optimize-persist vite-plugin-package-config
vite.config.ts 中增加配置
// vite.config.ts
import OptimizationPersist from 'vite-plugin-optimize-persist'
import PkgConfig from 'vite-plugin-package-config'

export default {
  plugins: [
    PkgConfig(),
    OptimizationPersist()
  ]
}
注意: 首次加载的时候,依然会很慢,这个是正常现象,因为这个插件, 加快vite载入界面速度的原理, 也和上面说的一样,而第一次,这个插件也没法知道,哪些依赖需要预构建,他只是在vite动态引入资源的时候,将这些资源都记录下来,自动写入了package.json中,当再次启动项目的时候,插件会读取之前他写入在package.json中的数据,并告知vite,这样vite就能对这些资源进行预构建了,也就能加快进入界面的速度了,但相应的启动速度就会比原来稍微慢一点
package.json
看到这里你可能会想,Vite第二次启动本来就有缓存,本来就快,那这个插件岂不是没有意义了?当然还是有意义的,如果在这之后,被人再拿到你的源代码,因为Package.Json中已经有了预构建配置了,所以,他的Vite在第一次启动时,就能对资源进行预构建了,另外,如果你由于某些原因需要删除Node_modules/.Vite这个缓存目录, 由于有这个插件,你的这次首次启动也会快起来。


 浙公网安备 33010602011771号