
【mybatisPlus】mybatis基本使用
一、了解Mybatis-Plus
1.1、Mybatis-Plus介绍
MyBatis-Plus(简称 MP)是一个 MyBatis 的增强工具,在 MyBatis 的基础上只做增强不做改变,为简化开发、提高效率而生。
官网:https://mybatis.plus/ 或 https://mp.baomidou.com/
1.2、代码以及文档
文档地址:https://mybatis.plus/guide/
源码地址:https://github.com/baomidou/mybatis-plus
1.3、特性
- 无侵入:只做增强不做改变,引入它不会对现有工程产生影响,如丝般顺滑
- 损耗小:启动即会自动注入基本 CURD,性能基本无损耗,直接面向对象操作
- 强大的 CRUD 操作:内置通用 Mapper、通用 Service,仅仅通过少量配置即可实现单表大部分 CRUD 操作,更有强大的条件构造器,满足各类使用需求
- 支持 Lambda 形式调用:通过 Lambda 表达式,方便的编写各类查询条件,无需再担心字段写错
- 支持多种数据库:支持 MySQL、MariaDB、Oracle、DB2、H2、HSQL、SQLite、Postgre、SQLServer2005、SQLServer 等多种数据库
- 支持主键自动生成:支持多达 4 种主键策略(内含分布式唯一 ID 生成器 - Sequence),可自由配置,完美解决主键问题
- 支持 XML 热加载:Mapper 对应的 XML 支持热加载,对于简单的 CRUD 操作,甚至可以无 XML 启动
- 支持 ActiveRecord 模式:支持 ActiveRecord 形式调用,实体类只需继承 Model 类即可进行强大的 CRUD 操作
- 支持自定义全局通用操作:支持全局通用方法注入( Write once, use anywhere )
- 支持关键词自动转义:支持数据库关键词(order、key…)自动转义,还可自定义关键词
- 内置代码生成器:采用代码或者 Maven 插件可快速生成 Mapper 、 Model 、 Service 、 Controller 层代码,支持模板引擎,更有超多自定义配置等您来使用
- 内置分页插件:基于 MyBatis 物理分页,开发者无需关心具体操作,配置好插件之后,写分页等同于普通 List 查询
- 内置性能分析插件:可输出 Sql 语句以及其执行时间,建议开发测试时启用该功能,能快速揪出慢查询
- 内置全局拦截插件:提供全表 delete 、 update 操作智能分析阻断,也可自定义拦截规则,预防误操作
- 内置 Sql 注入剥离器:支持 Sql 注入剥离,有效预防 Sql 注入攻击
1.4、作者
Mybatis-Plus是由baomidou(苞米豆)组织开发并且开源的,目前该组织大概有30人左右。
码云地址:https://gitee.com/organizations/baomidou
二、快速开始
对于Mybatis整合MP有常常有三种用法,分别是Mybatis+MP(了解)、Spring+Mybatis+MP(掌握)、Spring Boot+Mybatis+MP(掌握)。
2.1、创建数据库以及表
-- 创建测试表
CREATE TABLE `tb_user` (
  `id` bigint(20) NOT NULL AUTO_INCREMENT COMMENT '主键ID',
  `user_name` varchar(20) NOT NULL COMMENT '用户名',
  `password` varchar(20) NOT NULL COMMENT '密码',
  `name` varchar(30) DEFAULT NULL COMMENT '姓名',
  `age` int(11) DEFAULT NULL COMMENT '年龄',
  `email` varchar(50) DEFAULT NULL COMMENT '邮箱',
  PRIMARY KEY (`id`)
) ENGINE=InnoDB AUTO_INCREMENT=1 DEFAULT CHARSET=utf8;

-- 插入测试数据
INSERT INTO `tb_user` (`id`, `user_name`, `password`, `name`, `age`, `email`) VALUES ('1', 'qinglong', '123456', '青龙', '18', 'test1@1000phone.com');
INSERT INTO `tb_user` (`id`, `user_name`, `password`, `name`, `age`, `email`) VALUES ('2', 'baihu', '123456', '白虎', '20', 'test2@1000phone.com');
INSERT INTO `tb_user` (`id`, `user_name`, `password`, `name`, `age`, `email`) VALUES ('3', 'zhuque', '123456', '朱雀', '28', 'test3@1000phone.com');
INSERT INTO `tb_user` (`id`, `user_name`, `password`, `name`, `age`, `email`) VALUES ('4', 'xuanwu', '123456', '玄武', '21', 'test4@1000phone.com');
INSERT INTO `tb_user` (`id`, `user_name`, `password`, `name`, `age`, `email`) VALUES ('5', 'taoti', '123456', '饕鬄', '24', 'test5@1000phone.com');
2.2、创建工程
新建 Maven项目, 不要选择Maven骨架.
项目Pom.xml中导入依赖:
<?xml version="1.0" encoding="UTF-8"?>
<project xmlns="http://maven.apache.org/POM/4.0.0"
         xmlns:xsi="http://www.w3.org/2001/XMLSchema-instance"
         xsi:schemaLocation="http://maven.apache.org/POM/4.0.0 http://maven.apache.org/xsd/maven-4.0.0.xsd">
    <modelVersion>4.0.0</modelVersion>

    <groupId>com.qfedu</groupId>
    <artifactId>qianfeng_mybatis_plus</artifactId>
    <version>1.0-SNAPSHOT</version>
    <packaging>pom</packaging>

    <properties>
        <!-- 项目源码及编译输出的编码 -->
        <project.build.sourceEncoding>UTF-8</project.build.sourceEncoding>
        <project.reporting.outputEncoding>UTF-8</project.reporting.outputEncoding>
        <!-- 项目编译JDK版本 -->
        <maven.compiler.source>1.8</maven.compiler.source>
        <maven.compiler.target>1.8</maven.compiler.target>
    </properties>

    <dependencies>
        <!-- mybatis-plus插件依赖 -->
        <dependency>
            <groupId>com.baomidou</groupId>
            <artifactId>mybatis-plus</artifactId>
            <version>3.4.1</version>
        </dependency>
        <!-- MySql -->
        <dependency>
            <groupId>mysql</groupId>
            <artifactId>mysql-connector-java</artifactId>
            <version>5.1.47</version>
            <scope>runtime</scope>
        </dependency>
        <!-- 连接池 -->
        <dependency>
            <groupId>com.alibaba</groupId>
            <artifactId>druid</artifactId>
            <version>1.1.5</version>
        </dependency>
        <!--简化bean代码的工具包-->
        <dependency>
            <groupId>org.projectlombok</groupId>
            <artifactId>lombok</artifactId>
            <optional>true</optional>
            <version>1.18.4</version>
        </dependency>
        <dependency>
            <groupId>junit</groupId>
            <artifactId>junit</artifactId>
            <version>4.12</version>
        </dependency>
        <dependency>
            <groupId>log4j</groupId>
            <artifactId>log4j</artifactId>
            <version>1.2.17</version>
        </dependency>
    </dependencies>

    <build>
        <resources>
            <resource>
                <directory>src/main/java</directory>
                <includes>
                    <include>**/*.xml</include>
                </includes>
            </resource>
        </resources>
    </build>
</project>
2.3、MyBatis + MyBatis-Plus
下面说一下,Mybatis与Mybatis-Plus整合。
在项目的resources目录下新建log4j.properties:
# Global logging configuration
log4j.rootLogger=DEBUG, stdout
# MyBatis logging configuration...
log4j.logger.org.mybatis.example.BlogMapper=TRACE
# Console output...
log4j.appender.stdout=org.apache.log4j.ConsoleAppender
log4j.appender.stdout.layout=org.apache.log4j.PatternLayout
log4j.appender.stdout.layout.ConversionPattern=%5p [%t] - %m%n
2.3.1、Mybatis实现查询User
第一步,编写User实体对象:(这里使用lombok进行了简化bean操作)
/**
 * 用户实体类
 */
@Data //get set toString equales hashCode
@NoArgsConstructor //无参的构造方法
@AllArgsConstructor //有参的构造方法
public class User {
    private Long id;
    private String userName;
    private String password;
    private String name;
    private Integer age;
    private String email;
}
第二步,在resources目录下, 新建mybatis_config.xml文件及jdbc.properties:
mybatis_config.xml
<?xml version="1.0" encoding="UTF-8" ?>
<!DOCTYPE configuration PUBLIC "-//mybatis.org//DTD Config 3.0//EN" "http://mybatis.org/dtd/mybatis-3-config.dtd">
<configuration>
    <!-- 引入外部配置文件 -->
    <properties resource="jdbc.properties" />

    <!-- 别名 -->
    <typeAliases>
        <package name="com.qfedu.entity"/>
    </typeAliases>

    <!-- 环境配置 -->
    <environments default="mysql">
        <environment id="mysql">
            <transactionManager type="JDBC"></transactionManager>
            <dataSource type="POOLED">
                <property name="driver" value="${jdbc.driver}"/>
                <property name="url" value="${jdbc.url}"/>
                <property name="username" value="${jdbc.username}"/>
                <property name="password" value="${jdbc.password}"/>
            </dataSource>
        </environment>
    </environments>

    <!-- 引入映射配置文件 -->
    <mappers>
        <package name="com/qfedu/mapper"/>
    </mappers>
</configuration>
jdbc.properties
jdbc.driver=com.mysql.jdbc.Driver
jdbc.url=jdbc:mysql://localhost:3306/mybatisplus?useSSL=false&useUnicode=true&characterEncoding=utf-8
jdbc.username=root
jdbc.password=root
第三步,编写UserMapper接口:
/**
 * 用户Mapper接口
 */
public interface UserMapper {
    /**
     * 查询所有用户
     */
    List<User> findAll();
}
第四步,在mapper包下, 新建UserMapper.xml文件:
<?xml version="1.0" encoding="UTF-8" ?>
<!DOCTYPE mapper
        PUBLIC "-//mybatis.org//DTD Mapper 3.0//EN"
        "http://mybatis.org/dtd/mybatis-3-mapper.dtd">
<mapper namespace="com.qfedu.mapper.UserMapper">
    <select id="findAll" resultType="com.qfedu.pojo.User">
      select * from tb_user
    </select>
</mapper>
第五步,编写TestMybatis测试用例:
/**
 * 测试类
 */
public class TestMybatis {

    @Test
    public void testUserList() throws Exception {
        InputStream inputStream = Resources.getResourceAsStream(mybatis_config.xml);
        SqlSessionFactory sqlSessionFactory = new SqlSessionFactoryBuilder().build(inputStream);
        SqlSession sqlSession = sqlSessionFactory.openSession();

        UserMapper userMapper = sqlSession.getMapper(UserMapper.class);
        List<User> list = userMapper.findAll();
        for (User user : list) {
            System.out.println(user);
        }
    }
}
测试结果:
[main] [com.qfedu.mapper.UserMapper.findAll]-[DEBUG] ==>  Preparing: select * from tb_user
[main] [com.qfedu.mapper.UserMapper.findAll]-[DEBUG] ==> Parameters:
[main] [com.qfedu.mapper.UserMapper.findAll]-[DEBUG] <==      Total: 5
User(id=1, userName=null, password=123456, name=青龙, age=18, email=test1@1000phone.com)
User(id=2, userName=null, password=123456, name=白虎, age=20, email=test2@1000phone.com)
User(id=3, userName=null, password=123456, name=朱雀, age=28, email=test3@1000phone.com)
User(id=4, userName=null, password=123456, name=玄武, age=21, email=test4@1000phone.com)
User(id=5, userName=null, password=123456, name=饕鬄, age=24, email=test5@1000phone.com)
2.3.2、MyBatis+MyBatisPlus实现查询User
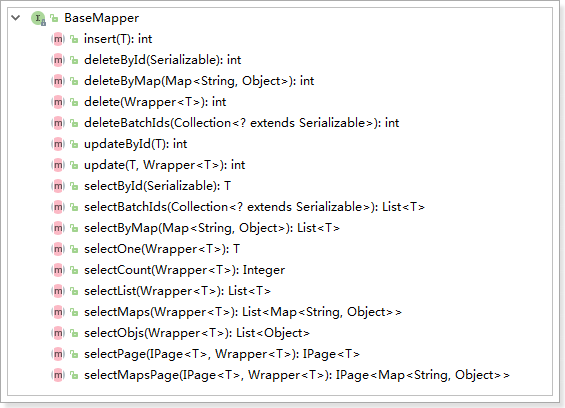
第一步,将UserMapper继承BaseMapper,将拥有了BaseMapper中的所有方法:
/**
 * 用户Mapper接口
 */
public interface UserMapper extends BaseMapper<User> {

    /**
     * 查询所有用户
     */
    List<User> findAll();
}
第二步,使用MP中的MybatisSqlSessionFactoryBuilder进行构建:
package com.qfedu.test;

import com.baomidou.mybatisplus.core.MybatisSqlSessionFactoryBuilder;
import com.qfedu.mapper.UserMapper;
import com.qfedu.pojo.User;
import org.apache.ibatis.io.Resources;
import org.apache.ibatis.session.SqlSession;
import org.apache.ibatis.session.SqlSessionFactory;
import org.junit.Test;

import java.io.InputStream;
import java.util.List;

/**
 * 测试Mybatis + MP
 */
public class TestMybatisPlus {

    @Test
    public void test3() throws IOException {
        String resource = "mybatis_config.xml";
        InputStream resourceAsStream = Resources.getResourceAsStream(resource);
        //这里使用的是MP中的MybatisSqlSessionFactoryBuilder
        SqlSessionFactory sqlSessionFactory = new MybatisSqlSessionFactoryBuilder().build(resourceAsStream);
        SqlSession sqlSession = sqlSessionFactory.openSession();

        UserMapper userMapper = sqlSession.getMapper(UserMapper.class);
        List<User> list = userMapper.selectList(null);
        for (User user : list) {
            System.out.println(user);
        }
    }
}
运行报错:
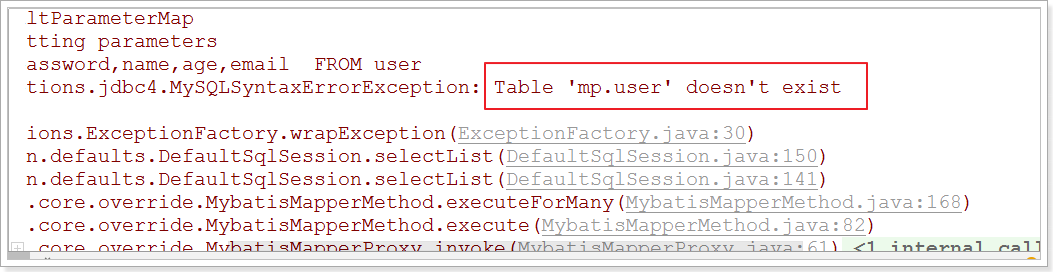
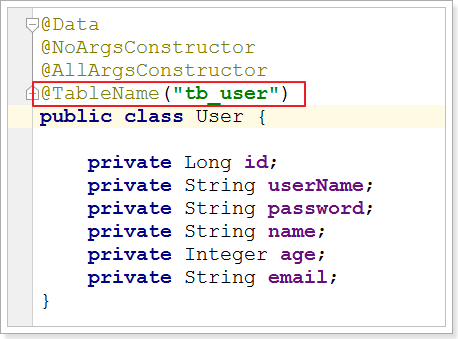
解决:在User对象中添加@TableName,指定数据库表名
测试:
[main] [com.qfedu.mapper.UserMapper.findAll]-[DEBUG] ==>  Preparing: select * from tb_user
[main] [com.qfedu.mapper.UserMapper.findAll]-[DEBUG] ==> Parameters:
[main] [com.qfedu.mapper.UserMapper.findAll]-[DEBUG] <==      Total: 5
User(id=1, userName=qinglong, password=123456, name=青龙, age=18, email=test1@1000phone.com)
User(id=2, userName=baihu, password=123456, name=白虎, age=20, email=test2@1000phone.com)
User(id=3, userName=zhuque, password=123456, name=朱雀, age=28, email=test3@1000phone.com)
User(id=4, userName=xuanwu, password=123456, name=玄武, age=21, email=test4@1000phone.com)
User(id=5, userName=taoti, password=123456, name=饕鬄, age=24, email=test5@1000phone.com)
简单说明:由于使用了MybatisSqlSessionFactoryBuilder进行了构建,继承的BaseMapper中的方法就载入到了SqlSession中,所以就可以直接使用相关的方法;
2.4、Spring + MyBatis + MyBatisPlus
引入了Spring框架,数据源、构建等工作就交给了Spring管理。
2.4.1、创建Maven项目
在pom.xml中添加相关依赖
<?xml version="1.0" encoding="UTF-8"?>
<project xmlns="http://maven.apache.org/POM/4.0.0"
         xmlns:xsi="http://www.w3.org/2001/XMLSchema-instance"
         xsi:schemaLocation="http://maven.apache.org/POM/4.0.0 http://maven.apache.org/xsd/maven-4.0.0.xsd">
    <parent>
        <artifactId>qianfeng_mybatis_plus</artifactId>
        <groupId>com.qfedu</groupId>
        <version>1.0-SNAPSHOT</version>
    </parent>
    <modelVersion>4.0.0</modelVersion>

    <artifactId>mp_spring_learn</artifactId>

    <dependencies>
        <dependency>
            <groupId>com.baomidou</groupId>
            <artifactId>mybatis-plus</artifactId>
            <version>3.4.1</version>
        </dependency>
        <!-- MySql -->
        <dependency>
            <groupId>mysql</groupId>
            <artifactId>mysql-connector-java</artifactId>
            <version>5.1.47</version>
            <scope>runtime</scope>
        </dependency>
        <!-- 连接池 -->
        <dependency>
            <groupId>com.alibaba</groupId>
            <artifactId>druid</artifactId>
            <version>1.1.5</version>
        </dependency>
        <!--简化bean代码的工具包-->
        <dependency>
            <groupId>org.projectlombok</groupId>
            <artifactId>lombok</artifactId>
            <optional>true</optional>
            <version>1.18.4</version>
        </dependency>
        <dependency>
            <groupId>junit</groupId>
            <artifactId>junit</artifactId>
            <version>4.12</version>
        </dependency>
        <dependency>
            <groupId>org.slf4j</groupId>
            <artifactId>slf4j-log4j12</artifactId>
            <version>1.6.4</version>
        </dependency>
        <dependency>
            <groupId>org.springframework</groupId>
            <artifactId>spring-jdbc</artifactId>
            <version>5.2.6.RELEASE</version>
        </dependency>
        <dependency>
            <groupId>org.springframework</groupId>
            <artifactId>spring-test</artifactId>
            <version>5.2.6.RELEASE</version>
        </dependency>
        <dependency>
            <groupId>org.springframework</groupId>
            <artifactId>spring-beans</artifactId>
            <version>5.2.6.RELEASE</version>
        </dependency>
        <dependency>
            <groupId>org.springframework</groupId>
            <artifactId>spring-core</artifactId>
            <version>5.2.6.RELEASE</version>
        </dependency>
        <dependency>
            <groupId>org.springframework</groupId>
            <artifactId>spring-context</artifactId>
            <version>5.2.6.RELEASE</version>
        </dependency>
        <dependency>
            <groupId>org.springframework</groupId>
            <artifactId>spring-expression</artifactId>
            <version>5.2.6.RELEASE</version>
        </dependency>
    </dependencies>

    <build>
        <resources>
            <resource>
                <directory>src/main/java</directory>
                <includes>
                    <include>**/*.xml</include>
                </includes>
            </resource>
        </resources>
    </build>
</project>
2.4.2、实现查询User
第一步,在项目的resources目录下, 新建jdbc.properties
jdbc.driver=com.mysql.jdbc.Driver
jdbc.url=jdbc:mysql://localhost:3306/test?useSSL=false&useUnicode=true&characterEncoding=utf-8
jdbc.username=root
jdbc.password=root
第二步,在项目resources目录下, 新建applicationContext.xml
<?xml version="1.0" encoding="UTF-8"?>
<beans xmlns="http://www.springframework.org/schema/beans"
       xmlns:xsi="http://www.w3.org/2001/XMLSchema-instance"
       xmlns:context="http://www.springframework.org/schema/context"
       xsi:schemaLocation="http://www.springframework.org/schema/beans
        http://www.springframework.org/schema/beans/spring-beans.xsd
        http://www.springframework.org/schema/context
        http://www.springframework.org/schema/context/spring-context.xsd">

    <context:property-placeholder location="classpath:jdbc.properties"/>

    <!-- 定义数据源 -->
    <bean id="dataSource" class="com.alibaba.druid.pool.DruidDataSource">
        <property name="driverClassName" value="${jdbc.driver}"/>
        <property name="url" value="${jdbc.url}"/>
        <property name="username" value="${jdbc.username}"/>
        <property name="password" value="${jdbc.password}"/>
    </bean>

    <!--这里使用MP提供的sqlSessionFactory,完成了Spring与MP的整合-->
    <bean id="sqlSessionFactory" class="com.baomidou.mybatisplus.extension.spring.MybatisSqlSessionFactoryBean">
        <property name="dataSource" ref="dataSource"/>
        <!-- 设置别名 -->
        <property name="typeAliasesPackage" value="com.qfedu.entity" />
    </bean>

    <!--扫描mapper接口,使用的依然是Mybatis原生的扫描器-->
    <bean class="org.mybatis.spring.mapper.MapperScannerConfigurer">
        <property name="basePackage" value="com.qfedu.mapper"/>
    </bean>

</beans>
第三步,添加日志配置文件:
# Global logging configuration
log4j.rootLogger=DEBUG, stdout
# MyBatis logging configuration...
log4j.logger.org.mybatis.example.BlogMapper=TRACE
# Console output...
log4j.appender.stdout=org.apache.log4j.ConsoleAppender
log4j.appender.stdout.layout=org.apache.log4j.PatternLayout
log4j.appender.stdout.layout.ConversionPattern=%5p [%t] - %m%n
第四步,编写User对象以及UserMapper接口:
/**
 * 用户实体类
 */
@Data
@NoArgsConstructor
@AllArgsConstructor
@TableName("tb_user")
public class User {
    private Long id;
    private String userName;
    private String password;
    private String name;
    private Integer age;
    private String email;
}
/**
 * 用户Mapper接口
 */
public interface UserMapper extends BaseMapper<User> {

}
第四步,编写测试用例:
/**
 * @author zhaojian
 */
@RunWith(SpringJUnit4ClassRunner.class)
@ContextConfiguration(locations = "classpath:applicationContext.xml")
public class TestSpringMP {

    @Autowired
    private UserMapper userMapper;

    @Test
    public void testSelectList(){
        List<User> users = this.userMapper.selectList(null);
        for (User user : users) {
            System.out.println(user);
        }
    }
}
测试:
User(id=1, userName=qinglong, password=123456, name=青龙, age=18, email=test1@1000phone.com)
User(id=2, userName=baihu, password=123456, name=白虎, age=20, email=test2@1000phone.com)
User(id=3, userName=zhuque, password=123456, name=朱雀, age=28, email=test3@1000phone.com)
User(id=4, userName=xuanwu, password=123456, name=玄武, age=21, email=test4@1000phone.com)
User(id=5, userName=taoti, password=123456, name=饕鬄, age=24, email=test5@1000phone.com)
三、通用CRUD
通过前面的学习,我们了解到通过继承BaseMapper就可以获取到各种各样的单表操作,接下来我们将详细讲解这些操作。
3.1、插入操作
3.1.1、测试用例
package com.qfedu.test;

import com.qfedu.mapper.UserMapper;
import com.qfedu.pojo.User;
import org.junit.Test;
import org.junit.runner.RunWith;
import org.springframework.beans.factory.annotation.Autowired;
import org.springframework.boot.test.context.SpringBootTest;
import org.springframework.test.context.junit4.SpringRunner;

import java.util.List;

/**
 * 普通增删改查测试
 */
@RunWith(SpringJUnit4ClassRunner.class)
@ContextConfiguration(locations = "classpath:applicationContext.xml")
public class UserMapperTest {

    @Autowired
    private UserMapper userMapper;

    @Test
    public void testInsert() {
        User user = new User();
        user.setAge(29);
        user.setName("梼杌");
        user.setEmail("taowu@1000phone.com");
        user.setUserName("taowu");
        user.setPassword("123456");
        int count = userMapper.insert(user);
        System.out.println("=======操作了几条数据:====" + count);
        System.out.println("===id是:====" + user.getId());
    }
}
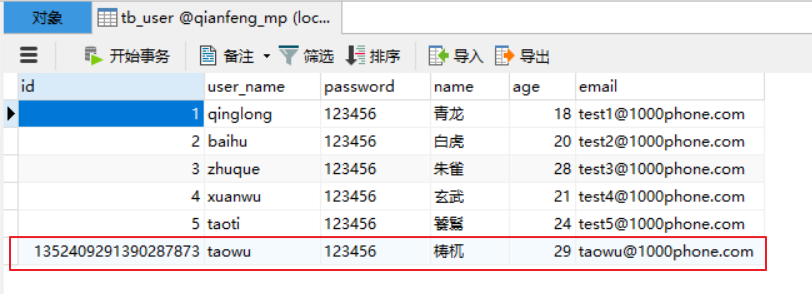
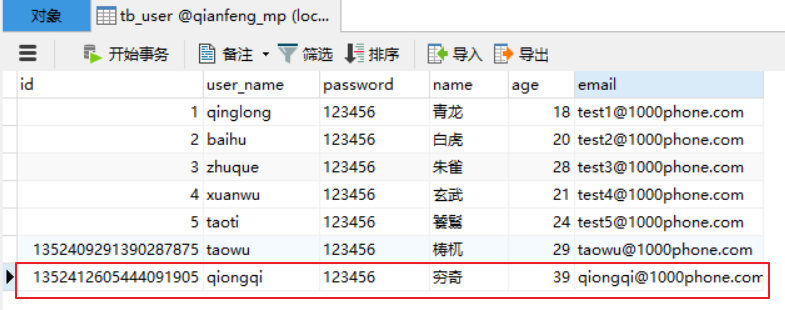
3.1.2、执行测试结果
3.1.3、ID生成策略
可以看到,数据已经写入到了数据库,但是,id的值不正确,我们期望的是数据库自增长,实际是MP生成了id的值写入到了数据库。
如何设置id的生成策略呢?
MP支持的id策略:
package com.baomidou.mybatisplus.annotation;

import lombok.Getter;

/**
 * 生成ID类型枚举类
 *
 * @author hubin
 * @since 2015-11-10
 */
@Getter
public enum IdType {
    /**
     * 数据库ID自增
     */
    AUTO(0),
    /**
     * 该类型为未设置主键类型
     */
    NONE(1),
    /**
     * 用户输入ID
     * <p>该类型可以通过自己注册自动填充插件进行填充</p>
     */
    INPUT(2),

    /* 以下3种类型、只有当插入对象ID 为空,才自动填充。 */
    /**
     * 全局唯一ID (idWorker)
     */
    ID_WORKER(3),
    /**
     * 全局唯一ID (UUID)
     */
    UUID(4),
    /**
     * 字符串全局唯一ID (idWorker 的字符串表示)
     */
    ID_WORKER_STR(5);

    private final int key;

    IdType(int key) {
        this.key = key;
    }
}
修改User对象:
/**
 * 用户实体类
 */
@Data
@NoArgsConstructor
@AllArgsConstructor
@TableName("tb_user")
public class User {
    //指定id类型为使用分布式ID生成器生成
    @TableId(type = IdType.ID_WORKER)
    private Long id;

    private String userName;
    private String password;
    private String name;
    private Integer age;
    private String email;
}
数据插入成功:
3.1.4、@TableField
在MP中通过@TableField注解可以指定字段的一些属性,常常解决的问题有2个:
1、对象中的属性名和字段名不一致的问题(非驼峰)
2、对象中的属性字段在表中不存在的问题
使用:
package com.qfedu.pojo;

import com.baomidou.mybatisplus.annotation.IdType;
import com.baomidou.mybatisplus.annotation.TableField;
import com.baomidou.mybatisplus.annotation.TableId;
import com.baomidou.mybatisplus.annotation.TableName;
import lombok.AllArgsConstructor;
import lombok.Data;
import lombok.NoArgsConstructor;

/**
 * 用户实体类
 * @author zhaojian
 */
@Data
@NoArgsConstructor
@AllArgsConstructor
@TableName("tb_user")
public class User {

    //指定id类型为使用分布式ID生成器生成
    @TableId(type = IdType.ID_WORKER)
    private Long id;

    private String userName;

    //密码字段不应该被查询出来
    @TableField(select = false)
    private String password;

    private String name;
    private Integer age;

    //表中字段名和实体类属性名不一致
    @TableField(value = "email")
    private String mail;

    //表中不存在这个字段
    @TableField(exist = false)
    private String address;

}
效果:

3.2、更新操作
在MP中,更新操作有2种,一种是根据id更新,另一种是根据条件更新。
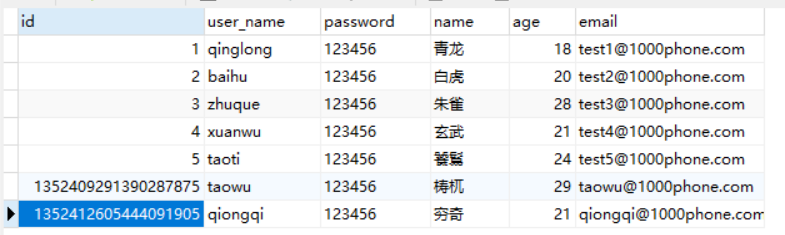
3.2.1、根据id更新
测试:
@RunWith(SpringRunner.class)
@SpringBootTest
public class UserMapperTest {

    @Autowired
    private UserMapper userMapper;

    @Test
    public void testUpdateById() {
        User user = new User();
        user.setId(1352412605444091905L); //主键
        user.setAge(21); //更新的字段

        //根据id更新,更新不为null的字段
        userMapper.updateById(user);
    }

}
结果:
3.2.2、根据条件更新
源码中的方法:
    /**
     * 根据 whereEntity 条件,更新记录
     *
     * @param entity        实体对象 (set 条件值,可以为 null)
     * @param updateWrapper 实体对象封装操作类(可以为 null,里面的 entity 用于生成 where 语句)
     */
    int update(@Param(Constants.ENTITY) T entity, @Param(Constants.WRAPPER) Wrapper<T> updateWrapper);
测试用例:
package com.qfedu.test;

import com.baomidou.mybatisplus.core.conditions.query.QueryWrapper;
import com.qfedu.mapper.UserMapper;
import com.qfedu.pojo.User;
import org.junit.Test;
import org.junit.runner.RunWith;
import org.springframework.beans.factory.annotation.Autowired;
import org.springframework.boot.test.context.SpringBootTest;
import org.springframework.test.context.junit4.SpringRunner;

import java.util.List;

/**
 * 普通增删改查测试
 * @author zhaojian
 */
@RunWith(SpringRunner.class)
@SpringBootTest
public class UserMapperTest {

    @Autowired
    private UserMapper userMapper;

    @Test
    public void testUpdate() {
        User user = new User();
        user.setAge(22); //更新的字段

        //更新的条件
        QueryWrapper<User> wrapper = new QueryWrapper<>();
        wrapper.eq("id", 1352412605444091905L);

        //执行更新操作
        int result = userMapper.update(user, wrapper);
        System.out.println("result = " + result);
    }
}
关于wrapper更多的用法后面会详细讲解。
3.3、删除操作
3.3.1、deleteById
源码中的方法:
/**
 * 根据 ID 删除
 *
 * @param id 主键ID
 */
int deleteById(Serializable id);
测试用例:
/**
 * 普通增删改查测试
 * @author zhaojian
 */
@RunWith(SpringRunner.class)
@SpringBootTest
public class UserMapperTest {

    @Autowired
    private UserMapper userMapper;

    @Test
    public void testDeleteById() {
        //执行删除操作
        int result = userMapper.deleteById(1352412605444091905L);
        System.out.println("result = " + result);
    }
}
结果:
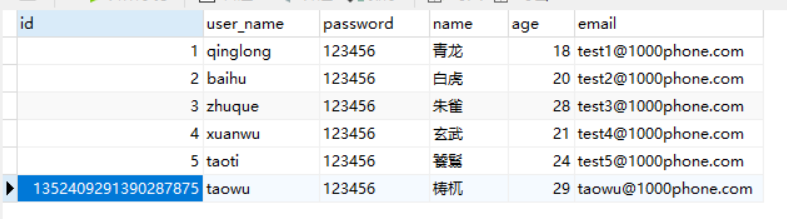
数据被删除。
3.3.2、deleteByMap
源码中的方法:
    /**
     * 根据 columnMap 条件,删除记录
     *
     * @param columnMap 表字段 map 对象
     */
    int deleteByMap(@Param(Constants.COLUMN_MAP) Map<String, Object> columnMap);
测试用例:
@Test
public void testDeleteByMap() {
    Map<String, Object> columnMap = new HashMap<>();
    columnMap.put("age",29);
    columnMap.put("name","梼杌");

    //将columnMap中的元素设置为删除的条件,多个之间为and关系
    int result = userMapper.deleteByMap(columnMap);
    System.out.println("result = " + result);
}
3.3.3、delete
源码中的方法:
/**
 * 根据 entity 条件,删除记录
 *
 * @param wrapper 实体对象封装操作类(可以为 null)
 */
int delete(@Param(Constants.WRAPPER) Wrapper<T> wrapper);
测试用例:
@Test
public void testDelete() {
    User user = new User();
    user.setAge(24);
    user.setName("饕鬄");

    //将实体对象进行包装,包装为操作条件
    QueryWrapper<User> wrapper = new QueryWrapper<>(user);

    int result = userMapper.delete(wrapper);
    System.out.println("result = " + result);
}
3.3.4、deleteBatchIds
源码中的方法:
    /**
     * 删除(根据ID 批量删除)
     *
     * @param idList 主键ID列表(不能为 null 以及 empty)
     */
    int deleteBatchIds(@Param(Constants.COLLECTION) Collection<? extends Serializable> idList);
测试用例:
@Test
public void testDeleteByMap() {
    //根据id集合批量删除
    int result = userMapper.deleteBatchIds(Arrays.asList(1L,10L,20L));
    System.out.println("result = " + result);
}
3.4、查询操作
MP提供了多种查询操作,包括根据id查询、批量查询、查询单条数据、查询列表、分页查询等操作。
3.4.1、selectById
源码中的方法:
    /**
     * 根据 ID 查询
     *
     * @param id 主键ID
     */
    T selectById(Serializable id);
测试用例:
@Test
public void testSelectById() {
    //根据id查询数据
    User user = userMapper.selectById(4L);
    System.out.println("result = " + user);
}
3.4.2、selectBatchIds
源码中的方法:
/**
 * 查询(根据ID 批量查询)
 *
 * @param idList 主键ID列表(不能为 null 以及 empty)
 */
List<T> selectBatchIds(@Param(Constants.COLLECTION) Collection<? extends Serializable> idList);
测试用例:
@Test
public void testSelectBatchIds() {
    //根据id集合批量查询
    List<User> users = userMapper.selectBatchIds(Arrays.asList(2L, 3L, 4L));
    for (User user : users) {
        System.out.println(user);
    }
}
3.4.3、selectOne
源码中的方法:
/**
 * 根据 entity 条件,查询一条记录
 *
 * @param queryWrapper 实体对象封装操作类(可以为 null)
 */
T selectOne(@Param(Constants.WRAPPER) Wrapper<T> queryWrapper);
测试用例:
public void testSelectOne() {
    QueryWrapper<User> wrapper = new QueryWrapper<User>();
    wrapper.eq("name", "玄武");

    //根据条件查询一条数据,如果结果超过一条会报错
    User user = userMapper.selectOne(wrapper);
    System.out.println(user);
}
3.4.4、selectCount
源码中的方法:
/**
 * 根据 Wrapper 条件,查询总记录数
 *
 * @param queryWrapper 实体对象封装操作类(可以为 null)
 */
Integer selectCount(@Param(Constants.WRAPPER) Wrapper<T> queryWrapper);
测试用例:
@Test
public void testSelectCount() {
    QueryWrapper<User> wrapper = new QueryWrapper<User>();
    wrapper.gt("age", 20); //年龄大于20岁

    //根据条件查询数据条数
    Integer count = userMapper.selectCount(wrapper);
    System.out.println("count = " + count);
}
3.4.5、selectList
源码中的方法:
/**
 * 根据 entity 条件,查询全部记录
 *
 * @param queryWrapper 实体对象封装操作类(可以为 null)
 */
List<T> selectList(@Param(Constants.WRAPPER) Wrapper<T> queryWrapper);
测试用例:
@Test
public void testSelectList() {
    QueryWrapper<User> wrapper = new QueryWrapper<User>();
    wrapper.gt("age", 20); //年龄大于20岁

    //根据条件查询数据
    List<User> users = userMapper.selectList(wrapper);
    for (User user : users) {
        System.out.println("user = " + user);
    }
}
3.4.6、selectPage
源码中的方法:
/**
 * 根据 entity 条件,查询全部记录(并翻页)
 *
 * @param page         分页查询条件(可以为 RowBounds.DEFAULT)
 * @param queryWrapper 实体对象封装操作类(可以为 null)
 */
IPage<T> selectPage(IPage<T> page, @Param(Constants.WRAPPER) Wrapper<T> queryWrapper);
配置分页插件:
    <!--这里使用MP提供的sqlSessionFactory,完成了Spring与MP的整合-->
    <bean id="sqlSessionFactory" class="com.baomidou.mybatisplus.extension.spring.MybatisSqlSessionFactoryBean">
        <property name="dataSource" ref="dataSource"/>
        <property name="plugins">
            <array>
                <ref bean="mybatisPlusInterceptor"/>
            </array>
        </property>
    </bean>

    <!--扫描mapper接口,使用的依然是Mybatis原生的扫描器-->
    <bean class="org.mybatis.spring.mapper.MapperScannerConfigurer">
        <property name="basePackage" value="com.qfedu.mapper"/>
    </bean>

    <bean id="configuration" class="com.baomidou.mybatisplus.core.MybatisConfiguration">
        <!-- 需配置该值为false,避免1或2级缓存可能出现问题,该属性会在旧插件移除后一同移除 -->
        <property name="useDeprecatedExecutor" value="false"/>
    </bean>

    <bean id="mybatisPlusInterceptor" class="com.baomidou.mybatisplus.extension.plugins.MybatisPlusInterceptor">
        <property name="interceptors">
            <list>
                <ref bean="paginationInnerInterceptor"/>
            </list>
        </property>
    </bean>

    <bean id="paginationInnerInterceptor" class="com.baomidou.mybatisplus.extension.plugins.inner.PaginationInnerInterceptor">
        <constructor-arg name="dbType" value="MYSQL"/>
    </bean>
测试用例:
@Test
public void testSelectPage() {
    QueryWrapper<User> wrapper = new QueryWrapper<User>();
    wrapper.gt("age", 20); //年龄大于20岁

    Page<User> page = new Page<>(1,1);

    //根据条件查询数据
    IPage<User> iPage = userMapper.selectPage(page, wrapper);
    System.out.println("数据总条数:" + iPage.getTotal());
    System.out.println("总页数:" + iPage.getPages());

    List<User> users = iPage.getRecords();
    for (User user : users) {
        System.out.println("user = " + user);
    }
}
四、条件构造器
在MP中,Wrapper接口的实现类关系如下:

可以看到,AbstractWrapper和AbstractChainWrapper是重点实现,接下来我们重点学习AbstractWrapper以及其子类。
说明:
QueryWrapper(LambdaQueryWrapper) 和 UpdateWrapper(LambdaUpdateWrapper) 的父类 用于生成 sql 的 where 条件, entity 属性也用于生成 sql 的 where 条件 注意: entity 生成的 where 条件与 使用各个 api 生成的 where 条件没有任何关联行为
官网文档地址:https://mybatis.plus/guide/wrapper.html
4.1、allEq
4.1.1、说明
allEq(Map<R, V> params)
allEq(Map<R, V> params, boolean null2IsNull)
allEq(boolean condition, Map<R, V> params, boolean null2IsNull)
个别参数说明:
params:key为数据库字段名,value为字段值null2IsNull: 为true则在map的value为null时调用 isNull 方法, 为false时则忽略value为null的
- 例1:
allEq({id:1,name:"老王",age:null})—>id = 1 and name = '老王' and age is null- 例2:
allEq({id:1,name:"老王",age:null}, false)—>id = 1 and name = '老王'
allEq(BiPredicate<R, V> filter, Map<R, V> params)
allEq(BiPredicate<R, V> filter, Map<R, V> params, boolean null2IsNull)
allEq(boolean condition, BiPredicate<R, V> filter, Map<R, V> params, boolean null2IsNull)
个别参数说明:
filter: 过滤函数,是否允许字段传入比对条件中params与null2IsNull: 同上
- 例1:
allEq((k,v) -> k.indexOf("a") > 0, {id:1,name:"老王",age:null})—>name = '老王' and age is null- 例2:
allEq((k,v) -> k.indexOf("a") > 0, {id:1,name:"老王",age:null}, false)—>name = '老王'
4.1.2、测试用例
@Test
public void testWrapper() {
    QueryWrapper<User> wrapper = new QueryWrapper<>();

    //设置条件
    Map<String,Object> params = new HashMap<>();
    params.put("name", "饕鬄");
    params.put("age", "39");
    params.put("password", null);

    wrapper.allEq(params);//SELECT * FROM tb_user WHERE password IS NULL AND name = ? AND age = ?
    //wrapper.allEq(params,false); //SELECT * FROM tb_user WHERE name = ? AND age = ?

    List<User> users = userMapper.selectList(wrapper);
    for (User user : users) {
        System.out.println(user);
    }
}
4.2、基本比较操作
- eq:等于 =
- ne:不等于 <>
- gt:大于 >
- ge:大于等于 >=
- lt:小于 <
- le:小于等于 <=
- between:BETWEEN 值1 AND 值2
- notBetween:NOT BETWEEN 值1 AND 值2
- in:字段 IN (value.get(0), value.get(1), …)
- notIn:字段 NOT IN (v0, v1, …)
测试用例:
@Test
public void testWrapper() {
    QueryWrapper<User> wrapper = new QueryWrapper<>();
    wrapper.eq("password", "123456").ge("age", 20).in("name", "朱雀", "玄武", "饕鬄");

    List<User> users = userMapper.selectList(wrapper);
    for (User user : users) {
        System.out.println(user);
    }
}
4.3、模糊查询
- like
- LIKE ‘%值%’
- 例:
like("name", "王")—>name like '%王%'- notLike
- NOT LIKE ‘%值%’
- 例:
notLike("name", "王")—>name not like '%王%'- likeLeft
- LIKE ‘%值’
- 例:
likeLeft("name", "王")—>name like '%王'- likeRight
- LIKE ‘值%’
- 例:
likeRight("name", "王")—>name like '王%'测试用例:
@Test
public void testWrapperLike() {
    QueryWrapper<User> wrapper = new QueryWrapper<>();

    /**
         * SELECT id,user_name,name,age,email AS mail FROM tb_user WHERE user_name LIKE ?
         * Parameters: %q%(String)
         */
    wrapper.like("user_name", "q");

    List<User> users = userMapper.selectList(wrapper);
    for (User user : users) {
        System.out.println(user);
    }
}
4.4、排序
- orderBy
- 排序:ORDER BY 字段, …
- 例:
orderBy(true, true, "id", "name")—>order by id ASC,name ASC- orderByAsc
- 排序:ORDER BY 字段, … ASC
- 例:
orderByAsc("id", "name")—>order by id ASC,name ASC- orderByDesc
- 排序:ORDER BY 字段, … DESC
- 例:
orderByDesc("id", "name")—>order by id DESC,name DESC测试用例:
@Test
public void testWrapperOrderBy() {
    QueryWrapper<User> wrapper = new QueryWrapper<>();

    //SELECT id,user_name,name,age,email AS mail FROM tb_user ORDER BY age DESC
    wrapper.orderByDesc("age");

    List<User> users = userMapper.selectList(wrapper);
    for (User user : users) {
        System.out.println(user);
    }
}
4.5、逻辑查询
- or
- 拼接 OR
- 主动调用
or表示紧接着下一个方法不是用and连接!(不调用or则默认为使用and连接)- and
- AND 嵌套
- 例:
and(i -> i.eq("name", "李白").ne("status", "活着"))—>and (name = '李白' and status <> '活着')测试用例:
@Test
public void testWrapperOr() {
    QueryWrapper<User> wrapper = new QueryWrapper<>();

    //SELECT id,user_name,name,age,email AS mail FROM tb_user WHERE name = ? OR age = ?
    wrapper.eq("name","青龙").or().eq("age", 40);

    List<User> users = userMapper.selectList(wrapper);
    for (User user : users) {
        System.out.println(user);
    }
}
4.6、select
在MP查询中,默认查询所有的字段,如果有需要也可以通过select方法进行指定字段。
@Test
public void testWrapperField() {
    QueryWrapper<User> wrapper = new QueryWrapper<>();

    //SELECT id,name,age FROM tb_user WHERE name = ? OR age = ?
    wrapper.eq("name", "青龙")
        .or()
        .eq("age", 40)
        .select("id", "name", "age");

    List<User> users = this.userMapper.selectList(wrapper);
    for (User user : users) {
        System.out.println(user);
    }
}
五、代码生成器
AutoGenerator 是 MyBatis-Plus 的代码生成器,通过 AutoGenerator 可以快速生成 Entity、Mapper、Mapper XML、Service、Controller 等各个模块的代码,极大的提升了开发效率。
5.1、添加依赖
<dependency>
    <groupId>com.baomidou</groupId>
    <artifactId>mybatis-plus-generator</artifactId>
    <version>3.4.1</version>
</dependency>
<dependency>
    <groupId>org.apache.velocity</groupId>
    <artifactId>velocity-engine-core</artifactId>
    <version>2.0</version>
</dependency>
5.2、编写配置
配置写在main方法中就可以
public static void main(String[] args) {
    //1. 全局配置
    GlobalConfig config = new GlobalConfig();
    config.setActiveRecord(false)
        .setAuthor("rx") // 作者
        .setOutputDir("生成代码存放的位置") // 生成路径
        .setFileOverride(true)  // 文件覆盖
        .setIdType(IdType.AUTO) // 主键策略
        .setServiceName("%sService")  // 设置生成的service接口的名字的首字母是否为I
        .setBaseResultMap(true) // 是否生成BaseResultMap
        .setBaseColumnList(true); // 是否生成BaseColumnList

    //2. 数据源配置
    DataSourceConfig dsConfig  = new DataSourceConfig();
    dsConfig.setDbType(DbType.MYSQL)  // 设置数据库类型
        .setDriverName("com.mysql.jdbc.Driver")
        .setUrl("数据库url")
        .setUsername("root")
        .setPassword("你的密码");

    //3. 策略配置
    StrategyConfig stConfig = new StrategyConfig();
    stConfig.setCapitalMode(true) //全局大写命名
        .setNaming(NamingStrategy.underline_to_camel) // 数据库表映射到实体的命名策略
        .setTablePrefix("tb_") //数据库表前缀
        .setInclude("tb_xxx");  //生成的表

    //4. 包名策略配置
    PackageConfig pkConfig = new PackageConfig();
    pkConfig.setParent("父包名") //父包
        .setMapper("mapper")
        .setService("service")
        .setController("controller")
        .setEntity("beans")
        .setXml("mapper");

    //5. 整合配置
    AutoGenerator ag = new AutoGenerator();

    ag.setGlobalConfig(config)
        .setDataSource(dsConfig)
        .setStrategy(stConfig)
        .setPackageInfo(pkConfig);

    //6. 执行
    ag.execute();
}
5.3、生成代码
运行5.2中的main方法,可以看到生成的代码。

 浙公网安备 33010602011771号