Spring系列之多个数据源配置
前言
在上篇文章讲到了如何配置单数据源,但是在实际场景中,会有需要配置多个数据源的场景,比如说,我们在支付系统中,单笔操作(包含查询、插入、新增)中需要操作主库,在批量查询或者对账单查询等对实时性要求不高的场景,需要使用读库来操作,依次来减轻数据库的压力。那么我们如何配置多数据源?
这里还是基于springboot应用的情况下,我们看一下怎么配置。
因为SpringBoot会实现自动配置,但是SpringBoot并不知道我们的业务场景分别要使用哪一个数据源,因此我们需要把相关的自动配置关闭。
首先,生成项目骨架,引入相应的依赖
  <dependency>
 		<groupId>org.springframework.boot</groupId>
 		<artifactId>spring-boot-starter-jdbc</artifactId>
 	</dependency>
 	<dependency>
 		<groupId>org.springframework.boot</groupId>
 		<artifactId>spring-boot-starter-actuator</artifactId>
 	</dependency>
 	<dependency>
 		<groupId>org.springframework.boot</groupId>
 		<artifactId>spring-boot-starter-web</artifactId>
 	</dependency>

 	<dependency>
 		<groupId>com.h2database</groupId>
 		<artifactId>h2</artifactId>
 		<scope>runtime</scope>
 	</dependency>
 	<dependency>
 		<groupId>org.projectlombok</groupId>
 		<artifactId>lombok</artifactId>
 		<optional>true</optional>
 	</dependency>
 	<dependency>
 		<groupId>org.springframework.boot</groupId>
 		<artifactId>spring-boot-starter-test</artifactId>
 		<scope>test</scope>
 	</dependency>
 	```
**然后,在Application排除自动装配类**

```java
@SpringBootApplication(exclude = { DataSourceAutoConfiguration.class,DataSourceTransactionManagerAutoConfiguration.class,JdbcTemplateAutoConfiguration.class})
@Slf4j
public class MultiDataSourceDemoApplication {
}
上面代码中,我们排除了DataSourceAutoConfiguration、DataSourceTransactionManagerAutoConfiguration、JdbcTemplateAutoConfiguration三个类,然后就可以自己定义DataSource了。
配置数据源
	//第一个数据源
	@Bean
	@ConfigurationProperties("first.datasource")
	public DataSource firstDataSource() {
		return DataSourceBuilder.create().build();
	}

	@Bean
	public JdbcTemplate firstJdbcTemplate() {
		return new JdbcTemplate(firstDataSource());
	}


	@Bean
	@Resource
	public PlatformTransactionManager firstTxManager(DataSource firstDataSource) {
		return new DataSourceTransactionManager(firstDataSource);
	}

	//第二个数据源
	@Bean
	@ConfigurationProperties("second.datasource")
	public DataSource secondDataSource() {
		return DataSourceBuilder.create().build();
	}

	@Bean
	public JdbcTemplate secondJdbcTemplate() {
		return new JdbcTemplate(secondDataSource());
	}

	@Bean
	@Resource
	public PlatformTransactionManager secondTxManager(DataSource secondDataSource) {
		return new DataSourceTransactionManager(secondDataSource);
	}
application.properties的配置项信息
management.endpoints.web.exposure.include=*
spring.output.ansi.enabled=ALWAYS

first.datasource.jdbc-url=jdbc:mysql://localhost:3306/first
first.datasource.username=root
first.datasource.password=xxx
second.datasource.jdbc-url=jdbc:mysql://localhost:3306/second
second.datasource.username=root
second.datasource.password=xxx
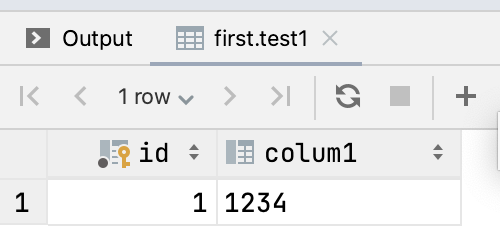
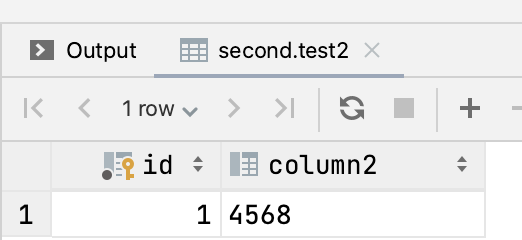
看一下表结构和数据


运行测试代码:
	@Test
	public void testMutilDataSource(){
		firstJdbcTemplate.queryForList("SELECT * FROM test1")
				.forEach(row -> log.info("记录:"+row.toString()));

		secondJdbcTemplate.queryForList("SELECT * FROM test2")
				.forEach(row -> log.info("记录:"+row.toString()));
	}
我们看一下运行效果:

我们可以看到,两个数据源都初始化成功了,并且各自数据源执行的结果准确。
上面的方式没有集成Mybatis,使用的是jdbcTemplate,网络上还有很多配置方式,比如动态选择数据源,大同小异,不过笔者还是建议不同的业务单独指定数据源,容易维护。
我们已经演示了简单的单数据源和多数据源的配置方式,我们下一篇文章将讲一下,SpringBoot默认的连接池HikariCP。


 浙公网安备 33010602011771号