华为二面:SpringBoot如何自定义Starter?
Spring Boot的自动配置机制为开发人员提供了一种轻松集成和配置各种功能的便捷方式。然而,随着项目的复杂性增加,更好地组织和分享通用功能变得至关重要。自定义Starter成为了理想的解决方案,旨在简化项目的依赖管理和自动配置,使开发者能够迅速而灵活地集成特定的功能模块。本文将深入探讨在Spring Boot中如何创建自定义Starter,为构建模块化且易维护的应用提供有力的支持。
接下来我们来实现一个自定义的starter。
实现自定义Starter
首先,我们需要明确自定义starter的目标功能,如提供特定领域的服务或集成第三方库。比如我们创建一个coderacademy-spring-boot-starter的starter,用于提供某些服务。例如我们的服务就实现一个打印功能:
public class CoderAcademyService {

	public String sayHello(){
        return "Hello 码农Academy!";
    }
}
本文旨在介绍如何自定义starter,故而starter的功能不是本文的主要内容,后续我们会提供一个基于注解实现ES操作/搜索的服务的starter。感兴趣的,点个关注哦~
创建项目结构
我们创建一个名为springboot-coderacademy-starter的项目,在pom.xml中设置groupId,artifactId还有version。其中groupId与artifactId应反映starter的名称。
<groupId>com.springboot.coderacaemy</groupId>
<artifactId>coderacermy-spring-boot-starter</artifactId>
<version>1.0.0-SNAPSHOT</version>
<packaging>jar</packaging>
然后我们在引入一些我们需要是用到的依赖,比如我们要使用@Configuration,@EnableConfigurationProperties等注解:
<?xml version="1.0" encoding="UTF-8"?>
<project xmlns="http://maven.apache.org/POM/4.0.0"
         xmlns:xsi="http://www.w3.org/2001/XMLSchema-instance"
         xsi:schemaLocation="http://maven.apache.org/POM/4.0.0 http://maven.apache.org/xsd/maven-4.0.0.xsd">
    <modelVersion>4.0.0</modelVersion>
    <parent>
        <groupId>org.springframework.boot</groupId>
        <artifactId>spring-boot-starter-parent</artifactId>
        <version>2.7.0</version>
    </parent>

    <groupId>com.springboot.coderacaemy</groupId>
    <artifactId>coderacermy-spring-boot-starter</artifactId>
    <version>1.0.0-SNAPSHOT</version>
    <packaging>jar</packaging>

    <name>springboot-starter</name>

    <properties>
        <maven.compiler.source>11</maven.compiler.source>
        <maven.compiler.target>11</maven.compiler.target>
        <project.build.sourceEncoding>UTF-8</project.build.sourceEncoding>
    </properties>

    <dependencies>
        <dependency>
            <groupId>org.springframework.boot</groupId>
            <artifactId>spring-boot-autoconfigure</artifactId>
        </dependency>

        <dependency>
            <groupId>org.springframework.boot</groupId>
            <artifactId>spring-boot-configuration-processor</artifactId>
            <optional>true</optional>
        </dependency>
    </dependencies>
</project>
其中spring-boot-configuration-processor这个依赖主要用于IDEA支持和编译时生成元数据。
本文使用的springboot版本为2.7.0
创建自动配置类
自动配置类负责定义Spring Boot应用程序中的通用配置和功能。这个类通常使用@Configuration注解进行标记,在这个类中注入服务、组件或其他你需要自动配置的对象。
import com.springboot.starter.coderacademy.service.CoderAcademyService;
import org.springframework.context.annotation.Configuration;

/**
 * @version 1.0
 * @description: <p></p >
 * @author: 码农Academy
 * @create: 2024/1/31 14:38
 */
@Configuration
public class CoderAcademyAutoConfig {

    @Bean
    public CoderAcademyService coderAcademyService(){
        return new CoderAcademyService();
    }
}
指定自动装配类
在resources文件夹下创建一个META-INF/spring.factories文件,在这个文件中指定自动装配类CoderAcademyAutoConfig:
org.springframework.boot.autoconfigure.EnableAutoConfiguration=com.springboot.starter.coderacademy.config.CoderAcademyAutoConfig
在META-INF/spring.factories文件中,org.springframework.boot.autoconfigure.EnableAutoConfiguration是一个特殊的键,它的值是一个包含要应用的自动配置类的全限定名列表。当应用启动时,SpringBoot的引导过程会扫描所有已引入jar包中的spring.factories文件,并根据EnableAutoConfiguration键下的类来加载和执行相应的自动配置逻辑。
当然如果不使用这个配置,在调用方使用@ComponentScan也可以扫描到CoderAcademyAutoConfig。但是这跟Starter的设计理念相悖。在Starter的设计中,一般不推荐调用方手动进行额外的扫描。这是因为调用方引入了Starter,就应该依赖于 Starter提供的自动配置。手动扫描可能会导致不必要的麻烦,例如循环依赖、配置类的重复加载等问题。
假如我们现在没有其他的配置了,比如说一下额外的属性配置,那我们就可以打包与发布了。
打包与发布
此时我们就可以将自定义Starter打包,并发布到Maven仓库或其他仓库管理工具。
本地开发时,可以直接install。不必发不到私服。
测试
我们新建一个调用方的项目,在其中引入coderacademy-spring-boot-starter。
<dependency>
	<groupId>com.springboot.coderacaemy</groupId>
	<artifactId>coderacermy-spring-boot-starter</artifactId>
	<version>1.0.0-SNAPSHOT</version>
</dependency>
我们编写测试类:
@SpringBootTest
class SpringbootCodeApplicationTests {
	private CoderAcademyService coderAcademyService;

	 @Test
    public void testCoderAcademy(){
       String str = coderAcademyService.sayHello();
       System.out.println(str);
    }

	@Autowired
    public void setCoderAcademyService(CoderAcademyService coderAcademyService) {
        this.coderAcademyService = coderAcademyService;
    }
}
执行结果如下:

这样一个很简单的Starter就完成了。
当然在实际开发中,我们还需要一些自定义配置项需要注入到Starter中,才可以提供完整的服务。
配置属性
我们新建一个CoderAcademyProperties类用于接收,调用方在自己项目中的application.yaml或者其他的配置中心配置的信息。
@ConfigurationProperties(prefix = "coderacademy")
public class CoderAcademyProperties {

    private String name = "码农Academy";

    public String getName() {
        return name;
    }

    public void setName(String name) {
        this.name = name;
    }
}
@ConfigurationProperties 是 SpringBoot中用于绑定外部配置到Bean的属性上,prefix属性指定了配置前缀。这样我们就可以在调用方的application.yml中配置以coderacademy为前缀的信息。这里我们也给了默认值。
然后我们将这个配置注入到CoderAcademyService中去。
public class CoderAcademyService {

    private final CoderAcademyProperties coderAcademyProperties;

    public String sayHello(){
        return "Hello "+ coderAcademyConfig.getName();
    }

    public CoderAcademyService(CoderAcademyProperties coderAcademyProperties) {
        this.coderAcademyProperties = coderAcademyProperties;
    }
}
我们改动一下CoderAcademyService的AutoConfig。
@EnableConfigurationProperties({CoderAcademyProperties.class})
@Configuration
public class CoderAcademyAutoConfig {

    @Bean
    public CoderAcademyService coderAcademyService(CoderAcademyProperties coderAcademyProperties){
        return new CoderAcademyService(coderAcademyProperties);
    }
}
我重新Deploy之后,然后在调用方配置一下CoderAcademyProperties中对应的属性:
coderacademy.name = CoderAcademy
再次跑一下单测:

在实际开发场景中,我们有时会遇到这样的需求:调用方希望根据自身项目的需求灵活定义配置项,无需严格遵循CoderAcademyProperties中预设的模式(例如coderacademy.name)。例如,他们可能倾向于通过自定义属性customer.starter.name来代替,并将这个属性值映射到其项目的配置文件中。随后,在调用方自己的@Configuration类里,基于这些个性化配置来创建一个CoderAcademyService实例。
然而,问题在于,Starter模块内部预先提供了一个默认的CoderAcademyService Bean定义。当调用方在其应用上下文中也声明了同类型的Bean时,这将触发Spring容器中的Bean冲突和初始化异常。为了解决这个问题,我们在设计Starter时需要考虑到这一点,我们在自动配置类中利用@ConditionalOnMissingBean注解来确保仅在容器中尚无CoderAcademyService Bean时才进行创建操作。这样就避免了重复注册同一类型Bean导致的问题。
@EnableConfigurationProperties({CoderAcademyProperties.class})
@Configuration
@ConditionalOnMissingBean(CoderAcademyService.class)
public class CoderAcademyAutoConfig {

    @Bean
    public CoderAcademyService coderAcademyService(CoderAcademyProperties coderAcademyProperties){
        return new CoderAcademyService(coderAcademyProperties);
    }
}
然后我们在调用方设计一个配置类,用于创建一个CoderAcademyService。
@Configuration
public class CustomerConfig {

    @Value("${customer.coderacademy.name}")
    private String customerName;

    @Bean
    public CoderAcademyService coderAcademyService(){
        CoderAcademyProperties properties = new CoderAcademyProperties();
        properties.setName(customerName);
        return new CoderAcademyService(properties);
    }
}
在调用方的application.properties加上customer.coderacademy.name配置。
customer.coderacademy.name = customer,coderacademy
我们再次在调用方执行:

属性配置提示
我们在使用其他的官方Starter时在application.properties或者application.yml配置相关属性时,IDEA会自动给出属性的Key的提示,以及给出默认值。那么在自定义Starter中该如何实现这功能呢?其实这就需要用到了我们引入的spring-boot-configuration-processor依赖。
spring-boot-configuration-processor 是 Spring Boot 提供的一个注解处理器,用于处理 @ConfigurationProperties 注解,生成配置属性的元数据,以提供更好的 IDE 支持和配置文件提示。注解处理器会扫描项目中标注了@ConfigurationProperties 注解的类,然后生成包含有关这些配置属性的详细信息的 spring-configuration-metadata.json文件。该文件位于META-INF下。这个元数据文件包含了配置属性的描述、类型、默认值等信息,以提供更好的代码提示和文档生成功能。元数据文件被 IDE(如 IDEA、Eclipse)使用,用于提供更强大的代码提示和补全功能。开发者在编辑配置文件时可以看到配置属性的描述、类型等信息,更容易正确地配置应用程序。
当然添加依赖之后,我们还需要添加Maven的插件(如果使用的是Maven)。
 <build>
        <plugins>
            <plugin>
                <groupId>org.apache.maven.plugins</groupId>
                <artifactId>maven-compiler-plugin</artifactId>
                <configuration>
                    <annotationProcessorPaths>
                        <path>
                            <groupId>org.springframework.boot</groupId>
                            <artifactId>spring-boot-configuration-processor</artifactId>
                            <version>2.7.0</version>
                        </path>
                    </annotationProcessorPaths>
                </configuration>
            </plugin>
        </plugins>
    </build>
然后我们执行 mvn clean -U install -DskipTests命令后,就可以在target下的META-INF就可以看见这个元数据文件。

我们在重新打包之后,在调用方的application.properties中配置属性信息时,可以看到效果:

配置文件默认值
在上述示例中,我们在CoderAcademyProperties代码中显示的给name赋值了一个默认值。这种方式实现也可以,但是不够优雅,我们换一种优雅的方式去实现配置的默认值设置。我们该用设置一个存储默认值的配置文件coderacademy-default.properties,从这个文件绑定配置的默认值。
我们在resources/META-INF下创建一个coderacademy-default.properties。
coderacademy.name = Default CoderAcademy
然后在CoderAcademyAutoConfig中使用@PropertySource将这这个默认文件中的配置加载绑定到Bean中即CoderAcademyProperties中。
@AutoConfigureAfter({CoderAcademyPropertiesAutoConfig.class})
@EnableConfigurationProperties({CoderAcademyProperties.class})
@Configuration
@ConditionalOnMissingBean(CoderAcademyService.class)
@PropertySource(name = "CoderAcademy Default Properties", value = "classpath:/META-INF/coderacademy-default.properties")
public class CoderAcademyAutoConfig {

    @Bean
    public CoderAcademyService coderAcademyService(CoderAcademyProperties coderAcademyProperties){
        return new CoderAcademyService(coderAcademyProperties);
    }

}
在SpringBoot应用中,通过application.properties或application.yml设置的属性具有较高的优先级。如果使用@PropertySource加载的属性与前者有冲突,则会被后者覆盖。
我们在调用方直接使用Starter中创建的CoderAcademyService,看一下效果:

即此时使用的是coderacademy-default.properties中配置的默认值。
我们在调用方配置coderacademy.name的值
coderacademy.name = This is CoderAcademy
再次运行一下数据

至此一个自定义的Starter就完成了。
示例
-
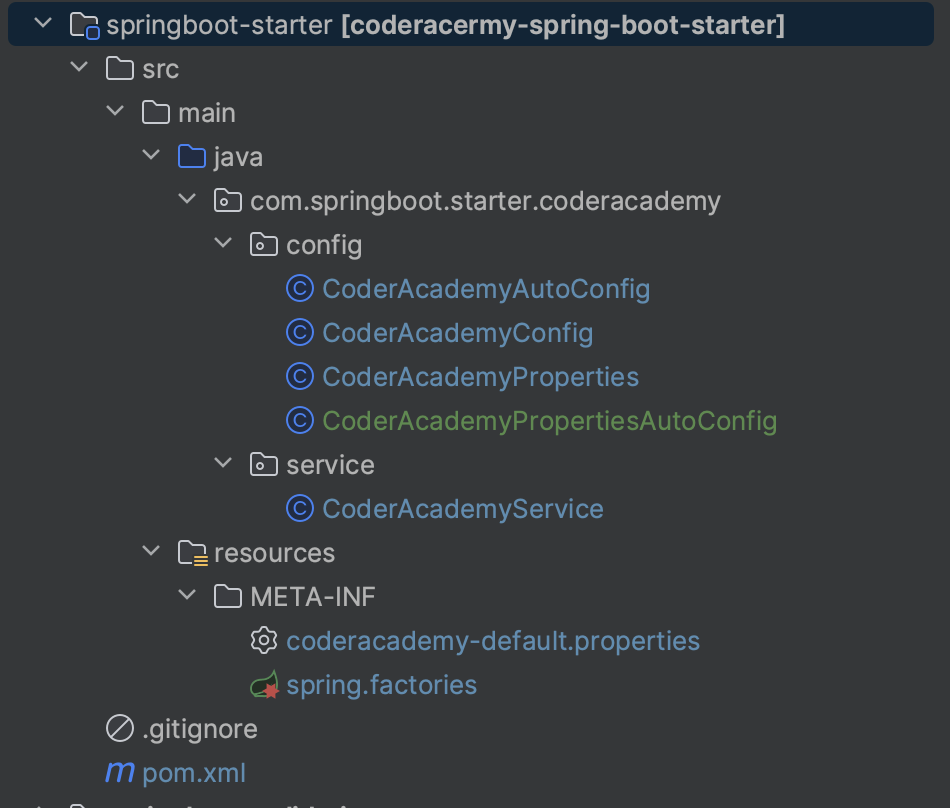
项目架构:
![image.png]()
-
依赖:
<?xml version="1.0" encoding="UTF-8"?>
<project xmlns="http://maven.apache.org/POM/4.0.0"
         xmlns:xsi="http://www.w3.org/2001/XMLSchema-instance"
         xsi:schemaLocation="http://maven.apache.org/POM/4.0.0 http://maven.apache.org/xsd/maven-4.0.0.xsd">
    <modelVersion>4.0.0</modelVersion>
    <parent>
        <groupId>org.springframework.boot</groupId>
        <artifactId>spring-boot-starter-parent</artifactId>
        <version>2.7.0</version>
    </parent>

    <groupId>com.springboot.coderacaemy</groupId>
    <artifactId>coderacermy-spring-boot-starter</artifactId>
    <version>1.0.0-SNAPSHOT</version>
    <packaging>jar</packaging>

    <name>springboot-starter</name>

    <properties>
        <maven.compiler.source>11</maven.compiler.source>
        <maven.compiler.target>11</maven.compiler.target>
        <project.build.sourceEncoding>UTF-8</project.build.sourceEncoding>
    </properties>

    <dependencies>
        <dependency>
            <groupId>org.springframework.boot</groupId>
            <artifactId>spring-boot-autoconfigure</artifactId>
        </dependency>

        <dependency>
            <groupId>org.springframework.boot</groupId>
            <artifactId>spring-boot-configuration-processor</artifactId>
            <optional>true</optional>
        </dependency>
    </dependencies>

    <build>
        <plugins>
            <plugin>
                <groupId>org.apache.maven.plugins</groupId>
                <artifactId>maven-compiler-plugin</artifactId>
                <configuration>
                    <annotationProcessorPaths>
                        <path>
                            <groupId>org.springframework.boot</groupId>
                            <artifactId>spring-boot-configuration-processor</artifactId>
                            <version>2.7.0</version>
                        </path>
                    </annotationProcessorPaths>
                </configuration>
            </plugin>
        </plugins>
    </build>
</project>
- 服务配置信息
@ConfigurationProperties(prefix = "coderacademy")
public class CoderAcademyProperties {

    private String url;

    private Integer port;

    private String userName;

    private String password;

	// 省略get set方法
}
CoderAcademyProperties主要作用是为了绑定application.properites中配置信息。其默认的配置文件coderacademy-default.properties:
coderacademy.url=https://www.coderacademy.online/
coderacademy.port=8080
coderacademy.user-name=CoderAcademy
coderacademy.password=123456
- 服务配置类
新建一个CoderAcademyConfig用于创建CoderAcademyService服务。CoderAcademyProperties只作为服务的配置信息,主要参与绑定外部配置文件中的配置信息。
public class CoderAcademyConfig {

    private String url;

    private Integer port;

    private String userName;

    private String password;

	// 省略 get  set
}
在创建一个将CoderAcademyProperties的参数绑定到配置类CoderAcademyConfig的一个自动装配类CoderAcademyPropertiesAutoConfig。
@Configuration
@EnableConfigurationProperties({CoderAcademyProperties.class})
@PropertySource(name = "CoderAcademy Default Properties", value = "classpath:/META-INF/coderacademy-default.properties")
public class CoderAcademyPropertiesAutoConfig {

    @Bean
    public CoderAcademyConfig coderAcademyConfig(CoderAcademyProperties coderAcademyProperties){
        CoderAcademyConfig coderAcademyConfig = new CoderAcademyConfig();
        coderAcademyConfig.setPort(coderAcademyProperties.getPort());
        coderAcademyConfig.setUrl(coderAcademyProperties.getUrl());
        coderAcademyConfig.setPassword(coderAcademyProperties.getPassword());
        coderAcademyConfig.setUserName(coderAcademyProperties.getUserName());
       return coderAcademyConfig;
    }
}
- 服务类
服务类中就是用CoderAcademyConfig创建。
public class CoderAcademyService {

    private final CoderAcademyConfig coderAcademyConfig;

    public String connectDB(){
        return "Connect to " + coderAcademyConfig.getUrl() + ":" + coderAcademyConfig.getPort() + " successfully!";
    }

    public CoderAcademyService(CoderAcademyConfig coderAcademyConfig) {
        this.coderAcademyConfig = coderAcademyConfig;
    }

}
创建一个服务自动装配类。
@Configuration
@AutoConfigureAfter({CoderAcademyPropertiesAutoConfig.class})
@ConditionalOnBean({CoderAcademyConfig.class})
public class CoderAcademyAutoConfig {

    @Bean
    @ConditionalOnMissingBean
    public CoderAcademyService coderAcademyService(CoderAcademyConfig coderAcademyConfig){
        return new CoderAcademyService(coderAcademyConfig);
    }
}
然后在META-INF/spring.factories下中使用EnableAutoConfiguration指定自动配置类。
org.springframework.boot.autoconfigure.EnableAutoConfiguration=com.springboot.starter.coderacademy.config.CoderAcademyAutoConfig,com.springboot.starter.coderacademy.config.CoderAcademyPropertiesAutoConfig
这时就可以把这个Starter打包推到私服,就可以使用了。
总结
自定义Spring Boot Starter的原理是在应用启动时,SpringBoot扫描含有spring.factories的jar包,加载其中的org.springframework.boot.autoconfigure.EnableAutoConfiguration条目。引入自定义starter后,相应的自动配置类会被检测并加载到Spring容器执行。通过条件注解等机制,可根据用户提供的配置信息或其他Bean的存在动态配置和初始化Bean,实现功能的自动化装配。自定义starter体现了SpringBoot模块化和可扩展性,简化了依赖管理和配置,使开发者能迅速构建具有特定功能的应用。
本文已收录于我的个人博客:码农Academy的博客,专注分享Java技术干货,包括Java基础、Spring Boot、Spring Cloud、Mysql、Redis、Elasticsearch、中间件、架构设计、面试题、程序员攻略等


 SpringBoot自定义Starter简化配置与集成,提高可复用性


 浙公网安备 33010602011771号