springcloud 入门(1) eureka注册中心
在微服务盛行的时代,分布式似乎成了程序员不可缺少的一项技能之一,在java领域 springcloud组件是微服务解决方案之一。所以会使用springcloud 也可以为自己加分。学习springcloud之前首先要学会springcloud项目的搭建, 那就来搭建吧。
项目环境
1、IDE:idea ,maven
2、操作系统:win10
3、jdk:1.8
4、springboot 2.1.6.RELEASE ,springcloud Greenwich.SR1
springcloud和springboot对应版本如下:
| springcloud 版本序列 | springboot版本 |
|---|---|
| Greenwich | 2.1.x |
| Finchley | 2.0.x |
| Edgware | 1.5.x |
| Dalston | 1.5.x |
步骤
springcloud需要使用到maven或者其他的项目管理工具,我只装了maven,所以就用maven搭建。
创建maven父模块
1、使用idea,file->new -->project
2 、
 3、 输入自己的GroupId和ArtifactId
 4、保存到自己项目路径下,然后finish就完事儿了,父项目创建完毕

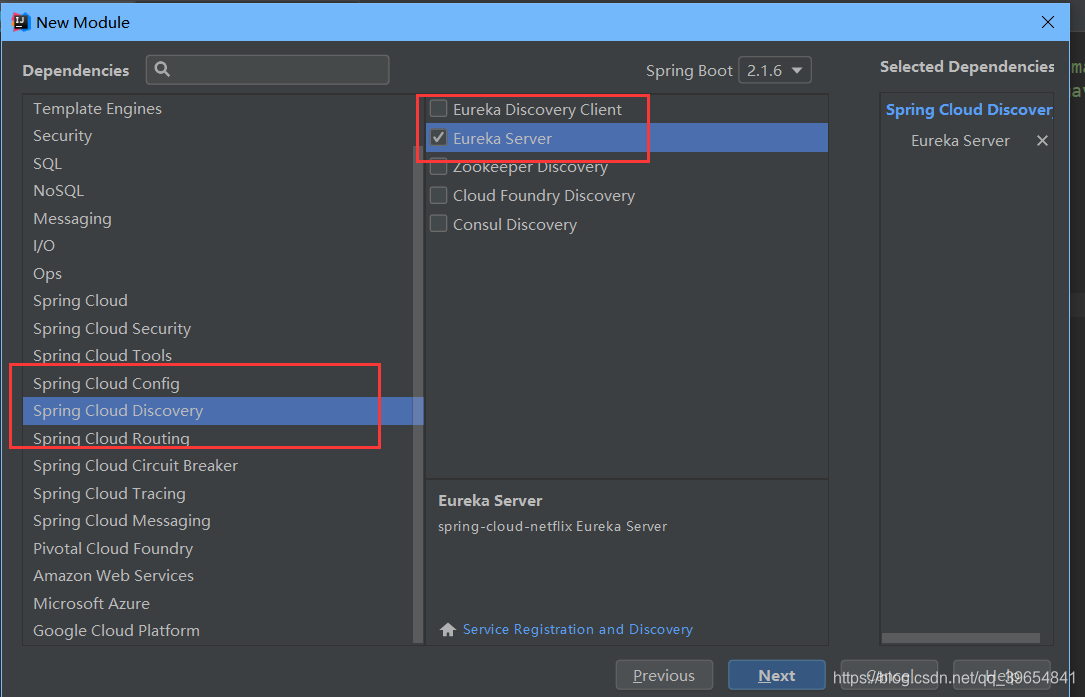
eureka服务端搭建
springcloud是基于springboot的一系列组件,搭建springcloud项目就是在springboot项目添加springcloud依赖。
1 、选中父模块,New——>Module


 Finsh之后一个服务发现就简单搭建完成。服务发现是微服务核心之一,没有服务发现组件的话微服务是不完整的,接下来就是配置相关信息
服务发现配置
1、打开eurekaServer启动类,加上@EnableEurekaServer注解,表明这是个服务注册中心。
@EnableEurekaServer
@SpringBootApplication
public class EruekaServerApplication {
    public static void main(String[] args) {
        SpringApplication.run(EruekaServerApplication.class, args);
    }

}
2、打开resources文件夹下的application.properties,我这里是properties文件,习惯了用properties文件,可能有些人用的是yml文件,但是这里用properties文件。
server.port=8001
spring.application.name=eureka-server
# 实例名称 名字可以自己定
eureka.instance.hostname=localhost

# eureka client 信息是否被其他eureka client 发现它的信息
eureka.client.register-with-eureka=false
# 此客户端是否应该从eureka server 获取eureka注册信息
eureka.client.fetch-registry=false

#关闭保护模式
eureka.server.enable-self-preservation=false
#设置清理的间隔时间,毫秒单位(默认是60秒)
eureka.server.eviction-interval-timer-in-ms=1000
配置文件修改好后,启动EruekaServerApplication ,访问http://localhost:8001/,看到如下界面代表eureka服务端创建成功。因为没有服务注册到eureka server红框内所有红框内没有服务实例
 ## 生产者搭建
生产者项目搭建跟eureka服务端一模一样,不同的是配置。
生产者配置
1、打开生产者启动类,在启动类上加上注解@EnableEurekaClient
@SpringBootApplication
@EnableEurekaClient
public class ProviderApplication {
    public static void main(String[] args) {
        SpringApplication.run(ProviderApplication.class, args);
    }
}
2、打开生产者的application.properties,添加如下配置
server.port=9001
# 生产者应用名称 -
spring.application.name=PROVIDER
# 生产者实例名,同一个spring.application.name 名称唯一
eureka.instance.instance-id=provider1

eureka.client.register-with-eureka=true
# 和eureka服务器通讯的URL
eureka.client.service-url.defaultZone=http://localhost:8001/eureka

# 设置心跳的时间间隔(默认是30秒)
eureka.instance.lease-renewal-interval-in-seconds=5
# eureka server 最后一次收到心跳时等待的时间,超时将会移除client(默认是90秒)
eureka.instance.lease-expiration-duration-in-seconds=3
3、创建一个HelloProvider 以证明生产者能正常访问
import org.springframework.web.bind.annotation.RequestMapping;
import org.springframework.web.bind.annotation.RestController;

/**
 * @author Aaron
 * @Date 2019/7/10 21:03
 **/
@RestController
@RequestMapping("/hi")
public class HelloProvider {

    @RequestMapping("/hello")
    public String hello(){
        return "hello,I am num one provider,nice to meet you!";
    }
}
配置完成之后启动ProviderApplication ,通过浏览器访问http://localhost:9001/hi/hello ,出现如下界面证明生产者创建成功

消费者搭建
消费者模块创建和生产者模块创建步骤相同,唯一不同的是eureka依赖
按照生产者模块步骤创建好消费者模块之后把消费者模块的eureka-server 依赖去除
消费者的依赖如下:
<dependencies>
       <dependency>
            <groupId>org.springframework.cloud</groupId>
            <artifactId>spring-cloud-starter-netflix-eureka-client</artifactId>
        </dependency>

		<dependency>
		      <groupId>org.springframework.boot</groupId>
            <artifactId>spring-boot-starter-web</artifactId>
        </dependency>

        <dependency>
            <groupId>org.springframework.boot</groupId>
            <artifactId>spring-boot-starter-test</artifactId>
            <scope>test</scope>
        </dependency>
    </dependencies>
消费者配置
1、在消费者启动类上加@EnableEurekaClient注解
@SpringBootApplication
@EnableEurekaClient
public class ConsumerApplication {

    public static void main(String[] args) {
        SpringApplication.run(ConsumerApplication.class, args);
    }

}
2、消费者application.properties配置
server.port=7001

#
eureka.client.register-with-eureka=false
# 和eureka服务器通讯的URL
eureka.client.service-url.defaultZone=http://localhost:8001/eureka
spring.application.name=consumer
eureka.instance.instance-id=consumer1
3、调用生产者
3.1 对于restful调用,springboot提供了RestTemplate,但是我们首先要将RestTemplate对象注入到spring容器中
配置类如下:
import org.springframework.cloud.client.loadbalancer.LoadBalanced;
import org.springframework.context.annotation.Bean;
import org.springframework.context.annotation.Configuration;
import org.springframework.web.client.RestTemplate;

/**
 * @author Aaron
 * @Date 2019/7/10 21:31
 **/
@Configuration
public class RestConfig {

    @Bean
    @LoadBalanced
    public RestTemplate restTemplate(){
        return new RestTemplate();
    }
}
3.2 创建一个HelloConsumer 调用生产者
/**
 * @author Aaron
 * @Date 2019/7/10 21:23
 **/
@RestController
@RequestMapping("/hi")
public class HelloConsumer {
    @Autowired
    private RestTemplate restTemplate;
    private final String providerUrl = "http://PROVIDER/hi/hello";

    @RequestMapping("/pro")
    public String provider(){
        return restTemplate.getForObject(providerUrl , String.class);
    }

    @RequestMapping("/hello")
    public String hello(){
        return "hello,I am consumer,nice to meet you!";
    }
}
4、启动ConsumerApplication ,浏览器访问http://localhost:7001/hi/pro,出现如下界面证明消费者创建成功

至此一个简单的springcloud eureka就此完成。
系列文章:
springcloud多模块项目一步一步搭建(2)之Ribbon
springcloud多模块项目一步一步搭建(3)之Feign
GitHub地址:
https://github.com/ArronSun/micro-services-practice.git
能力一般,水平有限,如有错误,请多指出。


 浙公网安备 33010602011771号