lunix系统maven私服搭建
使用Nexus创建私服
下载Nexus
下载地址:http://www.sonatype.com/download-oss-sonatype
https://help.sonatype.com/repomanager3/download
前置条件
JDK1.8
Windows安装Nexus
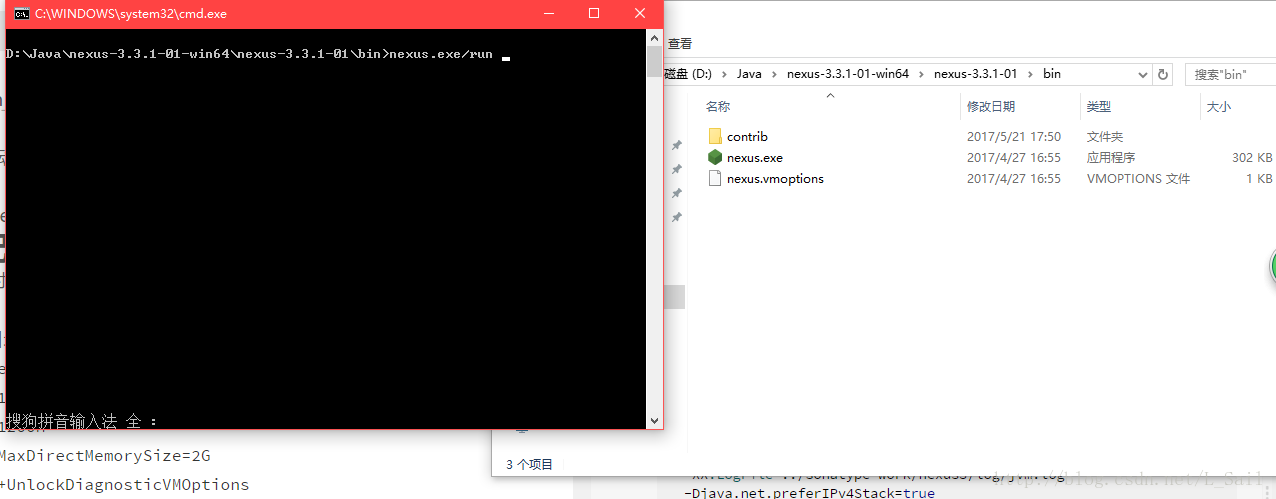
在之前的版本中,启动nexus服务都是在cmd中输入 nexus install来安装服务,nexus start来启动服务。
在nexus-3.2.0-01中,直接在nexus根目录下的bin下,输入 nexus.exe/run 即会启动服务。

linux安装
- 解压安装包
tar –zxvf nexus-3.0.0-03-unix.tar.gz
- 修改Jdk路径
Nexus3.0.0的版本需要JDK1.8的版本
-
cd /data/nexus-3.0.0-03/bin
-
vi nexus
-
添加JDK配置
INSTALL4J_JAVA_HOME_OVERRIDE=/data/jdk1.8.0_91
-
修改使用的用户
-
vi nexus.rc
-
添加配置
run_as_user=root
-
-
启动nexus服务
- ./ nexus
配置Nexus
- 此时的nexus服务都是安装包默认的数据存储路径、端口、IP、访问根目录、内存大小,可以通过如下操作进行修改。
bin目录下的nexus.vmoptions文件

-Xms1200M
-Xmx1200M
-XX:MaxDirectMemorySize=2G
-XX:+UnlockDiagnosticVMOptions
-XX:+UnsyncloadClass
-XX:+LogVMOutput
-XX:LogFile=../sonatype-work/nexus3/log/jvm.log
-Djava.net.preferIPv4Stack=true
-Dkaraf.home=.
-Dkaraf.base=.
-Dkaraf.etc=etc/karaf
-Djava.util.logging.config.file=etc/karaf/java.util.logging.properties
-Dkaraf.data=../sonatype-work/nexus3
-Djava.io.tmpdir=../sonatype-work/nexus3/tmp
-Dkaraf.startLocalConsole=false
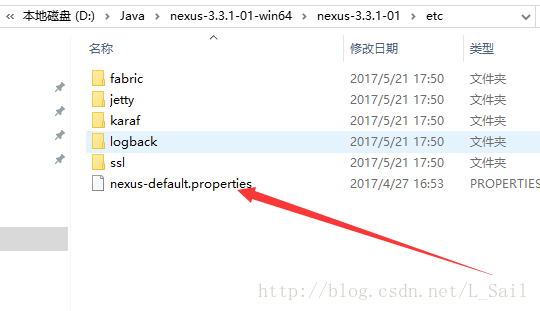
通过根目录下etc目录下的 nexus-default.properties 文件 ,修改默认端口,主机地址和项目名。

## DO NOT EDIT - CUSTOMIZATIONS BELONG IN $data-dir/etc/nexus.properties
##
# Jetty section
application-port=8081
application-host=0.0.0.0
nexus-args=${jetty.etc}/jetty.xml,${jetty.etc}/jetty-http.xml,${jetty.etc}/jetty-requestlog.xml
nexus-context-path=/

# Nexus section
nexus-edition=nexus-pro-edition
nexus-features=\
 nexus-pro-feature
成功验证
访问http://localhost:8081,看是否能跳转到Nexus页面,
Nexus的默认管理员用户名和密码为admin/admin123
当需要为项目添加Nexus私服上的public仓库时。
POM中配置Nexus仓库
<repositories>
        <repository>
            <id>Nexus</id>
            <name>Nexus</name>
            <url>http://localhost:8081/nexus/content/groups/public/</url>
            <releases>
                <enabled>true</enabled>
            </releases>
            <snapshots>
                <enabled>true</enabled>
            </snapshots>
        </repository>
    </repositories>
这样的配置只对当前Maven项目有效,在实际应用中,我们往往想要通过一次配置就能让本机所有的Maven项目都使用自己的Maven私服。
配置镜像让Maven只使用私服
<profiles>
        <profile>
            <id>nexus</id>
            <repositories>
                <repository>
                    <id>central</id>
                    <url>http://central</url>
                    <snapshots>
                        <updatePolicy>always</updatePolicy>
                        <enabled>true</enabled>
                    </snapshots>
                    <releases>
                        <updatePolicy>always</updatePolicy>
                        <enabled>true</enabled>
                    </releases>
                </repository>
            </repositories>
            <pluginRepositories>
                <pluginRepository>
                    <id>nexus</id>
                    <url>http://central</url>
                    <snapshots>
                        <updatePolicy>always</updatePolicy>
                        <enabled>true</enabled>
                    </snapshots>
                    <releases>
                        <updatePolicy>always</updatePolicy>
                        <enabled>true</enabled>
                    </releases>
                </pluginRepository>
            </pluginRepositories>
        </profile>
    </profiles>
    <activeProfiles>
        <activeProfile>nexus</activeProfile>
    </activeProfiles>
关于镜像、profile及profile激活的配置不再赘述,这里需要解释的是仓库及插件仓库配置,它们的id都为central,也就是说,覆盖了超级POM中央仓库的配置,它们的url已无关紧要,因为所有请求都会通过镜像访问私服地址。配置仓库及插件仓库的主要目的是开启对快照版本下载的支持,当Maven需要下载发布版或快照版构件的时候,它首先检查central,看该类型的构件是否支持,得到正面的回答之后,再根据镜像匹配规则转而访问私服仓库地址。


 浙公网安备 33010602011771号