vue-基础知识
指令
v- 开头都是vue 的指令
v-text 用来显示文本
v-html 用来展示富文本
v-if 用来控制元素的显示隐藏(切换真假DOM) 会重新渲染组件和销毁组件 触发onBeforeUnmount/onUnmounted
v-else-if 表示 v-if 的“else if 块”。可以链式调用
v-else v-if条件收尾语句
v-show 用来控制元素的显示隐藏(display none block Css切换)
v-on 简写@ 用来给元素添加事件
v-bind 简写: 用来绑定元素的属性Attr
v-model 双向绑定
v-for 用来遍历元素
v-on修饰符 冒泡案例
.stop 点击事件冒泡
<template>
  <div @click="parent">
    <div @click.stop="child">child</div>
  </div>
</template>


<script setup lang="ts">
  const child = () => {
    console.log('child');

  }
  const parent = () => {
    console.log('parent');
  }

</script>
.prevent 阻止表单提交
<template>
  <form action="/">
    <button @click.prevent="submit" type="submit">submit</button>
  </form>
</template>

<script setup lang="ts">
const submit = () => {
  console.log('child');

}
</script>
v-bind 绑定class
<template>
  <div :class="flag">{{flag}}</div>
</template>

<script setup lang="ts">
type Cls = {
  other: boolean,
  h: boolean
}
const flag: Cls = {
  other: false,
  h: true
};
</script>

<style>
.active {
  color: red;
}
.other {
  color: blue;
}
.h {
  height: 300px;
  border: 1px solid #ccc;
}
</style>
v-model
<template>
  <input v-model="message" type="text" />
  <div>{{ message }}</div>
</template>

<script setup lang="ts">
import { ref } from 'vue'
const message = ref("v-model")
</script>
虚拟Dom和diff算法
介绍虚拟dom
虚拟DOM就是通过js来生成的节点树
为什么要有虚拟DOM?
我们可以通过下面的例子
let div = document.createElement('div')
let str = ''
for (const key in div) {
  str += key + ''
}
console.log(str)

可以发现dom上面的属性非常多
所以直接操作dom会非常浪费性能
解决方案就是 我们可以用JS的计算性能来换取操作DOM所消耗的性能,既然我们逃不掉操作DOM这道坎,但是我们可以尽可能少的操作DOM
ref 全家桶
ref
受一个内部值并返回一个响应式且可变的 ref 对象。ref 对象仅有一个 .value property,指向该内部值。
我们这样操作是无法改变message 的值 因为message 不是响应式的无法被vue 跟踪,要改成ref
<template>
  <div>
    <button @click="changeMsg">change</button>
    <div>{{ message }}</div>
  </div>
</template>
<script setup lang="ts">
let message: string = "我是message"

const changeMsg = () => {
   message = "change msg"
}
</script>
<template>
  <div>{{ mes }}</div>
  <button @click='change'>修改</button>
</template>
<script setup lang="ts">
import {ref} from "vue";

const mes = ref({name: 'haoran'})
const change = () => {
  mes.value.name = '浩然'
  console.log(mes)
}
</script>
ifRef
判断是不是一个ref对象
<template>
  <button @click='change'>修改</button>
</template>
<script setup lang="ts">
import {ref, isRef} from "vue";
const mes = ref({name: 'haoran'})
const mes2 = {name: 'zhangSan'}
const change = () => {
  console.log(isRef(mes)) // true
  console.log(isRef(mes2)) // false
}
</script>
shallowRef
ref 是深层响应式
shallowRef 是浅层响应式
点击修改后页面数据并没有发生改变 但是内部已经改变
<template>
  <div>ref:{{ mes }}</div>
  <hr>
  <div>shallowRef:{{ mes2 }}</div>
  <button @click='change'>修改</button>
</template>
<script setup lang="ts">
import {ref, isRef, shallowRef} from "vue";

const mes = ref({name: 'haoran'})
const mes2 = shallowRef({name: 'zhangSan'})
const change = () => {
  mes2.value.name = '张三'
  console.log(mes2)
}
</script>

要直接修改value 页面才会对视图造成更新
const change = () => {
  mes2.value = {name: '张三'}
  console.log(mes2)
}

ref和shallowRef不能一起写,如果一起写shallowRef会被ref影响
:::tips
因为ref底层更新逻辑的时候,他会调用triggerRef这个函数
:::
const change = () => {
  mes.value.name = '浩然' // 如果这个数据在页面渲染了 那么shallowReactive会收到影响
  mes2.value.name = '张三'
}

triggerRef
强制更新页面DOM,也可以改变shallowRef里面的值
使用ref时 底层会调用triggerRef,所以会影响shallowRef
const change = () => {
  mes2.value.name = '张三'
  triggerRef(mes2)
}

customRef
自定义ref
customRef 是个工厂函数要求我们返回一个对象 并且实现 get 和 set 适合去做防抖之类的
跟ref原理差不多
<template>
  <div>customRef: {{ obj }}</div>
  <hr>
  <button @click='change'>修改</button>
</template>
<script setup lang="ts">
import {customRef} from "vue";

// 适合做防抖,连续点击500毫秒内触发一次
function MyRef<T>(value: T) {
  return customRef((track, trigger) => {
    let timer:any
    // 要返回一个对象
    return {
      get() {
        track()  // 收集依赖
        return value
      },
      set(newVal) {
        clearTimeout(timer)
        timer = setTimeout(() => {
          console.log('触发了')
          value = newVal
          trigger()  // 触发依赖
        },500)
      }
    }
  })
}

const obj = MyRef<string>('浩然')
const change = () => {
  obj.value = '我可以被修改'
}
</script>
ref小妙招
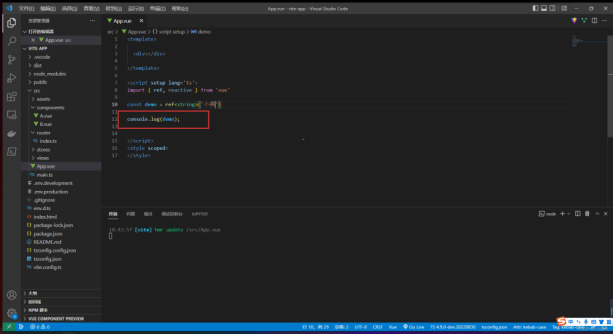
是个这玩意 查看起来很不方便 Vue 已经想到 了 帮我们做了格式化

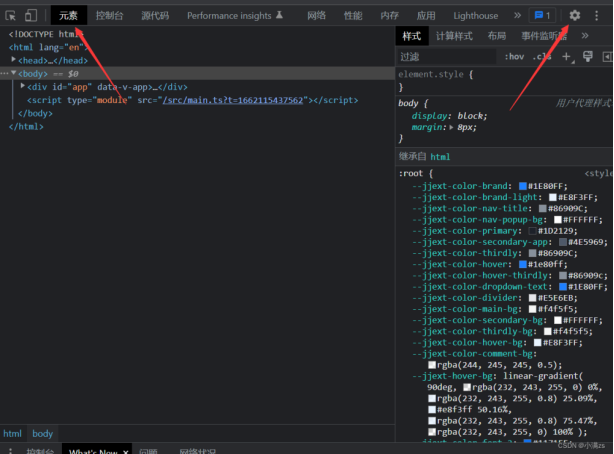
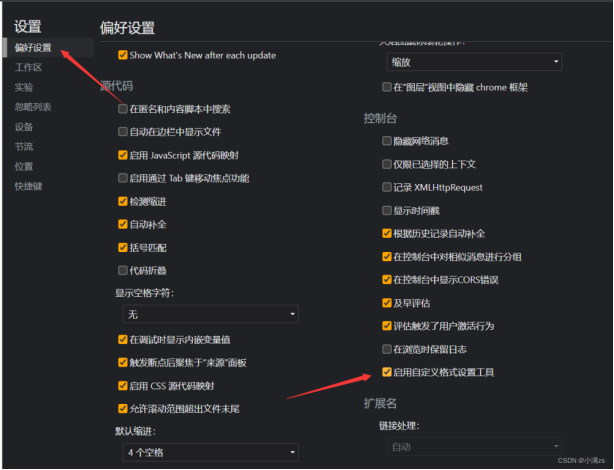
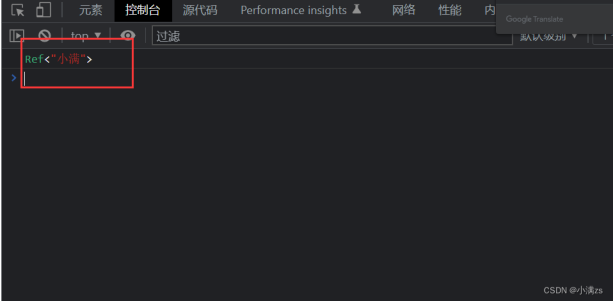
此时观看打印的值就很明了
想要查看原来的对象形式,可以右键Ref<"小满">,选择 show as JavaScript object
使用ref获取dom元素
<template>
  <div ref="dom">我是dom</div>
</template>
<script setup lang="ts">
import {ref} from "vue";
const dom = ref()
console.log(dom.value.innerHTML)  // 在这里打印会undefined 因为还没有渲染dom结构
const change = () => {
  console.log(dom.value.innerHTML)  // 我是dom
}
</script>
Reactive 全家桶
reactive
用来绑定复杂的数据,例如:数组、对象
reactive 源码约束了我们的类型
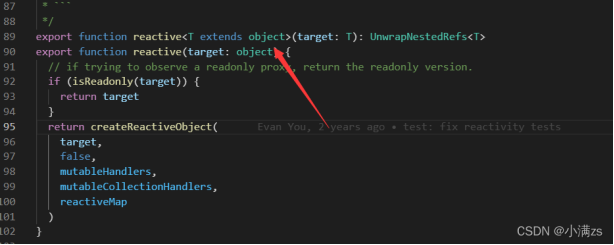
他是不可以绑定普通的数据类型这样是不允许 会给我们报错
import { reactive} from 'vue'

let person = reactive('sad')

要绑定普通的数据类型
可以使用ref
如果使用ref来绑定数组或者对象等复杂数据类型,从源码中可以看出也是去调用reactive
使用reactive修改值无需.value
reatcive 基础用法
import { reactive } from 'vue'
let person = reactive({
   name:"小满"
})
person.name = "大满"
数组异步赋值问题
不能给reactive直接覆盖复制,因为reactive是Proxy代理
这样赋值页面是不会变化的因为会脱离响应式
let person = reactive<number[]>([])
setTimeout(() => {
  person = [1, 2, 3]
  console.log(person);

},1000)
解决方案1
使用push
import { reactive } from 'vue'
let person = reactive<number[]>([])
setTimeout(() => {
  const arr = [1, 2, 3]
  person.push(...arr)
  console.log(person);

},1000)
方案2
包裹一层对象
type Person = {
  list?:Array<number>
}
let person = reactive<Person>({
   list:[]
})
setTimeout(() => {
  const arr = [1, 2, 3]
  person.list = arr;
  console.log(person);

},1000)
readonly
拷贝一份proxy对象将其设置为只读
<template>
  <div>
      <button @click.prevent="show">查看</button>
  </div>
</template>
<script setup lang="ts">
import {ref, reactive, readonly} from "vue";
let obj = reactive({
  name: '浩然'
})
const read = readonly(obj)

const show = () => {
  read.name = 'test' // 直接对read进行修改会报错
  console.log(read)
}
</script>

如果更改obj 那么readonly会受影响
const show = () => {
  obj.name = 'test'
  console.log(read)
}

shallowReactive
<template>
  <div>
    <div>{{ obj2 }}</div>
      <button @click.prevent="edit">修改</button>
  </div>
</template>
<script setup lang="ts">
import { reactive, shallowReactive } from "vue";
let obj = reactive({name: '浩然'})

const obj2:any = shallowReactive({
  foo: {
    bar: {
      num : 1
    }
  }
})
const edit = () => {
  // obj2.foo.bar.num = 2 // 页面数据不会发生改变 非响应式
  obj2.foo = {name: '浩然'}  // 页面数据发生改变 响应式数据
  console.log(obj2)
}
</script>
shallowReactive 与 shallowRef一样,不能同reactive同时写
<template>
  <div>
    <div>obj: {{obj}}</div>
    <div>obj2: {{ obj2 }}</div>
    <button @click.prevent="edit">修改</button>
  </div>
</template>
<script setup lang="ts">
import {reactive, shallowReactive} from "vue";

let obj = reactive({name: '浩然'})

const obj2: any = shallowReactive({
  foo: {
    bar: {
      num: 1
    }
  }
})

const edit = () => {
  obj.name = 'test' // 如果这个数据在页面渲染了 那么shallowReactive会收到影响
  obj2.foo.bar.num = 2 // 页面数据不会发生改变 非响应式
  console.log(obj2)
}
</script>
to系列全家桶
toRef
非响应式数据使用
只能修改响应式对象的值 非响应式数据的视图毫无变化(非响应式数据使用toRef没有任何作用)
<template>
  <div>
    {{ hao }}
  </div>
  <hr>
  <div>toRef: {{like}}</div>
  <hr>
  <button @click='change'>修改</button>
</template>
<script setup lang="ts">
import {reactive, toRef, toRefs, toRaw} from "vue";

const hao = {name: '浩然', age: 19, like: 'zjl'}
const like = toRef(hao,'like')
const change = () => {
  like.value = 'eat'
  console.log(like) // eat
}
</script>
响应式数据使用
// 改为响应式数据
const hao = reactive({name: '浩然', age: 19, like: 'zjl'})

用途:单独提取reactive对象中的一个属性进行操作、传递
toRefs
结构响应式数据对象,对每个属性进行toRef提取(结构响应式数据)
<template>
  <div>
    {{ hao }}
  </div>
  <hr>
  <div>toRefs_name: {{name}}</div>
  <hr>
  <div>toRefs_age: {{age}}</div>
  <hr>
  <div>toRefs_like: {{like}}</div>
  <hr>
  <button @click='change'>修改</button>
</template>
<script setup lang="ts">
import {reactive,toRefs, toRef, toRaw} from "vue";
const hao = reactive({name: '浩然', age: 19, like: 'zjl'})
const {name, age, like} = toRefs(hao) // 结构hao
const change = () => {
  like.value = 'JK'
  console.log(name)
  console.log(age)
  console.log(like)
}
</script>
手写源码
<script setup lang="ts">
import {reactive, toRef, toRaw} from "vue";

const hao = reactive({name: '浩然', age: 19, like: 'zjl'})
const toRefs = <T extends object>(object:T) => {
  const map:any = {}
  for (let key in object) {
    map[key] = toRef(object, key)
  }
  return map
}
const {name, age, like} = toRefs(hao)
const change = () => {
  like.value = 'JK'
  console.log(name)
  console.log(age)
  console.log(like)
}
</script>
toRaw
当你不想这个数据作为响应式,可以使用toRaw
<script setup lang="ts">
import {reactive,toRefs, toRef, toRaw} from "vue";
const hao = reactive({name: '浩然', age: 19, like: 'zjl'})
const change = () => {
  // 打印响应式数据hao和使用toRaw的响应式数据
  console.log(hao, toRaw(hao))
}
</script>

另一种实现方式,与toRaw效果相同
<script setup lang="ts">
import {reactive} from "vue";
const hao = reactive({name: '浩然', age: 19, like: 'zjl'})
const change = () => {
  console.log(hao, hao['__v_raw'])
}
</script>
computed计算属性
计算属性就是当依赖的属性的值发生变化的时候,才会触发他的更改,如果依赖的值,不发生变化的时候,使用的是缓存中的属性值。
写法一:
回调函数的方法
<template>
  <input v-model="firstname">
  <input v-model="lastname">
  <div>{{name}}</div>
</template>
<script setup lang="ts">
import {computed, ref} from "vue";
let firstname = ref('')
let lastname  = ref('')

// 当firstname、lastname 发生变化会触发computed
const name = computed(() => {
  return firstname.value + '---' + lastname.value
})
</script>
写法二:
对象的方法
const name = computed({
  get() {
    return firstname.value + '---' + lastname.value
  },
  set() {
    // firstname.value + '---' + lastname.value
  }
})
</script>
watch侦听器
watch第一个参数监听源
watch第二个参数回调函数cb(newVal,oldVal)
watch第三个参数一个options配置项是一个对象{
immediate:true //是否立即调用一次
deep:true //是否开启深度监听
}
<template>
  <input v-model="message" type="text">
</template>
<script setup lang="ts">
import {ref, watch} from "vue";
let message = ref<string>('')
watch(message, (value, oldValue) => {
  console.log(value)
  console.log(oldValue)
  console.log('-------------')
})
</script>
侦听多个值
<template>
  <input v-model="message" type="text">
  <input v-model="message2" type="text">
</template>
<script setup lang="ts">
import {ref, watch} from "vue";
let message = ref<string>('')
let message2 = ref<string>('')
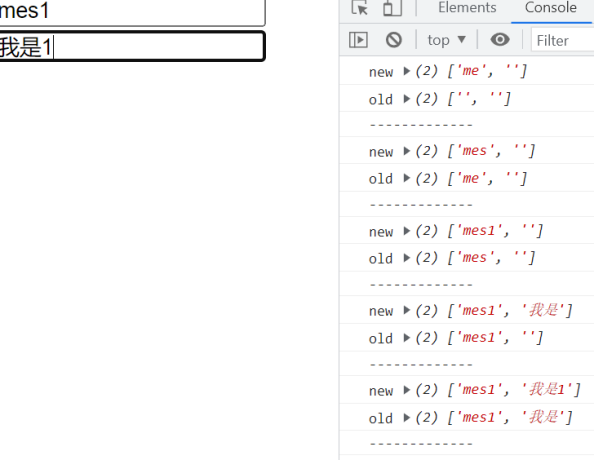
watch([message,message2], (value, oldValue) => {
  console.log('new',value)
  console.log('old',oldValue)
  console.log('-------------')
})
</script>
深度侦听
ref数据是无法侦听到深层数据的 ,reactive可以侦听深层数据
let message = ref<object>({
  nav: {
    bar: {
      name: '浩然'
    }
  }
})
当值有多层时,watch侦听就会失效,需要我们手动开启深度侦听
watch(message, (value, oldValue) => {
  console.log('new',value)
  console.log('old',oldValue)
  console.log('-------------')
},{
  deep: true
})
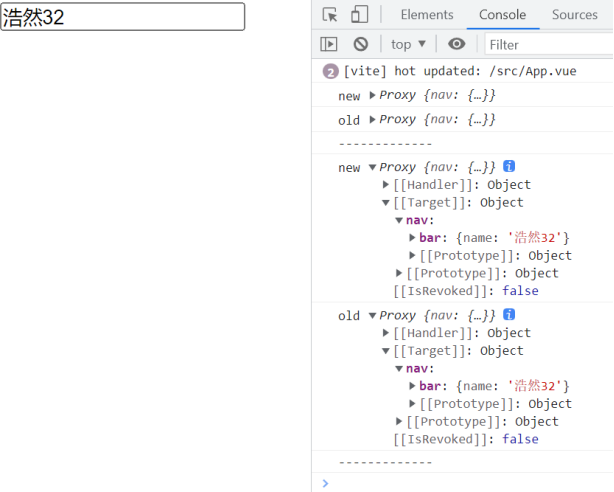
:::tips
但是也会出现一个bug,newVal和oldVal相同
:::
watch默认不会去执行,加上immediate: true会默认执行
侦听reactive单一值
<template>
  <input v-model="message.name1" type="text">
  <input v-model="message.name2" type="text">
</template>
<script setup lang="ts">
import {reactive,  watch} from "vue";
let message = reactive<object>({
  name1: 'haoran', // 监听这个值
  name2: '浩然'
})
watch(()=>message.name1, (value, oldValue) => {
  console.log('new',value)
  console.log('old',oldValue)
  console.log('-------------')
})
watchEffect 高级侦听器
立即执行传入的一个函数,同时响应式追踪其依赖,并在其依赖变更时重新运行该函数。
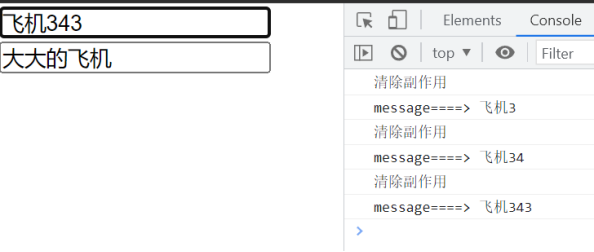
如果用到message 就只会监听message 就是用到几个监听几个 而且是非惰性 会默认调用一次
<template>
  <input v-model="message" type="text">
  <input v-model="message2" type="text">
</template>
<script setup lang="ts">
import { ref, watchEffect } from "vue";
let message = ref('飞机')
let message2 = ref('大大的飞机')
watchEffect(() => {
  console.log('message====>',message.value)
})
</script>
清除副作用
就是在触发监听之前会调用一个函数可以处理你的逻辑例如防抖
watchEffect((onCleanup) => {
  console.log('message====>',message.value)
  onCleanup(() => {
    console.log('清除副作用')
  })
})
停止侦听器
const stop = watchEffect(() => {})

// 当不再需要此侦听器时:
stop()
更多的配置项和调试
副作用刷新时机 flush 一般使用post
{
flush: 'post'
}
| pre | sync | post | |
|---|---|---|---|
| 更新时机 | 组件更新前执行 | 强制效果始终同步触发 | 组件更新后执行 |
watchEffect(() => {}, {
  flush: 'post',
  onTrack(e) {
    debugger
  },
  onTrigger(e) {
    debugger
  }
})
组件
每一个.vue 文件呢都可以充当组件来使用
每一个组件都可以复用
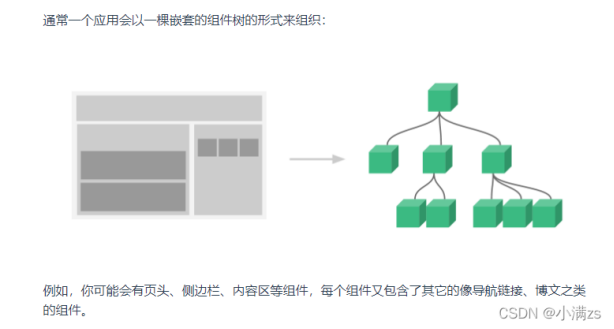
引入组件
<template>
  <hello-world></hello-world>
</template>
<script setup lang="ts">
  import HelloWorld from './components/HelloWorld.vue' // 组件的地址

</script>
组件的生命周期
简单来说就是一个组件从创建 到 销毁的 过程 成为生命周期
在我们使用Vue3 组合式API 是没有 beforeCreate 和 created 这两个生命周期的
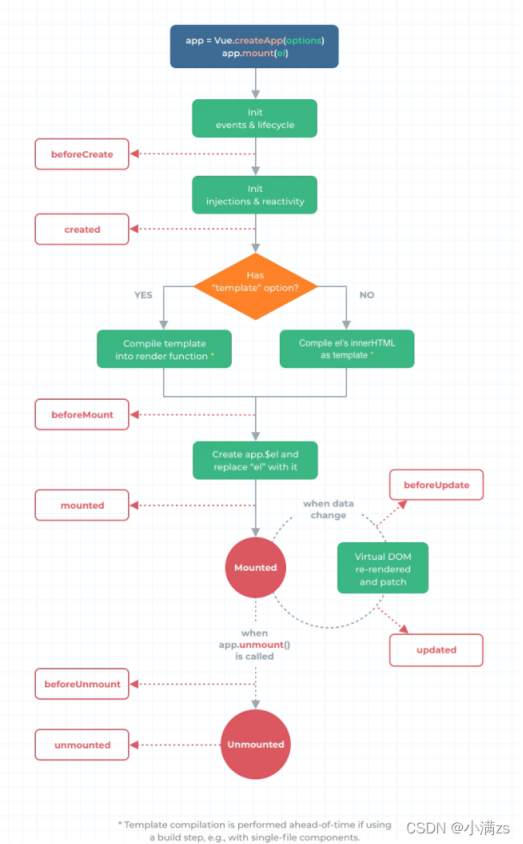
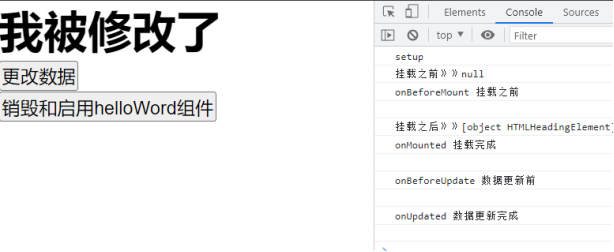
onBeforeMount()
在组件DOM实际渲染安装之前调用。在这一步中,根元素还不存在。
onMounted()
在组件的第一次渲染后调用,该元素现在可用,允许直接DOM访问
onBeforeUpdate()
数据更新时调用,发生在虚拟 DOM 打补丁之前。
updated()
DOM更新后,updated的方法即会调用。
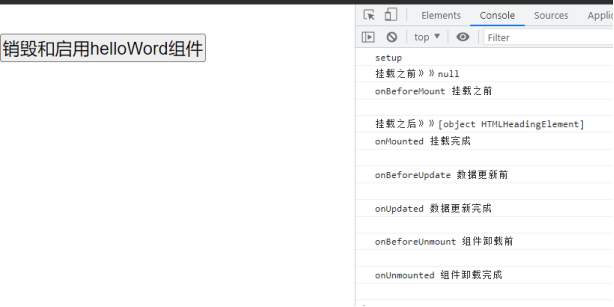
onBeforeUnmount()
在卸载组件实例之前调用。在这个阶段,实例仍然是完全正常的。
onUnmounted()
卸载组件实例后调用。调用此钩子时,组件实例的所有指令都被解除绑定,所有事件侦听器都被移除,所有子组件实例被卸载。
[
<template>
  <hello-world v-if="flag"></hello-world>
  <br>
  <button @click="flag = !flag">销毁和启用helloWord组件</button>
</template>
<script setup lang="ts">
import {ref} from "vue";
import HelloWorld from './components/HelloWorld.vue'
const flag = ref(true)
</script>
<template>
  <h1>{{val}}</h1>
  <button @click="change">更改数据</button>
</template>
<script setup lang="ts">
import {ref, onBeforeMount, onMounted, onBeforeUpdate, onUpdated, onBeforeUnmount, onUnmounted} from "vue";
const val = ref('helloWord组件')
console.log('setup')
// onBeforeMount 挂载之前 获取不到dom
onBeforeMount(() => {
  console.log('挂载之前》》'+document.querySelector('h1')) // null
  console.log('onBeforeMount 挂载之前')
  console.log(' ')
})
// onMounted 挂载完成
onMounted(() => {
  console.log('挂载之后》》'+document.querySelector('h1')) // null
  console.log('onMounted 挂载完成')
  console.log(' ')
})
// onBeforeUpdate 数据更新前
onBeforeUpdate(() => {
  console.log('onBeforeUpdate 数据更新前')
  console.log(' ')
})
// onUpdated 数据更新完成
onUpdated(() => {
  console.log('onUpdated 数据更新完成')
  console.log(' ')
})
// onBeforeUnmount 组件卸载前
onBeforeUnmount(() => {
  console.log('onBeforeUnmount 组件卸载前')
  console.log(' ')
})
// onUnmounted 组件完成
onUnmounted(() => {
  console.log('onUnmounted 组件卸载完成')
  console.log(' ')
})
const change = () => {
  val.value = '我被修改了'
}
</script>

<style scoped>
</style>
初始

更改数据
销毁组件
实操组件和认识less和scoped
less概览
什么是less?
Less (Leaner Style Sheets 的缩写) 是一门向后兼容的 CSS 扩展语言。这里呈现的是 Less 的官方文档(中文版),包含了 Less 语言以及利用 JavaScript 开发的用于将 Less 样式转换成 CSS 样式的 Less.js 工具。
因为 Less 和 CSS 非常像,因此很容易学习。而且 Less 仅对 CSS 语言增加了少许方便的扩展,这就是 Less 如此易学的原因之一。
官方文档 Less 快速入门 | Less.js 中文文档 - Less 中文网
在vite中使用less
npm install less -D 安装即可
在style标签注明即可
<style lang="less">

</style>
& 父级拼接
.layout {
  height: 100%;
  overflow: hidden;
  display: flex;
  /* .layout_right */
  &_right {
    background: red;
  }
}
什么是scoped
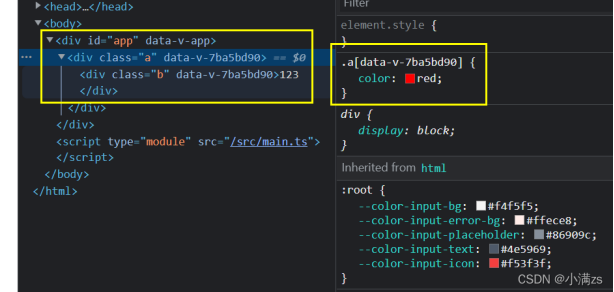
实现组件的私有化, 当前style属性只属于当前模块.
在DOM结构中可以发现,vue通过在DOM结构以及css样式上加了唯一标记,达到样式私有化,不污染全局的作用,
实操组件(自适应)
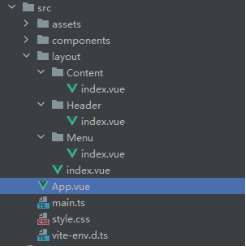
项目文件目录
/*这里存放全局样式*/
*{
  padding: 0;
  margin: 0;
}
html,body,#app {
  height: 100%;
  overflow: hidden;
}
<template>
  <Layout></Layout>
</template>
<script setup lang="ts">
import Layout from './layout/index.vue'
</script>
<style lang="less" scoped>

</style>
<template>
  <div class="layout">
      <Menu></Menu>
    <div class="layout_right">
      <Header></Header>
      <Content></Content>
    </div>
  </div>
</template>

<script setup lang="ts">
import Menu from './Menu/index.vue'
import Header from './Header/index.vue'
import Content from './Content/index.vue'
</script>

<style lang="less" scoped>
.layout {
  height: 100%;
  overflow: hidden;
  display: flex;
  &_right {
    flex: 1;
    display: flex;
    flex-direction: column;
  }
}
</style>
<template>
<div class="menu">
  menu
</div>
</template>

<script setup lang="ts">

</script>

<style lang="less" scoped>
.menu {
  width: 200px;
  border-right: 1px solid black;
}
</style>
<template>
  <div class="header">
    header
  </div>
</template>

<script setup lang="ts">

</script>

<style lang="less" scoped>
.header {
  height: 60px;
  border-bottom: 1px solid black;
}
</style>
<template>
  <div class="content">
    <div class="content_items" :key="item" v-for="item in 100">
      {{item}}
    </div>
  </div>
</template>

<script setup lang="ts">

</script>

<style lang="less" scoped>
.content {
  flex: 1;
  margin: 20px;
  border: 1px solid black;
  overflow: auto;
  &_items {
    margin: 5px;
    padding: 10px;
    border: 1px solid #ccc;

  }
}
</style>
最终效果
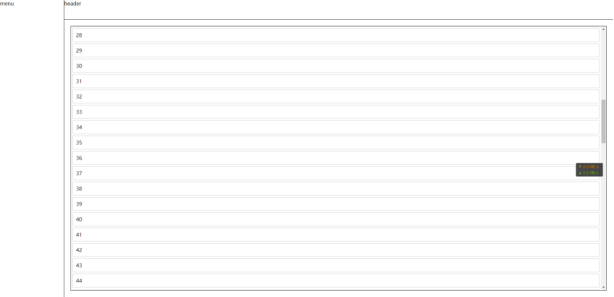
父子组件传参
父传子
父组件通过v-bind绑定一个数据,然后子组件通过defineProps接受传过来的值,
如以下代码
给Menu组件 传递了一个title 字符串类型是不需要v-bind
<template>
    <div class="layout">
        <Menu v-bind:data="data"  title="我是标题"></Menu>
        <div class="layout-right">
            <Header></Header>
            <Content></Content>
        </div>
    </div>
</template>

<script setup lang="ts">
import Menu from './Menu/index.vue'
import Header from './Header/index.vue'
import Content from './Content/index.vue'
import { reactive } from 'vue';

const data = reactive<number[]>([1, 2, 3])
</script>
子组件接受值
通过defineProps 来接受 defineProps是无须引入的直接使用即可
如果我们使用的TypeScript
可以使用传递字面量类型的纯类型语法做为参数
如 这是TS特有的
<template>
    <div class="menu">
        菜单区域 {{ title }}
        <div>{{ data }}</div>
    </div>
</template>

<script setup lang="ts">
defineProps<{
    title:string,
    data:number[]
}>()
</script>
如果你使用的不是TS
defineProps({
    title:{
        default:"",
        type:string
    },
    data:Array
})
TS 特有的默认值方式
withDefaults是个函数也是无须引入开箱即用接受一个props函数第二个参数是一个对象设置默认值
type Props = {
    title?: string,
    data?: number[]
}
withDefaults(defineProps<Props>(), {
    title: "张三",
    data: () => [1, 2, 3]
})
子传父
子组件给父组件传参
是通过defineEmits派发一个事件
<template>
    <div class="menu">
        <button @click="clickTap">派发给父组件</button>
    </div>
</template>

<script setup lang="ts">
import { reactive } from 'vue'
const list = reactive<number[]>([4, 5, 6])

const emit = defineEmits(['on-click'])
const clickTap = () => {
    emit('on-click', list)
}
</script>
我们在子组件绑定了一个click 事件 然后通过defineEmits 注册了一个自定义事件
点击click 触发 emit 去调用我们注册的事件 然后传递参数
父组件接受子组件的事件
<template>
    <div class="layout">
        <Menu @on-click="getList"></Menu>
        <div class="layout-right">
            <Header></Header>
            <Content></Content>
        </div>
    </div>
</template>

<script setup lang="ts">
import Menu from './Menu/index.vue'
import Header from './Header/index.vue'
import Content from './Content/index.vue'
import { reactive } from 'vue';

const data = reactive<number[]>([1, 2, 3])

const getList = (list: number[]) => {
    console.log(list,'父组件接受子组件');
}
</script>
我们从Menu 组件接受子组件派发的事件on-click 后面是我们自己定义的函数名称getList
会把参数返回过来
父获取子组件内部属性
子组件暴露给父组件内部属性
通过defineExpose
我们从父组件获取子组件实例通过ref
<Menu ref="menus"></Menu>

<script setup lang="ts">
  const menus = ref(null)
</script>
这时候打印menus.value 可以发现没有任何属性
如果父组件想要读到子组件的属性可以通过 defineExpose暴露
const list = reactive<number[]>([4, 5, 6])

defineExpose({
    list
})
配置全局组件
例如组件使用频率非常高(table,Input,button,等)这些组件 几乎每个页面都在使用便可以封装成全局组件
案例------我这儿封装一个Card组件想在任何地方去使用
组件目录

<template>
  <div class="card">
    <div class="card-header">
      <div>主标题</div>
      <div>副标题</div>
    </div>
    <div class="card-content" v-if="content">
      {{content}}
    </div>
  </div>
</template>

<script setup lang="ts">
defineProps<{
  content?:string
}>()
</script>

<style scoped lang="less">
@border:1px solid #ccc;
.card {
  border: @border;
  cursor: pointer;
  &:hover {
    box-shadow: 0 0 2px 3px #ccc;
  }
  &-header {
    display: flex;
    justify-content: space-between;
    padding: 10px;
    border-bottom: @border;
  }
  &-content {
    padding: 10px;
  }
}
</style>
全局注册
在main.ts 引入我们的组件跟随在createApp(App) 后面 切记不能放到mount 后面这是一个链式调用用
其次调用 component 第一个参数组件名称 第二个参数组件实例
import {createApp} from 'vue'
import './style.css'
import App from './App.vue'
import Card from './components/Card/index.vue'

createApp(App).component('Card', Card).mount('#app')
使用方法
直接在其他vue页面 立即使用即可 无需引入
<template>
 <Card></Card>
</template>
递归组件
<template>
<div class="menu">
  menu
  <Tree @on-item="getItem" :data="data"></Tree>
</div>
</template>

<script setup lang="ts">
import {reactive} from "vue";
import Tree from '../../components/Tree/index.vue'
type TreeList = {
  name: string,
  icon?: string,
  children?: TreeList[] | []
}
const data = reactive<TreeList[]>([
  {
    name: 'no.1',
    children: [
      {
        name: 'no.1-1',
        children: [
          {
            name: 'no.1-1-1',
          }
        ]
      }
    ]
  },
  {
    name: 'no.2',
    children: [
      {
        name: 'no.2-1',
      }
    ]
  },
  {
    name: 'no.3',
  },
  {
    name: 'test'
  }
])

const getItem = (item:TreeList) => {
  console.log(item)
}
</script>

<style lang="less" scoped>
.menu {
  width: 200px;
  border-right: 1px solid black;
}
</style>
<template>
  <div>
    <div @click.stop="clickItem(item)" style="margin-left:16px " :key="index" v-for="(item,index) in data">
      {{item.name}}
      <TreeItem @on-item="clickItem" v-if="item?.children?.length" :data="item.children"></TreeItem>
    </div>
  </div>
</template>

<script setup lang="ts">
import TreeItem from './index.vue'
type TreeList = {
  name: string,
  icon?: string,
  children?: TreeList[] | []
}
defineProps<{
  data?: TreeList[]
}>()
const emit = defineEmits(['on-item'])
const clickItem = (item:TreeList) => {
  // console.log(item)
  emit('on-item',item)
}
</script>

<style scoped lang="less">

</style>
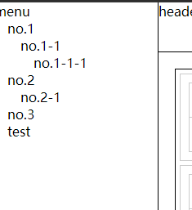
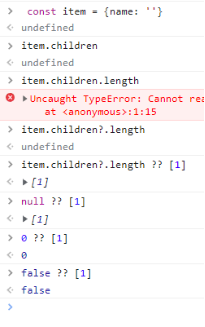
<TreeItem @on-item="clickItem" v-if="item?.children?.length" :data="item.children">
不写问号获取不存在的数据length 会报错
动态组件实现tab栏切换
什么是动态组件 就是:让多个组件使用同一个挂载点,并动态切换,这就是动态组件。
在挂载点使用component标签,然后使用v-bind:is=”组件”
用法如下
引入组件
import A from './A.vue'
import B from './B.vue'
<component :is="A"></component>
<template>
  <div class="content">
    <div class="tab">
      <div @click="tabCom(item)"  v-for="(item,i) in data" :key="i">
        {{item.name}}
      </div>
      <component :is="current.comName"></component>
    </div>
  </div>
</template>

<script setup lang="ts">
import A from './A.vue'
import B from './B.vue'
import C from './C.vue'
import {reactive, markRaw} from "vue";

type Tabs = {
  name: string,
  comName: any
}
type Com = Pick<Tabs,'comName'>
const data = reactive<Tabs[]>([
  {
    name: '我是A组件',
    comName: markRaw(A)
  },
  {
    name: '我是B组件',
    comName: markRaw(B)
  },
  {
    name: '我是C组件',
    comName: markRaw(C)
  },
])
let current = reactive<Com>({
  comName: data[0].comName
})
const tabCom = (item:Tabs) => {
  current.comName = item.comName
}
</script>
<style lang="less" scoped>
  .tab{
    display: flex;
    .active{
      background: skyblue;
      color: #fff;
    }
    div{
      padding: 5px 10px;
      border: 1px solid #ccc;
      margin: 6px 10px;
    }
  }

</style>
// A
<template>
  <div>AAAAAAAAAAA</div>
</template>
// B
<template>
  <div>B</div>
</template>
  // A
<template>
  <div>CCCCCCC</div>
</template>
通过is 切换 A B 组件
使用场景
tab切换 居多
注意事项
1.在Vue2 的时候is 是通过组件名称切换的 在Vue3 setup 是通过组件实例切换的
2.如果你把组件实例放到Reactive Vue会给你一个警告runtime-core.esm-bundler.js:38 [Vue warn]: Vue received a Component which was made a reactive object. This can lead to unnecessary performance overhead, and should be avoided by marking the component with markRaw or using shallowRef instead of ref.
Component that was made reactive:
这是因为reactive 会进行proxy 代理 而我们组件代理之后毫无用处 节省性能开销 推荐我们使用shallowRef 或者 markRaw 跳过proxy 代理
修改如下
const tab = reactive<Com[]>([
  {
    name: "A组件",
      comName: markRaw(A)
  }, {
    name: "B组件",
      comName: markRaw(B)
  }
])
markRaw:
import {reactive, markRaw} from "vue";

let obj = {name: 1}
console.log(markRaw(obj))
插槽slot
插槽就是子组件中的提供给父组件使用的一个占位符,用
匿名插槽
1.在子组件放置一个插槽
<template>
    <div>
       <slot></slot>
    </div>
</template>
2.父组件使用插槽
在父组件给这个插槽填充内容
<Dialog>
  <template v-slot>
  	<div>2132</div>
  </template>
</Dialog>
具名插槽
具名插槽其实就是给插槽取个名字。一个子组件可以放多个插槽,而且可以放在不同的地方,而父组件填充内容时,可以根据这个名字把内容填充到对应插槽中
    <div>
        <slot name="header"></slot>
        <slot></slot>
        <slot name="footer"></slot>
    </div>
父组件使用需对应名称
<Dialog>
  <template v-slot:header>
		<div>1</div>
  </template>
  <template v-slot>
  	<div>2</div>
  </template>
  <template v-slot:footer>
  	<div>3</div>
  </template>
</Dialog>
插槽简写
        <Dialog>
            <template #header>
               <div>1</div>
           </template>
           <template #default>
               <div>2</div>
           </template>
           <template #footer>
               <div>3</div>
           </template>
        </Dialog>
作用域插槽
在子组件动态绑定参数 派发给父组件的slot去使用
    <div>
        <slot name="header"></slot>
        <div>
            <div v-for="item in 100">
                <slot :data="item"></slot>
            </div>
        </div>

        <slot name="footer"></slot>
    </div>
通过结构方式取值
<Dialog>
  <template #header>
  <div>1</div>
  </template>
  <template #default="{ data }">
  <div>{{ data }}</div>
  </template>
  <template #footer>
  <div>3</div>
  </template>
</Dialog>
动态插槽
插槽可以是一个变量名
        <Dialog>
            <template #[name]>
                <div>
                    23
                </div>
            </template>
        </Dialog>
异步组件&代码分包&suspense
异步组件
在大型应用中,我们可能需要将应用分割成小一些的代码块 并且减少主包的体积
这时候就可以使用异步组件
顶层 await
在setup语法糖里面 使用方法




 浙公网安备 33010602011771号