
python下的orm基本操作(1)--Mysql下的CRUD简单操作(含源码DEMO)
最近逐渐打算将工作的环境转移到ubuntu下,突然发现对于我来说,这ubuntu对于我这种上上网,收收邮件,写写博客,写写程序的时实在是太合适了,除了刚接触的时候会不怎么完全适应命令行及各种权限管理,apt-get命令相当的方便,各种原先在windows下各种奇怪错误在ubuntu下都没有出现了,好了,我就不说废话了,今天大致简单的介绍下python下的ORM to Mysql 的操作(注意:一定要看官网的文档!)
refer:http://docs.sqlalchemy.org/en/latest/orm/tutorial.html
一,准备环境
1.安装mysql-server (在此之前请准备好Python的环境)
2.安装mysql-python 这里有点坑,我直接使用apt-get命令没有成功,后来使用pip安装成功的
~$ pip install mysql-python
3.安装sqlalchemy
准备环境OK之后,安装sqlalchemy
~$ pip install sqlalchemy
如果你在第二步 pip install mysql-python 如图的类似的问题,这是需要安装connector for c 一些环境,如果你是x64的环境,请选中里面的x86,x64,都要安装
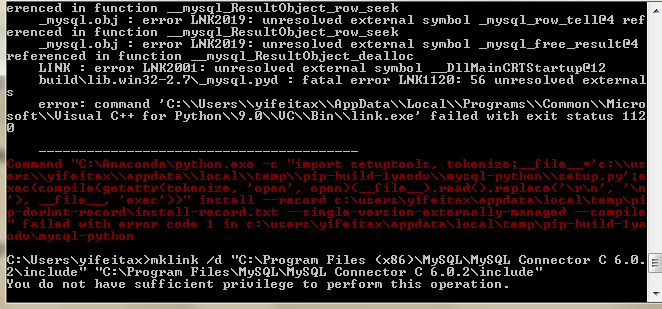
下载列表:http://dev.mysql.com/downloads/connector/c/6.0.html#downloads

参考的解决方案:http://stackoverflow.com/questions/1972259/cannot-open-include-file-config-win-h-no-such-file-or-directory-while-inst
环境都准备OK之后,我们来大致看一下如何使用sqlalchemy 的ORM
二,实际操作
1 创建engine对象
这里,engine类似我们的连接字符串,它指示了你会连接到哪种类型的数据库,用户名,密码,地址等,这里,我示例的是mysql数据库,
# -*- coding: UTF-8 -*-

from sqlalchemy import create_engine
from sqlalchemy.ext.declarative import declarative_base
from sqlalchemy import Column, Integer, String
from sqlalchemy.orm import sessionmaker

engine = create_engine('mysql://root:password@127.0.0.1:3306/test?charset=utf8',echo=True)
关于其它类型的数据库的连接字符串的写法,参考:
http://docs.sqlalchemy.org/en/rel_1_0/core/engines.html#sqlalchemy.create_engine
2.定义映射关系
#declare a Mapping,this is the class describe map to table column
Base = declarative_base()
3.定义连接管理器
#connect session to active the action
Session = sessionmaker(bind=engine)
session = Session()
4.表结构与类结构映射
class Person(Base):
    __tablename__ = 'Person'
    Id = Column(Integer, primary_key=True,autoincrement=True)
    Pname = Column(String,nullable=False,default='')
    Address = Column(String,nullable=False,default='')
    Age = Column(Integer,nullable=False,default=0)

    def __repr__(self):
        return 'the info is ID %s Pname is %s Address is %s and Age is %s' % \
        (self.Id, self.Pname, self.Address,  self.Age)
根据以上的代码,就可以完整的操作Mysql了,完整的代码如下:
# -*- coding: UTF-8 -*-

__author__ = 'Bruce'
from sqlalchemy import create_engine
from sqlalchemy import Column, Integer, String
from sqlalchemy.orm import sessionmaker
from sqlalchemy.ext.declarative import declarative_base

#declare the connecting to the server
engine = create_engine('mysql://account:password@127.0.0.1:3306/test?charset=utf8',echo=False)

#declare a Mapping,this is the class describe map to table column
Base = declarative_base()

#connect session to active the action
Session = sessionmaker(bind=engine)
session = Session()

class Person(Base):
    __tablename__ = 'Person'
    Id = Column(Integer, primary_key=True,autoincrement=True)
    Pname = Column(String,nullable=False,default='')
    Address = Column(String,nullable=False,default='')
    Age = Column(Integer,nullable=False,default=0)

    def __repr__(self):
        return 'the info is ID %s Pname is %s Address is %s and Age is %s' % \
        (self.Id, self.Pname, self.Address,  self.Age)

if __name__ == '__main__':
    #add one
    p = Person(Pname='bruce', Address='beijing', Age=22)
    session.add(p)
    session.commit()

    #query one
    p_1 = session.query(Person).filter_by(Pname='bruce').first()
    print p_1

    #delete one
    p_2 = session.query(Person).filter_by(Pname='bruce').first()
    if p_2:
        session.delete(p_2)
        session.commit()

    #edit one
    p_3 = session.query(Person).filter_by(Pname='bruce').first()
    if p_3:
        p_3.Age = 55
        session.commit()

 浙公网安备 33010602011771号