Java数据库连接(JDBC)、JDBC连接池(c3p0)、MyBatis分别如何使用?如何连接数据库?
一、JDBC的使用
第一步:导入jar包(mysql-connector-java.jar)
第二步:jdbc就是一个连接数据库工具,分为几个步骤
- 加载驱动
- 创建连接
- 创建statement
- 执行语句
第三步:编写代码实现
public class JdbcTest {

    public static void main(String[] args) throws ClassNotFoundException, SQLException {

       Class.forName("com.mysql.jdbc.Driver");

       String url = "jdbc:mysql://localhost:3306/book";

       String user = "root";

       String password = "123456";

       Connection connection = DriverManager.getConnection(url, user, password);

       Statement statement = connection.createStatement();

       String sql = "select * from book_info where book_id=1";

       ResultSet result = statement.executeQuery(sql);

       while(result.next()) {

           System.out.println(result.getString(1)

           +"  "+result.getString(2)

           +"  "+result.getString(3)

           +"  "+result.getString(4)

           +"  "+result.getString(5)

           +"  "+result.getString(6)

           +"  "+result.getString(7)

           +"  "+result.getString(8)

           +"  "+result.getString(9)

           +"  "+result.getString(10)

           +"  "+result.getString(11)

           );

       }

       result.close();

       statement.close();

    }
二、c3p0的使用
第一步:导入jar包mysql-connector-java.jar和c3p0.jar
第二步:参数配置
<?xml version="1.0" encoding="UTF-8"?>
<c3p0-config>
<default-config>
<property name="user">root</property>
<property name="password">123456</property>
<property name="jdbcUrl">jdbc:mysql://localhost:3306/book</property>
<property name="driverClass">com.mysql.jdbc.Driver</property>
</default-config>
</c3p0-config>
第三步:编写代码实现
package com.xc.c3p0;

import java.sql.Connection;

import java.sql.ResultSet;

import java.sql.SQLException;

import java.sql.Statement;

import javax.sql.DataSource;

import com.mchange.v2.c3p0.ComboPooledDataSource;

public class C3p0 {

       public static void main(String[] args) throws SQLException {

              DataSource source = new ComboPooledDataSource();

              Connection connection = source.getConnection();

              Statement statement = connection.createStatement();

              String sql = "select * from book_info";

              ResultSet result = statement.executeQuery(sql);

              while(result.next()) {

                     System.out.println(result.getString(1)

                                   +"  "+result.getString(2)

                                   +"  "+result.getString(3)

                                   +"  "+result.getString(4)

                                   +"  "+result.getString(5)

                                   +"  "+result.getString(6)

                                   +"  "+result.getString(7)

                                   +"  "+result.getString(8)

                                   +"  "+result.getString(9)

                                   +"  "+result.getString(10)

                                   +"  "+result.getString(11)

                                   );

                            }

                            result.close();

                            statement.close();

       }

}
三、MyBatis的使用
注:此处不在详细讲解操作步骤,而是主要整理技术演进,详细操作流程请参考其他博主的教程
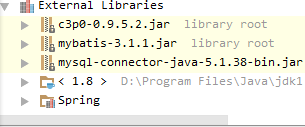
第一步:项目中需要导入下图中三个jar包

第二步:编写配置文件以及测试代码
1、db.properties
driver=com.mysql.jdbc.Driver
url=jdbc:mysql://localhost:3306/book
username=root
password=123456
2、mybatis-config.xml
"<configuration>
 <properties resource=""db.properties""/>
 <environments default=""development"">
  <environment id=""development"">
   <transactionManager type=""JDBC""></transactionManager>
   <dataSource type=""POOLED"">
    <property name=""driver"" value=""${driver}""></property>
    <property name=""url"" value=""${url}""></property>
    <property name=""username"" value=""${username}""></property>
    <property name=""password"" value=""${password}""></property>
   </dataSource>
  </environment>
 </environments>
 <mappers>
  <mapper resource = ""com/xc/dao/impl/UserMapper.xml""></mapper>
 </mappers>
</configuration>
"
3、UserMapper.xml
"<mapper namespace=""com.xc.dao.impl.UserMapper"">
 <select id=""count"" resultType=""int"">
  select count(1) as count from users
 </select>
</mapper>
"
4、UserMapperTest.java
public class UserMapperTest {
  public static void main(String[] args) throws SQLException, FileNotFoundException {
    String resource = "D:\\Eclipse_WorkSpace\\MavenProject\\WebMavenDemo01\\src\\main\\resources\\mybatis-config.xml";
    InputStream in = new FileInputStream(resource);
    SqlSessionFactory factory = new SqlSessionFactoryBuilder().build(in);
    int count = 0;
    SqlSession sqlSession = null;
    sqlSession = factory.openSession();
    //执行sql
    count = sqlSession.selectOne("com.xc.dao.impl.UserMapper.count");
    System.out.println(count);
    sqlSession.close();
  }
}
四、总结
MyBatis 是一款优秀的持久层框架,它支持定制化 SQL、存储过程以及高级映射。MyBatis 避免了几乎所有的 JDBC 代码和手动设置参数以及获取结果集。MyBatis 可以使用简单的 XML 或注解来配置和映射原生信息,将接口和 Java 的 POJOs(Plain Old Java Objects,普通的 Java对象)映射成数据库中的记录。


 浙公网安备 33010602011771号