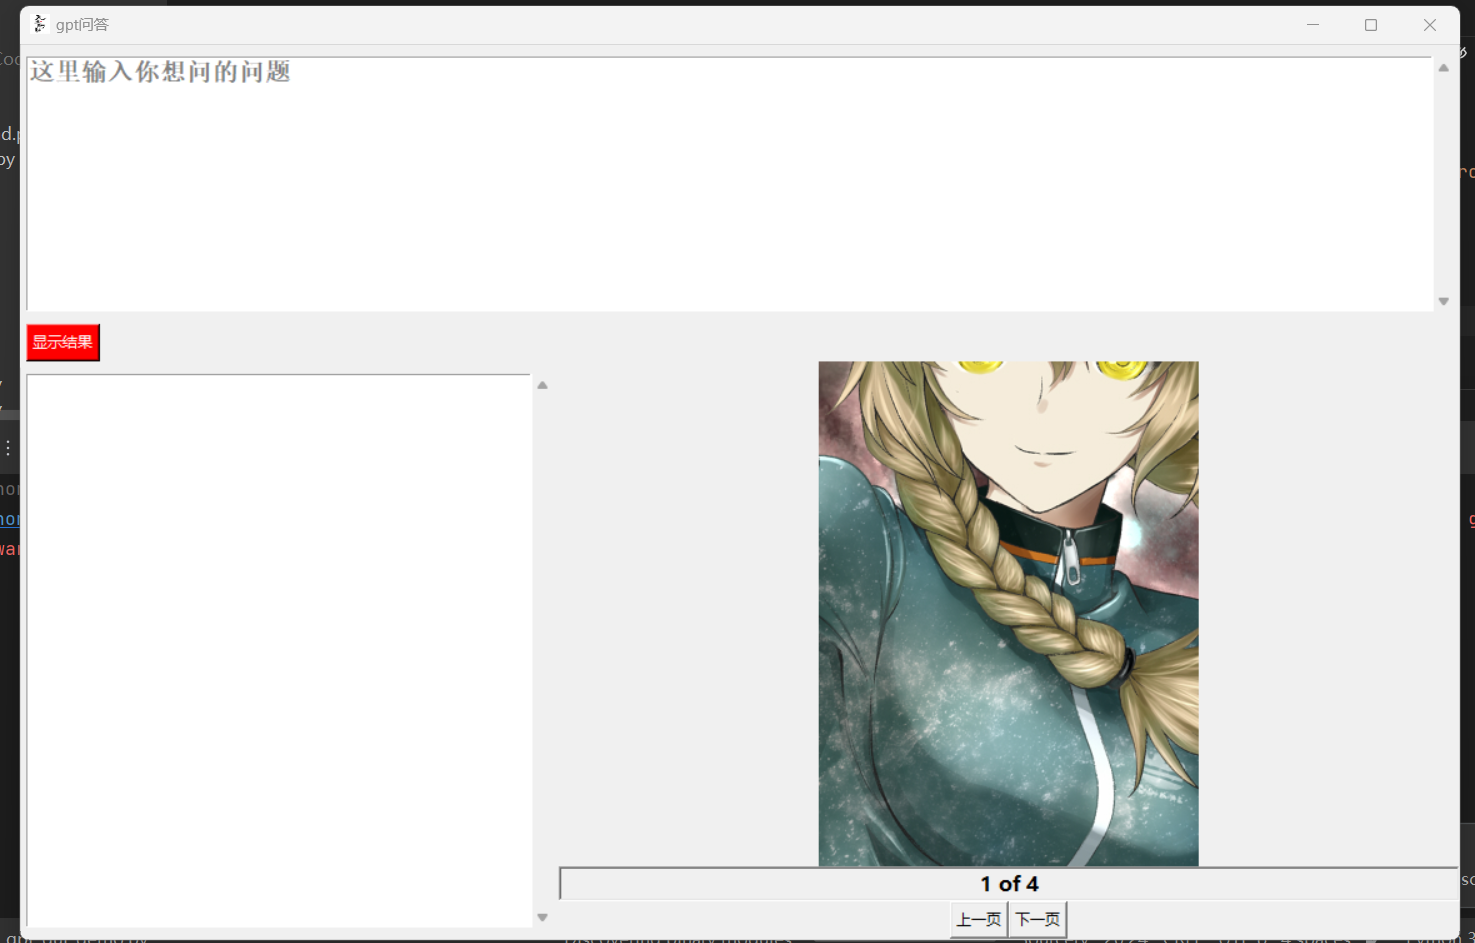
tk的一个布局demo
效果

代码
import tkinter as tk
from tkinter import scrolledtext
import requests

def Q_A(data):
    headers = {
            'origin': 'https://chat2.jinshutuan.com',
            'referer': 'https://chat2.jinshutuan.com/',
            'user-agent': 'Mozilla/5.0 (Windows NT 10.0; Win64; x64) AppleWebKit/537.36 (KHTML, like Gecko) Chrome/114.0.0.0 Safari/537.36',
        }
    session = requests.Session()
    session.trust_env = False
    json_data = {
        'prompt': data,
    }

    response = session.post('https://api.binjie.fun/api/generateStream', headers=headers, json=json_data)

    response_text = response.content.decode('utf-8')
    print(f'A:{response_text}')
    return response_text

def remove_placeholder(event):
    if result_entry.get("1.0", tk.END) == "这里输入你想问的问题\n":
        result_entry.delete("1.0", tk.END)
        result_entry.config(fg="black")  # Change text color to black

def display_result():
    result = result_entry.get("1.0", tk.END).strip()  # Get the text from the result entry
    if result:
        scrolled_text.delete(1.0, tk.END)  # Clear the current content

        scrolled_text.insert(tk.END, "请稍等,正在查询...")  # Display "请稍等,正在查询" first
        scrolled_text.update()  # Update the text widget to show the intermediate message

        Q = Q_A(result)  # Get the actual result

        scrolled_text.delete(1.0, tk.END)  # Clear the intermediate message
        scrolled_text.insert(tk.END, Q)  # Display the actual result

# 创建主窗口
root = tk.Tk()
root.iconbitmap(r'E:\Code\Python\Tkinter-py\Tk练习\天道酬勤.ico')
root.title("gpt问答")
screen_width = root.winfo_screenwidth()
screen_height = root.winfo_screenheight()
root.geometry(
    f'{int(screen_width * 0.75)}x{int(screen_height * 0.83)}+{int((screen_width - int(screen_width * 0.75)) / 2)}+{int((screen_height - int(screen_height * 0.83) - 40) / 2)}')

# root.resizable(0, 0)


# 创建一个输入框,用于输入结果
result_entry = scrolledtext.ScrolledText(root, wrap=tk.WORD, width=40, height=10, font=('微软宋体', 15, 'bold'))
result_entry.insert(tk.END, '这里输入你想问的问题')
result_entry.config(fg="gray")  # Set text color to gray
result_entry.bind("<FocusIn>", remove_placeholder)  # Remove placeholder when focused
result_entry.pack(fill=tk.BOTH, pady=10, padx=5)

# 创建一个按钮,用于显示结果
frame1 = tk.Frame(root)
frame1.pack(fill=tk.BOTH, padx=5)
display_button = tk.Button(frame1, text="显示结果", command=display_result, bg='red', fg='white', relief=tk.RAISED)
# display_button.pack()
display_button.grid(row=0, column=0)

# 创建一个可滚动的文本框,用于显示结果
frame2 = tk.Frame(root)
frame2.pack(fill=tk.BOTH, expand=True)
scrolled_text = scrolledtext.ScrolledText(frame2, wrap=tk.WORD, width=40, height=10, font=('宋体', 15))
scrolled_text.pack(side=tk.LEFT,anchor='nw',fill=tk.BOTH ,pady=10, padx=5)  # Use expand=True to fill available space

# 图片查看器
import glob
from PIL import Image, ImageTk
photos = glob.glob('photo/*.jpg')
photos = [ImageTk.PhotoImage(Image.open(photo)) for photo in photos]

current_photo_no = 0
photo_label = tk.Label(frame2, image=photos[current_photo_no], width=300, height=400)
photo_label.pack()

number_var = tk.StringVar()
number_var.set('1 of 4')
tk.Label(frame2, textvariable=number_var, font=('微软雅黑', 12, 'bold'), relief=tk.SUNKEN, anchor=tk.CENTER).pack(fill=tk.X)

button_frame = tk.Frame(frame2)
button_frame.pack()

prev_photo = tk.Button(button_frame, text='上一页')
next_photo = tk.Button(button_frame, text='下一页')

prev_photo.pack(side=tk.LEFT, anchor=tk.CENTER)
next_photo.pack(side=tk.RIGHT, anchor=tk.CENTER)

def change_photos(next_no):
    global current_photo_no
    current_photo_no += next_no
    if current_photo_no >= len(photos):
        current_photo_no = 0
    if current_photo_no < 0:
        current_photo_no = len(photos) - 1
    number_var.set(f'{current_photo_no + 1} of {len(photos)}')
    photo_label.configure(image=photos[current_photo_no])

prev_photo.config(command=lambda : change_photos(-1))
next_photo.config(command=lambda : change_photos(1))


# 运行主循环
root.mainloop()
本文来自博客园,作者:__username,转载请注明原文链接:https://www.cnblogs.com/code3/p/17642804.html


 浙公网安备 33010602011771号