
ionic3 使用QR Scaner 扫描
使用ionic的QR Scanner扫描二维码实现扫码登录功能
1. 官网开发帮助地址
Ionic的QR地址: https://ionicframework.com/docs/native/qr-scanner
git地址:https://github.com/bitpay/cordova-plugin-qrscanner
安装:
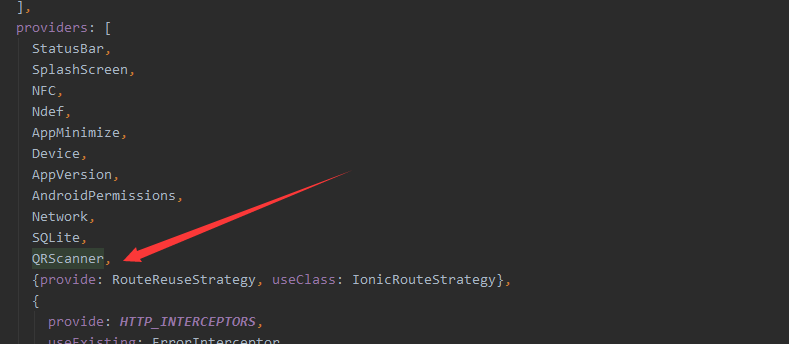
2.引入
在app.module中引入插件
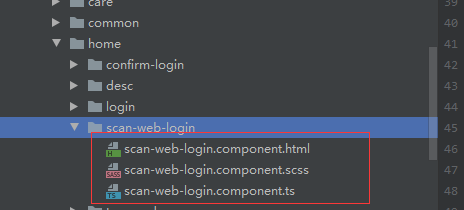
3.扫码页
html代码:
<ion-header>
  <ion-toolbar color="primary">
    <ion-buttons slot="start">
      <ion-back-button class="show-back-button" (click)="backParent()" text="扫描中..."></ion-back-button>
    </ion-buttons>
  </ion-toolbar>
</ion-header>
<ion-content no-scroll [ngClass]="{'qrscanner':isShow}" >
  <div [ngClass]="{'qrscanner-area':isShow}">
  </div>
  <div  [ngClass]="{'through-line':isShow}"></div>
  <div class="button-bottom">
    <button (click)="toggleLight()" ion-fab class="icon-camera" margin-right>
      <ion-icon name="flash" class="icon-img"></ion-icon>
    </button>
    <button (click)="toggleCamera()" ion-fab class="icon-camera">
      <ion-icon name="reverse-camera" class="icon-img"></ion-icon>
    </button>
  </div>

</ion-content>
scss代码:
.qrscanner {
  background: none;
  opacity: 0.2;
  .qrscanner-area {
    width: 100%;
    height: 86%;
    background: url(../../../assets/img/scanner.svg) no-repeat center center;
    background-size: contain;
  }
}

.through-line {
  left: 25%;
  width: 50%;
  height: 2px;
  background: red;
  position: absolute;
  animation: myfirst 2s linear infinite alternate;
}

@keyframes myfirst {
  0% {
    background: red;
    top: 30%;
  }
  25% {
    background: yellow;
    top: 35%;
  }
  50% {
    background: blue;
    top: 40%;
  }
  75% {
    background: green;
    top: 45%;
  }
  100% {
    background: red;
    top: 50%;
  }
}

.button-bottom {
  position: absolute;
  left: 50%;
  bottom: 80px;
  margin-left: -64px;
  .icon-camera {
    &:first-child {
      margin-right: 50px;
    }
    float: left;
    height: 43px;
    background: #377ae5;
    border-radius: 30px;
  }
  .icon-img {
    font-size: 31px;
    color: white;
  }
}
ts代码
import {Component, OnDestroy, OnInit} from '@angular/core';
import {ActivatedRoute, Router} from '@angular/router';
import {AlertController} from '@ionic/angular';
import {QRScanner, QRScannerStatus} from '@ionic-native/qr-scanner/ngx';
import {ToastCoreService} from '../../care/modal/api/toast.service';

@Component({
  selector: 'zl-scan-web-login',
  templateUrl: './scan-web-login.component.html',
  styleUrls: ['./scan-web-login.component.scss'],
})
export class ScanWebLoginComponent implements OnInit{
    light: boolean; // 判断闪光灯
    frontCamera: boolean; // 判断摄像头
    isShow = false; // 控制显示背景,避免切换页面卡顿
    constructor( private qrScanner: QRScanner, private alertController: AlertController,
                 private toastService: ToastCoreService, private activatedRouter: ActivatedRoute,
                 private router: Router) {
        this.light = false;
        this.frontCamera = false;
    }
    ngOnInit(): void {
        this.loadScanInfo();
    }
    loadScanInfo() {
        this.qrScanner.prepare()
            .then((status: QRScannerStatus) => {
                if (status.authorized) {
                    // camera permission was granted
                    // start scanning
                    const scanSub = this.qrScanner.scan().subscribe((text: string) => {
                        this.qrScanner.hide(); // hide camera preview
                        scanSub.unsubscribe(); // stop scanning
                        this.finishScan(text);
                    });

                    // show camera preview
                    this.qrScanner.show();

                    // wait for user to scan something, then the observable callback will be called
                } else if (status.denied) {
                    this.cameraPermission();
                } else {
                    this.toastService.toast('相机访问被拒绝,请稍后重试!', 'danger');
                }
            })
            .catch((e: any) => console.log('Error is', e));
    }

    ionViewDidEnter() {
        // 页面可见时才执行
        this.showCamera();
        this.isShow = true; // 显示背景
    }


    /**
     * 闪光灯控制,默认关闭
     */
    toggleLight() {
        if (this.light) {
            this.qrScanner.disableLight();
        } else {
            this.qrScanner.enableLight();
        }
        this.light = !this.light;
    }

    /**
     * 前后摄像头互换
     */
    toggleCamera() {
        if (this.frontCamera) {
            this.qrScanner.useBackCamera();
        } else {
            this.qrScanner.useFrontCamera();
        }
        this.frontCamera = !this.frontCamera;
    }

    showCamera() {
        (window.document.querySelector('ion-app') as HTMLElement).classList.add('cameraView');
    }
    hideCamera() {
        (window.document.querySelector('ion-app') as HTMLElement).classList.remove('cameraView');
        this.qrScanner.hide(); // 需要关闭扫描,否则相机一直开着
        this.qrScanner.destroy(); // 关闭
    }

    ionViewWillLeave() {
        this.hideCamera();
    }

    async cameraPermission() {
        const alert = await this.alertController.create({
            header: '相机访问权限被拒绝!',
            message: '<strong>点击确定按钮跳转到获取权限页面</strong>。',
            buttons: [
                {
                    text: '取消',
                    role: '取消',
                    cssClass: 'secondary',
                    handler: (blah) => {
                        console.log('Confirm Cancel: blah');
                    }
                }, {
                    text: '确定',
                    handler: () => {
                        this.qrScanner.openSettings();
                    }
                }
            ]
        });
        await alert.present();
    }

    finishScan(info: string) {
        // 确认登录页面
        this.router.navigate(['/home/confirm-login'], {queryParams: {'scanInfo': info}});
    }
    backParent() {
        const callbackUrl = this.activatedRouter.snapshot.paramMap.get('callback');
        this.router.navigate([callbackUrl], {relativeTo: this.activatedRouter});
    }

}
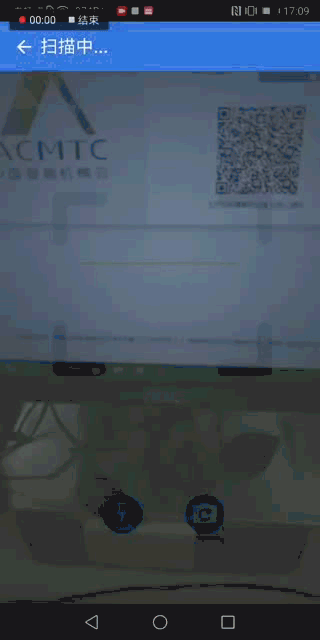
4.最终效果:

背景图下载地址:https://pan.baidu.com/s/1e2RnzEgkp4vMa1IFwofzsw
我们曾如此渴望生命的波澜,到后来才发现,人生最曼妙的风景是内心的淡定与从容

 浙公网安备 33010602011771号