vue.js 学习记录(一)
原文地址:http://www.cnblogs.com/rik28/p/6024425.html
1.这段代码在画面上输出"Hello World!"。
<!DOCTYPE html>
<html>
    <head>
        <meta charset="UTF-8">
        <title></title>
    </head>

    <body>
        <!--这是我们的View-->
        <div id="app">
            {{ message }}
        </div>
    </body>
    <script src="js/vue.js"></script>
    <script>
        // 这是我们的Model
        var exampleData = {
            message: 'Hello World!'
        }

        // 创建一个 Vue 实例或 "ViewModel"
        // 它连接 View 与 Model
        new Vue({
            el: '#app',
            data: exampleData
        })
    </script>
</html>
2. 双向绑定示例
MVVM模式本身是实现了双向绑定的,在Vue.js中可以使用v-model指令在表单元素上创建双向数据绑定。
<!--这是我们的View-->
<div id="app">
    <p>{{ message }}</p>
    <input type="text" v-model="message"/>
</div>
将message绑定到文本框,当更改文本框的值时,<p>{{ message }}</p> 中的内容也会被更新。
3. v-if指令
<!DOCTYPE html>
<html>
    <head>
        <meta charset="UTF-8">
        <title></title>
    </head>
    <body>
        <div id="app">
            <h1>Hello, Vue.js!</h1>
            <h1 v-if="yes">Yes!</h1>
            <h1 v-if="no">No!</h1>
            <h1 v-if="age >= 25">Age: {{ age }}</h1>
            <h1 v-if="name.indexOf('jack') >= 0">Name: {{ name }}</h1>
        </div>
    </body>
    <script src="js/vue.js"></script>
    <script>

        var vm = new Vue({
            el: '#app',
            data: {
                yes: true,
                no: false,
                age: 28,
                name: 'keepfool'
            }
        })
    </script>
</html>
注意:yes, no, age, name这4个变量都来源于Vue实例选项对象的data属性。

hello,Vue.js!
yes
age:28
<template> 中 v-if 条件组
因为 v-if 是一个指令,需要将它添加到一个元素上。但是如果我们想切换多个元素呢?此时我们可以把一个 <template> 元素当做包装元素,并在上面使用 v-if,最终的渲染结果不会包含它。
<template v-if="ok">
<h1>Title</h1>
<p>Paragraph 1</p>
<p>Paragraph 2</p>
</template>
v-else-if,顾名思义,用作 v-if 的 else-if 块。可以链式的多次使用:
<div v-if="type === 'A'">
  A
</div>
<div v-else-if="type === 'B'">
  B
</div>
<div v-else-if="type === 'C'">
  C
</div>
<div v-else>
  Not A/B/C
</div>
4. v-show指令
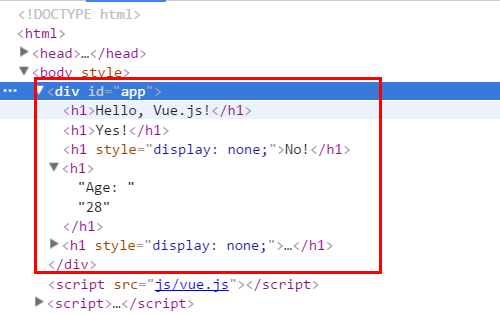
v-show也是条件渲染指令,和v-if指令不同的是,使用v-show指令的元素始终会被渲染到HTML,它只是简单地为元素设置CSS的style属性。
<!DOCTYPE html>
<html>
    <head>
        <meta charset="UTF-8">
        <title></title>
    </head>
    <body>
        <div id="app">
            <h1>Hello, Vue.js!</h1>
            <h1 v-show="yes">Yes!</h1>
            <h1 v-show="no">No!</h1>
            <h1 v-show="age >= 25">Age: {{ age }}</h1>
            <h1 v-show="name.indexOf('jack') >= 0">Name: {{ name }}</h1>
        </div>
    </body>
    <script src="js/vue.js"></script>
    <script>

        var vm = new Vue({
            el: '#app',
            data: {
                yes: true,
                no: false,
                age: 28,
                name: 'keepfool'
            }
        })
    </script>
</html>

5. v-else指令
可以用v-else指令为v-if或v-show添加一个“else块”。v-else元素必须立即跟在v-if或v-show元素的后面——否则它不能被识别。
<!DOCTYPE html>
<html>

    <head>
        <meta charset="UTF-8">
        <title></title>
    </head>
    <body>
        <div id="app">
            <h1 v-if="age >= 25">Age: {{ age }}</h1>
            <h1 v-else>Name: {{ name }}</h1>
            <h1>---------------------分割线---------------------</h1>
            <h1 v-show="name.indexOf('keep') >= 0">Name: {{ name }}</h1>
            <h1 v-else>Sex: {{ sex }}</h1>
        </div>
    </body>
    <script src="js/vue.js"></script>
    <script>
        var vm = new Vue({
            el: '#app',
            data: {
                age: 28,
                name: 'keepfool',
                sex: 'Male'
            }
        })
    </script>
</html>
v-else元素是否渲染在HTML中,取决于前面使用的是v-if还是v-show指令。
这段代码中v-if为true,后面的v-else不会渲染到HTML;v-show为tue,但是后面的v-else仍然渲染到HTML了。
6. v-for指令
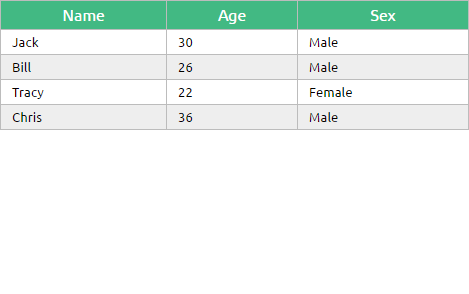
v-for指令基于一个数组渲染一个列表,它和JavaScript的遍历语法相似:

隐藏代码
<!DOCTYPE html>
<html>

    <head>
        <meta charset="UTF-8">
        <title></title>
        <link rel="stylesheet" href="styles/demo.css" />
    </head>

    <body>
        <div id="app">
            <table>
                <thead>
                    <tr>
                        <th>Name</th>
                        <th>Age</th>
                        <th>Sex</th>
                    </tr>
                </thead>
                <tbody>
                    <tr v-for="person in people">
                        <td>{{ person.name  }}</td>
                        <td>{{ person.age  }}</td>
                        <td>{{ person.sex  }}</td>
                    </tr>
                </tbody>
            </table>
        </div>
    </body>
    <script src="js/vue.js"></script>
    <script>
        var vm = new Vue({
            el: '#app',
            data: {
                people: [{
                    name: 'Jack',
                    age: 30,
                    sex: 'Male'
                }, {
                    name: 'Bill',
                    age: 26,
                    sex: 'Male'
                }, {
                    name: 'Tracy',
                    age: 22,
                    sex: 'Female'
                }, {
                    name: 'Chris',
                    age: 36,
                    sex: 'Male'
                }]
            }
        })
    </script>

</html>

在 v-for 块中,我们拥有对父作用域属性的完全访问权限。 v-for 还支持一个可选的第二个参数为当前项的索引。
<ul id="example-2">
  <li v-for="(item, index) in items">
    {{ parentMessage }} - {{ index }} - {{ item.message }}
  </li>
</ul>
var example2 = new Vue({
  el: '#example-2',
  data: {
    parentMessage: 'Parent',
    items: [
      { message: 'Foo' },
      { message: 'Bar' }
    ]
  }
})
Parent-0-Foo
Parent-1-Bar
Template v-for
如同 v-if 模板,你也可以用带有 v-for 的 <template> 标签来渲染多个元素块。例如:
<ul>
  <template v-for="item in items">
    <li>{{ item.msg }}</li>
    <li class="divider"></li>
  </template>
</ul>
对象迭代 v-for
你也可以用 v-for 通过一个对象的属性来迭代。
<ul id="repeat-object" class="demo">
  <li v-for="value in object">
    {{ value }}
  </li>
</ul>
new Vue({
  el: '#repeat-object',
  data: {
    object: {
      FirstName: 'John',
      LastName: 'Doe',
      Age: 30
    }
  }
})
整数迭代 v-for
v-for 也可以取整数。在这种情况下,它将重复多次模板。
7.v-bind指令
v-bind指令可以在其名称后面带一个参数,中间放一个冒号隔开,这个参数通常是HTML元素的特性(attribute),例如:v-bind:class
8. v-on指令
v-on指令用于给监听DOM事件,它的用语法和v-bind是类似的,例如监听<a>元素的点击事件:
有两种形式调用方法:绑定一个方法(让事件指向方法的引用),或者使用内联语句。
Greet按钮将它的单击事件直接绑定到greet()方法,而Hi按钮则是调用say()方法。
<!DOCTYPE html>
<html>
    <head>
        <meta charset="UTF-8">
        <title></title>
    </head>
    <body>
        <div id="app">
            <p><input type="text" v-model="message"></p>
            <p>
                <!--click事件直接绑定一个方法-->
                <button v-on:click="greet">Greet</button>
            </p>
            <p>
                <!--click事件使用内联语句-->
                <button v-on:click="say('Hi')">Hi</button>
            </p>
        </div>
    </body>
    <script src="js/vue.js"></script>
    <script>
        var vm = new Vue({
            el: '#app',
            data: {
                message: 'Hello, Vue.js!'
            },
            // 在 `methods` 对象中定义方法
            methods: {
                greet: function() {
                    // // 方法内 `this` 指向 vm
                    alert(this.message)
                },
                say: function(msg) {
                    alert(msg)
                }
            }
        })
    </script>
</html>
9. v-bind和v-on的缩写
Vue.js为最常用的两个指令v-bind和v-on提供了缩写方式。v-bind指令可以缩写为一个冒号,v-on指令可以缩写为@符号。
<!--完整语法-->
<a href="javascripit:void(0)" v-bind:class="activeNumber === n + 1 ? 'active' : ''">{{ n + 1 }}</a>
<!--缩写语法-->
<a href="javascripit:void(0)" :class="activeNumber=== n + 1 ? 'active' : ''">{{ n + 1 }}</a>

<!--完整语法-->
<button v-on:click="greet">Greet</button>
<!--缩写语法-->
<button @click="greet">Greet</button>
10.Class 与 Style 绑定
数据绑定一个常见需求是操作元素的 class 列表和它的内联样式。因为它们都是属性 ,我们可以用v-bind 处理它们:只需要计算出表达式最终的字符串。不过,字符串拼接麻烦又易错。因此,在 v-bind 用于 class 和 style 时, Vue.js 专门增强了它。表达式的结果类型除了字符串之外,还可以是对象或数组。
绑定html class样式
#对象语法
<!DOCTYPE html>
<html>
    <head>
        <meta charset="UTF-8">
        <title></title>
    </head>
    <body>
        <div id="app">
           <div class="static"
                         v-bind:class="{ active: isActive, 'text-danger': hasError }">内容</div>
        </div>
    </body>
    <script src="vue.min.js"></script>
    <script>
        var vm = new Vue({
            el: '#app',
            data: {
                isActive: true,
                hasError: false
            }
        })
    </script>
</html>
<div class="static active">内容
</div>
你也可以直接绑定对象
<!DOCTYPE html>
<html>
    <head>
        <meta charset="UTF-8">
        <title></title>
    </head>
    <body>
        <div id="app">
           <div v-bind:class="classObject">内容</div>
        </div>
    </body>
    <script src="vue.min.js"></script>
    <script>
        var vm = new Vue({
            el: '#app',
            data: {
                classObject: {
                                active: false,
                                'text-danger': true
                }
            }
        })
    </script>
</html>


<div class="text-danger">内容</div>
#数组语法
我们可以把一个数组传给 v-bind:class ,以应用一个 class 列表:
<!DOCTYPE html>
<html>
    <head>
        <meta charset="UTF-8">
        <title></title>
    </head>
    <body>
        <div id="app">
           <div v-bind:class="[activeClass, errorClass]">内容</div>

        </div>
    </body>
    <script src="vue.min.js"></script>
    <script>
        var vm = new Vue({
            el: '#app',
            data: {
                          activeClass: 'active',
                          errorClass: 'text-danger'
            }})
    </script>
</html>

<div class="active text-danger">内容</div>
如果你也想根据条件切换列表中的 class ,可以用三元表达式:
<!DOCTYPE html>
<html>
    <head>
        <meta charset="UTF-8">
        <title></title>
    </head>
    <body>
        <div id="app">
          <div v-bind:class="[isActive ? activeClass : '', errorClass]">内容</div>

        </div>
    </body>
    <script src="vue.min.js"></script>
    <script>
        var vm = new Vue({
            el: '#app',
            data: {
                          isActive: false,
                          errorClass: 'text-danger'
                        }})
    </script>
</html>

<div class="text-danger">内容</div>
此例始终添加 errorClass ,但是只有在 isActive 是 true 时添加 activeClass 。
绑定内联样式
<!DOCTYPE html>
<html>
    <head>
        <meta charset="UTF-8">
        <title></title>
    </head>
    <body>
        <div id="app">
         <div v-bind:style="{ color: activeColor, fontSize: fontSize + 'px' }">fds</div>

        </div>
    </body>
    <script src="vue.min.js"></script>
    <script>
        var vm = new Vue({
            el: '#app',
           data: {
                          activeColor: 'red',
                          fontSize: 30
                    }
                })
    </script>
</html>

<div style="color: red; font-size: 30px;">fds</div>
直接绑定到一个样式对象通常更好,让模板更清晰:
<!DOCTYPE html>
<html>
    <head>
        <meta charset="UTF-8">
        <title></title>
    </head>
    <body>
        <div id="app">
         <div v-bind:style="styleObject">fds</div>

        </div>
    </body>
    <script src="vue.min.js"></script>
    <script>
        var vm = new Vue({
            el: '#app',
           data: {
                          styleObject: {
                            color: 'red',
                            fontSize: '13px'
                          }
                    }
                })
    </script>
</html>

<div style="color: red; font-size: 13px;">fds</div>


 浙公网安备 33010602011771号