技术栈
技术栈
Django
服务器
阿里云
1.设置安全组开启端口
2.用XSHEEL连接22端口
Linux
su root # 切换为ROOT用户
sudo passwd  # 修改密码
sync  # 将数据由内存同步到硬盘中
shutdown # 关机
reboot # 重启
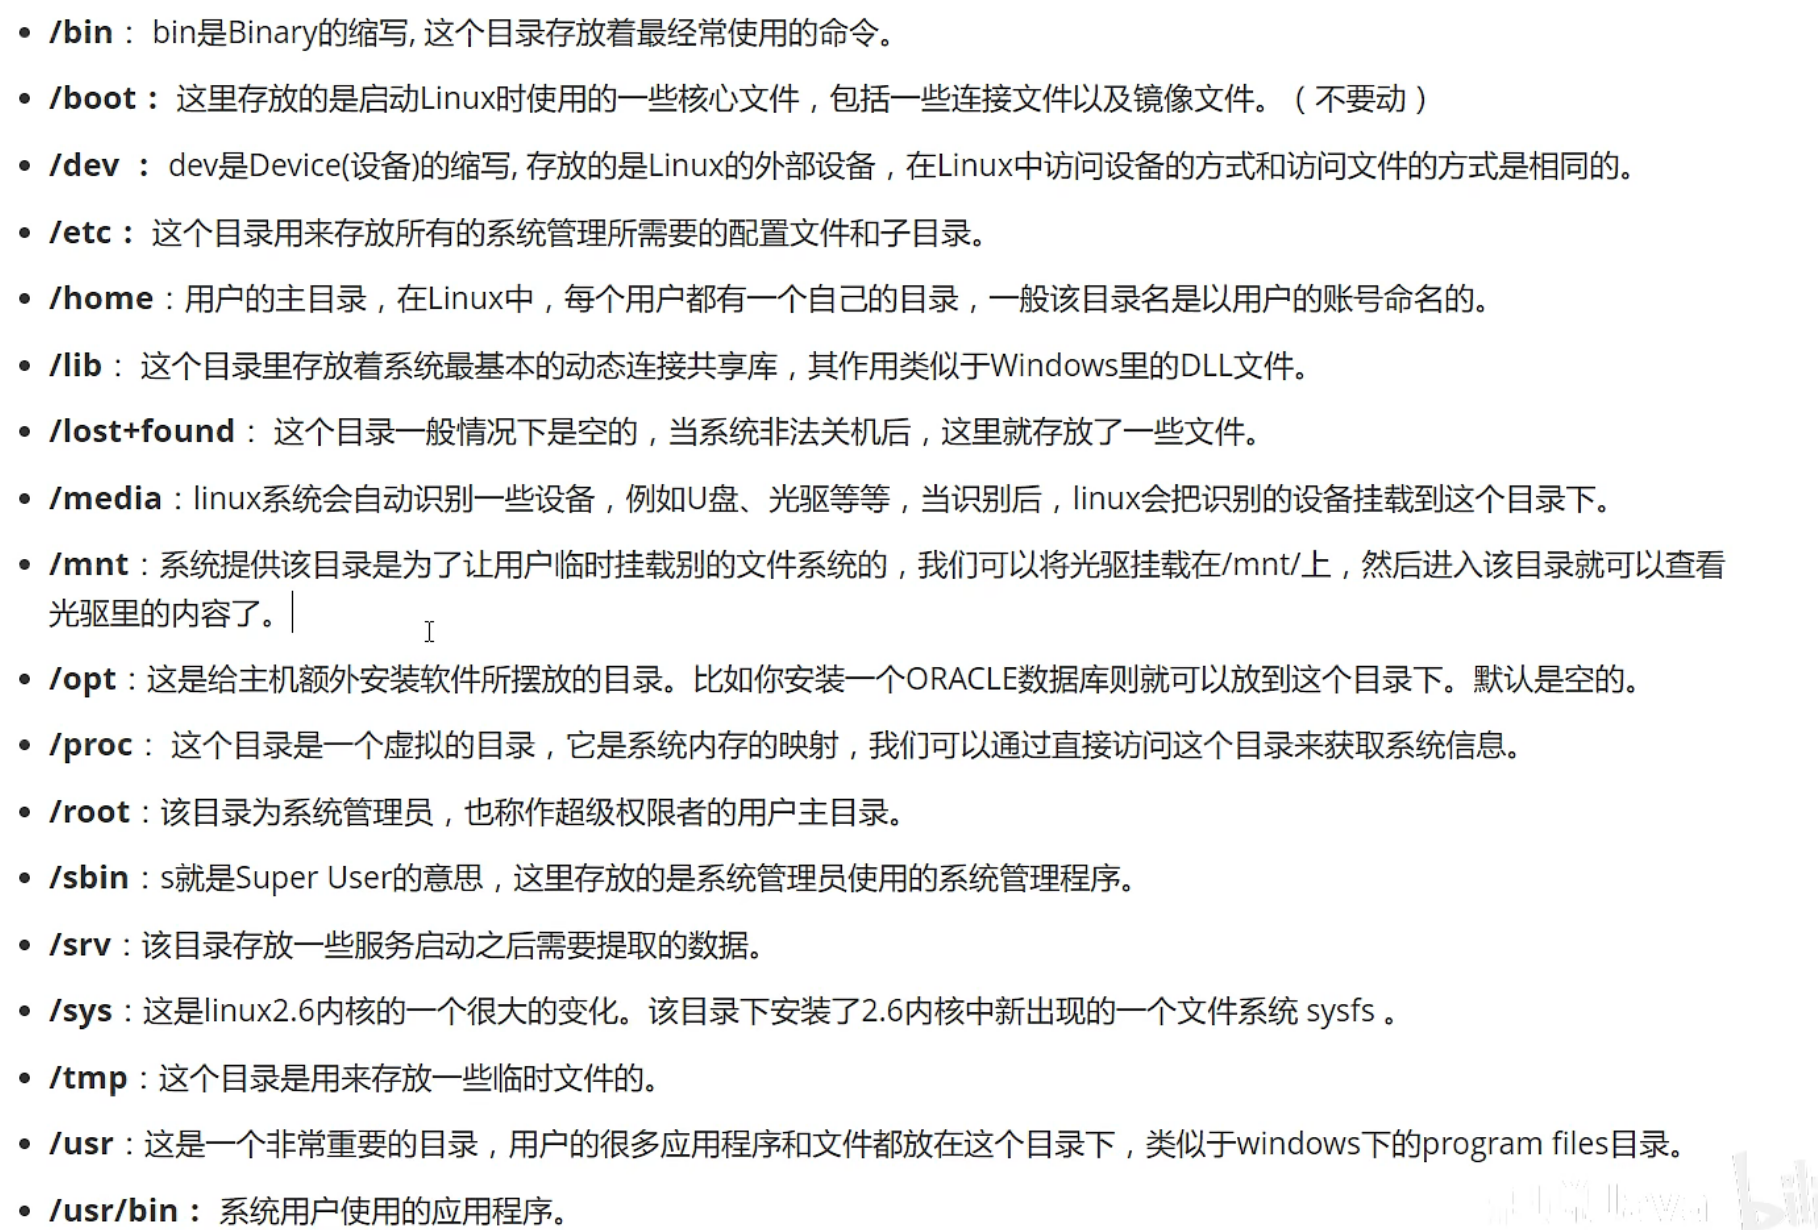
目录相关
ls / #列出目录
ls -a/ #查看所有的文件,包括隐藏文件
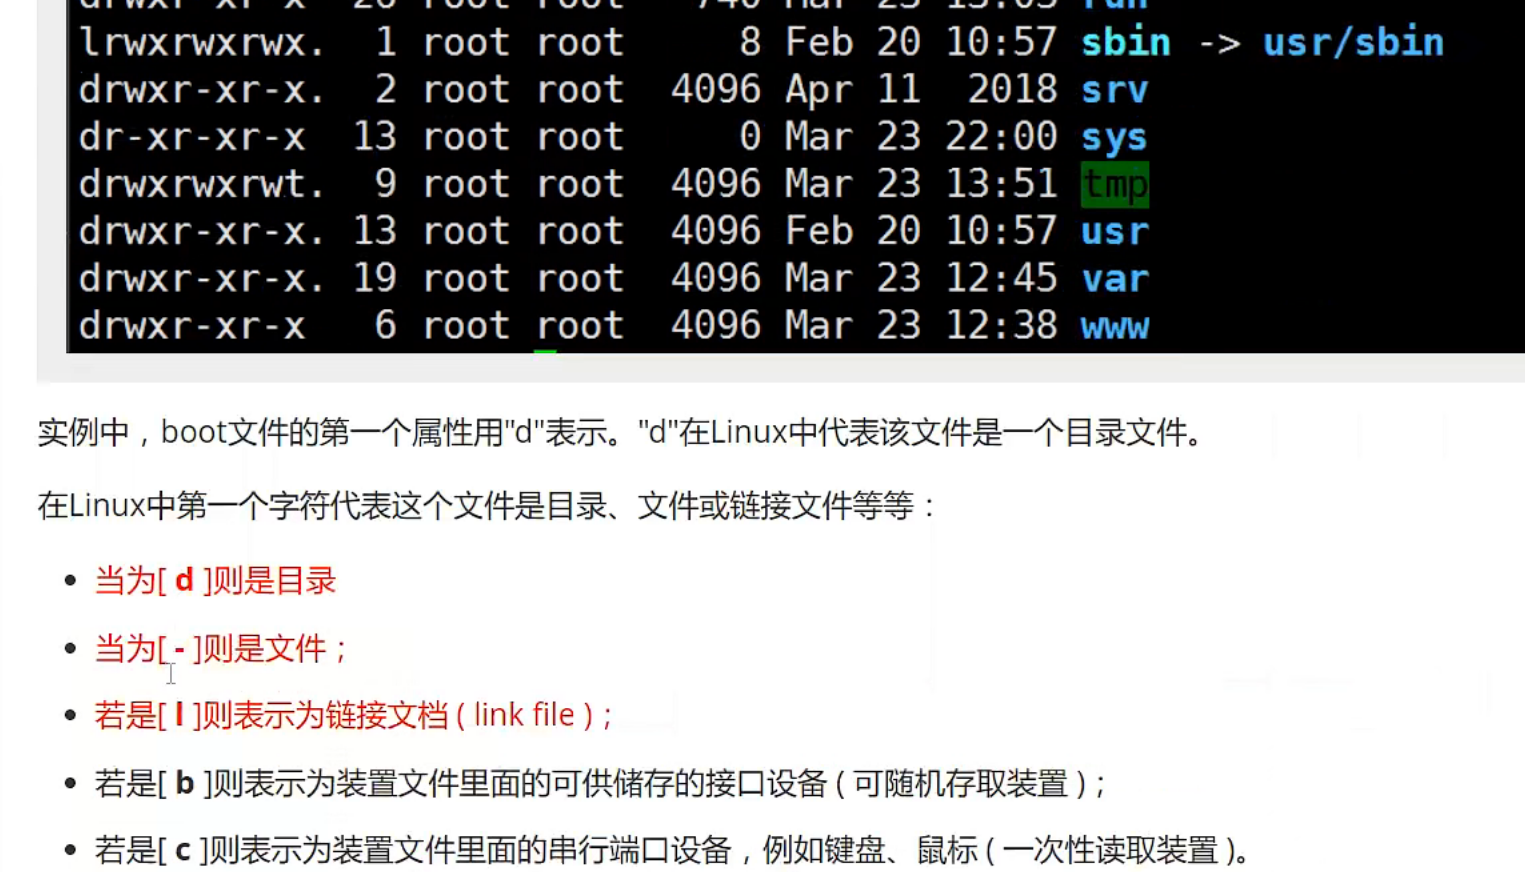
ls -l # 列出所有的文件,包含文件的属性和权限,没有隐藏文件
cd # 切换目录
cd .. # 返回上级目录
cd ~ # 回到当前用户目录
pwd #显示当前所在目录
mkdir 666 # 创建目录
mkdir -p test2/test3/test4 #创建多级目录
rmdir cwp666 # 删除空目录
rmdir -p test1/test2/test3/test4 # 删除多级目录
cp 原来的地方 新的地方 # 复制文件或者目录
rm # 移除文件或目录
rm -f # 忽略不存在的文件,不会出现警告,强制删除
rm -r # 递归删除目录
rm -i #互动,删除询问是否删除
rm -rf / #删除系统中所有文件,不要用,删库跑路,管吃住
mv # 移动文件或目录
mv -f # 强制移动
mv -u # 只替换已经更新过的文件
mv cw6 cwp66 # 重命名文件夹

文件属性
chgrp -R cwp cwpt # 更改文件属组
root@DESKTOP-2I89BA6:/home# ls -l
drwxr-xr-x 2 root cwp 4096 Aug 28 20:43 cwpt

chown -R cwp cwpt # 更改文件属主
root@DESKTOP-2I89BA6:/home# ls -l
drwxr-xr-x 2 cwp cwp 4096 Aug 28 20:43 cwpt
-
更改文件属性
解决权限问题
r:4  w:2  x:1
可读可写不可执行 rw-  6
可读可写可执行   rwx  7
chmod 777 文件赋予所有用户可读可写可执行
chmod 777 cwpt
root@DESKTOP-2I89BA6:/home# ls -l
drwxrwxrwx 2 cwp cwp 4096 Aug 28 20:43 cwpt
ifconfig 查看网络配置

文件内容查看
cat # 从第一行查看文件内容
tac # 从最后一行查看文件内容
nl # 显示行数查看
more # 分页显示内容 空格翻页 enter向下翻一行 ,:f 当前所在行
less # 分页显示内容,可往前翻 空格下翻页 上下键翻页 ,:f 当前所在行
/aaa123 # 向下查找字符串 、
?aaa123 # 向上查找字符串  按n寻找下一个,N寻找上一个
head #只看头几行
head -n 20 adduser.conf  # 只看头20行
tail #只看尾巴几行  # 只看尾20行
man [命令] #查看命令文档
Linux链接
硬链接: A---B,假设B是A的硬链接,那么他们指向了同一个文件!允许一个文件拥有多个路径,可以通过这种机制硬链接到一些重要文件上,防止误删!
软链接(符号链接):类似Windows下的快捷方式,删除源文件,软链接就访问不了了
创建链接 ln命令
touch 创建文件
touch f1 #创建文件
ln f1 f2 #创建f1的硬链接f2
ln -s f1 f3 #创建f1的软链接f3
echo "I LOVE PYTHON" >>f1  #往f1里写字符
root@DESKTOP-2I89BA6:/home# cat f1
I LOVE PYTHON
root@DESKTOP-2I89BA6:/home# cat f2
I LOVE PYTHON
root@DESKTOP-2I89BA6:/home# cat f3
I LOVE PYTHON
root@DESKTOP-2I89BA6:/home# rm -rf f1
root@DESKTOP-2I89BA6:/home# ls
cwp  cwpt  f2  f3
root@DESKTOP-2I89BA6:/home# cat f2
I LOVE PYTHON
root@DESKTOP-2I89BA6:/home# cat f3
cat: f3: No such file or directory # 删除f1之后,硬链接还可以访问,软链接失效
Vim编辑器
进入Vim按i进入编辑模式
退出编辑模式:ESC键
底线命令模式::
退出Vim:q
保存:w
保存退出:wq
强制退出不保存:q!
显示行号:set nu
不显示行号:set nonu
查找某一个字符:/字符
向下寻找:N
向上寻找:n
复原前一个动作(撤回):u
重作上一个动作:CTRL+r
Docker
查看当前环境
#系统内核是3.10以上的
[root@at-jun-ling /]# uname -r
3.10.0-1160.80.1.el7.x86_64
# 系统版本
[root@at-jun-ling /]# cat /etc/os-release
NAME="CentOS Linux"
VERSION="7 (Core)"
ID="centos"
ID_LIKE="rhel fedora"
VERSION_ID="7"
PRETTY_NAME="CentOS Linux 7 (Core)"
ANSI_COLOR="0;31"
CPE_NAME="cpe:/o:centos:centos:7"
HOME_URL="https://www.centos.org/"
BUG_REPORT_URL="https://bugs.centos.org/"

CENTOS_MANTISBT_PROJECT="CentOS-7"
CENTOS_MANTISBT_PROJECT_VERSION="7"
REDHAT_SUPPORT_PRODUCT="centos"
REDHAT_SUPPORT_PRODUCT_VERSION="7"
Docker官方文档
Docker Documentation | Docker Documentation
Docker安装
安装地址
#1.卸载旧的版本,这里之前没有装就会说No Match for argument
[root@at-jun-ling /]# sudo yum remove docker \
>                   docker-client \
>                   docker-client-latest \
>                   docker-common \
>                   docker-latest \
>                   docker-latest-logrotate \
>                   docker-logrotate \
>                   docker-engine
Loaded plugins: fastestmirror
No Match for argument: docker
No Match for argument: docker-client
No Match for argument: docker-client-latest
No Match for argument: docker-common
No Match for argument: docker-latest
No Match for argument: docker-latest-logrotate
No Match for argument: docker-logrotate
No Match for argument: docker-engine
No Packages marked for removal
#2.安装基本环境(需要的安装包)
[root@at-jun-ling /]# yum install -y yum-utils
Loaded plugins: fastestmirror
Determining fastest mirrors
base                                                                                                                                                                                       | 3.6 kB  00:00:00
epel                                                                                                                                                                                       | 4.7 kB  00:00:00
extras                                                                                                                                                                                     | 2.9 kB  00:00:00
updates                                                                                                                                                                                    | 2.9 kB  00:00:00
(1/7): epel/x86_64/group_gz                                                                                                                                                                |  99 kB  00:00:00
(2/7): base/7/x86_64/group_gz                                                                                                                                                              | 153 kB  00:00:00
(3/7): extras/7/x86_64/primary_db                                                                                                                                                          | 249 kB  00:00:00
(4/7): epel/x86_64/updateinfo                                                                                                                                                              | 1.0 MB  00:00:00
(5/7): epel/x86_64/primary_db                                                                                                                                                              | 7.0 MB  00:00:00
(6/7): base/7/x86_64/primary_db                                                                                                                                                            | 6.1 MB  00:00:00
(7/7): updates/7/x86_64/primary_db                                                                                                                                                         |  19 MB  00:00:00
Package yum-utils-1.1.31-54.el7_8.noarch already installed and latest version
Nothing to do
#3.设置镜像的仓库,默认是外网:https://download.docker.com/linux/centos/docker-ce.repo,可使用阿里云的镜像:http://mirrors.aliyun.com/docker-ce/linux/centos/docker-ce.repo
[root@at-jun-ling ~]# yum-config-manager \
>     --add-repo \
>     http://mirrors.aliyun.com/docker-ce/linux/centos/docker-ce.repo
Loaded plugins: fastestmirror
adding repo from: http://mirrors.aliyun.com/docker-ce/linux/centos/docker-ce.repo
grabbing file http://mirrors.aliyun.com/docker-ce/linux/centos/docker-ce.repo to /etc/yum.repos.d/docker-ce.repo
repo saved to /etc/yum.repos.d/docker-ce.repo
# 更新yum软件包索引
yum makecache
#4.安装最新版的Docker,docker-ce社区版
[root@at-jun-ling ~]# sudo yum install docker-ce docker-ce-cli containerd.io docker-compose-plugin
#5.启动Docker
systemctl start docker
#通过运行映像来验证 Docker 引擎安装是否成功。hello-world
[root@at-jun-ling ~]# docker run hello-world
Unable to find image 'hello-world:latest' locally#没有找到镜像
latest: Pulling from library/hello-world  #拉取镜像
2db29710123e: Pull complete
Digest: sha256:2498fce14358aa50ead0cc6c19990fc6ff866ce72aeb5546e1d59caac3d0d60f
Status: Downloaded newer image for hello-world:latest

Hello from Docker!
This message shows that your installation appears to be working correctly.

To generate this message, Docker took the following steps:
 1. The Docker client contacted the Docker daemon.
 2. The Docker daemon pulled the "hello-world" image from the Docker Hub.
    (amd64)
 3. The Docker daemon created a new container from that image which runs the
    executable that produces the output you are currently reading.
 4. The Docker daemon streamed that output to the Docker client, which sent it
    to your terminal.

To try something more ambitious, you can run an Ubuntu container with:
 $ docker run -it ubuntu bash

Share images, automate workflows, and more with a free Docker ID:
 https://hub.docker.com/

For more examples and ideas, visit:
 https://docs.docker.com/get-started/
# 查看Docker版本
[root@at-jun-ling ~]# docker version
Client: Docker Engine - Community
 Version:           23.0.0
 API version:       1.42
 Go version:        go1.19.5
 Git commit:        e92dd87
 Built:             Wed Feb  1 17:49:02 2023
 OS/Arch:           linux/amd64
 Context:           default

Server: Docker Engine - Community
 Engine:
  Version:          23.0.0
  API version:      1.42 (minimum version 1.12)
  Go version:       go1.19.5
  Git commit:       d7573ab
  Built:            Wed Feb  1 17:46:49 2023
  OS/Arch:          linux/amd64
  Experimental:     false
 containerd:
  Version:          1.6.16
  GitCommit:        31aa4358a36870b21a992d3ad2bef29e1d693bec
 runc:
  Version:          1.1.4
  GitCommit:        v1.1.4-0-g5fd4c4d
 docker-init:
  Version:          0.19.0
  GitCommit:        de40ad0
#6. 阿里云的加速器https://cr.console.aliyun.com/cn-shanghai/instances/mirrors ,配置镜像加速器针对Docker客户端版本大于 1.10.0 的用户,您可以通过修改daemon配置文件/etc/docker/daemon.json来使用加速器

sudo mkdir -p /etc/docker
sudo tee /etc/docker/daemon.json <<-'EOF'
{
  "registry-mirrors": ["https://xq9f7054.mirror.aliyuncs.com"]
}
EOF
sudo systemctl daemon-reload
sudo systemctl restart docker
#7.查看刚下载的image 'hello-world:latest'
[root@at-jun-ling ~]# docker images
REPOSITORY    TAG       IMAGE ID       CREATED         SIZE
hello-world   latest    feb5d9fea6a5   16 months ago   13.3kB
#7.卸载Docker
卸载 Docker Engine、CLI、containerd 和 Docker Compose 软件包:
sudo yum remove docker-ce docker-ce-cli containerd.io docker-compose-plugin docker-ce-rootless-extras
#主机上的映像、容器、卷或自定义配置文件 不会自动删除。删除所有映像、容器和 卷:
sudo rm -rf /var/lib/docker
sudo rm -rf /var/lib/containerd


