SpringBoot集成mybatis
1. springboot 集成 mybatis
1. 导入 jar
<!--spring-boot-web-->
<dependency>
    <groupId>org.springframework.boot</groupId>
    <artifactId>spring-boot-starter-web</artifactId>
    <version>2.3.2.RELEASE</version>
</dependency>

<!--spring-boot-mybatis -->
<dependency>
    <groupId>org.mybatis.spring.boot</groupId>
    <artifactId>mybatis-spring-boot-starter</artifactId>
    <version>2.1.3</version>
</dependency>

<!--spring-boot-test-->
<dependency>
    <groupId>org.springframework.boot</groupId>
    <artifactId>spring-boot-starter-test</artifactId>
    <version>2.3.2.RELEASE</version>
    <scope>test</scope>
</dependency>

<!--mysql-->
<dependency>
    <groupId>mysql</groupId>
    <artifactId>mysql-connector-java</artifactId>
    <version>8.0.19</version>
</dependency>
2. 配置文件
## 连接 mysql 最小配置
spring:
datasource:
driver-class-name: com.mysql.cj.jdbc.Driver
url: jdbc:mysql://localhost:3307/bdipcloud?characterEncoding=utf8&useSSL=false&serverTimezone=Asia/Shanghai&rewriteBatchedStatements=true&allowMultiQueries=true
username: root
password: 1234
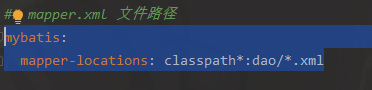
## mapper.xml 文件路径
mybatis:
mapper-locations: classpath*:dao/*.xml
mybatis.mapper-locations 表示的是 mapper.xml 文件位置,不加这个容易 org.apache.ibatis.binding.BindingException: Invalid bound statement (not found): com.demo.transaction.dao.BMapper.findBList
3. dao 层 mapper 接口
import org.apache.ibatis.annotations.Mapper;
import java.util.List;
import java.util.Map;

@Mapper
public interface BMapper {
    List<Map<String, Object>> findBList();
}
这个要记得添加 @Mapper 注解。
4. 对应 mapper 接口的 mapper.xml
<?xml version="1.0" encoding="UTF-8"?>
<!DOCTYPE mapper PUBLIC "-//mybatis.org//DTD Mapper 3.0//EN" "http://mybatis.org/dtd/mybatis-3-mapper.dtd">
<mapper namespace="com.demo.transaction.dao.BMapper">
    <select id="findBList" resultType="java.util.Map">
        select * from b
    </select>
</mapper>
这有两个要注意的地方:
- namespace 标签是对应的 mapper 接口全限定名
- mapper.xml 配置文件,如果在 src 目录中,默认是不会编译的(默认只编译 java),一般我们写在 resource 下面,创建目录尽量跟接口包名后半截保持一致,也就是从
/mapper或者/dao开始。
5. 启动类
import org.mybatis.spring.annotation.MapperScan;
import org.springframework.boot.SpringApplication;
import org.springframework.boot.autoconfigure.SpringBootApplication;

@SpringBootApplication
@MapperScan(basePackages = {"com.demo"})
public class TransactionMain {
    public static void main(String[] args) {
        SpringApplication.run(TransactionMain.class, args);
    }
}
@MapperScan 注解标注的是需要扫描的 mapper 接口类的包名路径
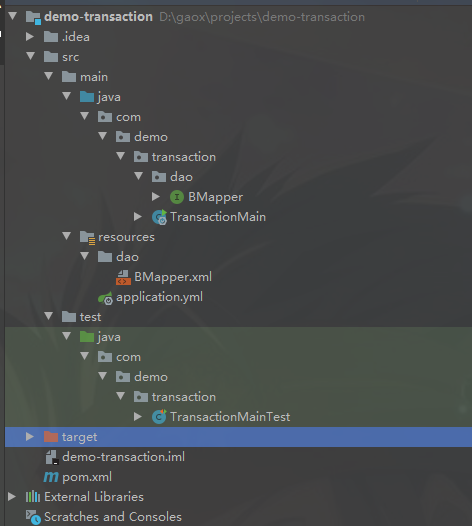
6. 整体结构
2. 根据目录配置多数据源
SpringBoot 多数据源,实际式就是配置多个 dataSource 和 SqlSessionFactory。
1. 导入 jar 包
<!--spring-boot-web-->
<dependency>
    <groupId>org.springframework.boot</groupId>
    <artifactId>spring-boot-starter-web</artifactId>
    <version>2.3.2.RELEASE</version>
</dependency>

<!--spring-boot-mybatis -->
<dependency>
    <groupId>org.mybatis.spring.boot</groupId>
    <artifactId>mybatis-spring-boot-starter</artifactId>
    <version>2.1.3</version>
</dependency>

<!--spring-boot-test-->
<dependency>
    <groupId>org.springframework.boot</groupId>
    <artifactId>spring-boot-starter-test</artifactId>
    <version>2.3.2.RELEASE</version>
    <scope>test</scope>
</dependency>

<!--mysql-->
<dependency>
    <groupId>mysql</groupId>
    <artifactId>mysql-connector-java</artifactId>
    <version>8.0.19</version>
</dependency>
2. 配置文件
这里如果不适用 durid 的连接池,使用的式 jdbc-url,这个具体看加载数据源使用的那个 key
spring:
  datasource:
    db1:
      driver-class-name: com.mysql.cj.jdbc.Driver
      jdbc-url: jdbc:mysql://localhost:3307/bdipcloud?characterEncoding=utf8&useSSL=false&serverTimezone=Asia/Shanghai&rewriteBatchedStatements=true&allowMultiQueries=true
      username: root
      password: 1234
    db2:
      driver-class-name: com.mysql.cj.jdbc.Driver
      jdbc-url: jdbc:mysql://localhost:3307/market?characterEncoding=utf8&useSSL=false&serverTimezone=Asia/Shanghai&rewriteBatchedStatements=true&allowMultiQueries=true
      username: root
      password: 1234
3. 使用两个配置文件,配置不同数据源
DBConfig1:
package com.demo.transaction.config;

import org.apache.ibatis.session.SqlSessionFactory;
import org.mybatis.spring.SqlSessionFactoryBean;
import org.mybatis.spring.SqlSessionTemplate;
import org.mybatis.spring.annotation.MapperScan;
import org.springframework.boot.context.properties.ConfigurationProperties;
import org.springframework.boot.jdbc.DataSourceBuilder;
import org.springframework.context.annotation.Bean;
import org.springframework.context.annotation.Configuration;
import org.springframework.core.io.support.PathMatchingResourcePatternResolver;
import org.springframework.jdbc.datasource.DataSourceTransactionManager;

import javax.sql.DataSource;

@Configuration
//basePackages 对应 mapper 类路径
@MapperScan(basePackages = "com.demo.transaction.dao.db1", sqlSessionTemplateRef = "sqlSessionTemplate1")
public class DBConfig1 {

    //每个数据源被封装成一个 dataSource
    @Bean(name = "dataSource1")
    @ConfigurationProperties(prefix = "spring.datasource.db1")
    public DataSource dataSource1(){
        return DataSourceBuilder.create().build();
    }

    @Bean(name = "sqlSessionFactory1")
    public SqlSessionFactory sqlSessionFactory() throws Exception {
        SqlSessionFactoryBean bean = new SqlSessionFactoryBean();
        bean.setDataSource(dataSource1());
        //对应 mapper 配置文件路径
        bean.setMapperLocations(new PathMatchingResourcePatternResolver().getResources("classpath:dao/db1/*.xml"));
        return bean.getObject();
    }

    @Bean(name = "transactionManager1")
    public DataSourceTransactionManager transactionManager() {
        return new DataSourceTransactionManager(dataSource1());
    }

    @Bean(name = "sqlSessionTemplate1")
    public SqlSessionTemplate testSqlSessionTemplate() throws Exception {
        return new SqlSessionTemplate(sqlSessionFactory());
    }
}
DBConfig2:
package com.demo.transaction.config;


import org.apache.ibatis.session.SqlSessionFactory;
import org.mybatis.spring.SqlSessionFactoryBean;
import org.mybatis.spring.SqlSessionTemplate;
import org.mybatis.spring.annotation.MapperScan;
import org.springframework.boot.context.properties.ConfigurationProperties;
import org.springframework.boot.jdbc.DataSourceBuilder;
import org.springframework.context.annotation.Bean;
import org.springframework.context.annotation.Configuration;
import org.springframework.core.io.support.PathMatchingResourcePatternResolver;
import org.springframework.jdbc.datasource.DataSourceTransactionManager;

import javax.sql.DataSource;

@Configuration
@MapperScan(basePackages = "com.demo.transaction.dao.db2", sqlSessionTemplateRef = "sqlSessionTemplate2")
public class DBConfig2 {

    @Bean(name = "dataSource2")
    @ConfigurationProperties(prefix = "spring.datasource.db2")
    public DataSource dataSource2(){
        return DataSourceBuilder.create().build();
    }

    @Bean(name = "sqlSessionFactory2")
    public SqlSessionFactory sqlSessionFactory() throws Exception {
        SqlSessionFactoryBean bean = new SqlSessionFactoryBean();
        bean.setDataSource(dataSource2());
        bean.setMapperLocations(new PathMatchingResourcePatternResolver().getResources("classpath:dao/db2/*.xml"));
        return bean.getObject();
    }

    @Bean(name = "transactionManager2")
    public DataSourceTransactionManager transactionManager() {
        return new DataSourceTransactionManager(dataSource2());
    }

    @Bean(name = "sqlSessionTemplate2")
    public SqlSessionTemplate testSqlSessionTemplate() throws Exception {
        return new SqlSessionTemplate(sqlSessionFactory());
    }
}
DataSource 是封装的数据源。
SqlSessionFactory 是 sqlSession 工场
DataSourceTransactionManager 事务管理器,当有多个数据源时,使用事务需要指明那个事务管理器
SqlSessionTemplate 用来创建 sqlSession 的模板
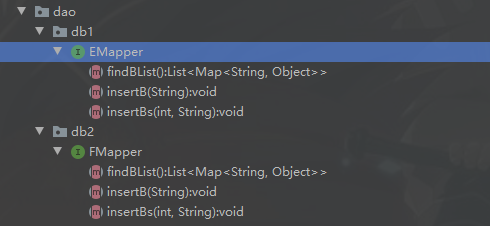
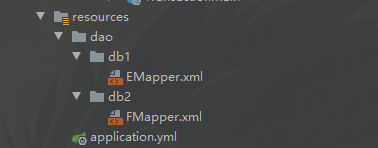
4. 对应不同文件夹,创建 mapper
5. 关于事务
当有多个事务管理器时,@Transaction 需要指定使用使用哪一个,否则会报错。使用哪个事务管理器,事务对于对应的数据源才会起作用。
@Service
public class BService {

    @Autowired
    private EMapper eMapper;

    @Autowired
    private FMapper fMapper;

    //此时因为指定的 transactionManager1,所以 eMapper 的执行会被回滚,而 fMapper 不会回滚
    @Transactional(value = "transactionManager1")
    public void testDemo(){
        eMapper.insertB("张三");
        eMapper.insertB("张三");
        fMapper.insertB("李四");
        fMapper.insertB("李四");
        System.out.println(1/0);
    }

}
这种需要同时支持两个事务管理器的事务,可以使用编程式事务来处理,或者分布式事务。
3. 连接池(DataSource 数据源)
其实就是 DataSource 的实现,对底层 jdbc 的封装。
1. 使用连接池优点
-1. 资源重用:避免了频繁创建、释放连接引起的大量性能开销。在减少系统消耗的基础上,另一方面也增进了系统运行环境的平稳性(减少内存碎片以及数据库临时进程/线程的数量)。
-2. 统一的连接管理,避免数据库连接泄漏。
2. 常见连接池
- C3P0
- DBCP
- omcat Jdbc Pool
- BoneCP
- Druid(阿里的,推荐使用)
- Hikari(springboot2.0 之后默认的,号称性能最好)
3. Druid 的使用
-
- 依赖
<!-- https://mvnrepository.com/artifact/com.alibaba/druid-spring-boot-starter -->
<dependency>
    <groupId>com.alibaba</groupId>
    <artifactId>druid-spring-boot-starter</artifactId>
    <version>1.2.21</version>
</dependency>
注意版本,要用新一点的。
-
- application.yml
spring:
  datasource:
    type: com.alibaba.druid.pool.DruidDataSource
    db1:
      driver-class-name: com.mysql.cj.jdbc.Driver
      url: jdbc:mysql://localhost:3307/bdipcloud?characterEncoding=utf8&useSSL=false&serverTimezone=Asia/Shanghai&rewriteBatchedStatements=true&allowMultiQueries=true
      username: root
      password: 1234
      initialSize: 1 # 初始化连接数
      maxActive: 1  # 最大连接数
      socketTimeout: 10000  # socket 最大读秒
      maxWait: 1000  # 最大等待获取连接时间
    db2:
      driver-class-name: com.mysql.cj.jdbc.Driver
      url: jdbc:mysql://localhost:3307/market?characterEncoding=utf8&useSSL=false&serverTimezone=Asia/Shanghai&rewriteBatchedStatements=true&allowMultiQueries=true
      username: root
      password: 1234
spring.datasource.type 表示数据源类型
-
- 配置类配置 DataSource
@Bean(name = "dataSource1")
@Primary
@ConfigurationProperties(prefix = "spring.datasource.db1")
public DataSource dataSource1(){
    return DruidDataSourceBuilder.create().build();
}
4. 事务管理器
当有一个以上数据源时,就需要配置多个事务管理器来管理对应的数据源。有两种方式配置事务管理器。
1. TransactionManagementConfigurer
通过实现 TransactionManagementConfigurer 接口,重写 annotationDrivenTransactionManager 方法返回一个事务管理器。
public class DruidBdipcloudConfig implements TransactionManagementConfigurer{

  @Override
  @Bean(name = "transactionManager")
  public TransactionManager annotationDrivenTransactionManager() {
      DataSourceTransactionManager transactionManager = new DataSourceTransactionManager();
      //设置事务管理器管理的数据源
      try {
          transactionManager.setDataSource(dataSourceOne());
      } catch (Exception e) {
          throw new RuntimeException(e);
      }
      return transactionManager;
  }

}
使用这个接口,会优先使用。
2. @Bean
@Bean(name = "ecologyTM")
  public TransactionManager ecologyTM() {
      DataSourceTransactionManager transactionManager = new DataSourceTransactionManager();
      //设置事务管理器管理的数据源
      transactionManager.setDataSource(dataSourceTwo());
      return transactionManager;
  }
有多个时,最好 @Primary 注解一个。
参看博客:https://blog.csdn.net/qq_40977118/article/details/109014755
5. 问题记录
1. BindingException 异常解决
org.apache.ibatis.binding.BindingException: Invalid bound statement (not found): xxx,这个错误主要是找不到查询方法导致的。排查方向:
-
- 启动类(主类)上加上@MapperScan(“dao接口类地址”)。例:
@MapperScan(basePackages = "com.zhull.yun.mapper")
- 启动类(主类)上加上@MapperScan(“dao接口类地址”)。例:
-
- Mapper 层也就是 dao 接口类中进行 @Mapper 注解
-
- 如果在Mapper.xml中有写自定义的方法,那还需要在application.yml中配置mapper-locations路径
- 如果在Mapper.xml中有写自定义的方法,那还需要在application.yml中配置mapper-locations路径
-
- mapper.xml 命名空间有没有问题
-
- 项目编译的target目录下看看xml有没有编译成功,可能存在需要加上 build 配置
<build>
<resources>
        <resource>
            <directory>src/main/java</directory>
            <includes>
                <include>**/*.xml</include>
            </includes>
            <filtering>true</filtering>
        </resource>
    </resources>
</build>
2. pom 加入 druid 连接池异常
Caused by: java.lang.ClassNotFoundException: org.springframework.boot.bind.RelaxedPropertyResolver

低版本的 druid ,默认的springboot的版本是1.5.12,这个版本中引入了RelaxedPropertyResolver,导致找不到。升级依赖版本即可。
3. sql 日志不打印
logging:
    level:
      com.threefivework.mymall.dao.mapper: DEBUG //包路径为mapper文件包路径
mybatis:
  configuration:
    log-impl: org.apache.ibatis.logging.stdout.StdOutImpl
SqlSessionFactory object = bean.getObject();
org.apache.ibatis.session.Configuration configuration = object.getConfiguration();
configuration.setLogImpl(StdOutImpl.class);
多数据源的时候,因为有多个 SqlSessionFactory,上面的配置就不生效了
参考文件
drudi 的 github 地址:https://github.com/alibaba/druid

 浙公网安备 33010602011771号