prometheus二进制部署与Grafana图形化界面的使用
一、Prometheus简介
为什么使用peometheus?
容器在k8s环境中可以任意横向扩容与缩容,那么就需要监控服务能够自动对新创建的容器进行监控,当容器删除后又能及时的从监控服务中删除,而传统的zabbix的监控方式需要在每一个容器中安装启动的agent,并且容器自动发现注册及模板关联方面并没有比较好的实现方式。
(1)官网:
(2)背景:
Prometheus是由前Google工程师从2012年开始在Soundcloud以开源软件的形式进行研发的系统监控和告警的软件。自此以后,许多公司和组织都采用了Prometheus作为监控告警工具。
Prometheus的开发者和用户社区非常活跃,它现在是一个独立的开源项目,可以独立于任何公司进行维护。为了证明这一点,Prometheus于2016年5月加入CNCF基金会,成为继Kubernetes之后的第二个CNCF托管项目。
(3)优势:
◽ 由指标名称和键/值对标签标识的时间序列数据组成的多维数据模型
◽强大的查询语言引擎PromQL
◽不依赖分布式存储,单个服务节点具有自治能力
◽时间序列数据是服务通过HTTP协议主动拉去获得的
◽ 也可以通过中间网关来推送时间序列数据
◽ 可以通过静态配置文件或服务发现来获取监控指标
◽支持多种类型的图标和仪表盘
(4)Prometheus的生态组件
◽Prometheus Server:收集和存储时间序列数据
◽ Client Library:客户端库,目的在于为那些期望原生提供Instrumentation功能的应用程序提供便捷的开发途径
◽ Push Gateway:接收那些通常由短期作业生成的指标数据的网关,并支持由Prometheus Server进行指标拉取操作
◽ Exporters:用于暴露现有应用程序或服务(不支持Instrumentation)的指标给Prometheus Server
◽ Alertmanager:从Prometheus Server接收到“告警通知”后,通过去重、分组、路由等预处理功能后以高效想用户完成告警信息发送
◽ Data Visualization:数据可视化与数据导出,Granfana等
◽ Service Discovery:动态发现待监控的Target,从而完成监控配置的重要组件,在容器化环境中尤为重要,该组件目前由Prometheus Server内建支持
◽ peometheus alerting:报警通知
(5)Prometueu的架构
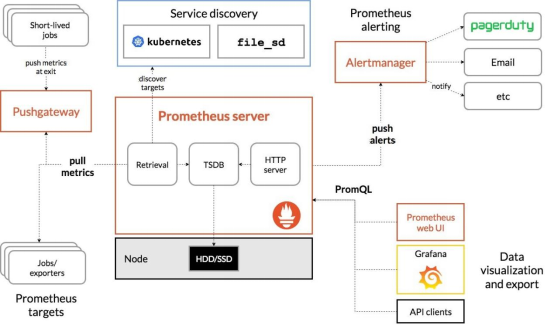
Prometheus Server直接从监控目标中或者间接通过推送网关来拉去监控数据,它在本地存储所有抓取到的样本数据,并对此数据执行一系列规则,以汇总和记录现有数据的新时间序列或生成告警。可以通过grafana或者其他工具来实现监控数据的可视化。
二、二进制部署peometheus监控系统
2.1 prometheus.io官网下载并解压二进制包
master节点

[root@master1 apps]# ln -sv /apps/prometheus-2.33.4.linux-amd64 /apps/prometheus
‘/apps/prometheus’ -> ‘/apps/prometheus-2.33.4.linux-amd64’
[root@master1 apps]# cd /apps/prometheus
[root@master1 prometheus]# ll
total 196068
drwxr-xr-x 2 3434 3434        38 Feb 23 00:59 console_libraries
drwxr-xr-x 2 3434 3434       173 Feb 23 00:59 consoles
-rw-r--r-- 1 3434 3434     11357 Feb 23 00:59 LICENSE
-rw-r--r-- 1 3434 3434      3773 Feb 23 00:59 NOTICE
-rwxr-xr-x 1 3434 3434 104419379 Feb 23 00:54 prometheus  #Prometheus服务可执行程序
-rw-r--r-- 1 3434 3434       934 Feb 23 00:59 prometheus.yml #prometheus配置文件
-rwxr-xr-x 1 3434 3434  96326544 Feb 23 00:57 promtool #测试工具,用于检测配置peometheus配置文件,检测meteics数据等
[root@master1 prometheus]# ./promtool check config ./prometheus.yml #检查配置文件
Checking ./prometheus.yml
SUCCESS: ./prometheus.yml is valid prometheus config file syntax
[root@master1 prometheus]# ./prometheus #测试方式启动prometheus(该方式开机不能自启)
2.2 创建prometheus service启动脚本
[root@master1 ~]# vim /etc/systemd/system/prometheus.service
[Unit]
Description=Prometheus Service
Documentation=https://prometheus.io/docs/introduction/overview/
After=network.target

[Service]
Restart=on-failure
WorkingDirectory=/apps/prometheus/
ExecStart=/apps/prometheus/prometheus --config.file=/apps/prometheus/prometheus.yml

[Install]
WantedBy=multi-user.targe
[root@master1 prometheus]# ss -tnl  #9090未被监听
State      Recv-Q Send-Q                Local Address:Port                               Peer Address:Port
LISTEN     0      32768               192.168.181.110:10248                                         *:*
LISTEN     0      32768                             *:30088                                         *:*
LISTEN     0      32768               192.168.181.110:10249                                         *:*
LISTEN     0      32768               192.168.181.110:10250                                         *:*
LISTEN     0      32768                     127.0.0.1:9099                                          *:*
LISTEN     0      32768                             *:30443                                         *:*
LISTEN     0      32768               192.168.181.110:6443                                          *:*
LISTEN     0      511                       127.0.0.1:6443                                          *:*
LISTEN     0      32768                     127.0.0.1:36301                                         *:*
LISTEN     0      128                               *:111                                           *:*
LISTEN     0      32768               192.168.181.110:10256                                         *:*
LISTEN     0      32768               192.168.181.110:10257                                         *:*
LISTEN     0      8                                 *:179                                           *:*
LISTEN     0      32768                             *:30004                                         *:*
LISTEN     0      32768                             *:30005                                         *:*
LISTEN     0      128                               *:22                                            *:*
LISTEN     0      32768                          [::]:10081                                      [::]:*
LISTEN     0      32768                          [::]:10251                                      [::]:*
LISTEN     0      128                            [::]:111                                        [::]:*
LISTEN     0      32768                          [::]:80                                         [::]:*
LISTEN     0      32768                          [::]:10259                                      [::]:*
LISTEN     0      128                            [::]:22                                         [::]:*
[root@master1 prometheus]# systemctl enable prometheus.service
Created symlink from /etc/systemd/system/multi-user.target.wants/prometheus.service to /etc/systemd/system/prometheus.service.
[root@master1 prometheus]# systemctl restart prometheus.service
[root@master1 prometheus]# ss -tnl
State      Recv-Q Send-Q                Local Address:Port                               Peer Address:Port
LISTEN     0      32768               192.168.181.110:10248                                         *:*
LISTEN     0      32768                             *:30088                                         *:*
LISTEN     0      32768               192.168.181.110:10249                                         *:*
LISTEN     0      32768               192.168.181.110:10250                                         *:*
LISTEN     0      32768                     127.0.0.1:9099                                          *:*
LISTEN     0      32768                             *:30443                                         *:*
LISTEN     0      32768               192.168.181.110:6443                                          *:*
LISTEN     0      511                       127.0.0.1:6443                                          *:*
LISTEN     0      32768                     127.0.0.1:36301                                         *:*
LISTEN     0      128                               *:111                                           *:*
LISTEN     0      32768               192.168.181.110:10256                                         *:*
LISTEN     0      32768               192.168.181.110:10257                                         *:*
LISTEN     0      8                                 *:179                                           *:*
LISTEN     0      32768                             *:30004                                         *:*
LISTEN     0      32768                             *:30005                                         *:*
LISTEN     0      128                               *:22                                            *:*
LISTEN     0      32768                          [::]:10081                                      [::]:*
LISTEN     0      32768                          [::]:9090                                       [::]:*
LISTEN     0      32768                          [::]:10251                                      [::]:*
LISTEN     0      128                            [::]:111                                        [::]:*
LISTEN     0      32768                          [::]:80                                         [::]:*
LISTEN     0      32768                          [::]:10259                                      [::]:*
LISTEN     0      128                            [::]:22                                         [::]:*
[root@master1 prometheus]#
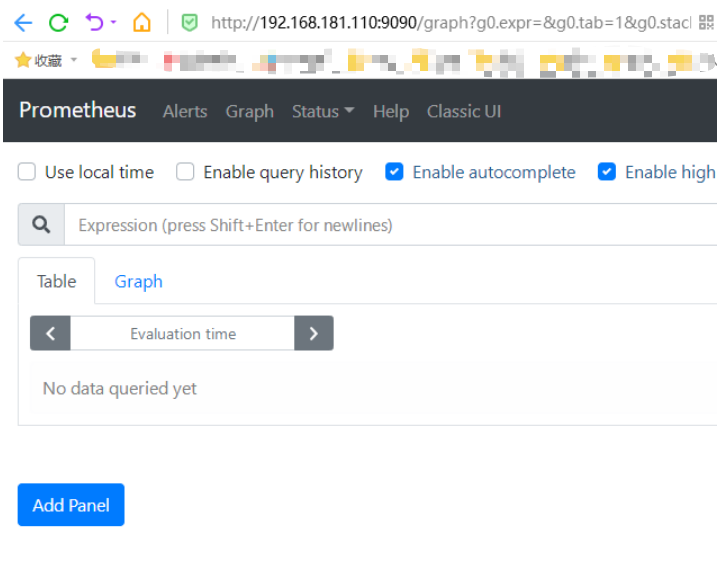
2.3 浏览器访问
2.4 node-exporter部署
node节点下载并解压node-exporter压缩包
[root@node1 apps]# ls
node_exporter-1.3.1.linux-amd64.tar.gz  node-exporter-1.3.1-onekey-install.tar.gz
node-exporter-1.3.1-onekey-install.sh   node-exporter.service
[root@node1 apps]# tar -xvf node_exporter-1.3.1.linux-amd64.tar.gz
node_exporter-1.3.1.linux-amd64/
node_exporter-1.3.1.linux-amd64/LICENSE
node_exporter-1.3.1.linux-amd64/NOTICE
node_exporter-1.3.1.linux-amd64/node_exporter
[root@node1 apps]# ls
node_exporter-1.3.1.linux-amd64         node-exporter-1.3.1-onekey-install.sh      node-exporter.service
node_exporter-1.3.1.linux-amd64.tar.gz  node-exporter-1.3.1-onekey-install.tar.gz
[root@node1 apps]# ln -sv /apps/node_exporter-1.3.1.linux-amd64 /apps/node_exporter  #软连接
‘/apps/node_exportr’ -> ‘/apps/node_exporter-1.3.1.linux-amd64’
2.5 编写service启动文件
[root@node1 apps]# cat /etc/systemd/system/node-exporter.service
[Unit]
Descirption=Prometheus Node Exporter
After=network.target

[Service]
ExecStart=/apps/node_exporter/node_exporter

[Install]
WantedBy=multi-user.target
开机自启
[root@node1 apps]# systemctl restart node-exporter.service
[root@node1 apps]# systemctl enable node-exporter.service
[root@node1 apps]# ss -ntl
State      Recv-Q Send-Q                Local Address:Port                               Peer Address:Port
LISTEN     0      32768               192.168.181.140:10250                                         *:*
LISTEN     0      32768                     127.0.0.1:9099                                          *:*
LISTEN     0      32768                             *:30443                                         *:*
LISTEN     0      511                       127.0.0.1:6443                                          *:*
LISTEN     0      128                               *:111                                           *:*
LISTEN     0      32768               192.168.181.140:10256                                         *:*
LISTEN     0      8                                 *:179                                           *:*
LISTEN     0      32768                             *:30004                                         *:*
LISTEN     0      32768                             *:30005                                         *:*
LISTEN     0      128                               *:22                                            *:*
LISTEN     0      32768               192.168.181.140:10248                                         *:*
LISTEN     0      32768                             *:30088                                         *:*
LISTEN     0      32768                     127.0.0.1:36393                                         *:*
LISTEN     0      32768               192.168.181.140:10249                                         *:*
LISTEN     0      32768                          [::]:9100                                       [::]:*
LISTEN     0      128                            [::]:111                                        [::]:*
LISTEN     0      128                            [::]:22                                         [::]:*
LISTEN     0      32768                          [::]:9094                                       [::]:*
2.6 浏览器访问

prometheus service上对prometheus主配置文件进行配置

# my global config
global:
  scrape_interval: 15s # Set the scrape interval to every 15 seconds. Default is every 1 minute.  #数据收集间隔时间,默认1分钟。
  evaluation_interval: 15s # Evaluate rules every 15 seconds. The default is every 1 minute.      #数据扫描时间间隔,默认1分钟。
  # scrape_timeout is set to the global default (10s).

# Alertmanager configuration
alerting:       #报警通知配置
  alertmanagers:
    - static_configs:
        - targets:
          # - alertmanager:9093

# Load rules once and periodically evaluate them according to the global 'evaluation_interval'.
rule_files:   #规则配置
  # - "first_rules.yml"
  # - "second_rules.yml"

# A scrape configuration containing exactly one endpoint to scrape:
# Here it's Prometheus itself.
scrape_configs: #数据采集目标配置
  # The job name is added as a label `job=<job_name>` to any timeseries scraped from this config.
  - job_name: "prometheus"

    # metrics_path defaults to '/metrics'
    # scheme defaults to 'http'.

    static_configs:
      - targets: ["localhost:9090"]
-job_name: "prometheus-node" #任务名字
static_configs: #静态发现
- targets: ["192.168.181.140:9100","192.168.181.141:9100","192.168.181.142:9100",] #目标列表
2.7 保存重启prometheus并查看端口是否起来
[root@master1 prometheus]# systemctl restart prometheus.service
[root@master1 prometheus]# netstat -ntl
Active Internet connections (only servers)
Proto Recv-Q Send-Q Local Address           Foreign Address         State
tcp        0      0 192.168.181.110:10248   0.0.0.0:*               LISTEN
tcp        0      0 0.0.0.0:30088           0.0.0.0:*               LISTEN
tcp        0      0 192.168.181.110:10249   0.0.0.0:*               LISTEN
tcp        0      0 192.168.181.110:10250   0.0.0.0:*               LISTEN
tcp        0      0 127.0.0.1:9099          0.0.0.0:*               LISTEN
tcp        0      0 0.0.0.0:30443           0.0.0.0:*               LISTEN
tcp        0      0 192.168.181.110:6443    0.0.0.0:*               LISTEN
tcp        0      0 127.0.0.1:6443          0.0.0.0:*               LISTEN
tcp        0      0 127.0.0.1:36301         0.0.0.0:*               LISTEN
tcp        0      0 0.0.0.0:111             0.0.0.0:*               LISTEN
tcp        0      0 192.168.181.110:10256   0.0.0.0:*               LISTEN
tcp        0      0 192.168.181.110:10257   0.0.0.0:*               LISTEN
tcp        0      0 0.0.0.0:179             0.0.0.0:*               LISTEN
tcp        0      0 0.0.0.0:30004           0.0.0.0:*               LISTEN
tcp        0      0 0.0.0.0:30005           0.0.0.0:*               LISTEN
tcp        0      0 0.0.0.0:22              0.0.0.0:*               LISTEN
tcp6       0      0 :::10081                :::*                    LISTEN
tcp6       0      0 :::9090                 :::*                    LISTEN
tcp6       0      0 :::10251                :::*                    LISTEN
tcp6       0      0 :::111                  :::*                    LISTEN
tcp6       0      0 :::80                   :::*                    LISTEN
tcp6       0      0 :::10259                :::*                    LISTEN
tcp6       0      0 :::22                   :::*                    LISTEN
[root@master1 prometheus]#
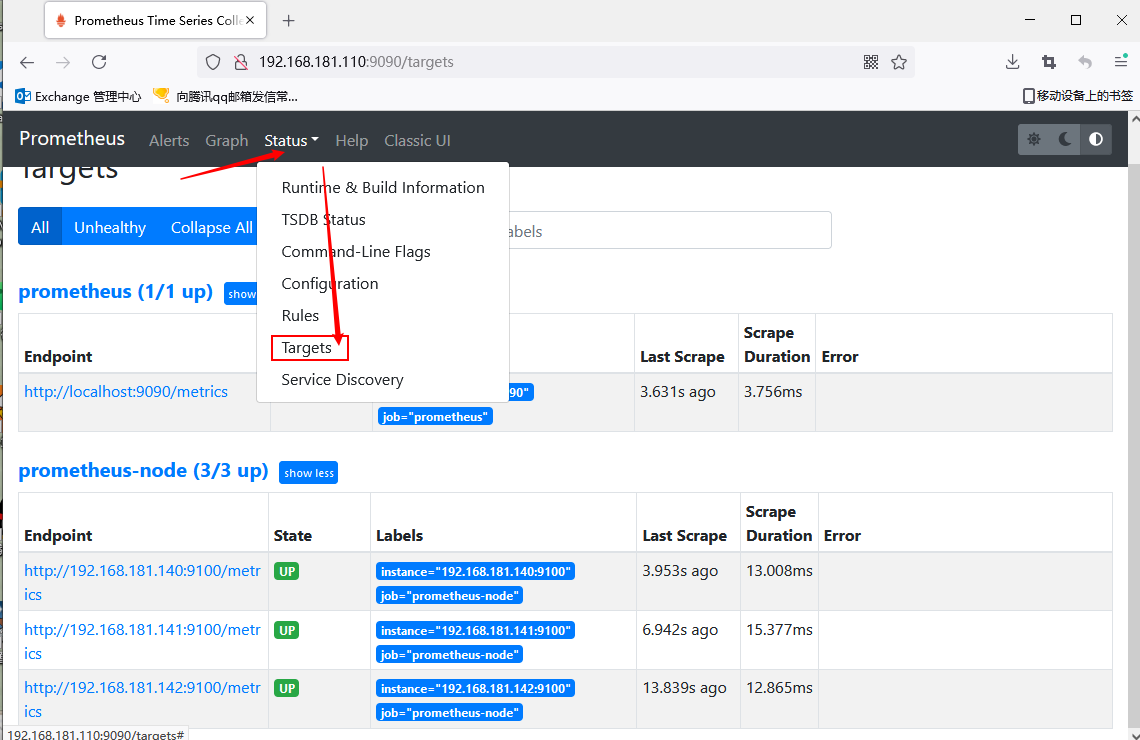
2.7 可以通过浏览器访问prometheus页面看到node节点的数据
三、Grafana部署
3.1 下载grafana的rpm包
[root@master1 prometheus]# wget https://dl.grafana.com/enterprise/release/grafana-enterprise-8.3.7-1.x86_64.rpm
[root@master1 prometheus]# sudo yum install grafana-enterprise-8.3.7-1.x86_64.rpm
[root@master1 ~]# systemctl restart grafana-server
[root@master1 ~]# systemctl enable grafana-server
Created symlink from /etc/systemd/system/multi-user.target.wants/grafana-server.service to /usr/lib/systemd/system/grafana-server.service.
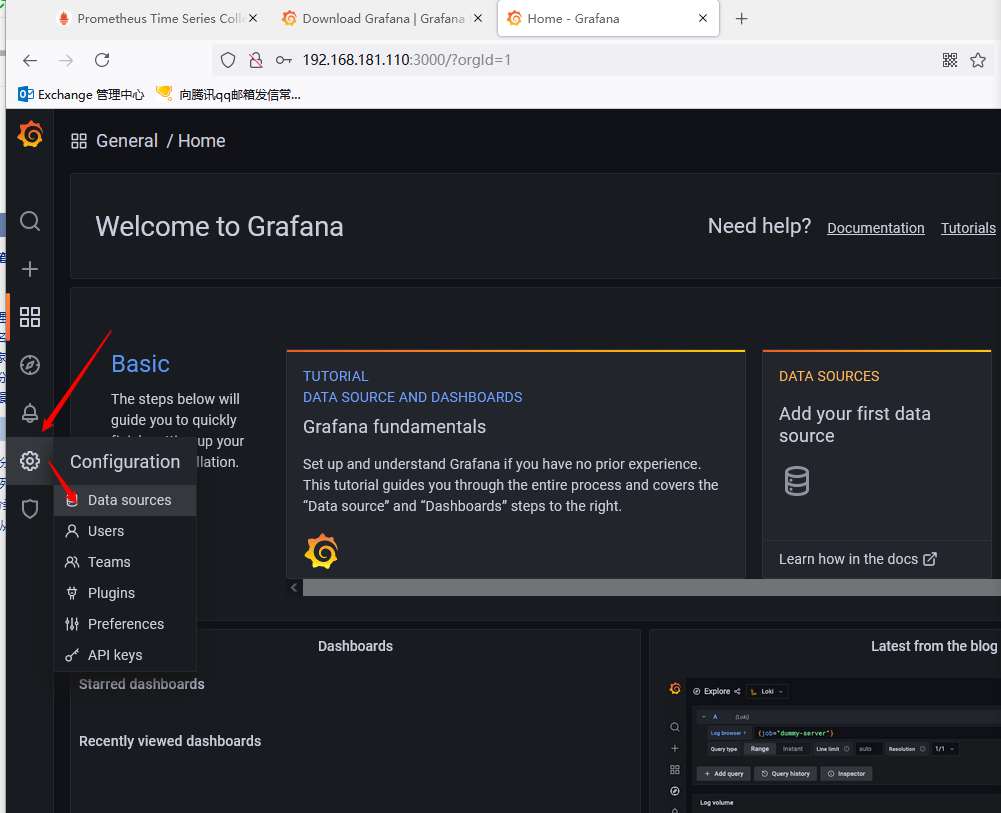
3.2 添加数据源
3.3 点击进去


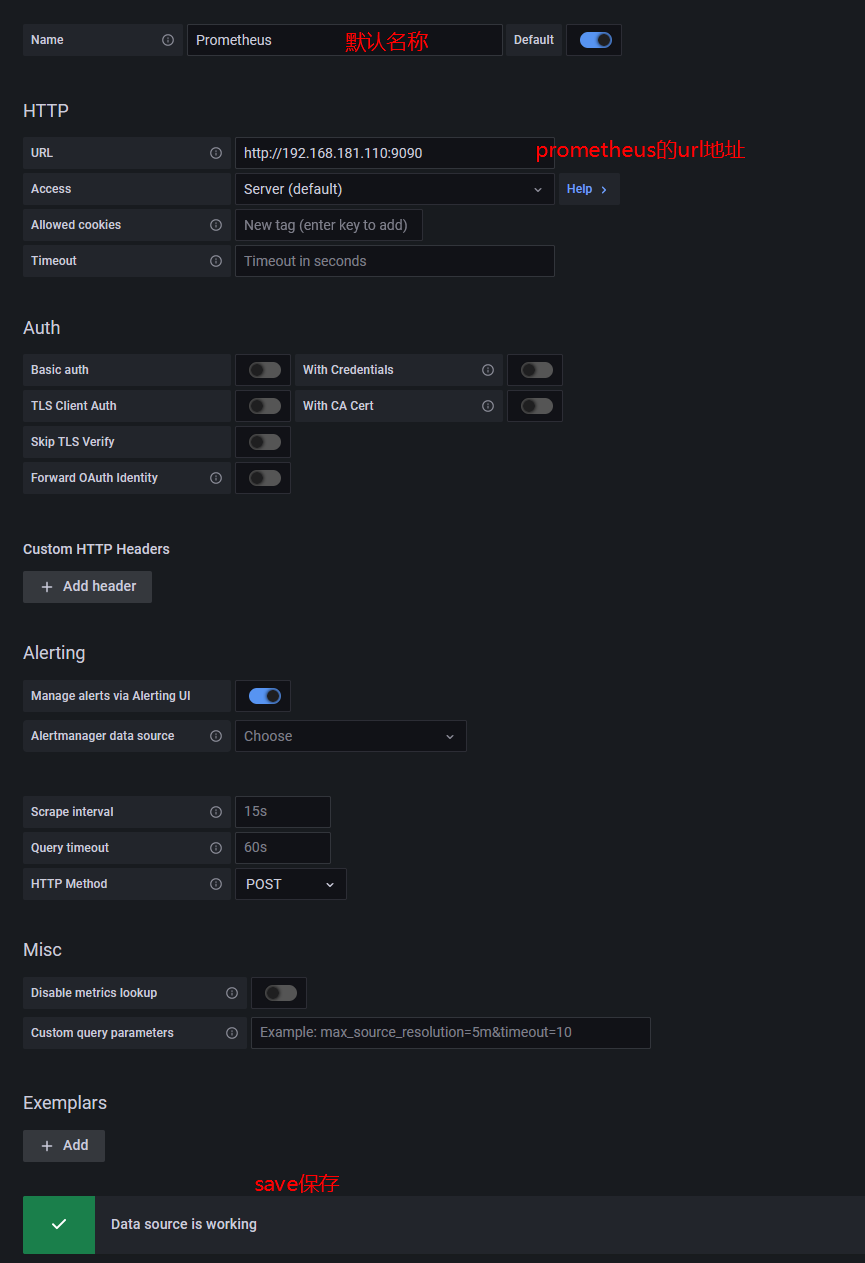
.3.4 保存成功说明数据源没问题

3.5 官方图形模板下载
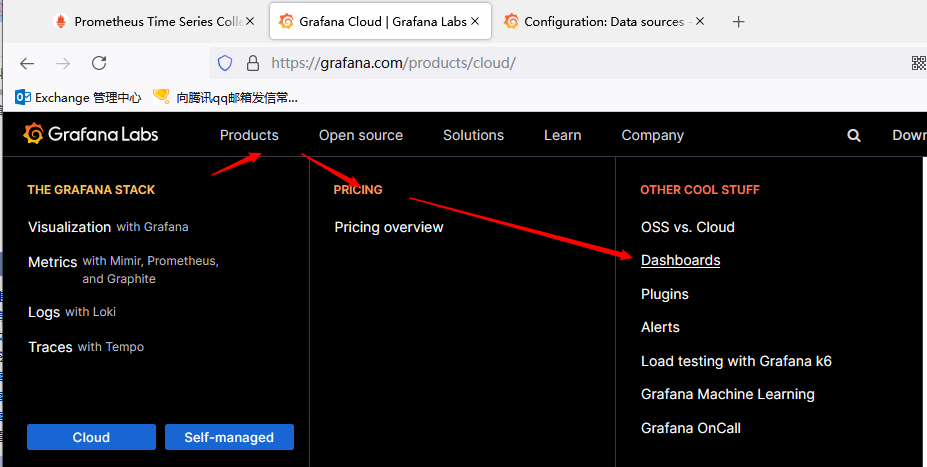
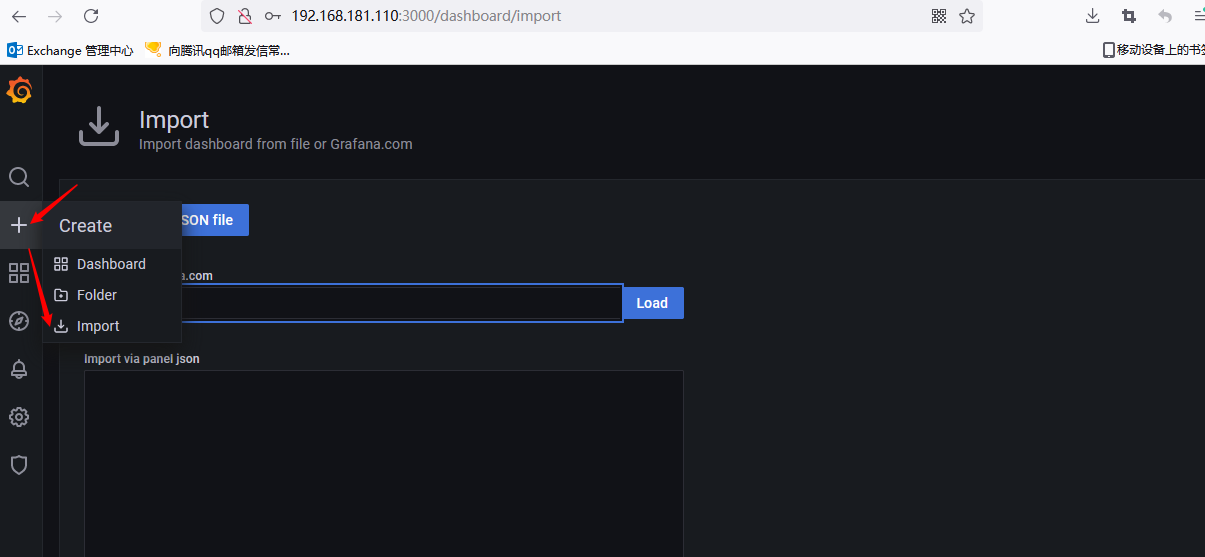
3.6 使用官网获得的模板的ID进行导入
3.7 添加数据源,然后创建
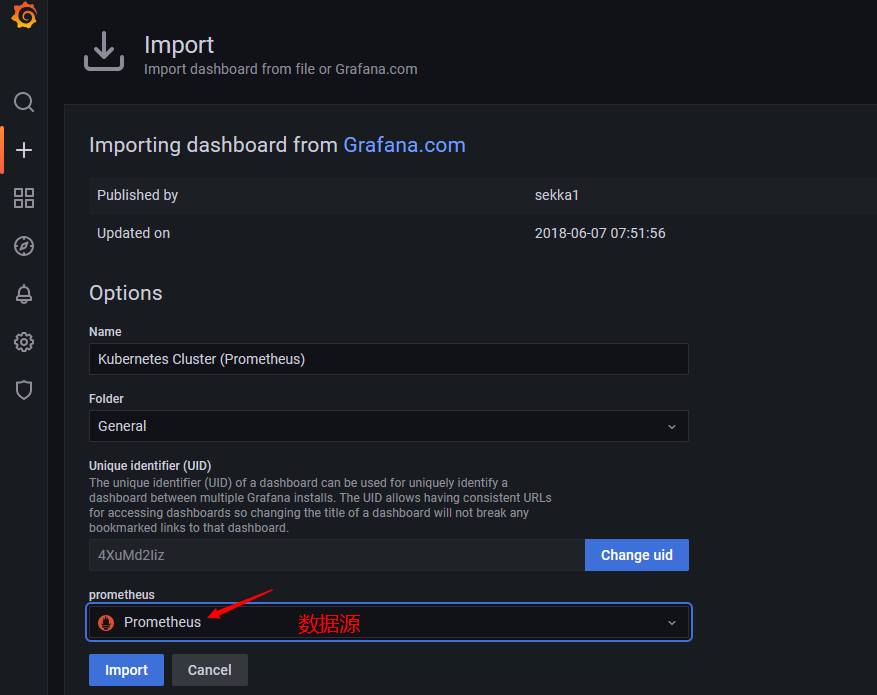
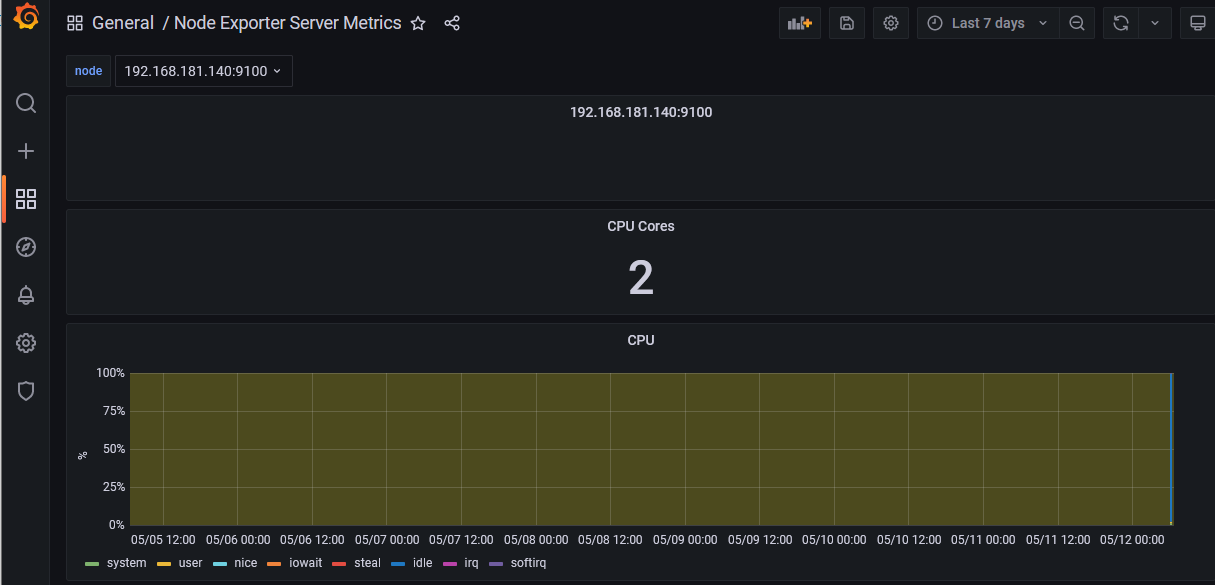
3.8 模板导入成功


【推荐】国内首个AI IDE,深度理解中文开发场景,立即下载体验Trae
【推荐】编程新体验,更懂你的AI,立即体验豆包MarsCode编程助手
【推荐】抖音旗下AI助手豆包,你的智能百科全书,全免费不限次数
【推荐】轻量又高性能的 SSH 工具 IShell:AI 加持,快人一步
· winform 绘制太阳,地球,月球 运作规律
· TypeScript + Deepseek 打造卜卦网站:技术与玄学的结合
· AI 智能体引爆开源社区「GitHub 热点速览」
· Manus的开源复刻OpenManus初探
· 写一个简单的SQL生成工具