
Zabbix3.4.5部署安装(二)
[root@Node3 ~]# cat /etc/redhat-release      //查看系统版本
CentOS Linux release 7.4.1708 (Core)
[root@Node3 ~]# ip -4 addr | grep 172.17      //查看IP地址
  inet 172.17.21.208/24 brd 172.17.21.255 scope global ens192
[root@Node3 ~]# cd /usr/src/zabbix3.4.5/    //软件包下载目录
[root@Node3 zabbix3.4.5]# ls
zabbix-agent-3.4.5-1.el7.x86_64.rpm         zabbix-proxy-sqlite3-3.4.5-1.el7.x86_64.rpm  zabbix-web-japanese-3.4.5-1.el7.noarch.rpm
zabbix-get-3.4.5-1.el7.x86_64.rpm           zabbix-sender-3.4.5-1.el7.x86_64.rpm         zabbix-web-mysql-3.4.5-1.el7.noarch.rpm
zabbix-java-gateway-3.4.5-1.el7.x86_64.rpm  zabbix-server-mysql-3.4.5-1.el7.x86_64.rpm   zabbix-web-pgsql-3.4.5-1.el7.noarch.rpm
zabbix-proxy-mysql-3.4.5-1.el7.x86_64.rpm   zabbix-server-pgsql-3.4.5-1.el7.x86_64.rpm
zabbix-proxy-pgsql-3.4.5-1.el7.x86_64.rpm   zabbix-web-3.4.5-1.el7.noarch.rpm
[root@Node3 ~]# systemctl stop firewalld.service    //停掉防火墙
[root@Node3 ~]# systemctl disable firewalld.service     //禁止防火墙开机自启动
Removed symlink /etc/systemd/system/multi-user.target.wants/firewalld.service.
Removed symlink /etc/systemd/system/dbus-org.fedoraproject.FirewallD1.service.
[root@Node3 ~]# iptables -X
[root@Node3 ~]# iptables -Z
[root@Node3 ~]# iptables -F
[root@Node3 ~]# iptables -vnL
Chain INPUT (policy ACCEPT 228 packets, 15806 bytes)
 pkts bytes target     prot opt in     out     source               destination

Chain FORWARD (policy ACCEPT 0 packets, 0 bytes)
 pkts bytes target     prot opt in     out     source               destination

Chain OUTPUT (policy ACCEPT 252 packets, 19733 bytes)
 pkts bytes target     prot opt in     out     source               destination
[root@Node3 ~]# sed -i 's/SELINUX=enforcing/SELINUX=disabled/g' /etc/selinux/config   //在/etc/selinux/config 把SELNUX=enforcing换成SELINUX=disabled
[root@Node3 ~]# setenforce 0
setenforce: SELinux is disabled
[root@Node3 ~]# getenforce
Disabled
[root@Node3 ~]# systemctl reboot
注:部署官方文档
rpm包安装3.4手册:https://www.zabbix.com/documentation/3.4/zh/manual/installation/getting_zabbix
从源代码安装zabbix 3.4: https://www.zabbix.com/documentation/3.4/zh/manual/installation/install#installation_from_sources
MariaDB数据库管理系统是MySQL的一个分支,主要由开源社区在维护,采用GPL授权许可。
开发这个分支的原因是:甲骨文公司收购了MySQL后,有将MySQL闭源的潜在风险,因此社区采用分支的方式来避开这个风险。
MariaDB的目的是完全兼容MySQL,包括API和命令行,使之能轻松成为MySQL的代替品 一)安装MariaDB:
[root@Node3 ~]# yum install mariadb-server mariadb –y    //yum安装mariadb
[root@Node3 ~]# rpm -qa | grep mariadb
mariadb-5.5.56-2.el7.x86_64
mariadb-server-5.5.56-2.el7.x86_64
mariadb-libs-5.5.56-2.el7.x86_64
二)设置MariaDB并启动:
1、编辑my.cnf文件,增加以下内容:
[root@Node3 ~]# vim /etc/my.cnf    //编辑my.cnf文件
[mysqld]
datadir=/var/lib/mysql
socket=/var/lib/mysql/mysql.sock
innodb_file_per_table = on  //每个表使用一张单独的表
skip_name_resolve =  on  //跳过名称反解
# Disabling symbolic-links is recommended to prevent assorted security risks
symbolic-links=0
# Settings user and group are ignored when systemd is used.
# If you need to run mysqld under a different user or group,
# customize your systemd unit file for mariadb according to the
# instructions in http://fedoraproject.org/wiki/Systemd
[mysqld_safe]
log-error=/var/log/mariadb/mariadb.log
pid-file=/var/run/mariadb/mariadb.pid
#
# include all files from the config directory
#
!includedir /etc/my.cnf.d
2、启动数据库,并设置开机自启动
[root@Node3 ~]# systemctl start mariadb.service       //启动数据库
[root@Node3 ~]# systemctl enable mariadb.service      //设置开机自启动
Created symlink from /etc/systemd/system/multi-user.target.wants/mariadb.service to /usr/lib/systemd/system/mariadb.service.
[root@Node3 ~]# systemctl status mariadb.service      //查看状态
● mariadb.service - MariaDB database server
   Loaded: loaded (/usr/lib/systemd/system/mariadb.service; enabled; vendor preset: disabled)
   Active: active (running) since Tue 2018-01-16 12:53:17 CST; 17s ago
 Main PID: 8736 (mysqld_safe)
   CGroup: /system.slice/mariadb.service
           ├─8736 /bin/sh /usr/bin/mysqld_safe --basedir=/usr
           └─8921 /usr/libexec/mysqld --basedir=/usr --datadir=/var/lib/mysql --plugin-dir=/usr/lib64/mysql/plugin --log-error=/var/log/mariadb/ma...
Jan 16 12:53:15 Node3.contoso.com mariadb-prepare-db-dir[8655]: MySQL manual for more instructions.
Jan 16 12:53:15 Node3.contoso.com mariadb-prepare-db-dir[8655]: Please report any problems at http://mariadb.org/jira
Jan 16 12:53:15 Node3.contoso.com mariadb-prepare-db-dir[8655]: The latest information about MariaDB is available at http://mariadb.org/.
Jan 16 12:53:15 Node3.contoso.com mariadb-prepare-db-dir[8655]: You can find additional information about the MySQL part at:
Jan 16 12:53:15 Node3.contoso.com mariadb-prepare-db-dir[8655]: http://dev.mysql.com
Jan 16 12:53:15 Node3.contoso.com mariadb-prepare-db-dir[8655]: Consider joining MariaDB's strong and vibrant community:
Jan 16 12:53:15 Node3.contoso.com mariadb-prepare-db-dir[8655]: https://mariadb.org/get-involved/
Jan 16 12:53:15 Node3.contoso.com mysqld_safe[8736]: 180116 12:53:15 mysqld_safe Logging to '/var/log/mariadb/mariadb.log'.
Jan 16 12:53:16 Node3.contoso.com mysqld_safe[8736]: 180116 12:53:16 mysqld_safe Starting mysqld daemon with databases from /var/lib/mysql
Jan 16 12:53:17 Node3.contoso.com systemd[1]: Started MariaDB database server.
[root@Node3 ~]# ss -tnl | grep 3306   //查看3306端口是否正常
LISTEN     0      50           *:3306                     *:*
三) 创建数据库:
[root@Node3 ~]# mysql
Welcome to the MariaDB monitor.  Commands end with ; or \g.
Your MariaDB connection id is 2
Server version: 5.5.56-MariaDB MariaDB Server

Copyright (c) 2000, 2017, Oracle, MariaDB Corporation Ab and others.

Type 'help;' or '\h' for help. Type '\c' to clear the current input statement.

MariaDB [(none)]> CREATE DATABASE zabbix CHARSET 'utf8' COLLATE 'utf8_bin';    //创建数据库,并设置字符集
Query OK, 1 row affected (0.00 sec)

MariaDB [(none)]> GRANT ALL ON zabbix.* TO 'zbxuser'@'172.17.21.%' IDENTIFIED BY 'zbxpass';      //授权用户对其数据库的权限
Query OK, 0 rows affected (0.00 sec)

MariaDB [(none)]> FLUSH PRIVILEGES;
Query OK, 0 rows affected (0.00 sec)

MariaDB [(none)]> exit
Bye
[root@Node3 ~]# mysql -uzbxuser -pzbxpass -h 172.17.21.208    //测试数据库是否登录正常
Welcome to the MariaDB monitor.  Commands end with ; or \g.
Your MariaDB connection id is 3
Server version: 5.5.56-MariaDB MariaDB Server

Copyright (c) 2000, 2017, Oracle, MariaDB Corporation Ab and others.

Type 'help;' or '\h' for help. Type '\c' to clear the current input statement.

MariaDB [(none)]>
1、设置zabbix yum源仓库
[root@Node3 ~]# rpm -Uvh http://repo.zabbix.com/zabbix/3.4/rhel/7/x86_64/zabbix-release-3.4-1.el7.centos.noarch.rpm  //连接外网可以安装yum源的rpm包,让其自动生成zabbix仓库
Retrieving http://repo.zabbix.com/zabbix/3.4/rhel/7/x86_64/zabbix-release-3.4-1.el7.centos.noarch.rpm
Preparing...                          ################################# [100%]
Updating / installing...
   1:zabbix-release-3.4-1.el7.centos  ################################# [100%]
[root@Node3 ~]# ls  /etc/yum.repos.d/   //查看仓库是否自动生成
cdrom.repo  repo  zabbix.repo  CentOS-Base.repo
[root@Node3 ~]#
2、安装 zabbix3.4.5
[root@Node3 zabbix3.4.5]# yum -y install zabbix-server-mysql-3.4.5-1.el7.x86_64.rpm zabbix-web-mysql-3.4.5-1.el7.noarch.rpm zabbix-get-3.4.5-1.el7.x86_64.rpm  //安装zabbix服务端
Loaded plugins: fastestmirror, langpacks
Examining zabbix-server-mysql-3.4.5-1.el7.x86_64.rpm: zabbix-server-mysql-3.4.5-1.el7.x86_64
Marking zabbix-server-mysql-3.4.5-1.el7.x86_64.rpm to be installed
Examining zabbix-web-mysql-3.4.5-1.el7.noarch.rpm: zabbix-web-mysql-3.4.5-1.el7.noarch
Marking zabbix-web-mysql-3.4.5-1.el7.noarch.rpm to be installed
Examining zabbix-get-3.4.5-1.el7.x86_64.rpm: zabbix-get-3.4.5-1.el7.x86_64
Marking zabbix-get-3.4.5-1.el7.x86_64.rpm to be installed
Resolving Dependencies
--> Running transaction check
---> Package zabbix-get.x86_64 0:3.4.5-1.el7 will be installed
---> Package zabbix-server-mysql.x86_64 0:3.4.5-1.el7 will be installed
--> Processing Dependency: fping for package: zabbix-server-mysql-3.4.5-1.el7.x86_64
base                                                                                                                          | 3.6 kB  00:00:00
extras                                                                                                                        | 3.4 kB  00:00:00
updates                                                                                                                       | 3.4 kB  00:00:00
(1/4): base/7/x86_64/group_gz                                                                                                 | 156 kB  00:00:00
(2/4): extras/7/x86_64/primary_db                                                                                             | 145 kB  00:00:01
(3/4): base/7/x86_64/primary_db                                                                                               | 5.7 MB  00:00:12
(4/4): updates/7/x86_64/primary_db                                                                                            | 5.2 MB  00:00:55
Loading mirror speeds from cached hostfile
 * base: mirrors.aliyun.com
 * extras: mirrors.cn99.com
 * updates: mirrors.aliyun.com
...........................安装过程省略............................
Installed:
  zabbix-get.x86_64 0:3.4.5-1.el7             zabbix-server-mysql.x86_64 0:3.4.5-1.el7             zabbix-web-mysql.noarch 0:3.4.5-1.el7

Dependency Installed:   //安装所需的依赖包
  OpenIPMI-libs.x86_64 0:2.0.19-15.el7           OpenIPMI-modalias.x86_64 0:2.0.19-15.el7             fping.x86_64 0:3.10-1.el7
  httpd.x86_64 0:2.4.6-67.el7.centos.6           httpd-tools.x86_64 0:2.4.6-67.el7.centos.6           iksemel.x86_64 0:1.4-2.el7.centos
  libzip.x86_64 0:0.10.1-8.el7                   mailcap.noarch 0:2.1.41-2.el7                        php.x86_64 0:5.4.16-43.el7_4
  php-bcmath.x86_64 0:5.4.16-43.el7_4            php-cli.x86_64 0:5.4.16-43.el7_4                     php-common.x86_64 0:5.4.16-43.el7_4
  php-gd.x86_64 0:5.4.16-43.el7_4                php-ldap.x86_64 0:5.4.16-43.el7_4                    php-mbstring.x86_64 0:5.4.16-43.el7_4
  php-mysql.x86_64 0:5.4.16-43.el7_4             php-pdo.x86_64 0:5.4.16-43.el7_4                     php-xml.x86_64 0:5.4.16-43.el7_4
  t1lib.x86_64 0:5.1.2-14.el7                    unixODBC.x86_64 0:2.3.1-11.el7                       zabbix-web.noarch 0:3.4.5-1.el7

Complete!
3、导入zabbix数据库
[root@Node3 zabbix3.4.5]# zcat /usr/share/doc/zabbix-server-mysql-3.4.5/create.sql.gz |mysql -uzbxuser -pzbxpass -h172.17.21.208 zabbix //导入数据库
4、配置数据库用户及密码
[root@Node3 ~]# vim /etc/zabbix/zabbix_server.conf //修改zabbix_server.conf配置文件红色部分
[root@Node3 ~]# grep -n '^[a-Z]' /etc/zabbix/zabbix_server.conf //查看修改部分
38:LogFile=/var/log/zabbix/zabbix_server.log
49:LogFileSize=0
72:PidFile=/var/run/zabbix/zabbix_server.pid
82:SocketDir=/var/run/zabbix
91:DBHost=172.17.21.208       //修改数据库地址
101:DBName=zabbix             //修改数据库名
117:DBUser=zbxuser            //修改数据库账号
125:DBPassword=zbxpass       //修改数据库密码
330:SNMPTrapperFile=/var/log/snmptrap/snmptrap.log
448:Timeout=4
490:AlertScriptsPath=/usr/lib/zabbix/alertscripts    //Zabbix运行脚本存放目录
500:ExternalScripts=/usr/lib/zabbix/externalscripts
536:LogSlowQueries=3000
[root@Node3 ~]#
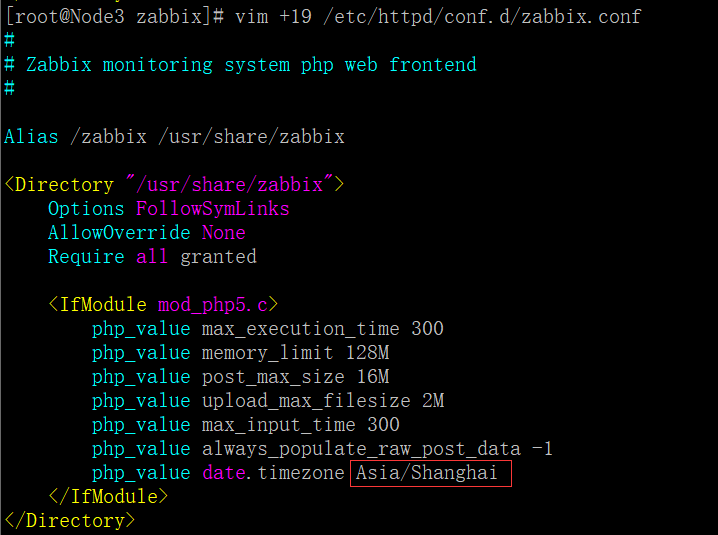
5、编辑Zabbix前端PHP配置,更改时区
[root@Node3 zabbix]# vim +19 /etc/httpd/conf.d/zabbix.conf //将#去掉,修改为Asia/Shanghai
6、SELinux配置
[root@Node3 zabbix]# setsebool -P httpd_can_connect_zabbix on
setsebool:  SELinux is disabled.
[root@Node3 zabbix]# setsebool -P httpd_can_cetwork_connect_db on
setsebool:  SELinux is disabled.
[root@Node3 zabbix]#
7、开启httpd服务,并设置开机自启动
[root@Node3 zabbix]# systemctl start httpd.service
[root@Node3 zabbix]# systemctl enable httpd.service
Created symlink from /etc/systemd/system/multi-user.target.wants/httpd.service to /usr/lib/systemd/system/httpd.service.
[root@Node3 zabbix]# ss -tnl | grep 80
LISTEN     0      128         :::80                      :::*
8、开启zabbix- server服务,并设置为开机自启动
[root@Node3 zabbix]# systemctl start zabbix-server.service
[root@Node3 zabbix]# systemctl enable zabbix-server.service
Created symlink from /etc/systemd/system/multi-user.target.wants/zabbix-server.service to /usr/lib/systemd/system/zabbix-server.service.
[root@Node3 zabbix]# ss -tnl | grep 10051
LISTEN     0      128          *:10051                    *:*
LISTEN     0      128         :::10051                   :::*
[root@Node3 zabbix]#
四、安装Zabbix Web
1、浏览器访问,并进行安装http://172.17.21.178/zabbix/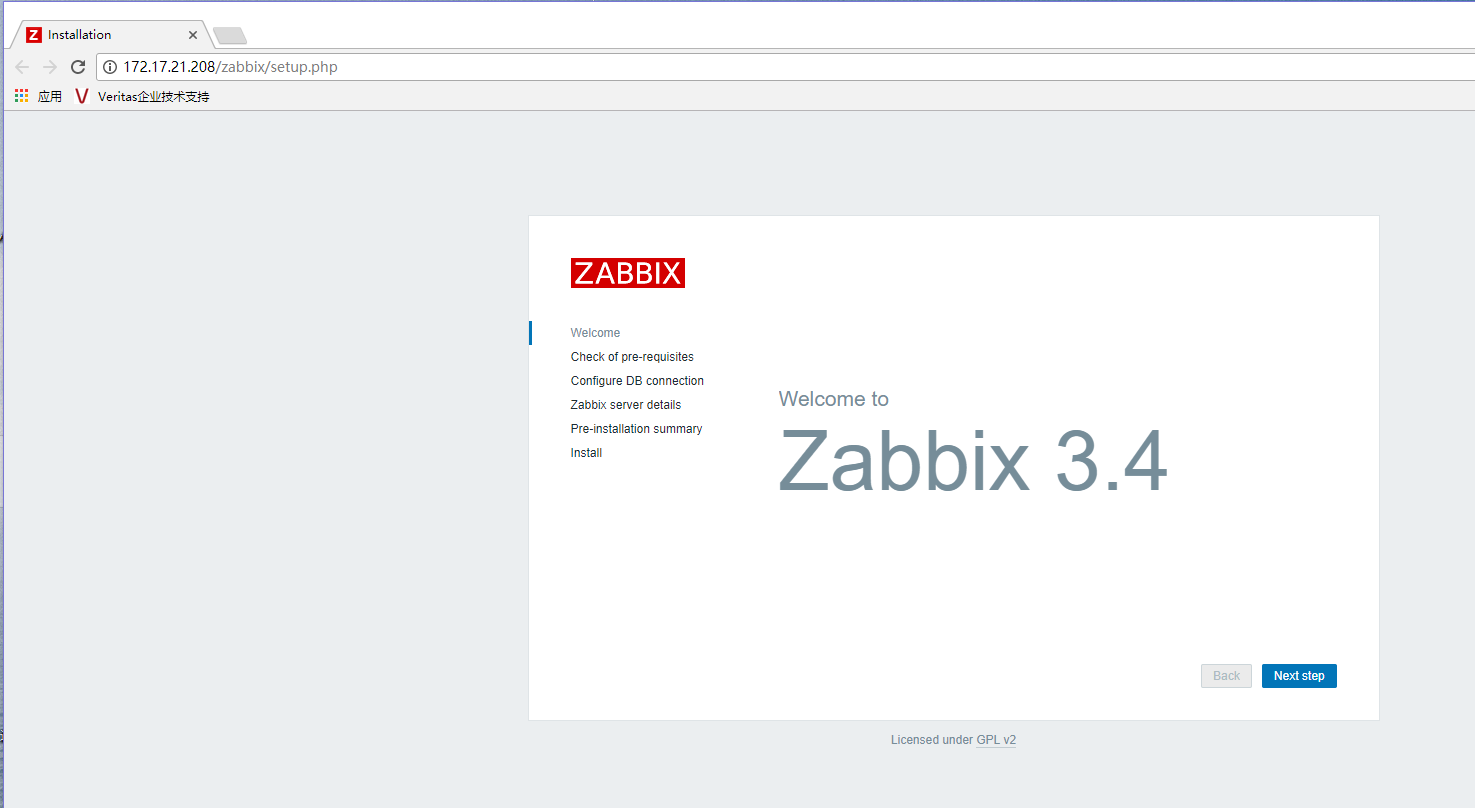
2、点击Next setp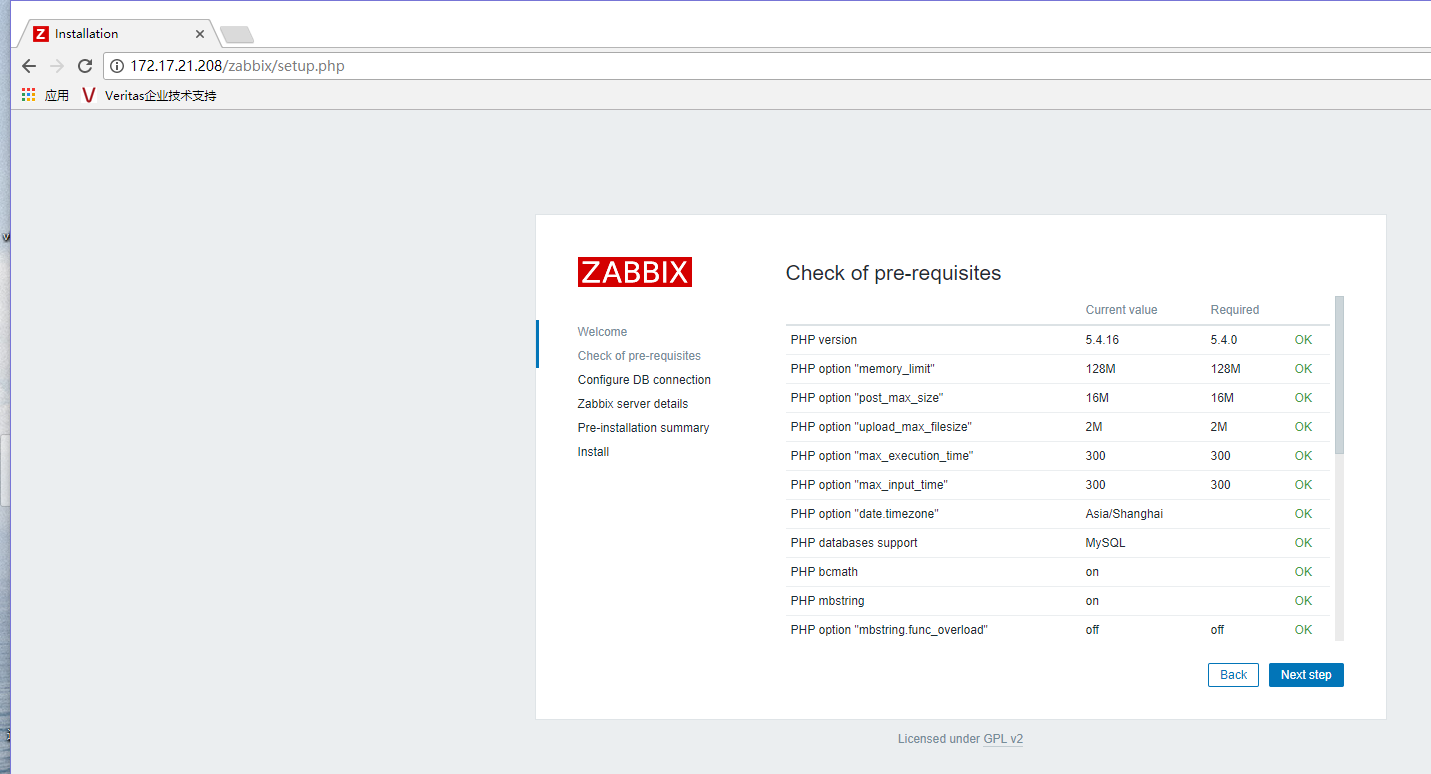
3、查看没有相关的报错信息,然后再点击Next step
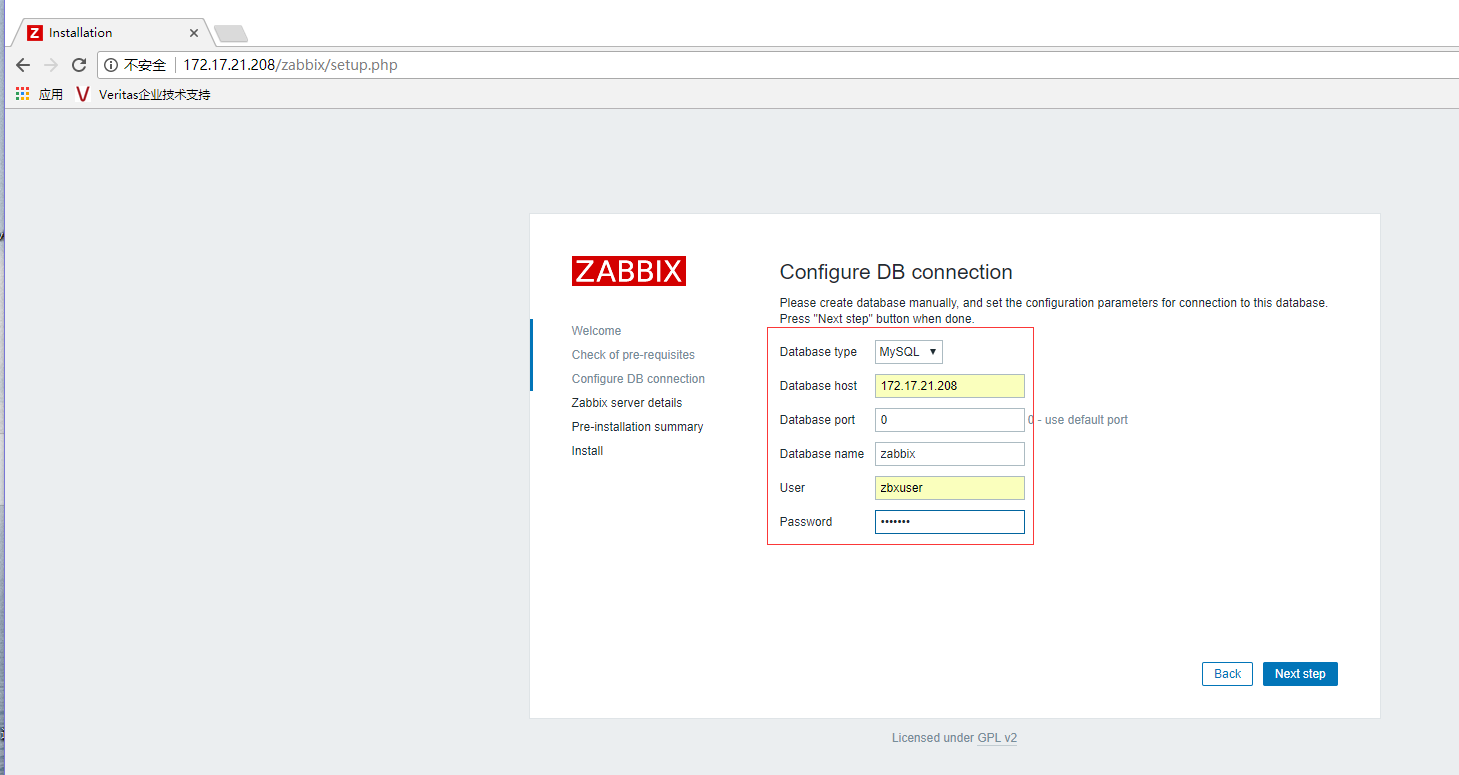
4、设置数据库地址,数据库,数据用户及密码、端口号等(端口号0代表默认端口)
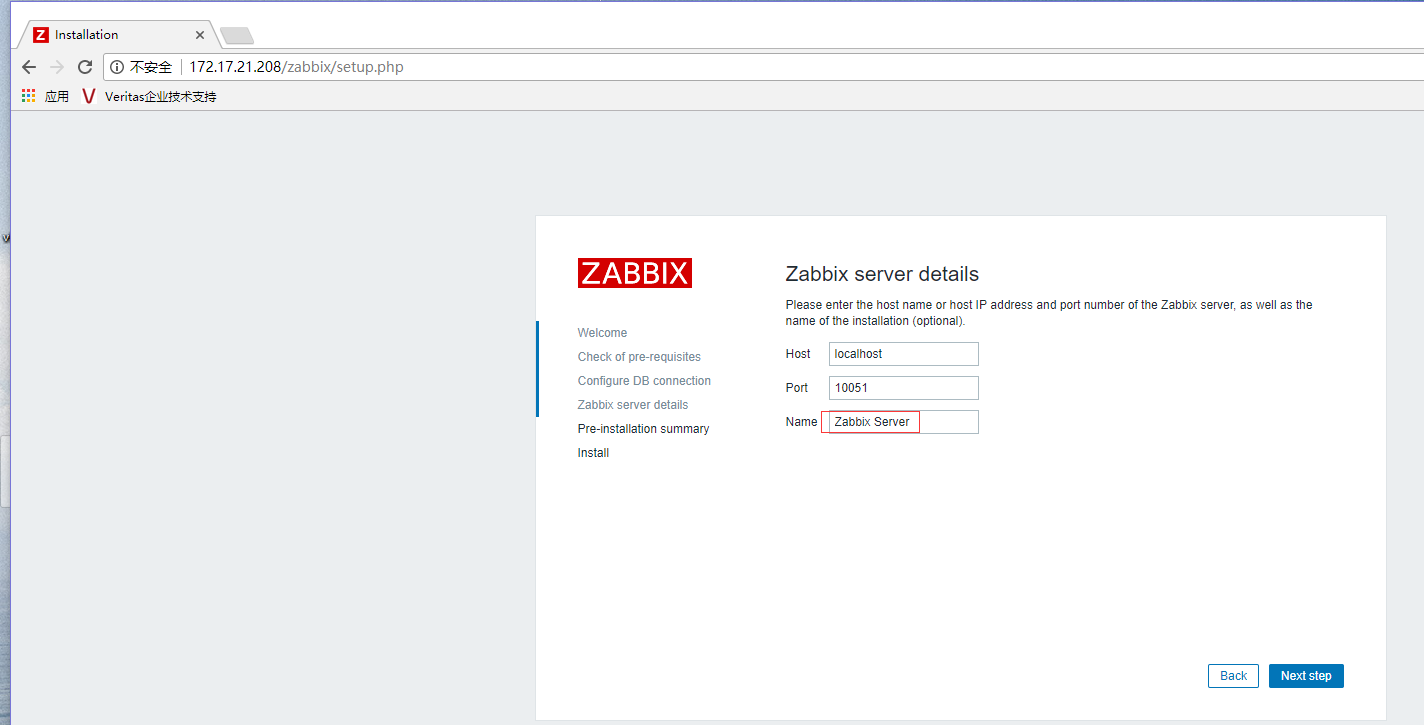
5、设置Zabbix平台名称,点击Next step
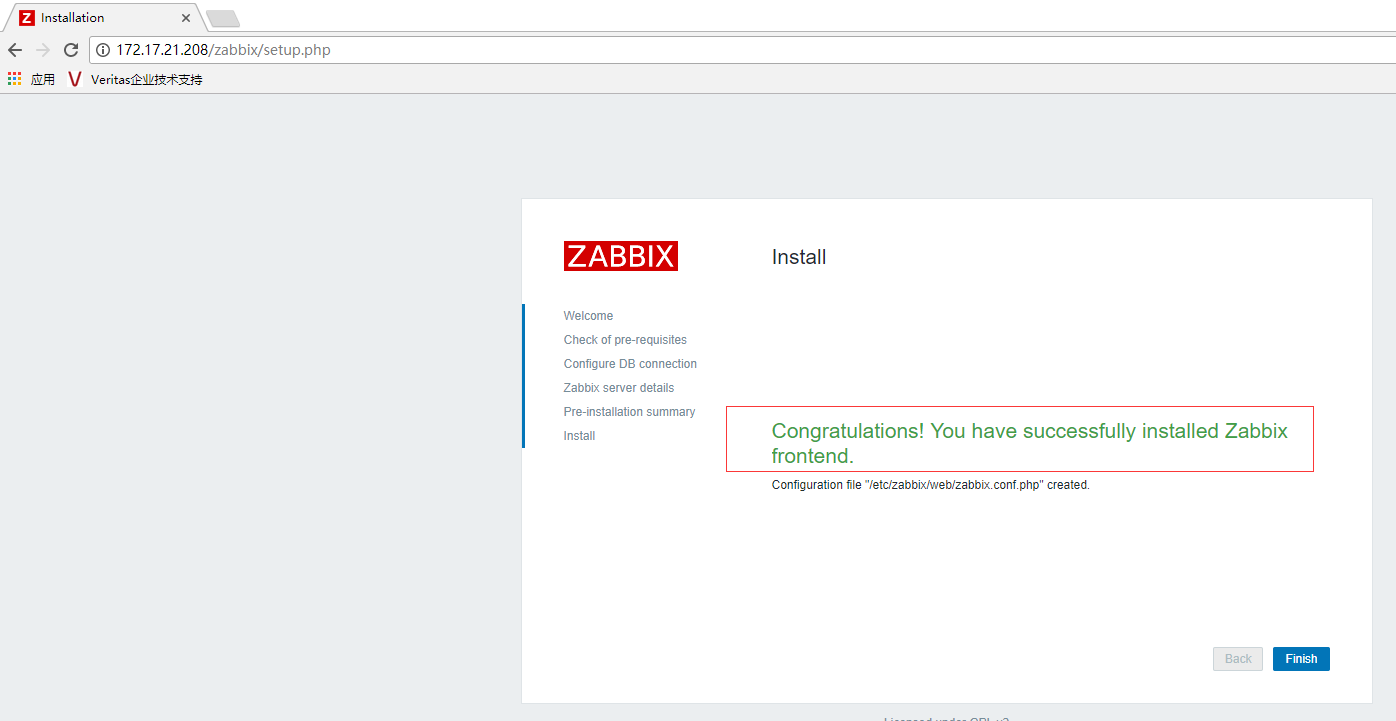
完成安装,会将在/etc/zabbix/web/zabbix.conf.php生成配置文件
Congratulations! You have successfully installed Zabbix frontend.
Configuration file "/etc/zabbix/web/zabbix.conf.php" created.
6、看到以上安装 成功的字样,代表安装成功,点击Finish结束安装,打开登录界面,默认账号为:Admin 密码为:zabbix,点击Sign in

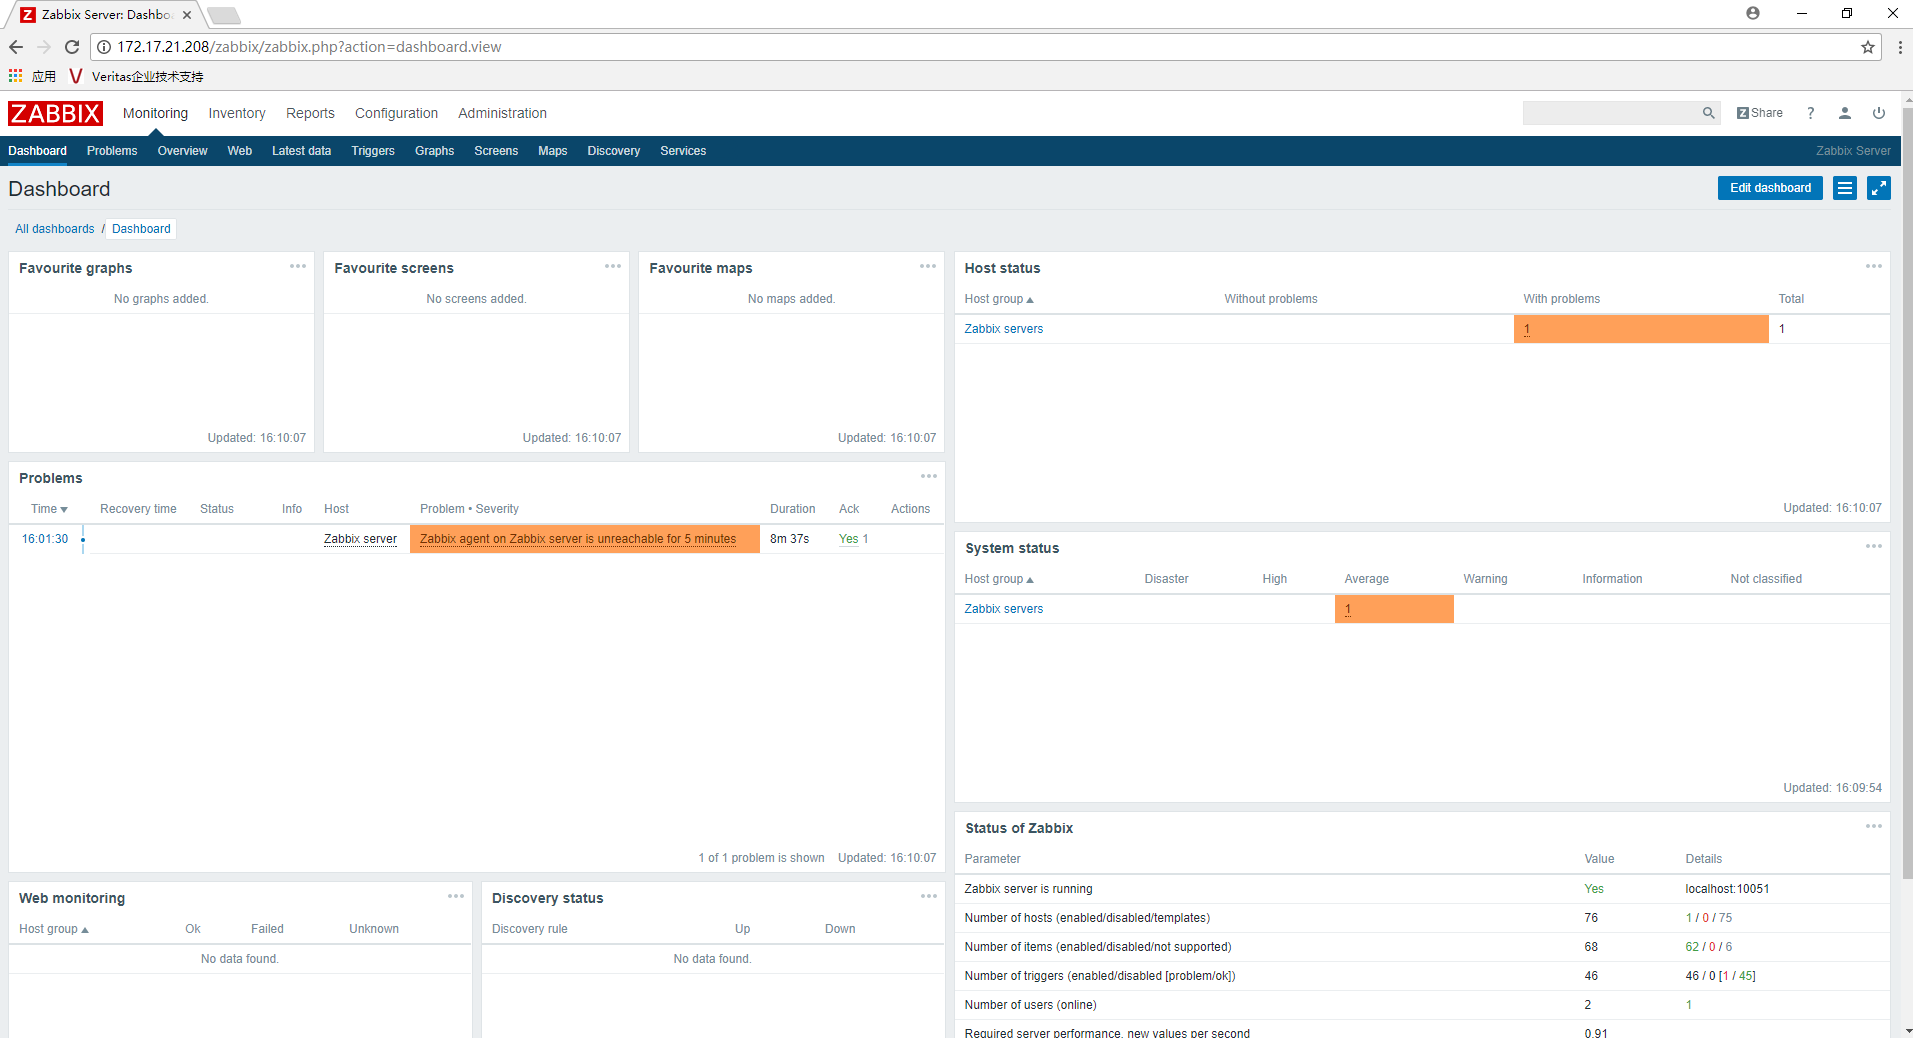
7、登录成功之后,看到以下界面,代表安装结束

 浙公网安备 33010602011771号