httperf学习笔记(CentOS-6.6环境下安装配置)
新工作已经找到了,最近在忙着熟悉环境,昨天领导让我接触下httperf压力测试工具
百度了下,相关的文档,准备着手配置一个测试环境基于linux系统httperf+autobench+gnuplot,
httperf可支持单独使用,autobench是基于httperf的Perl脚本,保存测试结果生成文件,gnuplot可以对生成的文件转化成易于观察的图形文件
首先当然是新建一个linux的虚拟机
博主这里使用的是CentOS-6.6-64位系统
因为是安装配置都是源码编译,先行安装编译环境
yum -y install gcc
由于后续编译中涉及到ncurse文件系统,所以先行安装
yum install ncurses-devel
由于这里使用的CentOS版本可以使用 yum 命令来操作文件的安装
下面依次安装流程:GD2, texinfo, gnuplot, httperf, autobench
安装包的下载都放在 /usr/local/src 目录下
进入linux系统终端或者命令行界面
安装gd-2.0.33包:
cd /usr/local/src
wget http://www.boutell.com/gd/http/gd-2.0.33.tar.gz
tar xzvf gd-2.0.33.tar.gz
cd gd-2.0.33
./configure --prefix=/usr/local/gd2
make
make install
echo "//usr/local/gd2/lib">>/etc/ld.conf
ldconfig
安装texinfo-4.8包:
cd /usr/local/src
wget http://ftp.gnu.org/gnu/texinfo/texinfo-4.8.tar.gz
tar zxvf texinfo-4.8.tar.gz
cd texinfo-4.8
./configure
make
make install
安装gnuplot-4.2.0包:
cd /usr/local/src
wget http://nchc.dl.sourceforge.net/sourceforge/gnuplot/gnuplot-4.2.0.tar.gz
tar zxvf gnuplot-4.2.0.tar.gz
cd gnupolt-4.2.0
./configure \
--prefix=/usr/local/gnuplot \
--with-cwdrc --without-row-help \
--with-kpsexpand \
--with-gd=/usr/local/gd2
make
make install
安装httperf-0.9.0包:
cd /usr/local/src
wget ftp://ftp.hpl.hp.com/pub/httperf/httperf-0.9.0.tar.gz
tar zxvf httperf-0.9.0.tar.gz
cd httperf-0.9.0
./configure --prefix=/usr/local/httperf
make
make install
安装autobench-2.1.2包:
cd /usr/local/src
wget http://www.xenoclast.org/autobench/downloads/autobench-2.1.2.tar.gz
tar zxvf autobench-2.1.2.tar.gz
cd autobench-2.1.2
make
make install
配置环境变量
vi /etc/profile

在第48行 HISTSIZE=1000下方添加
export PATH=/usr/local/bin:/usr/local/gnuplot/bin:/usr/local/httperf/bin:$PATH
保存退出后配置环境变量生效
source /etc/profile
现在就已经可以通过 bench2graph 文件对httperf的测试结果文件生成图形文件
但是这里涉及到生成图形颜色的问题,考虑到不更改源代码,先复制源文件
cp /usr/local/bin/bench2graph /usr/local/bin/bench2ps
注意:网上都说要通过sed -i修改文件内容(PS:博主这里加了这段命令后生成图片文件的时候反而报错,不知道原因,直接使用原文件是可以的)
sed -i 's/postscript color/png xffffff/g' /usr/local/bin/bench2ps
接下来在使用过程中会遇到一个报错
httperf: warning: open file limit > FD_SETSIZE; limiting max. # of open files to FD_SETSIZE
需要修改2个文件:
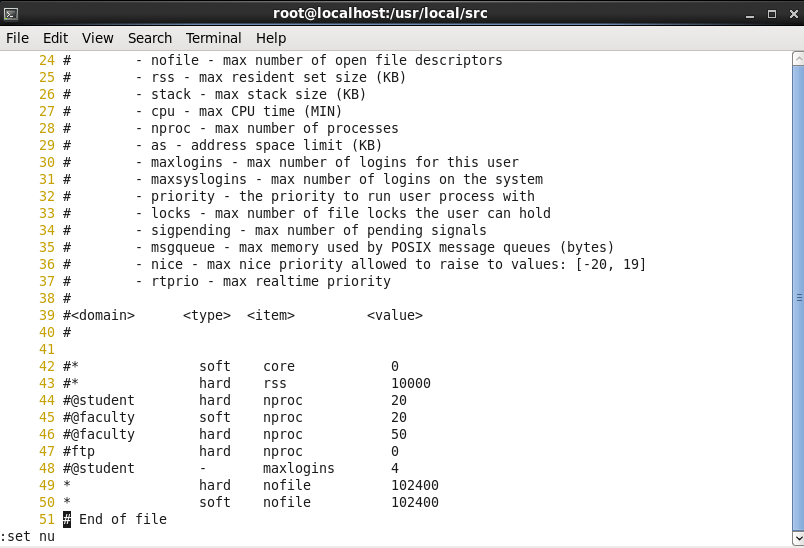
vi /etc/security/limits.conf

在文件最后一行添加
*                hard    nofile          102400
*                soft    nofile          102400
再修改另一文件:
vi /usr/include/bits/typesizes.h

在文件第63行的值修改成102400
以上2个文件修改之后,需要重新编译httperf
cd /usr/local/src/httperf-0.9.0
./configure --prefix=/usr/local/httperf
make
make install
配置过程全部结束,下来是介绍一下简单的使用
博主这里对百度首页为例,百度对应的IP:202.108.22.5,端口:80
/usr/local/bin/autobench \
> --single_host \
> --host1=202.108.22.5 \
> --port1=80 \
> --quiet \
> --low_rate=10 \
> --high_rate=1000 \
> --rate_step=10 \
> --num_call=1 \
> --num_conn=100 \
> --timeout=10 \
> --file /opt/result1.tsv
再通过修改后的文件bench2ps,命令格式:
bench2ps 测试结果文件 测试图形文件
/usr/local/bin/bench2ps /opt/result1.tsv /opt/result1.ps 1 2 3 4 5 6 7 8 9
输入标题后,成功生成图片文件


