


seafile官网:https://www.seafile.com/home/
1、查看树莓派的系统、架构、位数:https://blog.csdn.net/weixin_41010198/article/details/109166131
型号:cat /proc/device-tree/model

2、在github下载与树莓派对应的安装包,并进行安装
1 2 3 4 5 | sudo apt-get updatesudo apt-get upgradesudo apt-get install python2.7 libpython2.7 python-setuptools python-pil python-ldap python-urllib3 sqlite3 python-requestsmkdir seafilecd seafilewget https://github.com/haiwen/seafile-rpi/releases/download/v9.0.2/seafile-server-9.0.2-buster-arm32v7l.tar.gztar -xzf seafile-server-9.0.2-buster-arm32v7l.tar.gzcd seafile-server-9.0.2bash setup-seafile.sh |
3、根据提示填写以下信息(除了名称和ip外,其他可以默认)
1 2 3 4 5 6 | # 服务器名称[server name]: noobBran# 局域网内树莓派IP[This server's ip or domain]: 192.168.1.101# seafile服务器端口号,使用默认8082[default: 8082 ] |
4、修改IP
cd /home/pi/seafile
cd conf
nano gunicorn.conf.py
修改该文件以下内容,指定为你自身的IP,局域网下才可以访问
bind = "192.168.1.101:8000"
5、运行
cd /home/pi/seafile/seafile-server-9.0.2
bash seafile.sh start && bash seahub.sh start
配置用户名和密码
6、登录
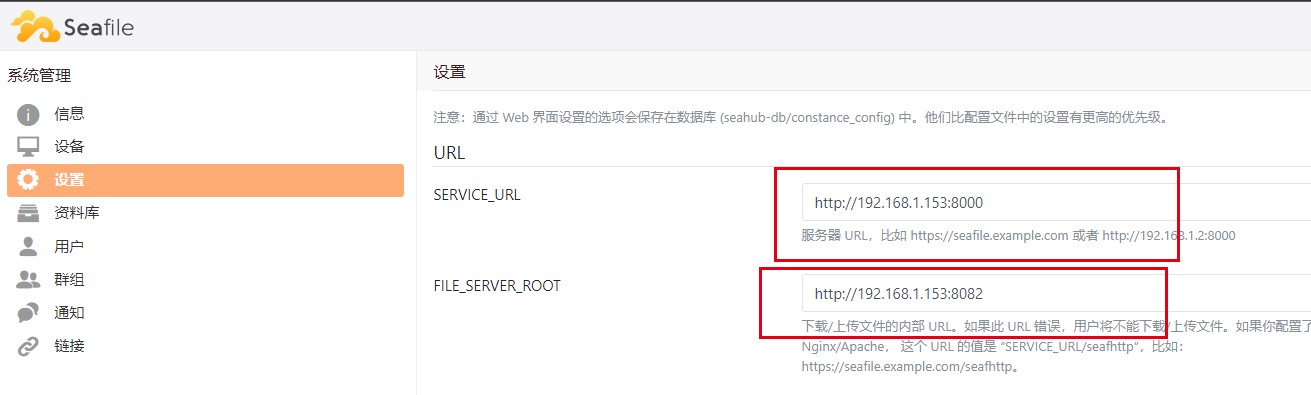
局域网下登录http://192.168.1.101:8000,输入用户名,密码,即可进入seafile后台,点击右上角系统管理->设置,更换为你的ip:8082
7、下载客户端
https://www.seafile.com/download/
可以实现多设备文件夹同步
8、若IP更改,需要首先更改步骤4的IP,然后进入后台,更改步骤6的两个IP
参考文章:http://www.noobbran.site/2021/08/17/2021-08-17-raspi-seafile/
http://static.kancloud.cn/kancloud/seafile-manual/51446
本文来自博客园,作者:Clay,转载请注明原文链接:https://www.cnblogs.com/clayyjh/p/16433620.html


【推荐】国内首个AI IDE,深度理解中文开发场景,立即下载体验Trae
【推荐】编程新体验,更懂你的AI,立即体验豆包MarsCode编程助手
【推荐】抖音旗下AI助手豆包,你的智能百科全书,全免费不限次数
【推荐】轻量又高性能的 SSH 工具 IShell:AI 加持,快人一步
· winform 绘制太阳,地球,月球 运作规律
· 超详细:普通电脑也行Windows部署deepseek R1训练数据并当服务器共享给他人
· TypeScript + Deepseek 打造卜卦网站:技术与玄学的结合
· AI 智能体引爆开源社区「GitHub 热点速览」
· 写一个简单的SQL生成工具