springboot 2.0.8 跳转html页面
springboot项目创建链接 https://blog.csdn.net/q18771811872/article/details/88126835
springboot2.0 跳转jsp教程 https://blog.csdn.net/q18771811872/article/details/88342298
jsp+html跳转整合 https://blog.csdn.net/q18771811872/article/details/88343672
springboot 成功创建了后,继续写一下跳转到html页面的方法, 这里我把 jsp和html 分开两篇文章。然后再写一个两种方式整合的
这篇 是跳转到html文件的
1创建目录结果和html文件
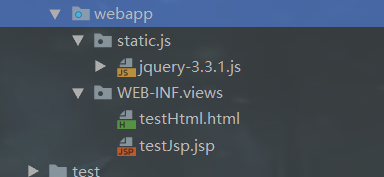
![]()
2配置return 返回模版

![]()
3.UserController.java代码如下,这里就直接使用上次创建的查询方法
@RequestMapping(value = "/testHtml", produces = "application/json;charset=UTF-8", method = {RequestMethod.POST, RequestMethod.GET})
    public String testHtml(Model m, HttpServletRequest request, HttpServletResponse response){
        List<Map<String,Object>> list=userService.userQueryAll();
        request.setAttribute("list",list);
        log.info("进入了testHtml方法!");
        return "views/testHtml";
    }
4.application.yml 文件 配置 thymeleaf 模版参数

![]()
spring:
  dataSource:
    type: com.alibaba.druid.pool.DruidDataSource
    url: jdbc:mysql://localhost:3306/db-test?useUnicode=true&characterEncoding=utf8&tinyInt1isBit=false&usessl=false
    username: root
    password: 123456
    driverClassName: com.mysql.jdbc.Driver
  thymeleaf:
    #清除缓存
    cache: false
    mode: LEGACYHTML5 #非严格模式
    prefix: /WEB-INF/ #默认 classpath:/templates/
    suffix: .html
    servlet:
      content-type: text/html
5. pom.xml 文件加入thymeleaf 架包
        <dependency>
            <groupId>org.springframework.boot</groupId>
            <artifactId>spring-boot-starter-thymeleaf</artifactId>
        </dependency>
        <!--非严格模式下 规避一些html编译错误 -->
        <dependency>
            <groupId>net.sourceforge.nekohtml</groupId>
            <artifactId>nekohtml</artifactId>
            <version>1.9.22</version>
        </dependency>
6. html页面这里我为了方便事先引入了jQuery ,并且直接使用了thymeleaf 模版来接收数据,也是第一次用。
<!DOCTYPE html>
<html lang="ch" xmlns:th="http://www.springframework.org/schema/mvc">
<head>
    <meta charset="UTF-8">
    <title>Title</title>
</head>
<body>
<input th:value="${list[0][create_time]}">
<table border="1">

</table>
</body>
<script src="/static/js/jquery-3.3.1.min.js" type="text/javascript" charset="utf-8"></script>
<script th:inline="javascript" type="text/javascript" charset="utf-8">
    /**
     *
     * 在html标签中 使用  th:value、th:text 来获取数据
     *  例
     *  <input th:value="${list2[0][create_time]}">
     * @type {Array[]}
     */
    console.log(JSON.stringify([[${list}]]));
    var list = ([[${list}]]);
    tableAppend(list)
    function tableAppend() {
        var table_html=`
        <tr>
        <th>序号</th>
        <th>名字</th>
        <th>号码</th>
        <th>创建时间</th>
        </tr>`;
        for(var i=0;list.length>i;i++){
            table_html += `
        <tr>
            <td>${list[i]['id']}</td>
            <td>${list[i]['name']}</td>
            <td>${list[i]['phone']}</td>
            <td>${list[i]['create_time']}</td>
        </tr>`;

        }
        $("table").append(table_html);
    }
</script>
</html>
7. Project Structure里面 这个一般是默认配置好了的,如果没有就要加上哦

![]()
就这样启动就行了 效果图如下

![]()
springboot项目创建链接 https://blog.csdn.net/q18771811872/article/details/88126835
springboot2.0 跳转jsp教程 https://blog.csdn.net/q18771811872/article/details/88342298
jsp+html跳转整合 https://blog.csdn.net/q18771811872/article/details/88343672
原文地址: https://blog.csdn.net/q18771811872/article/details/88312862

 浙公网安备 33010602011771号