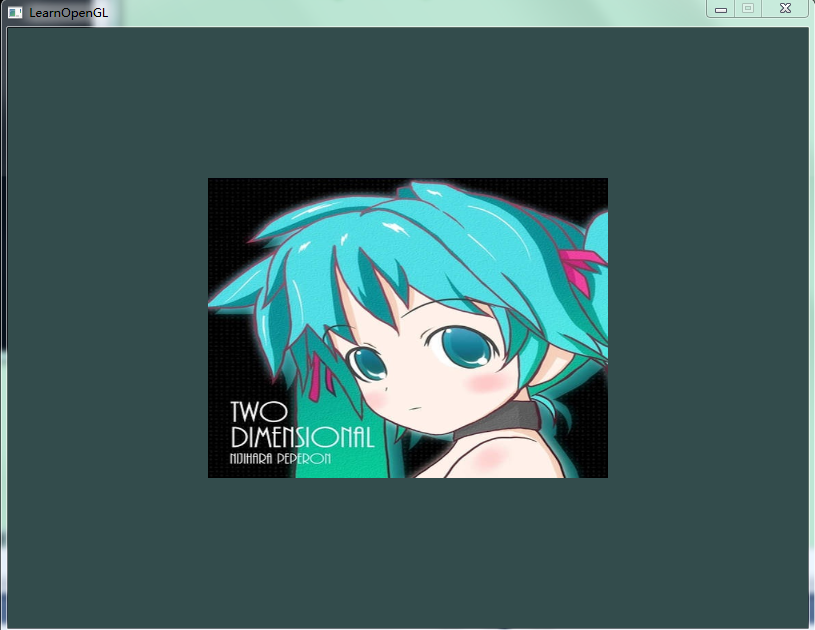
纹理是一个2D图片(也有1D和3D),它用来添加物体的细节;这就像有一张绘有砖块的图片贴到你的3D的房子上,你的房子看起来就有了一个砖墙。因为我们可以在一张图片上插入足够多的细节,这样物体就会拥有很多细节而不会增加额外的顶点。
为了能够把纹理映射到三角形上,我们需要说明三角形的每个顶点各自对应纹理的哪个部分。这样每个顶点就会有一个纹理坐标(texture coordinate),它指明从纹理图像的哪个地方采样。之后在所有的其他的像素上进行像素插值。
纹理坐标与顶点坐标不同。纹理坐标的范围为(0,0)-(1,1) 分别代指左下角和右上角。
过程
1. 初始化OpenGL环境
2. 设置顶点&纹理坐标数组
GLfloat vertices[] = {
// Positions                    // Texture Coords
0.5f, 0.5f,  0.0f, 1.0f, -1.0f, // Top Right
0.5f, -0.5f,  0.0f, 1.0f, 0.0f, // Bottom Right
-0.5f, -0.5f,  1.0f, 0.0f, 0.0f, // Bottom Left
-0.5f, 0.5f,  0.0f, 0.0f, -1.0f  // Top Left
3. 创建并载入着色器
顶点着色器:
#version 330 core
layout (location = 0) in vec3 position;
layout (location = 1) in vec2 texCoord;

out vec2 TexCoord;

void main()
{
    gl_Position = vec4(position, 1.0f);
    TexCoord = texCoord;
}
像素着色器:
#version 330 core
in vec3 ourColor;
in vec2 TexCoord;

out vec4 color;

uniform sampler2D ourTexture;

void main()
{
    color = texture(ourTexture, TexCoord);
}
4. 设置VAO、VBO、EBO
GLuint indices[] = {  // Note that we start from 0!
		0, 1, 3, // First Triangle
		1, 2, 3  // Second Triangle
	};
	GLuint VBO, VAO, EBO;
	glGenVertexArrays(1, &VAO);
	glGenBuffers(1, &VBO);
	glGenBuffers(1, &EBO);

	glBindVertexArray(VAO);

	glBindBuffer(GL_ARRAY_BUFFER, VBO);
	glBufferData(GL_ARRAY_BUFFER, sizeof(vertices), vertices, GL_STATIC_DRAW);

	glBindBuffer(GL_ELEMENT_ARRAY_BUFFER, EBO);
	glBufferData(GL_ELEMENT_ARRAY_BUFFER, sizeof(indices), indices, GL_STATIC_DRAW);

	// Position attribute
	glVertexAttribPointer(0, 3, GL_FLOAT, GL_FALSE, 5 * sizeof(GLfloat), (GLvoid*)0);
	glEnableVertexAttribArray(0);

	// TexCoord attribute
	glVertexAttribPointer(1, 2, GL_FLOAT, GL_FALSE, 5 * sizeof(GLfloat), (GLvoid*)(3 * sizeof(GLfloat)));
	glEnableVertexAttribArray(1);

	glBindVertexArray(0); // Unbind VAO
5. 创建并载入纹理 (这里载入图片使用SOIL库,推荐使用FreeImage)
// Load and create a texture
	GLuint texture;
	glGenTextures(1, &texture);
	glBindTexture(GL_TEXTURE_2D, texture); // All upcoming GL_TEXTURE_2D operations now have effect on this texture object
	// Set the texture wrapping parameters
	glTexParameteri(GL_TEXTURE_2D, GL_TEXTURE_WRAP_S, GL_REPEAT);	// Set texture wrapping to GL_REPEAT (usually basic wrapping method)
	glTexParameteri(GL_TEXTURE_2D, GL_TEXTURE_WRAP_T, GL_REPEAT);
	// Set texture filtering parameters
	glTexParameteri(GL_TEXTURE_2D, GL_TEXTURE_MIN_FILTER, GL_LINEAR);
	glTexParameteri(GL_TEXTURE_2D, GL_TEXTURE_MAG_FILTER, GL_LINEAR);
	// Load image, create texture and generate mipmaps
	int width, height;
	unsigned char* image = SOIL_load_image("image.jpg", &width, &height, 0, SOIL_LOAD_RGB);
	glTexImage2D(GL_TEXTURE_2D, 0, GL_RGB, width, height, 0, GL_RGB, GL_UNSIGNED_BYTE, image);
	glGenerateMipmap(GL_TEXTURE_2D);
	SOIL_free_image_data(image);
	glBindTexture(GL_TEXTURE_2D, 0); // Unbind texture when done, so we won't accidentily mess up our texture.
6. 绘制及善后工作
	while (!glfwWindowShouldClose(window))
	{
		// Check if any events have been activiated (key pressed, mouse moved etc.) and call corresponding response functions
		glfwPollEvents();

		// Render
		// Clear the colorbuffer
		glClearColor(0.2f, 0.3f, 0.3f, 1.0f);
		glClear(GL_COLOR_BUFFER_BIT);


		// Bind Texture
		glBindTexture(GL_TEXTURE_2D, texture);

		// Activate shader
		ourShader.Use();

		// Draw container
		glBindVertexArray(VAO);
		glDrawElements(GL_TRIANGLES, 6, GL_UNSIGNED_INT, 0);
		glBindVertexArray(0);

		// Swap the screen buffers
		glfwSwapBuffers(window);
	}
	// Properly de-allocate all resources once they've outlived their purpose
	glDeleteVertexArrays(1, &VAO);
	glDeleteBuffers(1, &VBO);
	glDeleteBuffers(1, &EBO);
	// Terminate GLFW, clearing any resources allocated by GLFW.
	glfwTerminate();
效果


