

Docker Swarm部署
Swarm 是 Docker 官方提供的一款集群管理工具,其主要作用是把若干台 Docker 主机抽象为一个整体,并且通过一个入口统一管理这些 Docker 主机上的各种 Docker 资源。
具体使用说明可参考:https://www.runoob.com/docker/docker-swarm.html
Swarm架构图
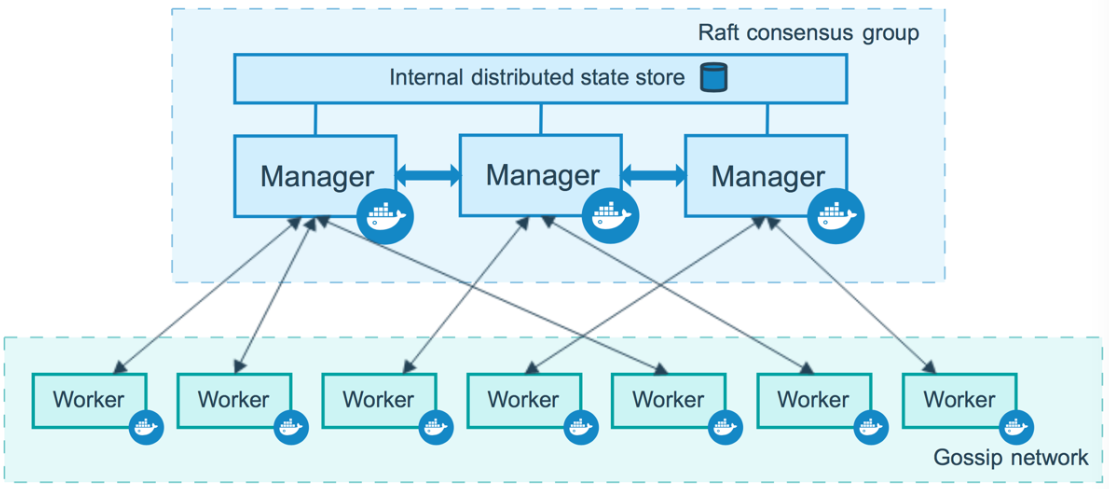
Swarm几个概念说明
1、Swarm节点
Swarm节点分为两类:
- work为工作节点,接收和执行任务,运行具体的服务
- manager为管理节点,用于执行集群命令,调度任务等等。默认情况下,manager也具体work的功能,可以接收和执行任务
2、Service
集群中具体要运行的容器
3、Task
集群中要执行的命令
Swarm的部署
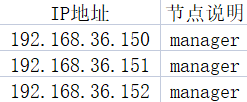
部署规划
注:Swarn至少需要三个节点来组成,主要原因是因为Swarm模式下理节点应用Raft算法来维护集群的全局状态,Raft算法可以忍受(N-1)/2的节点故障,并且需要集群中多数派(N/2+1)节点选举同意。比如在5个管理节点的集群中,如果3个节点不可用,则系统不能接收任何新的请求,但是当前正在运行的tasks可以继续工作。
该部署使用的Centos7为例
1.安装Docker(所有设备)
可以参考我之前编写的Docker离线部署、Docker在线部署
2.关闭防火墙和SELinux(所有设备)
systemctl stop firewalld.service
systemctl disable firewalld.service
setenforce 0
vi /etc/selinux/config
1 | SELINUX=enforcing改为SELINUX=disabled |
3.配置IP地址和主机名之间的映射(所有设备)
vi /etc/hosts
1 2 3 | 192.168.36.150 node1192.168.36.151 node2192.168.36.152 node3 |
需重启设备生效
4.初始化集群(192.168.36.150)
#随意选择一台即可,为主管理节点
docker swarm init --advertise-addr 192.168.36.150
1 2 3 4 5 6 7 8 9 | Swarm initialized: current node (wkitrpeohzhsbbc8mwglsxnh4) is now a manager.To add a worker to this swarm, run the following command: docker swarm join \ --token SWMTKN-1-1wvexqlgfkf0vq4pingm60gcky11nk2k6w7udqh6xui5quornb-7bkjtln6uxa4fuvedfmchmh0f \ 192.168.36.150:2377To add a manager to this swarm, run 'docker swarm join-token manager' and follow the instructions. |
注:2377为管理集群端口,还有一个端口为2375是docker服务的监听端口
5.加入集群(192.168.36.151、192.168.36.152)
#也就是执行上方初始化集群时所提示的命令
1 2 3 | docker swarm join \--token SWMTKN-1-1wvexqlgfkf0vq4pingm60gcky11nk2k6w7udqh6xui5quornb-7bkjtln6uxa4fuvedfmchmh0f \192.168.36.150:2377 |
1 | This node joined a swarm as a worker. |
6.查看Swarm集群节点信息(192.168.36.150)
#只有manager才能进行操作配置
docker node ls
1 2 3 4 | ID HOSTNAME STATUS AVAILABILITY MANAGER STATUSiy9mcykdxlhui68ufkiiswrug node2 Ready Active uplqcne2s917s3h2pxl6m01fu node3 Ready Active wkitrpeohzhsbbc8mwglsxnh4 * node1 Ready Active Leaders |
7.升级work为管理节点 (192.168.36.150)
#指定node的ID
docker node promote uplqcne2s917s3h2pxl6m01fu
docker node promote iy9mcykdxlhui68ufkiiswrug
#再次查看集群节点信息
1 2 3 4 | ID HOSTNAME STATUS AVAILABILITY MANAGER STATUSiy9mcykdxlhui68ufkiiswrug node2 Ready Active Reachableuplqcne2s917s3h2pxl6m01fu node3 Ready Active Reachable wkitrpeohzhsbbc8mwglsxnh4 * node1 Ready Active Leaders |
8.创建服务
其实这个和k8s中的service很像,如果你有了解过k8s的话,swarm是会维持这个副本数的存活数量的,所以当你的某个副本节点容器挂掉了的话,是会自启的(若是有空闲的设备,则副本节点容器可能会漂移到空闲设备上)
#副本数为3
docker service create --replicas 3 -p 80:80 --name nginx nginx:laster
#查看服务
docker service ls
1 2 | ID NAME MODE REPLICAS IMAGErol1bp0zf76e nginx replicated 3/3 nginx:latest |
#查看服务进程,可以看到都均匀在3个节点上执行了
docker service ps nginx
1 2 3 4 | ID NAME IMAGE NODE DESIRED STATE CURRENT STATE ERROR PORTSxhk1h0e0uqac nginx.1 nginx:latest node3 Running Running 7 minutes ago 8rf274cs4eki nginx.2 nginx:latest node1 Running Running 7 minutes ago a7zt1fdpwy6w nginx.3 nginx:latest node2 Running Running 7 minutes agoc |
此时我们直接访问IP:端口即可访问到我们的NGINX
9.Swarm网络说明
#列出docker当前所以网络
docker network ls
1 2 3 4 5 6 | NETWORK ID NAME DRIVER SCOPEb1b0ba487115 bridge bridge localdcae7e5aa116 docker_gwbridge bridge local29e0fc533049 host host localbmf1f8xfaqeo ingress overlay swarm67bab01e6f0b none null local |
docker_gwbridge和ingress是swarm自动创建的,当用户执行了docker swarm init/connect之后
docker_gwbridge:通过这个网络,容器可以连接到宿主机
Ingress:这个网络用于将服务暴露给外部访问,Docker swarm就是通过它实现将外部请求路由到不同的主机容器,并且实现了负载均衡的功能
10.验证Ingress网络
#通过Swarm网络说可得知,Ingress不仅将服务暴露给外部,还提供了负载均衡的功能,对此,我们来对容器内部的nginx做一点修改
docker ps
1 2 | CONTAINER ID IMAGE COMMAND CREATED STATUS PORTS NAMES5ecae1937edc nginx:latest "/docker-entrypoin..." 46 minutes ago Up 46 minutes 80/tcp nginx.1.xhk1h0e0uqacy6p9s86erudc7 |
#三台设备分别进入容器修改nginx访问页面(用于区分我们所访问到不同的容器)
docker exec -it 5ecae1937edc /bin/bash
1 2 3 | cd /usr/share/nginx/htmlecho "this is service1" > index.html nginx -s reload |
#然后从外部访问到我们容器内部的nginx试试,可以看到内容已经被修改为我们所配置的内容
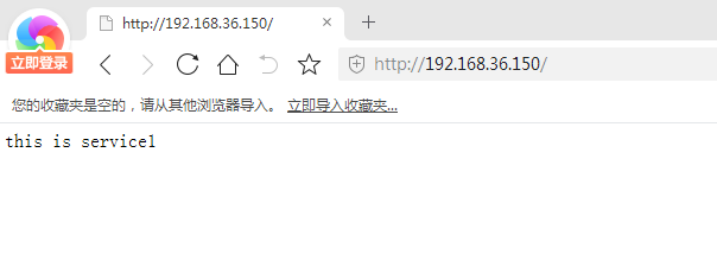
#通过下方命令,可以更加直观的看到Ingress所提供的负载均衡功能
for i in {1..10}; do curl 192.168.36.150; done
1 2 3 4 5 6 7 8 9 10 | this is service2this is service1this is service3this is service2this is service1this is service3this is service2this is service1this is service3this is service2 |
for i in {1..10}; do curl 192.168.36.151; done
1 2 3 4 5 6 7 8 9 10 | this is service3this is service1this is service2this is service1this is service2this is service3this is service1this is service2this is service3this is service2 |
可以看到我们的三个设备的IP都负载到了我们的三个容器之中
11.Swarm的其他命令使用说明
#申请离开集群(登陆要离开的设备执行命令)
docker swarm leave
1 | Node left the swarm. |
#离开后状态会变为Down
docker node ls
1 2 3 4 | ID HOSTNAME STATUS AVAILABILITY MANAGER STATUSiy9mcykdxlhui68ufkiiswrug node2 Down Active uplqcne2s917s3h2pxl6m01fu node3 Ready Active wkitrpeohzhsbbc8mwglsxnh4 * node1 Ready Active Leader |
#删除该node,指定node的ID
docker node rm iy9mcykdxlhui68ufkiiswrug
#管理节点降级为wrok,指定node的ID
docker node demote uplqcne2s917s3h2pxl6m01fu
#删除服务
docker service rm v851t1jxa8a7
#查看service 详情
docker service inspect nginx
#查看服务日志
docker service logs l6nrhzb9esj9
#服务副本数的扩容与缩容
docker service update --replicas 6 rol1bp0zf76e


【推荐】国内首个AI IDE,深度理解中文开发场景,立即下载体验Trae
【推荐】编程新体验,更懂你的AI,立即体验豆包MarsCode编程助手
【推荐】抖音旗下AI助手豆包,你的智能百科全书,全免费不限次数
【推荐】轻量又高性能的 SSH 工具 IShell:AI 加持,快人一步
· 无需6万激活码!GitHub神秘组织3小时极速复刻Manus,手把手教你使用OpenManus搭建本
· Manus爆火,是硬核还是营销?
· 终于写完轮子一部分:tcp代理 了,记录一下
· 别再用vector<bool>了!Google高级工程师:这可能是STL最大的设计失误
· 单元测试从入门到精通