
线程安全性-原子性之Atomic包
先了解什么是线程安全性:当多个线程访问某个类时,不管运行时环境采用何种调度方式或者这些进程将如何交替执行,并且在主调代码中不需要任何额外的同步或协同,这个类都能表现出正确的行为,那么就称为这个类是线程安全的。
线程安全性主要体现在三个方面:
1.原子性:提供了互斥访问,同一时刻只能有一个线程来对它进行操作
2.可见性:一个线程对主内存的修改可以及时的被其他线程观察到
3.有序性:一个线程观察其他线程中的指令执行顺序,由于指令 重排序的存在,该观察结果一般杂乱无序
原子性-Atomic包:他们都是通过CAS来完成原子性的;
先看一段代码:
package com.example.concurrency;

import com.example.concurrency.annotation.NotThreadSafr;
import lombok.extern.slf4j.Slf4j;

import java.util.concurrent.CountDownLatch;
import java.util.concurrent.ExecutorService;
import java.util.concurrent.Executors;
import java.util.concurrent.Semaphore;

/**
 * @author xiaozhuang
 * @date 2022年04月07日 11:55
 */
@Slf4j
@NotThreadSafr  // 线程不安全例子
public class ConcurrencyTest {
    // 请求访问总数
    public static int clientTotal = 5000;
    // 同时并发执行的线程数
    public static int threadTotal = 200;
    // 计数的值
    public static int count = 0;

    public static void main(String[] args) throws InterruptedException {
        // 线程池
        ExecutorService executorService = Executors.newCachedThreadPool();
        // 信号量  参数为  运行并发的数目
        final Semaphore semaphore = new Semaphore(threadTotal);
        // 递减计数器  参数为 请求数量  没执行成功一次会  减1
        final CountDownLatch countDownLatch = new CountDownLatch(clientTotal);
        for (int i = 0; i < clientTotal; i++) {
            // 讲请求放入线程池中
            executorService.execute(() -> {
                try {
                    //判断信号量 判断当前线程是否允许被执行
                    semaphore.acquire();
                    add();
                    // 释放进程
                    semaphore.release();
                } catch (Exception e) {
                    log.error("exception", e);
                }
                // 没执行完一次 计算器-1
                countDownLatch.countDown();
            });

        }
        countDownLatch.await();
        // 关闭线程池
        executorService.shutdown();
        log.info("count:{}", count);
    }

    private static void add() {
        count++;
    }

}
运行时得到的值不准确,达不到预期的5000;
但是我们吧int类型改成Atomic类时,就达到预期的值了,也就是线程安全;
package com.example.concurrency.example.count;

import com.example.concurrency.annotation.NotThreadSafr;
import com.example.concurrency.annotation.ThreadSafe;
import lombok.extern.slf4j.Slf4j;

import java.util.concurrent.CountDownLatch;
import java.util.concurrent.ExecutorService;
import java.util.concurrent.Executors;
import java.util.concurrent.Semaphore;
import java.util.concurrent.atomic.AtomicInteger;

/**
 * @author xiaozhuang
 * @date 2022年04月07日 11:55
 */
@Slf4j
@ThreadSafe  // 线程安全例子
public class CountEample2 {
    // 请求访问总数
    public static int clientTotal = 5000;
    // 同时并发执行的线程数
    public static int threadTotal = 200;
    // 计数的值
    public static AtomicInteger count = new AtomicInteger(0);

    public static void main(String[] args) throws InterruptedException {
        // 线程池
        ExecutorService executorService = Executors.newCachedThreadPool();
        // 信号量  参数为  运行并发的数目
        final Semaphore semaphore = new Semaphore(threadTotal);
        // 递减计数器  参数为 请求数量  没执行成功一次会  减1
        final CountDownLatch countDownLatch = new CountDownLatch(clientTotal);
        for (int i = 0; i < clientTotal; i++) {
            // 讲请求放入线程池中
            executorService.execute(() -> {
                try {
                    //判断信号量 判断当前线程是否允许被执行
                    semaphore.acquire();
                    add();
                    // 释放进程
                    semaphore.release();
                } catch (Exception e) {
                    log.error("exception", e);
                }
                // 没执行完一次 计算器-1
                countDownLatch.countDown();
            });

        }
        countDownLatch.await();
        // 关闭线程池
        executorService.shutdown();
        // count.get() 获取当前的值
        log.info("count:{}", count.get());
    }

    private static void add() {
        // 先添加操作再获取值
        count.incrementAndGet();
        // 先获取值再添加操作
        //count.getAndIncrement();
    }

}
原因是Atomic的incrementAndGet()方法;点进去看到
this为当前对象,valueOffset值偏移

以原子方式将当前值加一;Unsafe.compareAndSwapInt方法处理此问题
再点进去getAndAddInt方法,是下面这段代码:
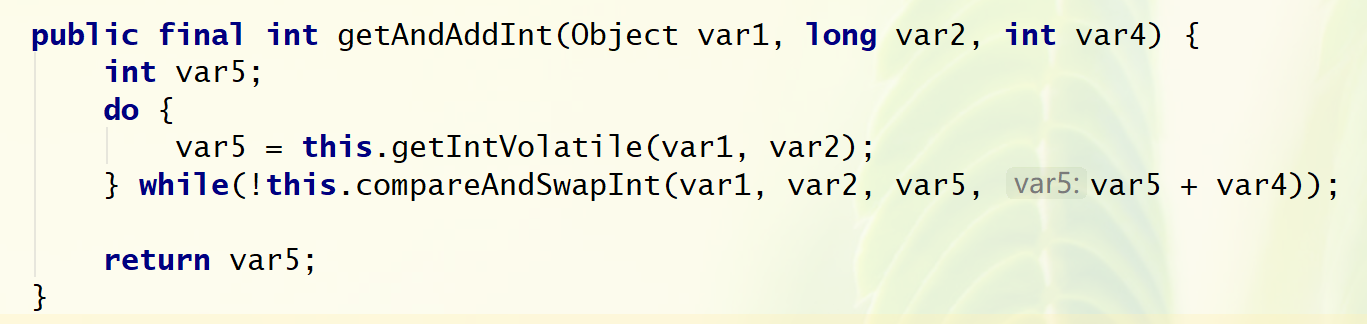
而CAS就是compareAndSwapInt的缩写;

被native标识的方法,也就是java底层的方法;
现在对这段代码解析一波:首先传过来的 ①:var1 就是我们之前传过来的count对象 ②:var2 是当前的值 ③:var4 的值就是1 ④:var5 是通过底层方法获取底层当前的值;
假设现在要做的操作是2+1:var1 就是我们之前传过来的count对象; 那么var2就是2, var4是1;如果没有别的线程来处理var1 对象的时候,这时候 var5返回就是2,也就是this.getIntVolatie(var1,var2)得到的值是2;
然后是compareAndSwapInt这个方法的调用:var1-当前count对象,var2-值为2,var5-值为底层传过来的2,var4-值为1;后面的var5+var4 (var5为底层取出来的值,var4要增加的值1),等于3;
当前方法希望达成的目标是,对这个count对象,当前的var2的值与底层的var5的值相同的情况下,把它更新成后面的值(也就是var5+var4);
当我们刚进来这个方法的时候,var2的值为2,再进行更新变成3的时候,可能会被别的线程更改,所有他会判断期望的值,也就是var2的值等于var5的时候,才会更新成后面的值,如果不相等,则会重新再var1这个对象中取出var2这个值,再去跟var5对比,相等就做后面的操作;
再举个例子:在进行2+1操作的时候,刚进来var2的值为2,在进行更新变成3的时候,被其他线程所更改了,此时底层的var5的值就是3了,当前线程拿var2来跟var5对比(也就是2与3对比),是不相等的;那么它就是再去var1这个对象中把var2值取出来,此时取出来的就是3了(假设期间没被其他线程更改),var2与var5都是3,比对相等,然后进行后面的更新,var5+var4--> 3+1=4;
下面介绍一下Atomic包中 AtomicRerence类的使用:
package com.example.concurrency.example.atomic;

import com.example.concurrency.annotation.NotThreadSafr;
import com.example.concurrency.annotation.ThreadSafe;
import lombok.extern.slf4j.Slf4j;

import java.util.concurrent.CountDownLatch;
import java.util.concurrent.ExecutorService;
import java.util.concurrent.Executors;
import java.util.concurrent.Semaphore;
import java.util.concurrent.atomic.AtomicReference;


@Slf4j
@ThreadSafe
public class AtomicEample1 {
    // AtomicReference类
   private static AtomicReference<Integer>count=new AtomicReference<>(0);

    public static void main(String[] args) {
        // 值为0时,赋值为2   下面的以此类推
        count.compareAndSet(0,2);
        count.compareAndSet(0,1);
        count.compareAndSet(1,3);
        count.compareAndSet(2,4);
        count.compareAndSet(3,5);
        log.info("count:{}",count.get());
    }

}
输出为:4--->首先是0 更新为2, 当其为2时,更新为4;其他的因为第一个参数对不上,所有不会执行。
Atomic包中 AtomicIntegerFieldUpdater类的使用:
package com.example.concurrency.example.atomic;

import com.example.concurrency.annotation.ThreadSafe;
import lombok.Getter;
import lombok.extern.slf4j.Slf4j;

import java.util.concurrent.atomic.AtomicIntegerFieldUpdater;

@Slf4j
@ThreadSafe
public class AtomicEample2 {
    // 针对integer的操作  泛型为需要更新的对象
    // 第一个参数为类的class,第二参数必须由 volatile修饰的名字  就是下面的count属性
    private static AtomicIntegerFieldUpdater<AtomicEample2> updater =
            AtomicIntegerFieldUpdater.newUpdater(AtomicEample2.class, "count");
    @Getter
    public volatile int count = 100;

    private static AtomicEample2 eample2 = new AtomicEample2();

    public static void main(String[] args) {
        // 如果当前对象的属性值为100  就修改为150
        if (updater.compareAndSet(eample2, 100, 150)) {
            log.info("updater success one:{}", eample2.getCount());
        }
        // 如果当前对象的属性值为200  就修改为150
        if (updater.compareAndSet(eample2, 200, 150)) {
            log.info("updater success two:{}", eample2.getCount());
        } else {
            log.info("updater failed:{}", eample2.getCount());
        }
    }
}
它是以原子性去更新某个类的实例指定的某个字段,这里也就是count字段,并且这个字段必须被volatile修饰且不能是static的;
输出为:updater success one:150与 updater failed:150--->值为100更新为150; 值已经是150,固if不成立走else输出150;
再介绍一下AtomicStampReference类关于CAS的ABA问题:
首先什么是CAS的ABA:就是本线程在进行CAS操作的时候,其他线程将变量的值从A改成了B,然后又改回了A;本线程在使用期望值A去与当前变量比较时,发现A变成没有变,于是CAS就将A值进行了交换操作;此时,实际该值已经被其他线程改变过了。
CAS的解决思路:每次变量更新的时候将变量的版本号进行+1操作,那么之前的就是A是1版本-->改成 B是2版本-->再改回 A是3版本;只有变量被某个线程修改过,版本号就会发生递增变化,从而解决了ABA问题。
package com.example.concurrency.example.atomic;

import com.example.concurrency.annotation.ThreadSafe;
import lombok.extern.slf4j.Slf4j;

import java.util.concurrent.atomic.AtomicStampedReference;

/**
 * @author xiaozhuang
 * @date 2022年04月07日 22:31
 */
@Slf4j
@ThreadSafe
public class AtomicEample3 {
    // initalRef为初始值  initialStamp为初始版本号
    private static AtomicStampedReference<Integer> stampedReference =
            new AtomicStampedReference<>(100, 1);

    public static void main(String[] args) {
        new Thread(() -> {
            log.info("张三查-初始值为:{},版本号为:{}", stampedReference.getReference(), stampedReference.getStamp());
            stampedReference.compareAndSet(100, 127, stampedReference.getStamp(),
                    stampedReference.getStamp() + 1);
            log.info("当前值为:{},版本号为:{}", stampedReference.getReference(), stampedReference.getStamp());
            stampedReference.compareAndSet(127, 100, stampedReference.getStamp(),
                    stampedReference.getStamp() + 1);
            log.info("当前值为:{},版本号为:{}", stampedReference.getReference(), stampedReference.getStamp());
        }, "小明").start();
        new Thread(() -> {
            try {
                Thread.sleep(200);
                log.info("李四查-初始值为:{},版本号为:{}", stampedReference.getReference(), stampedReference.getStamp());
                boolean isSuccess = stampedReference.compareAndSet(100, 126, stampedReference.getStamp(),
                        stampedReference.getStamp() + 1);
                log.info("是否更新成功:{},当前值为:{},版本号为:{}", isSuccess ? "success" : "failed", stampedReference.getReference(), stampedReference.getStamp());

            } catch (InterruptedException e) {
                e.printStackTrace();
            }

        },"李四").start();
    }
}

点进去compareAndSet方法中
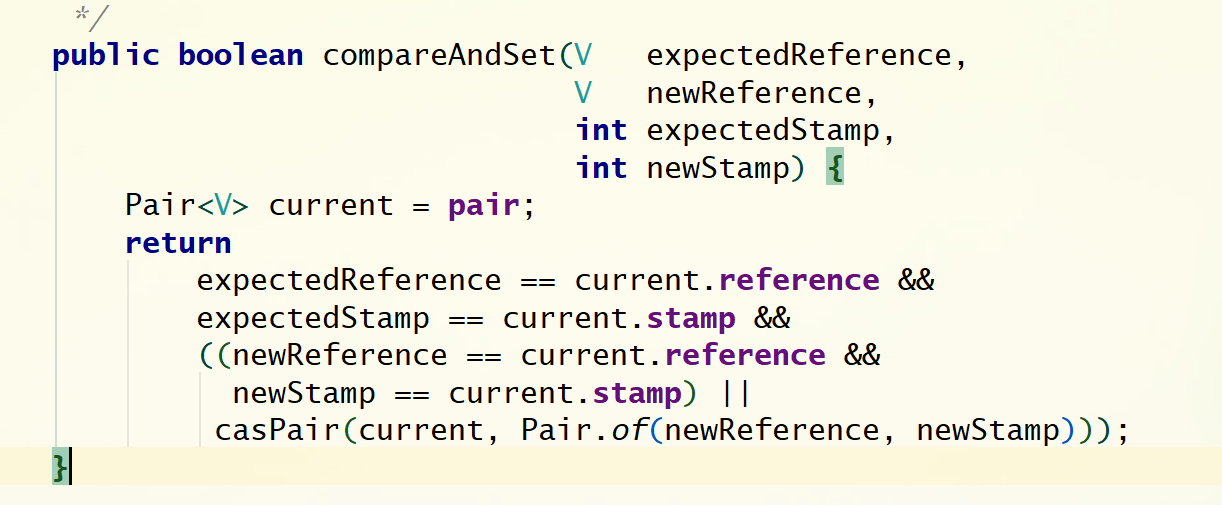
四个参数:① 预期值 ②更新的值 ③预期版本号 ④更新的版本号
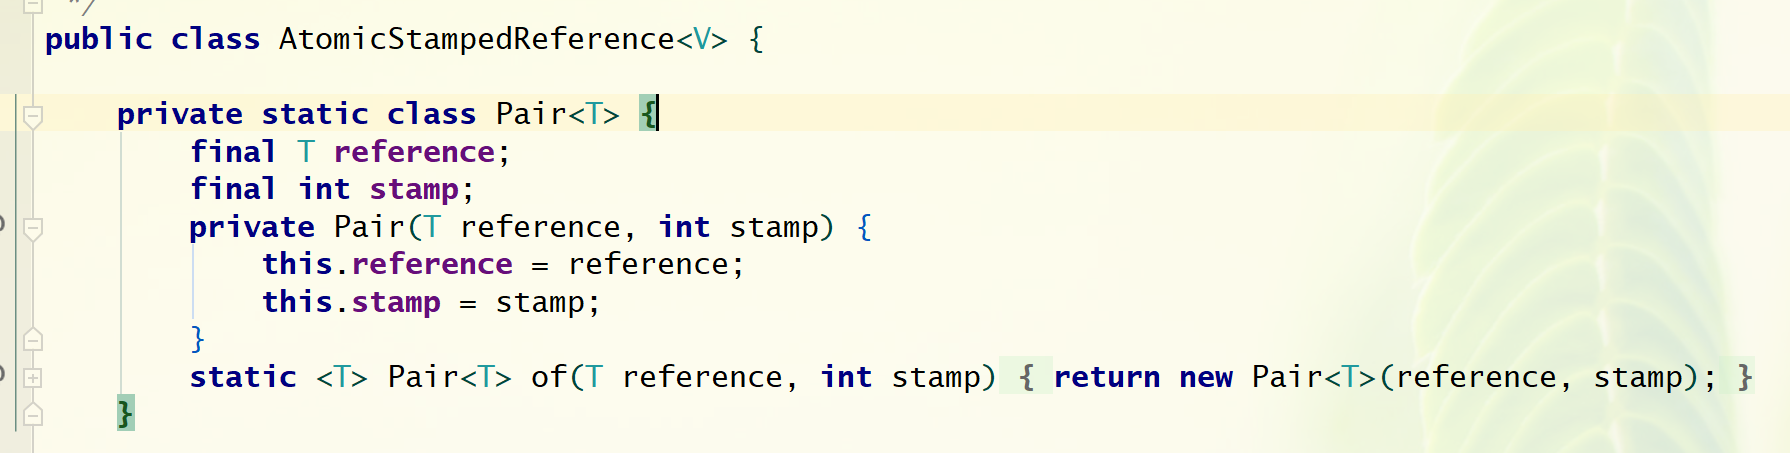
对于这份Pair,点进去发现它是AtomicStampedReference的内部类,发现它里面含有对象的值和版本号
可以看到compareAndSet返回的是更新是否成功的布尔值,那么它是在哪里进行更新操作的呢?可以看到这个方法里最底下的 casPair方法,点进去可以看到它是用底层的CAS将值和版本号进行更新的,而CAS怎么做的,在上面已经分析过了。

再介绍一下AtomicLongArrayBoolean类:
package com.example.concurrency.example.atomic;

import com.example.concurrency.annotation.ThreadSafe;
import lombok.extern.slf4j.Slf4j;

import java.util.concurrent.CountDownLatch;
import java.util.concurrent.ExecutorService;
import java.util.concurrent.Executors;
import java.util.concurrent.Semaphore;
import java.util.concurrent.atomic.AtomicBoolean;
import java.util.concurrent.atomic.AtomicReference;


@Slf4j
@ThreadSafe
public class AtomicEample4 {
    // AtomicBoolean   参数为 默认值
    private static AtomicBoolean isHappend = new AtomicBoolean(false);
    // 请求访问总数
    public static int clientTotal = 5000;
    // 同时并发执行的线程数
    public static int threadTotal = 200;

    public static void main(String[] args) throws InterruptedException {
        // 线程池
        ExecutorService executorService = Executors.newCachedThreadPool();
        // 信号量  参数为  运行并发的数目
        final Semaphore semaphore = new Semaphore(threadTotal);
        // 递减计数器  参数为 请求数量  没执行成功一次会  减1
        final CountDownLatch countDownLatch = new CountDownLatch(clientTotal);
        for (int i = 0; i < clientTotal; i++) {
            // 讲请求放入线程池中
            executorService.execute(() -> {
                try {
                    //判断信号量 判断当前线程是否允许被执行
                    semaphore.acquire();
                    test();
                    // 释放进程
                    semaphore.release();
                } catch (Exception e) {
                    log.error("exception", e);
                }
                // 没执行完一次 计算器-1
                countDownLatch.countDown();
            });

        }
        countDownLatch.await();
        // 关闭线程池
        executorService.shutdown();
        log.info("isHappend:{}", isHappend.get());
    }

    private static void test() {
        // 预期值是false   更新为true
        if (isHappend.compareAndSet(false, true)) {
            log.info("update sueccess");
        }
    }
}
可以看到我们请求总数为5000,并发数200,但是这段代码只输出了一次,原因是 第一次是false,与预期值一致,改为true了;那么接下来不管判断再多次,它都是true,永远跟期望值为false不同,所以永远也修改不了了;在实际应用中,让一段代码只执行一次,不会重复,可以使用它来做。
顺带说一下AtomicLong 与LongAddr的区别以及AtomicLongArray的使用:
LongAddr的优点:LongAdder在AtomicLong的基础上将单点的更新压力分散到各个节点,在并发量低的时候通过对一个base的值的直接更新可以很好的保 障和AtomicLong的性能基本保持一致,而在并发量高的时候则是通过分散提高了性能。
缺点:LongAdder在统计的时候如果有并发更新,可能导致统计的数据有误差。
AtomicLongArray:与其他Atomic类基本差不多,不同的是多了个Array,在进行取值,更新操作时,都要根据索引来维护。


【推荐】国内首个AI IDE,深度理解中文开发场景,立即下载体验Trae
【推荐】编程新体验,更懂你的AI,立即体验豆包MarsCode编程助手
【推荐】抖音旗下AI助手豆包,你的智能百科全书,全免费不限次数
【推荐】轻量又高性能的 SSH 工具 IShell:AI 加持,快人一步
· winform 绘制太阳,地球,月球 运作规律
· 震惊!C++程序真的从main开始吗?99%的程序员都答错了
· 【硬核科普】Trae如何「偷看」你的代码?零基础破解AI编程运行原理
· 超详细:普通电脑也行Windows部署deepseek R1训练数据并当服务器共享给他人
· 上周热点回顾(3.3-3.9)