ASP.NET实现二维码 ASP.Net上传文件 SQL基础语法 C# 动态创建数据库三(MySQL) Net Core 实现谷歌翻译ApI 免费版 C#发布和调试WebService ajax调用WebService实现数据库操作 C# 实体类转json数据过滤掉字段为null的字段

ASP.NET实现二维码

using System;
using System.Collections.Generic;
using System.Drawing;
using System.Linq;
using System.Text;
using System.Web;
using System.Web.UI;
using System.Web.UI.WebControls;
using ThoughtWorks.QRCode.Codec;

namespace WeChat
{
public partial class WebForm2 : System.Web.UI.Page
{
protected void Page_Load(object sender, EventArgs e)
{

}

protected void btnCRC_Click(object sender, EventArgs e)
{
//创建时间
DateTime currentTime = new System.DateTime();
//取当前年月日时分秒
currentTime = System.DateTime.Now;
//取当前年
int Year = currentTime.Year;
//取当前月
int Month = currentTime.Month;
//取当前日
int Day = currentTime.Day;
if (Day < 10)
{
Day = 0 + Day;
}
//取当前时
int Hour = currentTime.Hour;
//取当前分
int Minute = currentTime.Minute;
int Minute1 = currentTime.Minute + 10;
//取当前秒
int Second = currentTime.Second;
//取当前毫秒
int Millisecond = currentTime.Millisecond;
this.txtCRC.Text = Second.ToString();
ThoughtWorksQRCode("您好欢迎使用二维码查看!");
}
private void ThoughtWorksQRCode(string strtxt)
{
try
{
Bitmap bt;
string enCodeString = strtxt;
QRCodeEncoder qrCodeEncoder = new QRCodeEncoder();
bt = qrCodeEncoder.Encode(enCodeString, Encoding.UTF8);
string filename = DateTime.Now.ToString("yyyymmddhhmmss");
filename = filename.Replace(" ", "");
filename = filename.Replace(":", "");
filename = filename.Replace("-", "");
filename = filename.Replace(".", "");
bt.Save(Server.MapPath("~/images/") + filename + ".jpg");
this.Image1.ImageUrl = "~/images/" + filename + ".jpg";
}
catch (Exception e)
{
throw e;
}

}

//public void GenerateQRCode(string content)
//{
// try
// {
// // _fileLog.Info("GenerateQRCode|开始生成二维码");
// if (null != content)
// {
// //初始化二维码生成工具
// var qrCodeEncoder = new QRCodeEncoder
// {
// QRCodeEncodeMode = QRCodeEncoder.ENCODE_MODE.BYTE,
// QRCodeErrorCorrect = QRCodeEncoder.ERROR_CORRECTION.M,
// QRCodeVersion = 0,
// QRCodeScale = 4
// };
// //将字符串生成二维码图片
// var image = qrCodeEncoder.Encode(content);
// var ms = new MemoryStream();
// image.Save(ms, ImageFormat.Png);
// Response.BinaryWrite(ms.GetBuffer());
// Response.End();
// }
// //_fileLog.Info("CloudCardController|GenerateQRCode|成功生成二维码");
// }
// catch (Exception ex)
// {
// //_fileLog.Error("GenerateQRCode|生成二维码出现异常,异常信息:" + ex.Message);
// }

//}
//private void CreateCode_Simple(string nr)
//{
// QRCodeEncoder qrCodeEncoder = new QRCodeEncoder();
// qrCodeEncoder.QRCodeEncodeMode = QRCodeEncoder.ENCODE_MODE.BYTE;
// qrCodeEncoder.QRCodeScale = 4;
// qrCodeEncoder.QRCodeVersion = 8;
// qrCodeEncoder.QRCodeErrorCorrect = QRCodeEncoder.ERROR_CORRECTION.M;
// //System.Drawing.Image image = qrCodeEncoder.Encode("4408810820 深圳-广州 小江");
// System.Drawing.Image image = qrCodeEncoder.Encode(nr);
// string filename = DateTime.Now.ToString("yyyymmddhhmmssfff").ToString() + ".jpg";
// string filepath = Server.MapPath(@"~\Upload") + "\\" + filename;
// System.IO.FileStream fs = new System.IO.FileStream(filepath, System.IO.FileMode.OpenOrCreate, System.IO.FileAccess.Write);
// image.Save(fs, System.Drawing.Imaging.ImageFormat.Jpeg);

// fs.Close();
// image.Dispose();
// //二维码解码
// var codeDecoder = CodeDecoder(filepath);
//}

///// <summary>
///// 二维码解码
///// </summary>
///// <param name="filePath">图片路径</param>
///// <returns></returns>
//public string CodeDecoder(string filePath)
//{
// if (!System.IO.File.Exists(filePath))
// return null;
// Bitmap myBitmap = new Bitmap(Image.FromFile(filePath));
// QRCodeDecoder decoder = new QRCodeDecoder();
// string decodedString = decoder.decode(new QRCodeBitmapImage(myBitmap));
// return decodedString;
//}
}
}


ASP.Net上传文件

在做Web项目时,上传文件是经常会碰到的需求。ASP.Net的WebForm开发模式中,封装了FileUpload控件,可以方便的进行文件上传操作。但有时,你可能不希望使用ASP.Net中的服务器控件,仅仅使用Input标签来实现文件上传。当然也是可以的。下面总结在项目中使用过的上传文件的方式。

一、使用Asp.Net中的FileUpload服务器端控件实现上传

使用asp.net中的服务器端控件FileUpload上传文件非常方便。FileUpload对上传操作进行了封装,你只需要调用SaveAs方法即可完成上传。下面是简单的上传代码。

    <p>服务器端控件上传</p>
    <asp:FileUpload ID="MyFileUpload" runat="server" /> 
        <asp:Button ID="FileUploadButton" runat="server" Text="上传" 
            onclick="FileUploadButton_Click" />
复制代码
复制代码
 1    protected void FileUploadButton_Click(object sender, EventArgs e)
 2         {
 3             if (MyFileUpload.HasFile)
 4             {
 5                 string filePath = Server.MapPath("~/UploadFiles/");
 6                 string fileName = MyFileUpload.PostedFile.FileName;
 7                 MyFileUpload.SaveAs(filePath + fileName);
 8                 Response.Write("<p >上传成功!</p>");
 9             }
10             else
11             {
12                 Response.Write("<p >请选择要上传的文件!</p>");
13             }
14         }
复制代码
复制代码

当然,在实际项目中就不能这么简单的保存文件了。你至少得增加一些文件类型的判断,防止用户上传一些能够威胁到系统安全的文件。你可以采用客户端JS验证的方式,也能够在.cs的服务器端代码中验证。

在asp.Net WebForm开发框架下,我们也可以利用Html的Input标签来上传文件。这时候需要注意的一点,这个type为file的Input标签需要加上runat="server"属性,否则在后台Request.Files获取不到上传的文件。

  <p>使用Html的Input标签上传</p>
    <input type="file" name="MyFileUploadInput" runat="server" /><asp:Button 
            ID="InputFileUploadButton" runat="server" Text="上传" 
            onclick="InputFileUploadButton_Click" />
复制代码
复制代码
 1         protected void InputFileUploadButton_Click(object sender, EventArgs e)
 2         {
 3             HttpFileCollection files = Request.Files;
 4             string filePath = Server.MapPath("~/UploadFiles/");
 5             if (files.Count != 0)
 6             {
 7                 string fileName = files[0].FileName;
 8                 files[0].SaveAs(Path.Combine(filePath, fileName));
 9                 Response.Write("<p>上传成功</p>");
10             }
11             else
12             {
13                 Response.Write("<p>未获取到Files:"+ files.Count.ToString()+"</p>");
14             }
15         }
复制代码
复制代码

以这种方式进行上传的时候,好处就是可以方便的用JS生成多个Input标签来上传多个文件。且此时需要注意的是,Input标签必须要有name属性。在后台,只需要循环调用SaveAs()方法即可。

接下来的两种上传方式(二和三)都会用到Ajax异步提交数据,后台使用一个.ashx文件进行处理。两种方式共用一个文件,ajax传入的url参数中加一个method来区分哪种方式传过来的。后台代码如下:

复制代码
复制代码
 1    public void ProcessRequest(HttpContext context)
 2         {
 3             string method = context.Request.QueryString["method"].ToString();
 4             switch (method)
 5             {
 6                 case "ajaxFileUpload":
 7                     ajaxFileUpload(context);
 8                     break;
 9                 case "formDataUpload":
10                     formDataUpload(context);
11                     break;
12                 default:
13                     break;
14             }
15         }
16 
17         private static void formDataUpload(HttpContext context)
18         {
19             HttpFileCollection files = context.Request.Files;
20 
21             string msg = string.Empty;
22             string error = string.Empty;
23             if (files.Count > 0)
24             {
25                 files[0].SaveAs(ConfigurationManager.AppSettings["FilePath"].ToString() + System.IO.Path.GetFileName(files[0].FileName));
26                 msg = " 成功! 文件大小为:" + files[0].ContentLength;
27                 string res = "{ error:'" + error + "', msg:'" + msg + "'}";
28                 context.Response.Write(res);
29                 context.Response.End();
30             }
31         }
32 
33         private static void ajaxFileUpload(HttpContext context)
34         {
35             HttpFileCollection files = context.Request.Files;
36 
37             string msg = string.Empty;
38             string error = string.Empty;
39             if (files.Count > 0)
40             {
41                 files[0].SaveAs(ConfigurationManager.AppSettings["FilePath"].ToString() + System.IO.Path.GetFileName(files[0].FileName));
42                 msg = " 成功! 文件大小为:" + files[0].ContentLength;
43                 string res = "{ error:'" + error + "', msg:'" + msg + "'}";
44                 context.Response.Write(res);
45                 context.Response.End();
46             }
47         }
复制代码
复制代码


二、使用Html中的Input标签加FormData对象实现

使用这种方式上传附件,对浏览器有些要求。FormData属于Html5中新增的特性,IE浏览器只有在10以上才支持。所以,个中利弊自己权衡,但用起来觉得方便。下面直接上代码:

复制代码
复制代码
 1   function formDataUpload() {
 2             var fileupload = document.getElementById('fileToUpload').files;
 3             var formdata = new FormData();
 4             formdata.append('files', fileupload[0]);
 5             var xmlHttp = new XMLHttpRequest();
 6             xmlHttp.open("post", 'Handlers/FileUpload.ashx?method=formDataUpload');
 7             xmlHttp.onreadystatechange = function () {
 8                 if (xmlHttp.readyState == 4 && xmlHttp.status == 200) {
 9                     alert('上传成功');
10                 }
11             }
12             xmlHttp.send(formdata);
13         }
复制代码
复制代码


三、使用Jquery中的ajaxfileupload.js插件实现上传

使用此方法,需要引用jquery.js和ajaxfileupload.js两个文件。还需要注意的部分是两个文件的版本匹配问题,可能在使用过程中会出现些异常。此时发挥搜索引擎的作用,总能找到你需要的解决方案。

JavaScript代码如下:

复制代码
复制代码
 1     function ajaxFileUpLoad() {
 2         $.ajaxFileUpload(
 3             {
 4                 url: 'Handlers/FileUpload.ashx?method=ajaxFileUpload',
 5                 secureuri: false,
 6                 fileElementId: 'fileToUpload',
 7                 dataType: 'json',
 8                 success: function (data, status) {
 9                     $('#img1').attr("src", data.imgurl);
10                     if (typeof (data.error) != 'undefined') {
11                         if (data.error != '') {
12                             alert(data.error);
13                         } else {
14                             alert(data.msg);
15                         }
16                     }
17                 },
18                 error: function (data, status, e) {
19                     alert(e);
20                 }
21             }
22         )
23         return false;
24     }
复制代码
复制代码

Html页面上的代码如下:

复制代码
复制代码
 1 <html xmlns="http://www.w3.org/1999/xhtml">
 2 <head>
 3 <script type="text/javascript" src="Scripts/jquery-1.4.1.js"></script>
 4 <script type="text/javascript" src="Scripts/ajaxfileupload.js"></script>
 5 <script type="text/javascript">
 6     $(function () {
 7         $("#ajaxfileuploadButton").click(function () {
 8             ajaxFileUpLoad();
 9         })
10 
11         $("#formdataButton").click(function () {
12             formDataUpload();
13         })
14     });
15 
16 </script>
17     <title></title>
18     <script type="text/javascript">
19      
20     </script>
21 </head>
22 <body>
23 <input type="file" id="fileToUpload" name="fileToUpload" />
24 <input type="button" id="ajaxfileuploadButton" value="ajaxfileupload插件上传" />
25 <input type="button" id="formdataButton" value="FormData方式上传" />
26 </body>
27 </html>
复制代码


SQL基础语法

数据库:

结构化查询语言(Structured Query Language)简称SQL;

数据库管理系统(Database Management System)简称DBMS;

数据库管理员(Database Administration)简称DBA,功能是确保DBMS的正常高效运行;

数据库分体验版(一般只安装库文件和服务)和正式版(授权使用);

在正式团队开发时,一般只安装界面,登录到服务器共同操作数据库,这样可避免每人的数据库不同而无法组合。

SQL server 2008 模式:

1.客户机/服务器(C/S)

2.浏览器/服务器(B/S)


数据库文件:

***一个数据库最多可以存32767个数据文件和32767个日志文件

名称 用途 扩展名
主文件 存储数据、启动信息 必须有且只能有一个
mdf

次要文件 存储主文件未存储的数 可有可无、可多可少
ndf

日志文件 记录操作信息 必须有且至少有一个
ldf

ps:一个文件或文件组只能用于一个数据库,不能用于多个数据库。

一个文件只能是某一个文件组的成员,不能是多个文件组的成员。

日志文件永远不能是任意文件组的成员。

数据信息和日志信息不能放在同一个文件或文件组中。


数据库系统服务器类型:

1.数据库引擎:核心服务,是一个复杂的系统,负责数据的存储,处理和安全;

2.Analysis services:分析挖掘数据,支持本地多维数据集引擎,可使断开连接的客户端上的应用程序能够在本地浏览器以存储的多维数据;

3.Reporting services:报表服务器管理工具;

4.Intergration services:负责数据的提取,转换和加载等操作,可以高效处理各种各样的数据源。例:Oracle、Excel、XML文档等;

5.SQL server compact edition:不是SQL server 2008的组成部分,它是一种功能强大的轻型关系数据库引擎。


数据库产品:

甲骨文 Oracle

IBM DB2、Informix

赛贝斯 Sybase Ase

微软 Access、Microsoft SQL sever

My SQL 开源DB

PS:Microsoft SQL sever 2008 代码名称为:katmai

数据库中系统数据库中包含Master、Tempdb、Model和Msdb类型。


SQL sever 2008 的数据存储单位:

1.页:最基本的单位。

8KB为一页,128页为1MB,开头是96B的标头,

表中每一行数据字节数不能超过8192-96B(8192=1024*8)

2.区:管理空间的基本单位。

8个链接页为一个区,即64KB为一个区,16个区为1MB,

控制表和索引的存储<64KB时存在混合盘,只有在64KB是才整存。


控制数据库的服务:

运行cmd

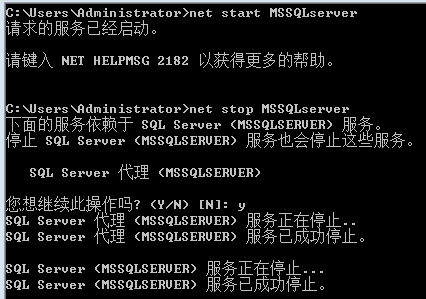
输入net start MSSQLserver 启动数据库服务

输入net stop MSSQLserver 关闭数据库服务

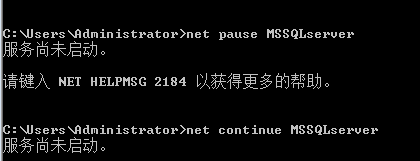
输入net pause MSSQLserver 暂停数据库服务

输入net continue MSSQLserver 继续数据库服务


常用语句
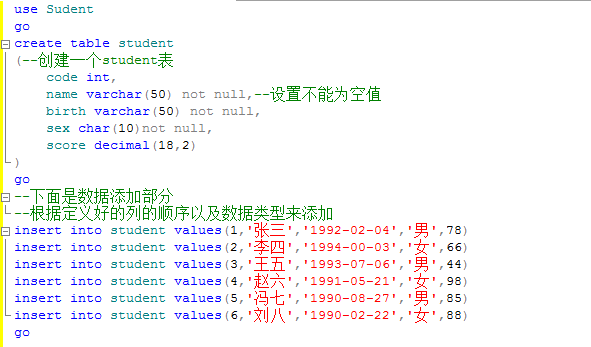
序号 code int
名字 name varchar(50)not null
日期 birth varchar(50) null
性别 sex char(10)not null
分数 score decimal(18,2)
价格 price deciman(18,2) 
产地 addr varchar(50)

insert into 添加
select 查询
insert into 插入
update 更改
delete 删除


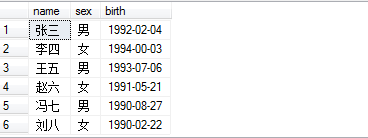
练习:


排列顺序:

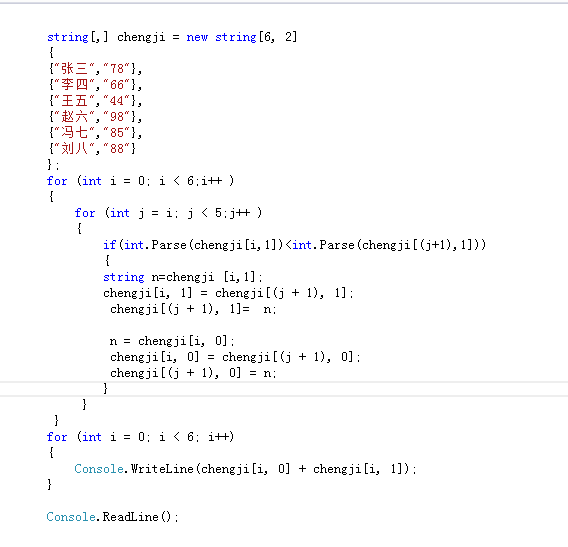
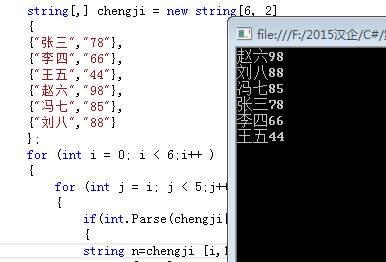
1、C#的做法


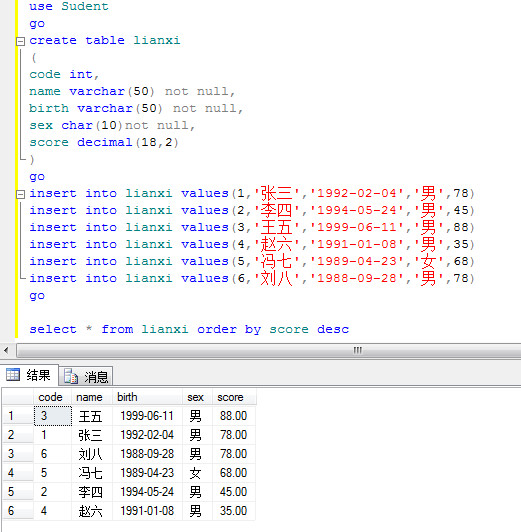
2、SQL server 做法


前面有说明使用EF动态新建数据库与表,数据库使用的是SQL SERVER2008的,在使用MYSQL的时候还是有所不同

一、添加 EntityFramework.dll ,System.Data.Entity.dll ,MySql.Data, MySql.Data.Entity.EF6

注意:Entity Framework5.0.0(好像最新的6.X是不支持mysql的)

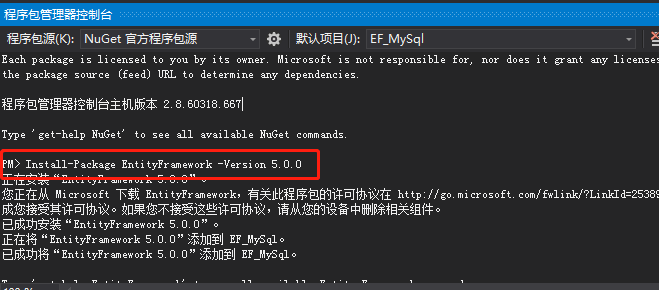
二、添加dll文件,可以使用“管理NuGet程序包”或者“Nuget程序包管理控制台”添加


与 控制台平台添加


以下为控制台平台安装dll语句
 EntityFramework.dll : Install-Package EntityFramework -Version 5.0.0
MySql.Data : Install-Package MySql.Data -Version 6.9.12
MySql.Data.Entity:Install-Package MySql.Data.Entity -Version 6.9.12

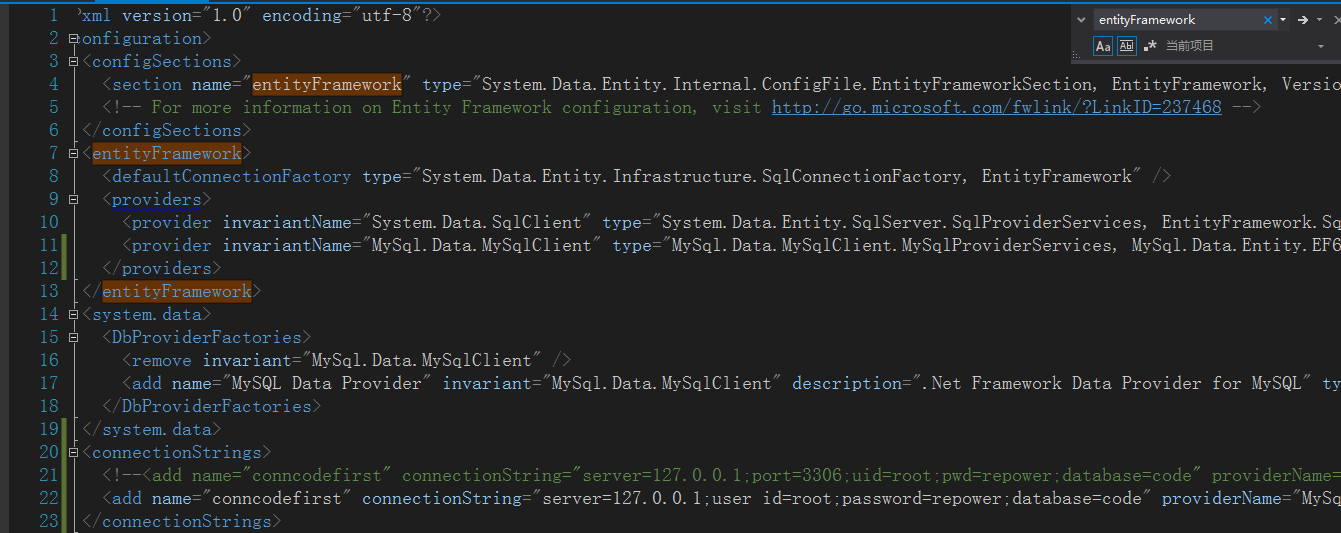
三、在app.config文件中添加connectionStrings


 源文件

1
2
3
4
5
6
7
8
9
10
11
12
13
14
15
16
17
18
19
20
21
22
23
24
<?xml version="1.0" encoding="utf-8"?>
<configuration>
  <configSections>
    <section name="entityFramework" type="System.Data.Entity.Internal.ConfigFile.EntityFrameworkSection, EntityFramework, Version=6.0.0.0, Culture=neutral, PublicKeyToken=b77a5c561934e089" requirePermission="false" />
    <!-- For more information on Entity Framework configuration, visit http://go.microsoft.com/fwlink/?LinkID=237468 -->
  </configSections>
  <entityFramework>
    <defaultConnectionFactory type="System.Data.Entity.Infrastructure.SqlConnectionFactory, EntityFramework" />
    <providers>
      <provider invariantName="System.Data.SqlClient" type="System.Data.Entity.SqlServer.SqlProviderServices, EntityFramework.SqlServer" />
      <provider invariantName="MySql.Data.MySqlClient" type="MySql.Data.MySqlClient.MySqlProviderServices, MySql.Data.Entity.EF6, Version=6.9.12.0, Culture=neutral, PublicKeyToken=c5687fc88969c44d"></provider>
    </providers>
  </entityFramework>
  <system.data>
    <DbProviderFactories>
      <remove invariant="MySql.Data.MySqlClient" />
      <add name="MySQL Data Provider" invariant="MySql.Data.MySqlClient" description=".Net Framework Data Provider for MySQL" type="MySql.Data.MySqlClient.MySqlClientFactory, MySql.Data, Version=6.9.12.0, Culture=neutral, PublicKeyToken=c5687fc88969c44d" />
    </DbProviderFactories>
  </system.data>
  <connectionStrings>
    <!--<add name="conncodefirst" connectionString="server=127.0.0.1;port=3306;uid=root;pwd=repower;database=code" providerName="MySql.Data.MySqlClient"/>-->
    <add name="conncodefirst" connectionString="server=127.0.0.1;user id=root;password=repower;database=code" providerName="MySql.Data.MySqlClient" />
  </connectionStrings>
</configuration>

四、添加类

1
2
3
4
5
6
7
8
9
10
11
12
13
14
15
16
17
18
19
20
21
22
23
24
25
26
[Table("Student")]
    public class Student
    {
        public Student()
        {
 
        }
        [Key]
        public int StudentID { getset; }
        public string StudentName { getset; }
        public DateTime AddTime { getset; }
 
    }
 
    [Table("Standard")]
    public class Standard
    {
        public Standard()
        {
 
        }
        public int StandardId { getset; }
        public string StandardName { getset; }
        public DateTime AddTime { getset; }
 
    }


添加SchoolContext 继承DbContext

1
2
3
4
5
6
7
8
9
10
11
12
13
14
15
16
17
18
19
20
21
22
[DbConfigurationType(typeof(MySql.Data.Entity.MySqlEFConfiguration))]
    public class SchoolContext : DbContext
    {
        public SchoolContext()
            base("name=conncodefirst")
        {
 
        }
 
        static SchoolContext()
        {
            DbConfiguration.SetConfiguration(new MySql.Data.Entity.MySqlEFConfiguration());
        }
 
        public DbSet<Student> Students { getset; }
        public DbSet<Standard> Standards { getset; }
 
        //protected override void OnModelCreating(DbModelBuilder modelBuilder)
        //{
        //    base.OnModelCreating(modelBuilder);
        //}
    }


最后调用

1
2
3
4
5
6
SchoolContext dbCOntext = new SchoolContext();
                //dbCOntext.Database.
                bool flag = dbCOntext.Database.CreateIfNotExists();
                Student stud = new Student() { StudentName = "New Student", AddTime = DateTime.Now };
                dbCOntext.Students.Add(stud);
                dbCOntext.SaveChanges();

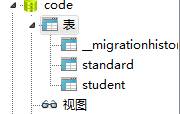
  结果


Net Core 实现谷歌翻译ApI 免费版


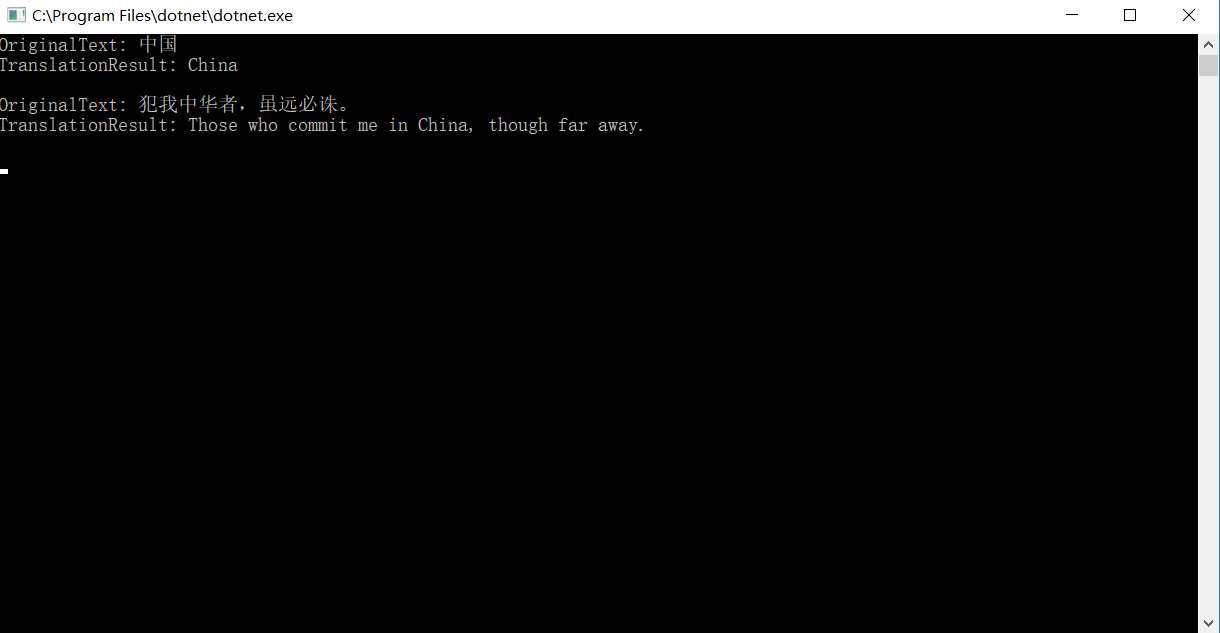
  由于谷歌翻译官方API是付费版本,本着免费和开源的精神。分享一下用 Net Core 实现谷歌翻译API的代码。


项目引用的Nuget 包:

ChakraCore.NET

Newtonsoft.Json

JavaScriptEngineSwitcher.ChakraCore.Native.win-x86(特别说明一下"win-x86",代表程序运行环境。)

翻译地址https://translate.google.cn (国内可以访问)

参数说明: 

text:待翻译文本

sl:需要翻译的语言(中文:zh-CN,英文:en)

tl: 翻译结果的语言(中文:zh-CN,英文:en)


复制代码
 1 public class HttpHelper
 2     {
 3         /// <summary>
 4         /// 请求
 5         /// </summary>
 6         /// <param name="url">地址</param>
 7         /// <param name="args">参数</param>
 8         /// <returns></returns>
 9         public static string GetRequest(string url, CookieContainer cookieContainer, Dictionary<string, dynamic> args)
10         {
11             try
12             {
13                 if (args.Count > 0)
14                 {
15                     var argStr = string.Empty;
16 
17                     foreach (var item in args)
18                     {
19                         if (item.Key == null || item.Value == null)
20                         {
21                             continue;
22                         }
23                         argStr = $"{argStr}{item.Key}={item.Value}&";
24                     }
25 
26                     url = $"{url}?{argStr.TrimEnd('&')}";
27                 }
28 
29                 HttpWebRequest request = (HttpWebRequest)WebRequest.Create(url);
30                 request.Method = "get";
31                 request.Timeout = 100000;
32                 request.CookieContainer = cookieContainer;
33                 request.UserAgent = GetUserAgent();
34                 request.Headers.Add("X-Requested-With:XMLHttpRequest");
35                 request.Accept = "text/html,application/xhtml+xml,application/xml;q=0.9,image/webp,*/*;q=0.8";
36                 using (var webResponse = (HttpWebResponse)request.GetResponse())
37                 {
38                     using (var reader = new StreamReader(webResponse.GetResponseStream(), Encoding.UTF8))
39                     {
40 
41                         return reader.ReadToEnd();
42                     }
43                 }
44             }
45             catch (Exception)
46             {
47                 return string.Empty;
48             }
49         }
50         
51         /// <summary>
52         /// 用户代理
53         /// </summary>
54         /// <returns></returns>
55         private static string GetUserAgent()
56         {
57             var userAgents = new List<string>
58             {
59                 "Mozilla/5.0 (Windows NT 6.1; WOW64) AppleWebKit/537.1 (KHTML, like Gecko) Chrome/22.0.1207.1 Safari/537.1",
60                 "Mozilla/5.0 (X11; CrOS i686 2268.111.0) AppleWebKit/536.11 (KHTML, like Gecko) Chrome/20.0.1132.57 Safari/536.11",
61                 "Mozilla/5.0 (Windows NT 6.1; WOW64) AppleWebKit/536.6 (KHTML, like Gecko) Chrome/20.0.1092.0 Safari/536.6",
62                 "Mozilla/5.0 (Windows NT 6.2) AppleWebKit/536.6 (KHTML, like Gecko) Chrome/20.0.1090.0 Safari/536.6",
63                 "Mozilla/5.0 (Windows NT 6.2; WOW64) AppleWebKit/537.1 (KHTML, like Gecko) Chrome/19.77.34.5 Safari/537.1",
64                 "Mozilla/5.0 (X11; Linux x86_64) AppleWebKit/536.5 (KHTML, like Gecko) Chrome/19.0.1084.9 Safari/536.5",
65                 "Mozilla/5.0 (Windows NT 6.0) AppleWebKit/536.5 (KHTML, like Gecko) Chrome/19.0.1084.36 Safari/536.5",
66                 "Mozilla/5.0 (Windows NT 6.1; WOW64) AppleWebKit/536.3 (KHTML, like Gecko) Chrome/19.0.1063.0 Safari/536.3",
67                 "Mozilla/5.0 (Windows NT 5.1) AppleWebKit/536.3 (KHTML, like Gecko) Chrome/19.0.1063.0 Safari/536.3",
68                 "Mozilla/5.0 (Macintosh; Intel Mac OS X 10_8_0) AppleWebKit/536.3 (KHTML, like Gecko) Chrome/19.0.1063.0 Safari/536.3",
69                 "Mozilla/5.0 (Windows NT 6.2) AppleWebKit/536.3 (KHTML, like Gecko) Chrome/19.0.1062.0 Safari/536.3",
70                 "Mozilla/5.0 (Windows NT 6.1; WOW64) AppleWebKit/536.3 (KHTML, like Gecko) Chrome/19.0.1062.0 Safari/536.3",
71                 "Mozilla/5.0 (Windows NT 6.2) AppleWebKit/536.3 (KHTML, like Gecko) Chrome/19.0.1061.1 Safari/536.3",
72                 "Mozilla/5.0 (Windows NT 6.1; WOW64) AppleWebKit/536.3 (KHTML, like Gecko) Chrome/19.0.1061.1 Safari/536.3",
73                 "Mozilla/5.0 (Windows NT 6.1) AppleWebKit/536.3 (KHTML, like Gecko) Chrome/19.0.1061.1 Safari/536.3",
74                 "Mozilla/5.0 (Windows NT 6.2) AppleWebKit/536.3 (KHTML, like Gecko) Chrome/19.0.1061.0 Safari/536.3",
75                 "Mozilla/5.0 (X11; Linux x86_64) AppleWebKit/535.24 (KHTML, like Gecko) Chrome/19.0.1055.1 Safari/535.24",
76                 "Mozilla/5.0 (Windows NT 6.2; WOW64) AppleWebKit/535.24 (KHTML, like Gecko) Chrome/19.0.1055.1 Safari/535.24",
77                 "Mozilla/5.0 (Macintosh; U; Mac OS X Mach-O; en-US; rv:2.0a) Gecko/20040614 Firefox/3.0.0 ",
78                 "Mozilla/5.0 (Macintosh; U; PPC Mac OS X 10.5; en-US; rv:1.9.0.3) Gecko/2008092414 Firefox/3.0.3",
79                 "Mozilla/5.0 (Macintosh; U; Intel Mac OS X 10.5; en-US; rv:1.9.1) Gecko/20090624 Firefox/3.5",
80                 "Mozilla/5.0 (Macintosh; U; Intel Mac OS X 10.6; en-US; rv:1.9.2.14) Gecko/20110218 AlexaToolbar/alxf-2.0 Firefox/3.6.14",
81                 "Mozilla/5.0 (Macintosh; U; PPC Mac OS X 10.5; en-US; rv:1.9.2.15) Gecko/20110303 Firefox/3.6.15",
82                 "Mozilla/5.0 (Macintosh; Intel Mac OS X 10.6; rv:2.0.1) Gecko/20100101 Firefox/4.0.1",
83                 "Opera/9.80 (Windows NT 6.1; U; en) Presto/2.8.131 Version/11.11",
84                 "Opera/9.80 (Android 2.3.4; Linux; Opera mobi/adr-1107051709; U; zh-cn) Presto/2.8.149 Version/11.10",
85                 "Mozilla/5.0 (Windows; U; Windows NT 5.1; en-US) AppleWebKit/531.21.8 (KHTML, like Gecko) Version/4.0.4 Safari/531.21.10",
86                 "Mozilla/5.0 (Windows; U; Windows NT 5.2; en-US) AppleWebKit/533.17.8 (KHTML, like Gecko) Version/5.0.1 Safari/533.17.8",
87                 "Mozilla/5.0 (Windows; U; Windows NT 6.1; en-US) AppleWebKit/533.19.4 (KHTML, like Gecko) Version/5.0.2 Safari/533.18.5",
88                 "Mozilla/5.0 (compatible; MSIE 9.0; Windows NT 6.1; Trident/5.0",
89                 "Mozilla/4.0 (compatible; MSIE 8.0; Windows NT 6.0; Trident/4.0)",
90                 "Mozilla/4.0 (compatible; MSIE 7.0; Windows NT 6.0)",
91                 "Mozilla/4.0 (compatible; MSIE 6.0; Windows NT 5.1)"
92             };
93 
94             return userAgents.OrderBy(x => Guid.NewGuid()).First();
95         }
96     }
复制代码


复制代码
  1 /// <summary>
  2     /// 翻译 助手
  3     /// </summary>
  4     public static class TranslationHelper
  5     {
  6         /// <summary>
  7         /// Chakra 上下文
  8         /// </summary>
  9         private static readonly ChakraContext _chakraContext;
 10 
 11         /// <summary>
 12         /// Cookie
 13         /// </summary>
 14         private static readonly CookieContainer _cookieContainer;
 15 
 16         /// <summary>
 17         /// 请求地址
 18         /// </summary>
 19         private static readonly string _baseUrl;
 20 
 21         /// <summary>
 22         /// 静态
 23         /// </summary>
 24         static TranslationHelper()
 25         {
 26             var runtime = ChakraRuntime.Create();
 27 
 28             _baseUrl = "http://translate.google.cn/translate_a/single";
 29             _cookieContainer = new CookieContainer();
 30             _chakraContext = runtime.CreateContext(true);
 31 
 32             var basePath = PlatformServices.Default.Application.ApplicationBasePath;
 33             var jsFileText = File.ReadAllText($@"{basePath}\gettk.js");
 34 
 35             _chakraContext.RunScript(jsFileText); //运行脚本
 36         }
 37 
 38         /// <summary>
 39         /// 获取翻译结果(需要翻译的文字默认使用中文)
 40         /// </summary>
 41         /// <param name="toLang">语言</param>
 42         /// <param name="originalText">待翻译的文本</param>
 43         /// <returns></returns>
 44         public static string GetTranslation(this string toLang, string originalText)
 45         {
 46             if (string.IsNullOrEmpty(toLang))
 47             {
 48                 return toLang;
 49             }
 50             if (string.IsNullOrEmpty(originalText))
 51             {
 52                 return originalText;
 53             }
 54 
 55             return GetTranslation("zh-cn", toLang, originalText);
 56 
 57         }
 58 
 59         /// <summary>
 60         /// 获取翻译结果
 61         /// </summary>
 62         /// <param name="fromLang">需要翻译的语言</param>
 63         /// <param name="toLang">翻译结果的语言</param>
 64         /// <param name="originalText">待翻译文本</param>
 65         /// <returns></returns>
 66         public static string GetTranslation(this string fromLang, string toLang, string originalText)
 67         {
 68             var args = new Dictionary<string, dynamic>
 69             {
 70                 { "client", "t" },
 71                 { "sl", fromLang },
 72                 { "tl", toLang },
 73                 { "dt", "t" },
 74                 { "tk", GetTK(originalText) },
 75                 { "text", HttpUtility.UrlEncode(originalText) }
 76             };
 77 
 78             var result = HttpHelper.GetRequest(_baseUrl, _cookieContainer, args);
 79 
 80             return result.FormattedJson();
 81         }
 82 
 83         /// <summary>
 84         /// 获取TK
 85         /// </summary>
 86         /// <param name="originalText"></param>
 87         /// <returns></returns>
 88         private static string GetTK(string originalText)
 89         {
 90             _chakraContext.GlobalObject.WriteProperty("originalText", originalText);
 91             return _chakraContext.RunScript("getTK(originalText)");
 92         }
 93 
 94         /// <summary>
 95         /// 格式化Json
 96         /// </summary>
 97         /// <param name="jsonStr">Json</param>
 98         /// <returns></returns>
 99         private static string FormattedJson(this string jsonStr)
100         {
101             if (string.IsNullOrEmpty(jsonStr))
102             {
103                 return string.Empty;
104             }
105 
106             var array = JsonConvert.DeserializeObject<JArray>(jsonStr);
107 
108             var result = array[0][0][0].ToString();
109 
110             return result;
111         }
112 
113     }
复制代码


C#发布和调试WebService

 
一.编写并发布WebService服务
1.新建空web应用程序
 
2.右键项目解决方案-添加-新建项-选择web服务
添加完成如下:
3.可以看到实例代码里有这一行注释,请取消注释,因为我们要使用ajax来调用webservice
// [System.Web.Script.Services.ScriptService]

4.实例代码包含一个HelloWorld的方法,仅仅返回一个 Hello Word 。

在下面再写一个带参数的方法:

[WebMethod]
        public int add(int a , int b)
        {
            return a + b;
        }


5.右键项目解决方案-发布-发布方法(选择文件系统)-目标位置(存放webservice代码的路径,随便一个都行但你要记住,后面要用)-发布

发布是否成功可以看vs下的输出栏


6.打开iis(Internet Information Services (IIS)管理器)

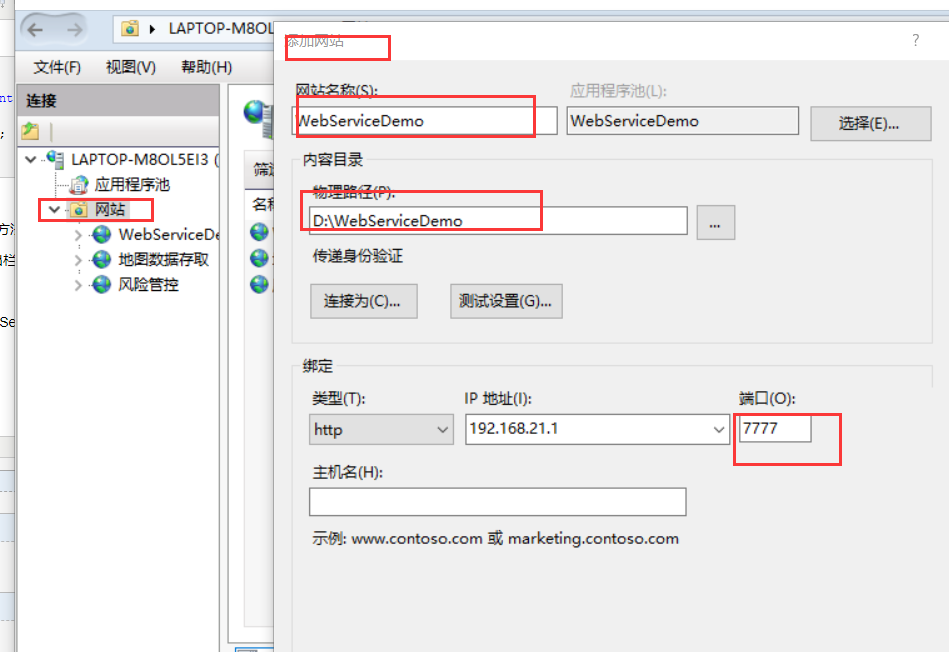
右键网站-添加网站-


物理路径就是发布webService时选择的路径

选择一个未占用的端口号

确定。

7.双击网站下新建的webServiceDemo

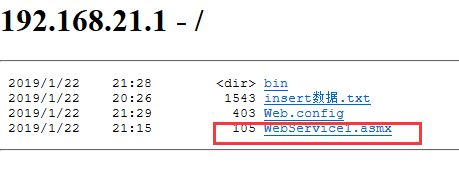
双击目录浏览,启用目录浏览(不做这步会出错的)

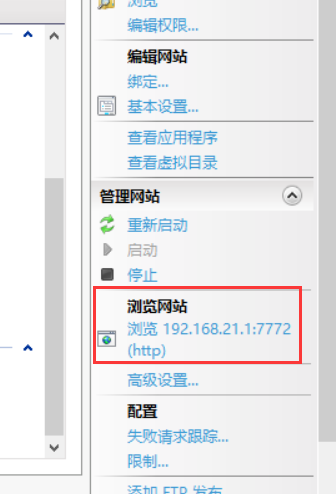
然后点击右侧-浏览网站


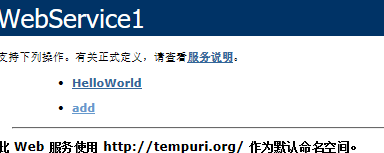
点击文件名

8.然后就可以测试我们写的webService方法了


 9.关于启用目录浏览,可以省去这一步,在操作中也免去了点击目录文件这一步骤。

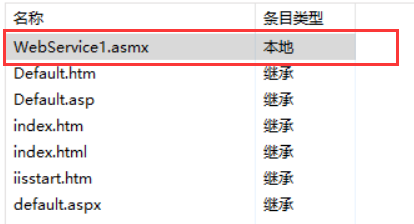
不用启用目录浏览,而添加默认文档:

添加的默认文档就是打开网站显示的首页。

我们将其设置为WebService1.asmx,这样进入网站首页显示的就是我们写的方法。


ajax调用WebService实现数据库操作


 首先说下测试环境和思路:

前端收集数据转换成json格式传输到后端,处理并存入数据库

1.数据库操作:

复制代码
[WebMethod]
        public string InsertPoint(string data)
        {
            //解决跨域问题
            //Context.Response.AddHeader("Access-Control-Allow-Origin", "*");
            string database = "Data Source=.;Initial Catalog=test;Persist Security Info=True;User ID=sa;Password=password1633";
            //string data = HttpContext.Current.Request["data"];
            try
            {

                if (data.Equals("") || data == null)
                {
                    return "data is null";
                }
                else
                {
                    OverlaysPoint opoint = JsonConvert.DeserializeObject<OverlaysPoint>(data);// 将接收的参数data实例化为一个对象(方便操作),注意该类的变量名要和json的key值对应
                    /*foreach (Data_Opoint dtpoint in opoint.overlays)
                    {
                        sql = "insert into Map_Overlays(wf_pictureid,wf_picturename,wf_railid,wf_name,wf_location,wf_createtime,wf_pid,wf_lng,wf_lat) values('" + "123456789" + "','" + opoint.picturename + "','" + opoint.id + "','" + opoint.name + "','" + opoint.location + "','" + opoint.createime + "','" + dtpoint.pid + "','" + dtpoint.lng.ToString() + "','" + dtpoint.lat.ToString() + "')";
                        ExecuteUpdate(sql, database);

                    }*/
                    string[] xyArray = opoint.position.Split(new string[] { "(", ",", ")" }, StringSplitOptions.RemoveEmptyEntries); //处理json字符串
//执行sql语句 string sql = "insert into map_img_points(miid,pointtype,pointid, pointcode, positionx, positiony, pointinfo) values ('地图id', '" + opoint.point_type + "', '" + opoint.point_bm + "','" + opoint.point_code + "','" + xyArray[0] + "','" + xyArray[1] + "', '" + opoint.point_info + "')"; executeUpdate(sql, database); return "success"; } } catch (NullReferenceException e) { return e.StackTrace; } }
复制代码

Data Source :  一个点默认为本地数据库,其他数据库填写相应ip ; 

Initial Catelog:是目标数据库名称

我们接收一个json数据,将其value填入一个实例化的类对象,通过这个类的实例化对象来使用它

OverlaysPoint opoint = JsonConvert.DeserializeObject<OverlaysPoint>(data);

根据json创建的OverPoint类:

复制代码
public class OverlaysPoint
    {
        public string point_type;
        public string point_bm;
        public string point_code;
        public string position;
        public string point_info;
        public string con_bussiness;
        public string con_entity;
        public string con_fields;
        public string showpic;
        public string showtext;
        public string showdata;
        public string create_time;
        public string data_refresh_rate;
    }
复制代码

executeQuery和executeUpdate方法(可重用):

复制代码
//对数据库操作
        //用于查询
        private DataTable executeQuery(string sqlStr, string sqlCon)      
        {
            SqlConnection con = new SqlConnection(@sqlCon);
            con.Open();
            SqlCommand cmd = new SqlCommand();
            cmd.Connection = con;
            cmd.CommandType = CommandType.Text;
            cmd.CommandText = sqlStr;
            DataTable dt = new DataTable();        //实例化数据表
            SqlDataAdapter msda;
            msda = new SqlDataAdapter(cmd);        //实例化适配器
            msda.Fill(dt);                        //保存数据
            con.Close();
            return dt;
        }
        //用于增删改;
        private int executeUpdate(string sqlStr, string sqlCon)      
        {
            SqlConnection con = new SqlConnection(@sqlCon);
            con.Open();
            SqlCommand cmd = new SqlCommand();
            cmd.Connection = con;
            cmd.CommandType = CommandType.Text;
            cmd.CommandText = sqlStr;
            int iud = 0;
            iud = cmd.ExecuteNonQuery();
            con.Close();
            return iud;
        }
复制代码


 要使用JsonConvert需要引入外部依赖包 Newtonsoft.Json.dll 。

右键项目解决方案-添加引用-


 2.ajax调用:

复制代码

var jsonOverlays = JSON.stringify(data.field).replace(/\"/g,"'");// 将json数据的双引号替换为单引号
$.ajax({
                type:"POST",
                contentType: "application/json; charset=utf-8",
                url:"http://192.168.21.1:7777/WebService1.asmx/InsertPoint",
                data: "{\"data\":\"" + jsonOverlays + "\"}",  //这是post请求要传递的参数
                dataType: 'json', //预期返回类型
                success: function(result){    //回调函数
                    layer.msg('ajax调用成功' + result.d);
                    console.log(result.d);
                },
                error: function (data) {
                    //200的响应有可能被认为error, responseText中没有Message部分
                    alert('error');
                },
                complete: function (data) {
                    ; //after success ot error
                }
            });
复制代码

注意:1.双引号替换为单引号  2.构造data的参数 


ps:报错:

No 'Access-Control-Allow-Origin' header is present on the requested resource. Origin 'http://localhost:63342' is therefore not allowed access.

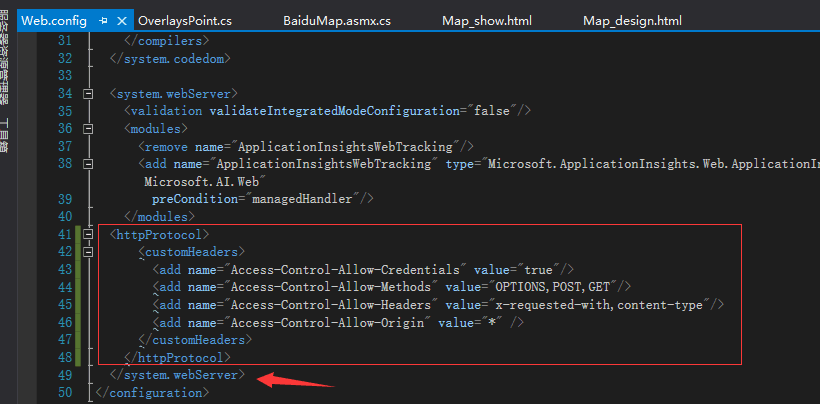
解决跨域问题:


复制代码
<httpProtocol>
        <customHeaders>
            <add name="Access-Control-Allow-Credentials" value="true"/>
            <add name="Access-Control-Allow-Methods" value="OPTIONS,POST,GET"/>
            <add name="Access-Control-Allow-Headers" value="x-requested-with,content-type"/>
            <add name="Access-Control-Allow-Origin" value="*"/>
        </customHeaders>
    </httpProtocol>
复制代码


2019-1-22测试无误:


如果出错,注意查看浏览器端控制台报错(ajax出错)和vs输出窗口(c#方法出错)


C# 实体类转json数据过滤掉字段为null的字段


C# 实体类转json数据过滤掉字段为null的字段

语法如下:

var jsonSetting = new JsonSerializerSettings {NullValueHandling = NullValueHandling.Ignore};

var json = JsonConvert.SerializeObject(data,Formatting.Indented,jsonSetting)

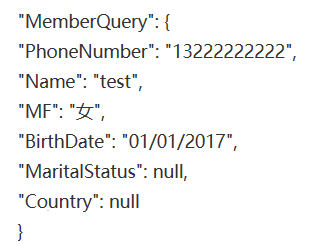
1,null值未处理之前的数据结构:

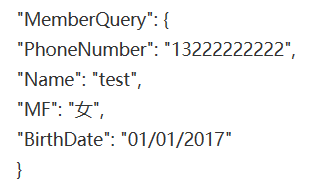
2,null值处理之后的数据结构:

很简单的操作哈!

posted @ 2019-01-23 17:46  ~雨落忧伤~  阅读(156)  评论(0编辑  收藏  举报