

9.项目进阶,构建安全高效企业服务(SpringSecurity)
1.SpringSecurity
介绍#- 简介
- Spring Security是一个专注与为Java应用程序提供身份认证和授权的框架,它的强大之处在于它可以轻松扩展以满足自定义的需求。
- 特征
- 对身份的认证和授权提供全面的、可扩展的支持。
- 防止各种攻击,如会话固定攻击、点击劫持、csrf攻击等。
- 支持与Servelt API、Spring MVC等Web技术集成。
- 原理
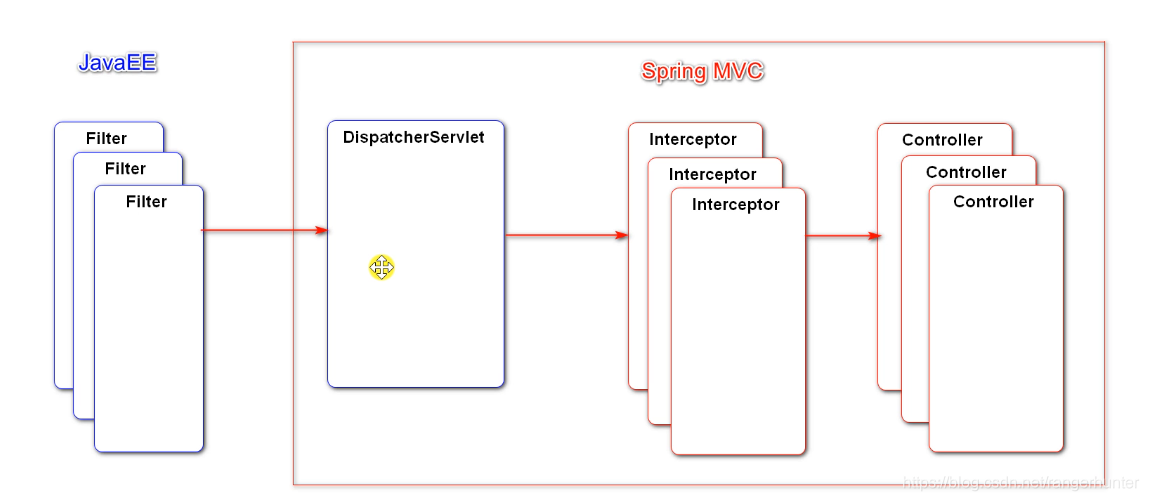
- 底层使用Filter(javaEE标准)进行拦截
- Filter-->DispatchServlet-->Interceptor-->Controller(后三者属于Spring MVC)
- 推荐学习网站:www.spring4all.com
- 看几个核心的Filter源码
- 导包:spring-boot-starter-security
 <dependency>
      <groupId>org.springframework.boot</groupId>
      <artifactId>spring-boot-starter-security</artifactId>
</dependency>
- User实体类实现UserDetails接口,实现接口中各方法(账号、凭证是否可用过期,管理权限)

@Data
public class User implements UserDetails {
    private int id;
    private String username;
    private String password;
    private String salt;
    private String email;
    private int type;
    private int status;
    private String activationCode;
    private String headerUrl;
    private Date createTime;

    // true: 账号未过期.
    @Override
    public boolean isAccountNonExpired() {
        return true;
    }

    // true: 账号未锁定.
    @Override
    public boolean isAccountNonLocked() {
        return true;
    }

    // true: 凭证未过期.
    @Override
    public boolean isCredentialsNonExpired() {
        return true;
    }

    // true: 账号可用.
    @Override
    public boolean isEnabled() {
        return true;
    }

    @Override
    public Collection<? extends GrantedAuthority> getAuthorities() {
        List<GrantedAuthority> list = new ArrayList<>();
        list.add(new GrantedAuthority() {
            @Override
            public String getAuthority() {
                switch (type) {
                    case 1:
                        return "ADMIN";
                    default:
                        return "USER";
                }
            }
        });
        return list;
    }
}
- UserService实现UserDetailsService接口,实现接口方法(security检查用户是否登录时用到该接口)
@Service
public class UserService implements UserDetailsService {
     ...
    @Override
    public UserDetails loadUserByUsername(String username) throws UsernameNotFoundException {
        return this.findUserByName(username);
    }
}
- 新建SecurityConfig类
- 继承WebSecurityConfigurerAdapter
- 配置忽略静态资源的访问
- 实现认证的逻辑,自定义认证规则(AuthenticationManager: 认证的核心接口)
- 登录相关配置
- 退出相关配置
- 委托模式: ProviderManager将认证委托给AuthenticationProvider.
- 实现授权的逻辑
- 授权配置
- 增加Filter,处理验证码
- 记住我
@Configuration
public class SecurityConfig extends WebSecurityConfigurerAdapter {
    @Autowired
    private UserService userService;

    @Override
    public void configure(WebSecurity web) throws Exception {
        // 忽略静态资源的访问
        web.ignoring().antMatchers("/resources/**");
    }
    // AuthenticationManager: 认证的核心接口.
    // AuthenticationManagerBuilder: 用于构建AuthenticationManager对象的工具.
    // ProviderManager: AuthenticationManager接口的默认实现类.

    public void configure(AuthenticationManagerBuilder auth) throws Exception{
        // 内置的认证规则
        // auth.userDetailsService(userService).passwordEncoder(new Pbkdf2PasswordEncoder("12345"));
        // 自定义认证规则
        // AuthenticationProvider: ProviderManager持有一组AuthenticationProvider,每个AuthenticationProvider负责一种认证.
        // 委托模式: ProviderManager将认证委托给AuthenticationProvider.
        auth.authenticationProvider(new AuthenticationProvider() {
            // Authentication: 用于封装认证信息的接口,不同的实现类代表不同类型的认证信息.
            @Override
            public Authentication authenticate(Authentication authentication) throws AuthenticationException {
                String username = authentication.getName();
                String password = (String) authentication.getCredentials();
                User user = userService.findUserByName(username);
                if (user == null) {
                    throw new UsernameNotFoundException("账号不存在!");
                }
                password = CommunityUtil.bCrypt(password);
                if (!user.getPassword().equals(password)) {
                    throw new BadCredentialsException("密码不正确!");
                }
                // principal: 主要信息; credentials: 证书; authorities: 权限;
                return new UsernamePasswordAuthenticationToken(user, user.getPassword(), user.getAuthorities());
            }
            // 当前的AuthenticationProvider支持哪种类型的认证.
            @Override
            public boolean supports(Class<?> aClass) {
                // UsernamePasswordAuthenticationToken: Authentication接口的常用的实现类.
                return UsernamePasswordAuthenticationToken.class.equals(aClass);
            }
        });
    }

    @Override
    protected void configure(HttpSecurity http) throws Exception {
        //登录相关配置
        http.formLogin()
                .loginPage("/loginpage")
                .loginProcessingUrl("/login")
                .successHandler(new AuthenticationSuccessHandler() {//成功回调
                    @Override
                    public void onAuthenticationSuccess(HttpServletRequest request, HttpServletResponse response, Authentication authentication) throws IOException, ServletException {
                        response.sendRedirect(request.getContextPath()+"/index");
                    }
                })
                .failureHandler(new AuthenticationFailureHandler() {//失败回调
                    @Override
                    public void onAuthenticationFailure(HttpServletRequest request, HttpServletResponse response, AuthenticationException e) throws IOException, ServletException {
                        request.setAttribute("error", e.getMessage());
                        request.getRequestDispatcher("/loginpage").forward(request, response);
                    }
                });
        //登出相关配置
        http.logout()
                .logoutUrl("/lohout")
                .logoutSuccessHandler(new LogoutSuccessHandler() {
                    @Override
                    public void onLogoutSuccess(HttpServletRequest request, HttpServletResponse response, Authentication authentication) throws IOException, ServletException {
                        response.sendRedirect(request.getContextPath() + "/index");
                    }
                });
        //授权配置
        http.authorizeHttpRequests()
                .antMatchers("/letter").hasAnyAuthority("USER","ADMIN")
                .antMatchers("admin").hasAnyAuthority("ADMIN")
                .and().exceptionHandling().accessDeniedPage("/denied");
        super.configure(http);
        //增加Filter,处理验证码
        http.addFilterBefore(new Filter() {
            @Override
            public void doFilter(ServletRequest servletRequest, ServletResponse servletResponse, FilterChain filterChain) throws IOException, ServletException {
                HttpServletRequest request= (HttpServletRequest) servletRequest;
                HttpServletResponse response= (HttpServletResponse) servletResponse;
                if(request.getServletPath().equals("/login")){
                    String verifyCode=request.getParameter("verifyCode");
                    if(verifyCode==null||!verifyCode.equalsIgnoreCase("1234")){
                        request.setAttribute("error","验证码错误");
                        request.getRequestDispatcher("/loginpage").forward(request,response);
                        return;
                    }
                }
                //让请求继续向下执行
                filterChain.doFilter(request,response);
            }
        }, UsernamePasswordAuthenticationFilter.class);
        //记住我
        http.rememberMe()
                .tokenRepository(new InMemoryTokenRepositoryImpl())
                .tokenValiditySeconds(3600*24)//记住时间
                .userDetailsService(userService);
    }
}
- 重定向,浏览器访问A,服务器返回302,建议访问B.一般不能带数据给B(Session和Cookie)
- 转发,浏览器访问A,A完成部分请求,存入Request,转发给B完成剩下请求。(有耦合)
- 在HomeController添加认证逻辑
- 认证成功后,结果会通过SecurityContextHolder存入SecurityContext中.
@Controller
public class HomeController {
    @Autowired
    private DiscussPostService discussPostService;
    @Autowired
    private UserService userService;
    @Autowired
    private LikeService likeService;

    @RequestMapping(path = "/index", method = RequestMethod.GET)
    public String getIndexPage(Model model) {
        // 认证成功后,结果会通过SecurityContextHolder存入SecurityContext中.
        Object obj = SecurityContextHolder.getContext().getAuthentication().getPrincipal();
        if (obj instanceof User) {
            model.addAttribute("loginUser", obj);
        }
        return "/index";
    }

    @RequestMapping(path = "/discuss", method = RequestMethod.GET)
    public String getDiscussPage() {
        return "/site/discuss";
    }

    @RequestMapping(path = "/letter", method = RequestMethod.GET)
    public String getLetterPage() {
        return "/site/letter";
    }

    @RequestMapping(path = "/admin", method = RequestMethod.GET)
    public String getAdminPage() {
        return "/site/admin";
    }

    @RequestMapping(path = "/loginpage", method = {RequestMethod.GET, RequestMethod.POST})
    public String getLoginPage() {
        return "/site/login";
    }

    // 拒绝访问时的提示页面
    @RequestMapping(path = "/denied", method = RequestMethod.GET)
    public String getDeniedPage() {
        return "/error/404";
    }
}
2.权限控制
登录检查#
-
之前采用拦截器实现了登录检查,这是简单的权限管理方案,现在将废弃。
- 修改WebMvcConfig,将loginRequiredInterceptor注释。
授权配置#
-
对当前系统内的所有的请求,分配访问权限(普通用户、板主、管理员)。
- 新建SecurityConfig类,配置静态资源都可以访问
- 配置授权操作,以及权限不够时的处理
认证方案#
-
绕过Security认证流程,采用系统原来的认证方案。
- Security底层默认会拦截/logout请求,进行退出处理。覆盖它默认的逻辑,才能执行我们自己的退出代码.
- 这里没有用Security进行认证,需要将结果自己存入SecurityContext
- UserService增加查询用户权限方法
- 在LoginTicketInterceptor,构建用户认证的结果,并存入SecurityContext,以便于Security进行授权.
CSRF配置
-
防止CSRF攻击的基本原理,以及表单、AJAX的相关配置。
- CSRF攻击:某网站盗取你的Cookie(ticket)凭证,模拟你的身份访问服务器。(发生在提交表单的时候)
- Security会在表单里增加一个TOCKEN(自动生成)
- 异步请求Security无法处理,在html文件生成CSRF令牌,(异步不是通过请求体传数据,通过请求头)
- 发送AJAX请求之前,将CSRF令牌设置到请求的消息头中.
Spring Security:认证+授权
认证:判断是否登录,账户是否存在,密码是否正确;
授权 :管理员和普通用户访问不同路径的权限不同。加以配置。
Spring Security作用在SpringMVC之前,多个Filter,作用也类似于SpringMVC的拦截器。如:Filter1检查验证码,Filter2检查账户密码。
(1)废弃之前的拦截器 LoginRequiredInterceptor
在CommunityConstant添加静态变量
  /**
     * 权限:普通用户
     */
    String AUTHORITY_USER = "user";

    /**
     * 权限:管理员
     */
    String AUTHORITY_ADMIN = "admin";

    /**
     * 权限:版主
     */
    String AUTHORITY_MODERATOR = "moderator";
(2)userService增加
public Collection<? extends GrantedAuthority> getAuthorities(int userId){
        User user=this.findUserById(userId);
        List<GrantedAuthority> list=new ArrayList<>();
        list.add(new GrantedAuthority() {
            @Override
            public String getAuthority() {//获取用户权限
                switch (user.getType()) {
                    case 1:
                        return AUTHORITY_ADMIN;
                    case 2:
                        return AUTHORITY_MODERATOR;
                    default:
                        return AUTHORITY_USER;
                }
            }
        });
        return list;
}
(3)SecurityConfig中添加授权配置
    @Override
    protected void configure(HttpSecurity http) throws Exception {
        ...
        //授权
        http.authorizeRequests()
                .antMatchers("/user/setting",
                        "/user/upload",
                        "/discuss/add",
                        "/comment/add/**",
                        "/letter/**",
                        "/notice/**",
                        "/like",
                        "/follow",
                        "/unfollow"
                ).hasAnyAuthority(//不同权限用户
                        AUTHORITY_USER,
                        AUTHORITY_ADMIN,
                        AUTHORITY_MODERATOR
                ).anyRequest().permitAll()//白名单
                .and().csrf().disable();//不开启跨站请求伪造的防护 //无状态可以防攻击
          //CSRF 为了保证不是其他第三方网站访问,要求访问时携带参数名为_csrf 值为 token(token 在服务端产生)的内容,如果token 和服务端的 token 匹配成功,则正常访问。

        //权限不够时的处理
        http.exceptionHandling()
                //当用户请求了一个受保护的资源,但是用户没有通过认证,那么抛出异常,AuthenticationEntryPoint. Commence(..)就会被调用。
                //所以,我们可以通过定义AuthenticationEntryPoint统一处理抛出的异常:commence()
                .authenticationEntryPoint(new AuthenticationEntryPoint() {
                    @Override
                    public void commence(HttpServletRequest request, HttpServletResponse response, AuthenticationException authException) throws IOException, ServletException {
                        String xRequestedWith = request.getHeader("x-requested-with");
                        if ("XMLHttpRequest".equals(xRequestedWith)) {
                            response.setContentType("application/plain;charset=utf-8");
                            PrintWriter writer = response.getWriter();
                            writer.write(CommunityUtil.getJSONString(403, "你还没有登录哦!"));
                        } else {
                            response.sendRedirect(request.getContextPath() + "/login");
                        }
                    }
                })
                .accessDeniedHandler(new AccessDeniedHandler() {
                    @Override
                    public void handle(HttpServletRequest request, HttpServletResponse response, AccessDeniedException accessDeniedException) throws IOException, ServletException {
                        String xRequestedWith = request.getHeader("x-requested-with");
                        if ("XMLHttpRequest".equals(xRequestedWith)) {
                            response.setContentType("application/plain;charset=utf-8");
                            PrintWriter writer = response.getWriter();
                            writer.write(CommunityUtil.getJSONString(403, "你没有访问此功能的权限!"));
                        } else {
                            response.sendRedirect(request.getContextPath() + "/denied");
                        }
                    }
                });
        // Security底层默认会拦截/logout请求,进行退出处理.
        // 覆盖它默认的逻辑,才能执行我们自己的退出代码.
        http.logout().logoutUrl("/securitylogout");
    }
(4)绕过Security认证系统,采用原来的认证方案。修改LoginTicketInterceptor:
@Override //在Action执行前调用
    public boolean preHandle(HttpServletRequest request, HttpServletResponse response, Object handler) throws Exception {
        //从cookie中取出凭证,查看是否过期,未过期可以直接放行,过期需要重新登录
        String ticket= CookieUtil.getValue(request,"ticket");
        if(ticket!=null){
            LoginTicket loginTicket=userService.findLoginTicket(ticket);
            //检查该凭证是否有效:状态是否是登录状态(0),是否超时
            if(loginTicket!=null&&loginTicket.getStatus()==0&&loginTicket.getExpired().after(new Date())){//如果登出了,这里过不去,直接500
                //有效,则在本次请求中持有用户数据
                User user=userService.findUserById(loginTicket.getUserId());
                hostHolder.setUsers(user);//user被持有

                //构建用户认证的结果,并存入SecurityContent,以便于Security进行授权
                Authentication authentication = new UsernamePasswordAuthenticationToken(
                        user, user.getPassword(), userService.getAuthorities(user.getId()));
                SecurityContextHolder.setContext(new SecurityContextImpl(authentication));//认证对象放上下文
            }
        }
        return true;
    }
    //在请求结束时清理用户数据
    @Override//在DispatcherServlet完全处理完请求之后被调用,可用于清理资源
    public void afterCompletion(HttpServletRequest request, HttpServletResponse response, Object handler, Exception ex){
        hostHolder.clear();
        SecurityContextHolder.clearContext();
    }
(5)CSRF配置
security自带有这个功能的实现,对于表单的提交,但是对于异步请求就没有实现。需要自己去实现。
在需要提交异步请求的位置
<meta name="_csrf" th:content="${_csrf.token}">
<meta name="_csrf_header" th:content="${_csrf.headerName}">
在对应的js文件
//发送AJAX请求之前,将SCRF令牌设置到请求的消息头中。
var token = $("meta[name='_csrf']").attr("content");
var header = $("meta[name='_csrf_header']").attr("content");
$(document).ajaxSend(function (e, xhr, options) {
    xhr.setRequestHeader(header, token);
});
防止csrf攻击,表单,AJAX的配置。
一般需要对所有的异步请求都要配,不然就是不安全的,无法通过,也可以不做配置,那么在授权的时候需要.and().csrf().disable();
存在问题:not marked as ignorable (11 known properties: "authorities", "status", "activationCode", "username", "createTime", "type", "id", "email", "headerUrl", "salt", "password"])
redis序列化时多了几个字段,这是因为为了整合springsecurity在User类中实现了UserDetails接口,重写了一些方法。
使用@JsonIgnoreProperties注解,可以在User对象在序列化时忽略这些字段
在User类前添加:
@JsonIgnoreProperties({"enabled","accountNonExpired", "accountNonLocked", "credentialsNonExpired", "authorities"})

3.置顶、加精、删除
功能实现#
-
点击“置顶”、“加精”、“删除”,修改帖子的状态
- 在DiscussPostMapper增加修改方法
- DiscussPostService、DiscussPostController相应增加方法,注意在Es中同步变化
- 要在EventConsumer增加消费删帖事件
- 修改html和js文件
权限管理#
-
版主可以执行“置顶”、“加精”操作。管理员可以执行“删除”操作。
- 在SecurityConfig类下配置,置顶、加精、删除的访问权限。
按钮显示#
-
版主可以看到“置顶”、“加精”按钮。管理员可以看到“删除“按钮。
-
导包:thymeleaf-extras-springsecurity5,thymeleaf对security的支持。
-
(1)引入依赖
<dependency>
     <groupId>org.thymeleaf.extras</groupId>
     <artifactId>thymeleaf-extras-springsecurity5</artifactId>
</dependency>
(2)在discussPostMapper添加方法
int updateType(int id, int type);
int updateStatus(int id, int status);


 <update id="updateType">
      update discuss_post set type = #{type} where id = #{id}
</update>

<update id="updateStatus">
      update discuss_post set status = #{status} where id = #{id}
</update>
(3)在discussPostService中添加方法
public int updateType(int id, int type) {
    return discussPostMapper.updateType(id, type);
}
public int updateStatus(int id, int status) {
    return discussPostMapper.updateStatus(id, status);
}
(4)discussPostController中添加方法
    // 置顶
    @RequestMapping(path = "/top", method = RequestMethod.POST)
    @ResponseBody
    public String setTop(int id) {
        discussPostService.updateType(id, 1);
        // 触发发帖事件
        Event event = new Event();
        event.setTopic(TOPIC_PUBLISH);
        event.setUserId(hostHolder.getUser().getId());
        event.setEntityType(ENTITY_TYPE_POST);
        event.setEntityId(id);
        eventProducer.fireEvent(event);
        return CommunityUtil.getJSONString(0);
    }
    // 加精
    @RequestMapping(path = "/wonderful", method = RequestMethod.POST)
    @ResponseBody
    public String setWonderful(int id) {
        discussPostService.updateStatus(id, 1);
        // 触发发帖事件
        Event event = new Event();
        event.setTopic(TOPIC_PUBLISH);
        event.setUserId(hostHolder.getUser().getId());
        event.setEntityType(ENTITY_TYPE_POST);
        event.setEntityId(id);
        eventProducer.fireEvent(event);
        return CommunityUtil.getJSONString(0);
    }
    // 删除
    @RequestMapping(path = "/delete", method = RequestMethod.POST)
    @ResponseBody
    public String setDelete(int id) {
        discussPostService.updateStatus(id, 2);
        // 触发删帖事件
        Event event = new Event();
        event.setTopic(TOPIC_DELETE);
        event.setUserId(hostHolder.getUser().getId());
        event.setEntityType(ENTITY_TYPE_POST);
        event.setEntityId(id);
        eventProducer.fireEvent(event);
        return CommunityUtil.getJSONString(0);
    }
(5)改写discuss-detail.html
<html lang="en" xmlns:th="http://www.thymeleaf.org" xmlns:sec="http://www.thymeleaf.org/extras/spring-security">

<!-- 标题 -->
<h6 class="mb-4"> <img src="http://static.nowcoder.com/images/img/icons/ico-discuss.png"/>
  <span th:utext="${post.title}">备战春招,面试刷题跟他复习,一个月全搞定!</span>
  <div class="float-right"> <input type="hidden" id="postId" th:value="${post.id}">
    <button type="button" class="btn btn-danger btn-sm" id="topBtn" th:disabled="${post.type==1}" sec:authorize="hasAnyAuthority('moderator')">置顶</button>
    <button type="button" class="btn btn-danger btn-sm" id="wonderfulBtn" th:disabled="${post.status==1}" sec:authorize="hasAnyAuthority('moderator')">加精</button>
    <button type="button" class="btn btn-danger btn-sm" id="deleteBtn" th:disabled="${post.status==2}" sec:authorize="hasAnyAuthority('admin')">删除</button>
  </div>
</h6>
discuss.js中添加:
$(function(){
    $("#topBtn").click(setTop);
    $("#wonderfulBtn").click(setWonderful);
    $("#deleteBtn").click(setDelete);
});

// 置顶
function setTop() {
    $.post(
        CONTEXT_PATH + "/discuss/top",
        {"id":$("#postId").val()},
        function(data) {
            data = $.parseJSON(data);
            if(data.code == 0) {
                $("#topBtn").attr("disabled", "disabled");
            } else {
                alert(data.msg);
            }
        }
    );
}
// 加精
function setWonderful() {
    $.post(
        CONTEXT_PATH + "/discuss/wonderful",
        {"id":$("#postId").val()},
        function(data) {
            data = $.parseJSON(data);
            if(data.code == 0) {
                $("#wonderfulBtn").attr("disabled", "disabled");
            } else {
                alert(data.msg);
            }
        }
    );
}
// 删除
function setDelete() {
    $.post(
        CONTEXT_PATH + "/discuss/delete",
        {"id":$("#postId").val()},
        function(data) {
            data = $.parseJSON(data);
            if(data.code == 0) {
                location.href = CONTEXT_PATH + "/index";
            } else {
                alert(data.msg);
            }
        }
    );
}
(6)SecurityConfig中加路径
         .antMatchers(
                        "/discuss/top",
                        "/discuss/wonderful"
                )
                .hasAnyAuthority(
                        AUTHORITY_MODERATOR
                )
                .antMatchers(
                        "/discuss/delete"
                )
                .hasAnyAuthority(
                        AUTHORITY_ADMIN
                )
存在问题:
(1)【置顶】【加精】【删除】按钮均不显示
后来debug发现,即使我在数据库修改了数据,但是代码跑出来还是普通用户角色,所以按钮不显示。后来把很多都清空重启才ok。
(2)登录后任何操作只能做一次,比如【点赞】、【关注】等,再做后续操作就会【403】
org.springframework.security.authentication.InsufficientAuthenticationException: Full authentication is required to access this resource
思考了一下,感觉是上下文被清了,认证信息也没了,所以在每次重启服务后,第一次请求结束后,就会把认证清了,这样后续无论有什么操作,都必须再登录才行。感觉这个逻辑应该改成登出时候清空认证,所以我是在logout里加上了这个清空。

4.Redis高级数据类型
HyperLogLog#
采用一种基数算法,用于完成独立数据的统计,特点是占用空间小,无论统计多少数据,只占用12K的内存空间,不足的是统计不精确,误差在0.81%。
    //统计20万个重复数据的独立总数。
    @Test
    public void testHyperLogLog(){
        String redisKey = "test:hll:01";
        for (int i = 1; i <= 100000; i++) {
            redisTemplate.opsForHyperLogLog().add(redisKey, i);
        }
        for (int i = 1; i <= 100000; i++) {
            int r = (int)(Math.random() * 100000 + 1);
            redisTemplate.opsForHyperLogLog().add(redisKey, r);
        }
        Long size = redisTemplate.opsForHyperLogLog().size(redisKey);
        System.out.println(size);
    }

    //将3组数据合并,再统计合并后的重复数据的独立总数
    @Test
    public void testHyperLogLogUnion(){
        String redisKey2 = "test:hll:02";
        for (int i = 1; i <= 10000; i++) {
            redisTemplate.opsForHyperLogLog().add(redisKey2, i);
        }
        String redisKey3 = "test:hll:03";
        for (int i = 5001; i <= 15000; i++) {
            redisTemplate.opsForHyperLogLog().add(redisKey3, i);
        }
        String redisKey4 = "test:hll:04";
        for (int i = 10001; i <= 20000; i++) {
            redisTemplate.opsForHyperLogLog().add(redisKey4, i);
        }
        String unionKey = "test:hll:union";
        redisTemplate.opsForHyperLogLog().union(unionKey, redisKey2, redisKey3, redisKey4);
        long size = redisTemplate.opsForHyperLogLog().size(unionKey);
        System.out.println(size);
    }
Bitmap#
不是一种独立的数据结构,实际上是字符串。支持按位存取数据,可以将其看成是byte数组。适合储存大量的连续的布尔值,比如记录签到。
    //统计一组数据的布尔值
    @Test
    public void testBitMap(){
        String redisKey = "test:bm:01";
        //记录
        redisTemplate.opsForValue().setBit(redisKey, 1, true);
        redisTemplate.opsForValue().setBit(redisKey, 4, true);
        redisTemplate.opsForValue().setBit(redisKey, 7, true);
        //查询
        System.out.println(redisTemplate.opsForValue().getBit(redisKey, 0));
        System.out.println(redisTemplate.opsForValue().getBit(redisKey, 1));
        System.out.println(redisTemplate.opsForValue().getBit(redisKey, 2));
        //统计
         Object obj = redisTemplate.execute(new RedisCallback() {
            @Override
            public Object doInRedis(RedisConnection connection) throws DataAccessException {
                return connection.bitCount(redisKey.getBytes());
            }
        });
        System.out.println(obj);
    }

    //统计3组数据的布尔值,并对这3组数据做OR运算
    @Test
    public void testBitMapOperation(){
        String redisKey2 = "test:bm:02";
        redisTemplate.opsForValue().setBit(redisKey2, 0, true);
        redisTemplate.opsForValue().setBit(redisKey2, 1, true);
        redisTemplate.opsForValue().setBit(redisKey2, 2, true);
        String redisKey3 = "test:bm:03";
        redisTemplate.opsForValue().setBit(redisKey3, 2, true);
        redisTemplate.opsForValue().setBit(redisKey3, 3, true);
        redisTemplate.opsForValue().setBit(redisKey3, 4, true);
        String redisKey4 = "test:bm:04";
        redisTemplate.opsForValue().setBit(redisKey3, 4, true);
        redisTemplate.opsForValue().setBit(redisKey3, 5, true);
        redisTemplate.opsForValue().setBit(redisKey3, 6, true);
        String redisKey = "test:bm:or";
        Object obj = redisTemplate.execute(new RedisCallback() {
            @Override
            public Object doInRedis(RedisConnection connection) throws DataAccessException {
                connection.bitOp(RedisStringCommands.BitOperation.OR,
                        redisKey.getBytes(), redisKey2.getBytes(), redisKey3.getBytes(), redisKey4.getBytes());
                return connection.bitCount(redisKey.getBytes());
            }
        });
        System.out.println(obj);
        System.out.println(redisTemplate.opsForValue().getBit(redisKey,0));
        System.out.println(redisTemplate.opsForValue().getBit(redisKey,1));
        System.out.println(redisTemplate.opsForValue().getBit(redisKey,2));
        System.out.println(redisTemplate.opsForValue().getBit(redisKey,3));
        System.out.println(redisTemplate.opsForValue().getBit(redisKey,4));
        System.out.println(redisTemplate.opsForValue().getBit(redisKey,5));
        System.out.println(redisTemplate.opsForValue().getBit(redisKey,6));
    }
5.网站数据统计
UV(Unique Visitor)#
-
独立访客,需通过用户IP排重新统计数据。
-
每次访问都要进行统计。
-
HyperLoglog,性能好,且存储空间小。
DAU(Daily Active User)#
-
日活跃用户,需通过用户ID排重新统计数据。
-
访问过一次,则认为其为活跃。QW
-
Bitmap,性能好、且可以统计精确的结果。
(1)在RedisKey中定义变量
  private static final String PREFIX_UV = "uv";
  private static final String PREFIX_DAU = "dau";

    //单日UV
    public static String getUVKey(String date){
        return PREFIX_UV + SPLIT + date;
    }
    //区间UV
    public static String getUVKey(String startDate, String endDate){
        return PREFIX_UV + SPLIT + startDate + SPLIT + endDate;
    }
    // 单日活跃用户
    public static String getDAUKey(String date) {
        return PREFIX_DAU + SPLIT + date;
    }
    // 区间活跃用户
    public static String getDAUKey(String startDate, String endDate) {
        return PREFIX_DAU + SPLIT + startDate + SPLIT + endDate;
    }
(2)新建DataService类进行统计操作。
@Service
public class DataService {
    @Autowired
    private RedisTemplate redisTemplate;
    private SimpleDateFormat df=new SimpleDateFormat("yyyyMMdd");
    //将指定IP计入UV
    public void recordUV(String ip) {
        String redisKey = RedisKeyUtil.getUVKey(df.format(new Date()));
        redisTemplate.opsForHyperLogLog().add(redisKey, ip);
    }

    // 统计指定日期范围内的UV
    public long calculateUV(Date start,Date end){
        if(start==null||end==null){
            throw new IllegalArgumentException("参数不能为空");
        }
        // 整理该日期范围内的key
        List<String> keyList = new ArrayList<>();
        Calendar calendar = Calendar.getInstance();
        calendar.setTime(start);
        while (!calendar.getTime().after(end)) {//把start到end这段时间都加入keyList
            String key = RedisKeyUtil.getUVKey(df.format(calendar.getTime()));
            keyList.add(key);
            calendar.add(Calendar.DATE, 1);
        }

        // 合并这些数据
        String redisKey = RedisKeyUtil.getUVKey(df.format(start), df.format(end));
        redisTemplate.opsForHyperLogLog().union(redisKey, keyList.toArray());
        // 返回统计的结果
        return redisTemplate.opsForHyperLogLog().size(redisKey);
    }

    // 将指定用户计入DAU
    public void recordDAU(int userId) {
        String redisKey = RedisKeyUtil.getDAUKey(df.format(new Date()));
        redisTemplate.opsForValue().setBit(redisKey, userId, true);
    }
    //统计指定日期范围内的DAU
    public long calculateDAU(Date start, Date end) {
        if (start == null || end == null) {
            throw new IllegalArgumentException("参数不能为空!");
        }
        // 整理该日期范围内的key
        List<byte[]> keyList = new ArrayList<>();
        Calendar calendar = Calendar.getInstance();
        calendar.setTime(start);
        while (!calendar.getTime().after(end)) {
            String key = RedisKeyUtil.getDAUKey(df.format(calendar.getTime()));
            keyList.add(key.getBytes());
            calendar.add(Calendar.DATE, 1);
        }
        // 进行OR运算
        return (long) redisTemplate.execute(new RedisCallback() {//不重复的key
            @Override
            public Object doInRedis(RedisConnection connection) throws DataAccessException {
                String redisKey = RedisKeyUtil.getDAUKey(df.format(start), df.format(end));
                connection.bitOp(RedisStringCommands.BitOperation.OR,
                        redisKey.getBytes(), keyList.toArray(new byte[0][0]));
                return connection.bitCount(redisKey.getBytes());
            }
        });
    }
}
(3)表现层一分为二,首先是何时记录(set)这个值,其次是查看(get),记录在拦截器写。
返回时使用forward转发,表明当前请求仅完成一半,还需另外一个方法继续处理请求。
DataInterceptor
@Component
public class DataInterceptor implements HandlerInterceptor {
    @Autowired
    private DataService dataService;
    @Autowired
    private HostHolder hostHolder;

    @Override
    public boolean preHandle(HttpServletRequest request, HttpServletResponse response, Object handler) throws Exception {
        // 统计UV
        String ip = request.getRemoteHost();
        dataService.recordUV(ip);
        // 统计DAU
        User user = hostHolder.getUser();
        if (user != null) {
            dataService.recordDAU(user.getId());
        }
        return true;
    }
}
DataInterceptor注册在WebMvcConfig中
registry.addInterceptor(dataInterceptor)
         .excludePathPatterns("/**/*.css", "/**/*.js", "/**/*.png", "/**/*.jpg", "/**/*.jpeg");
}
DataController
@Controller
public class DataController {
    @Autowired
    private DataService dataService;

    // 统计页面
    @RequestMapping(path = "/data", method = {RequestMethod.GET, RequestMethod.POST})
    public String getDataPage() {
        return "/site/admin/data";
    }

    // 统计网站UV
    @RequestMapping(path = "/data/uv",method = RequestMethod.POST)
    public String getUV(@DateTimeFormat(pattern = "yyyy-MM-dd") Date start,
                        @DateTimeFormat(pattern = "yyyy-MM-dd") Date end, Model model){
        long uv=dataService.calculateUV(start,end);
        model.addAttribute("uvResult",uv);
        model.addAttribute("uvStartDate", start);
        model.addAttribute("uvEndDate", end);
        return "forward:/data";
    }

    // 统计活跃用户
    @RequestMapping(path = "/data/dau", method = RequestMethod.POST)
    public String getDAU(@DateTimeFormat(pattern = "yyyy-MM-dd") Date start,
                         @DateTimeFormat(pattern = "yyyy-MM-dd") Date end, Model model) {
        long dau = dataService.calculateDAU(start, end);
        model.addAttribute("dauResult", dau);
        model.addAttribute("dauStartDate", start);
        model.addAttribute("dauEndDate", end);
        return "forward:/data";
    }
}
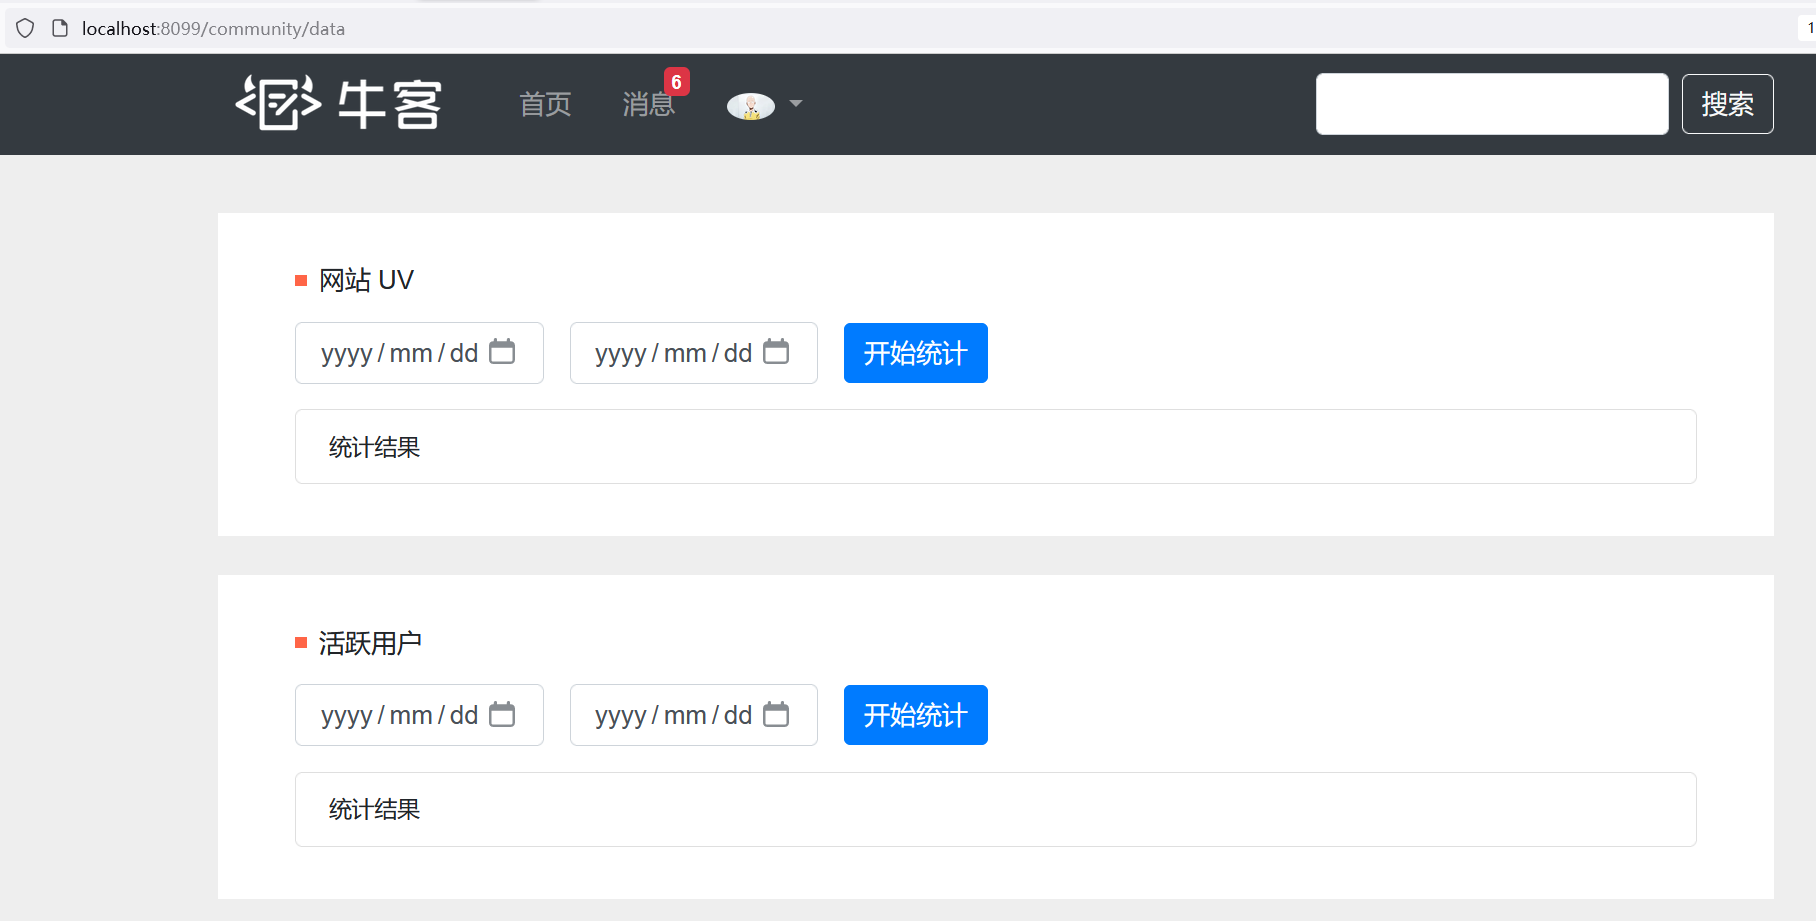
(4)改写date.html
    <!-- 内容 -->
        <div class="main">
            <!-- 网站UV -->
            <div class="container pl-5 pr-5 pt-3 pb-3 mt-3">
                <h6 class="mt-3"><b class="square"></b> 网站 UV</h6>
                <form class="form-inline mt-3" method="post" th:action="@{/data/uv}">
                    <input type="date" class="form-control" required name="start" th:value="${#dates.format(uvStartDate,'yyyy-MM-dd')}"/>
                    <input type="date" class="form-control ml-3" required name="end" th:value="${#dates.format(uvEndDate,'yyyy-MM-dd')}"/>
                    <button type="submit" class="btn btn-primary ml-3">开始统计</button>
                </form>
                <ul class="list-group mt-3 mb-3">
                    <li class="list-group-item d-flex justify-content-between align-items-center">
                        统计结果
                        <span class="badge badge-primary badge-danger font-size-14" th:text="${uvResult}">0</span>
                    </li>
                </ul>
            </div>
            <!-- 活跃用户 -->
            <div class="container pl-5 pr-5 pt-3 pb-3 mt-4">
                <h6 class="mt-3"><b class="square"></b> 活跃用户</h6>
                <form class="form-inline mt-3" method="post" th:action="@{/data/dau}">
                    <input type="date" class="form-control" required name="start" th:value="${#dates.format(dauStartDate,'yyyy-MM-dd')}"/>
                    <input type="date" class="form-control ml-3" required name="end" th:value="${#dates.format(dauEndDate,'yyyy-MM-dd')}"/>
                    <button type="submit" class="btn btn-primary ml-3">开始统计</button>
                </form>
                <ul class="list-group mt-3 mb-3">
                    <li class="list-group-item d-flex justify-content-between align-items-center">
                        统计结果
                        <span class="badge badge-primary badge-danger font-size-14" th:text="${dauResult}">0</span>
                    </li>
                </ul>
            </div>
        </div>
当前用户为管理员时(type=1),直接浏览器输入路径【http://localhost:8099/community/data】,即可转到数据统计页面。
当前用户是其他用户角色,当前页面404。
6.任务执行和调度
JDK线程池:ExecutorService、ScheduledExecutorService
Spring线程池:ThreadPoolTaskExecutor、ThreadPoolTaskScheduler
@RunWith(SpringRunner.class)
@SpringBootTest
@ContextConfiguration(classes = CommunityApplication.class)
public class ThreadPoolTests {
    private static final Logger logger = LoggerFactory.getLogger(ThreadPoolTests.class);
    // JDK普通线程池
    private ExecutorService executorService = Executors.newFixedThreadPool(5);
    // JDK可执行定时任务的线程池
    private ScheduledExecutorService scheduledExecutorService = Executors.newScheduledThreadPool(5);
    // Spring普通线程池
    @Autowired
    private ThreadPoolTaskExecutor taskExecutor;
    // Spring可执行定时任务的线程池
    @Autowired
    private ThreadPoolTaskScheduler taskScheduler;
    @Autowired
    private AlphaService alphaService;

    private void sleep(long m) {
        try {
            Thread.sleep(m);
        } catch (InterruptedException e) {
            e.printStackTrace();
        }
    }

    // 1.JDK普通线程池
    @Test
    public void testExecutorService() {
        Runnable task = new Runnable() {
            @Override
            public void run() {
                logger.debug("Hello ExecutorService");
            }
        };
        for (int i = 0; i < 10; i++) {
            executorService.submit(task);
        }
        sleep(10000);
    }

    // 2.JDK定时任务线程池
    @Test
    public void testScheduledExecutorService() {
        Runnable task = new Runnable() {
            @Override
            public void run() {
                logger.debug("Hello ScheduledExecutorService");
            }
        };
        scheduledExecutorService.scheduleAtFixedRate(task, 10000, 1000, TimeUnit.MILLISECONDS);
        sleep(30000);
    }

    // 3.Spring普通线程池
    @Test
    public void testThreadPoolTaskExecutor() {
        Runnable task = new Runnable() {
            @Override
            public void run() {
                logger.debug("Hello ThreadPoolTaskExecutor");
            }
        };

        for (int i = 0; i < 10; i++) {
            taskExecutor.submit(task);
        }

        sleep(10000);
    }

    // 4.Spring定时任务线程池
    @Test
    public void testThreadPoolTaskScheduler() {
        Runnable task = new Runnable() {
            @Override
            public void run() {
                logger.debug("Hello ThreadPoolTaskScheduler");
            }
        };

        Date startTime = new Date(System.currentTimeMillis() + 10000);
        taskScheduler.scheduleAtFixedRate(task, startTime, 1000);

        sleep(30000);
    }

    // 5.Spring普通线程池(简化)
    @Test
    public void testThreadPoolTaskExecutorSimple() {
        for (int i = 0; i < 10; i++) {
            alphaService.execute1();
        }

        sleep(10000);
    }

    // 6.Spring定时任务线程池(简化)
    @Test
    public void testThreadPoolTaskSchedulerSimple() {
        sleep(30000);
    }
}
7.热帖排行
热榜
-
Spring Quartz(将数据存储到数据库,分布式时可以共享数据)
- 核心调度接口Scheduler
- 定义任务的接口:execute方法
- JobDetail接口:配置Job的名字、组等
- Trigger接口:配置Job什么时候运行、运行频率
- QuartzConfig:配置 -> 数据库 -> 调用
Scheduler可以将Trigger绑定到某一JobDetail中,这样当Trigger触发时,对应的Job就被执行。
一个Job可以对应多个Trigger,但一个Trigger只能对应一个Job。
-
FactoryBean可简化Bean的实例化过程:
-
通过FactoryBean封装Bean的实例化过程
-
将FactoryBean装配到Spring容器里
-
将FactoryBean注入给其他的Bean.
-
该Bean得到的是FactoryBean所管理的对象实例.
-
热榜排行
-
Nowcoder
- log(精华分 + 评论数 * 10 + 点赞数 * 2)+(发布时间 - 牛客纪元)
- 在发帖、点赞、加精时计算帖子分数(存入Redis中)
- 新建PostScoreRefreshJob类进行处理
(1)引入依赖
<dependency>
       <groupId>org.springframework.boot</groupId>
       <artifactId>spring-boot-starter-quartz</artifactId>
</dependency>
(2)在application.properties做配置
# QuartzProperties
spring.quartz.job-store-type=jdbc
spring.quartz.scheduler-name=communityScheduler
spring.quartz.properties.org.quartz.scheduler.instanceId=AUTO
spring.quartz.properties.org.quartz.jobStore.class=org.springframework.scheduling.quartz.LocalDataSourceJobStore(springboot2.5.6后要改成这个)
spring.quartz.properties.org.quartz.jobStore.driverDelegateClass=org.quartz.impl.jdbcjobstore.StdJDBCDelegate
spring.quartz.properties.org.quartz.jobStore.isClustered=true
spring.quartz.properties.org.quartz.threadPool.class=org.quartz.simpl.SimpleThreadPool
spring.quartz.properties.org.quartz.threadPool.threadCount=5
(3)拼接Redis key
private static final String PREFIX_POST = "post";
// 帖子分数
public static String getPostScoreKey() {
    return PREFIX_POST + SPLIT + "score";
}
(4)DiscusspostController. add
// 计算帖子分数
String redisKey = RedisKeyUtil.getPostScoreKey();
redisTemplate.opsForSet().add(redisKey, post.getId());
// 计算帖子分数
String redisKey = RedisKeyUtil.getPostScoreKey(); redisTemplate.opsForSet().add(redisKey, id);
 // 计算帖子分数
String redisKey = RedisKeyUtil.getPostScoreKey();
redisTemplate.opsForSet().add(redisKey, discussPostId);
likeController.like
//只有对帖子点赞才算分数
if(entityType == ENTITY_TYPE_POST) {
      // 计算帖子分数
      String redisKey = RedisKeyUtil.getPostScoreKey();
      redisTemplate.opsForSet().add(redisKey, postId);
}
public class PostScoreRefreshJob implements Job, CommunityConstant {
    private static final Logger logger = LoggerFactory.getLogger(PostScoreRefreshJob.class);
    @Autowired
    private RedisTemplate redisTemplate;
    @Autowired
    private DiscussPostService discussPostService;
    @Autowired
    private LikeService likeService;
    @Autowired
    private ElasticsearchService elasticsearchService;
    // 牛客纪元
    private static final Date epoch;
    static {
        try {
            epoch = new SimpleDateFormat("yyyy-MM-dd HH:mm:ss").parse("2014-08-01 00:00:00");
        } catch (ParseException e) {
            throw new RuntimeException("初始化牛客纪元失败!", e);
        }
    }
    @Override
    public void execute(JobExecutionContext context) throws JobExecutionException {
        String redisKey = RedisKeyUtil.getPostScoreKey();
        BoundSetOperations operations = redisTemplate.boundSetOps(redisKey);

        if (operations.size() == 0) {
            logger.info("[任务取消] 没有需要刷新的帖子!");
            return;
        }

        logger.info("[任务开始] 正在刷新帖子分数: " + operations.size());
        while (operations.size() > 0) {
            this.refresh((Integer) operations.pop());
        }
        logger.info("[任务结束] 帖子分数刷新完毕!");
    }

    private void refresh(int postId) {
        DiscussPost post = discussPostService.findDiscussPostById(postId);

        if (post == null) {
            logger.error("该帖子不存在: id = " + postId);
            return;
        }

        // 是否精华
        boolean wonderful = post.getStatus() == 1;
        // 评论数量
        int commentCount = post.getCommentCount();
        // 点赞数量
        long likeCount = likeService.findEntityLikeCount(ENTITY_TYPE_POST, postId);

        // 计算权重
        double w = (wonderful ? 75 : 0) + commentCount * 10 + likeCount * 2;
        // 分数 = 帖子权重 + 距离天数
        double score = Math.log10(Math.max(w, 1))
                + (post.getCreateTime().getTime() - epoch.getTime()) / (1000 * 3600 * 24);
        // 更新帖子分数
        discussPostService.updateScore(postId, score);
        // 同步搜索数据
        post.setScore(score);
        elasticsearchService.saveDiscussPost(post);
    }
}
(6)配置QuartzConfig文件
// 配置 -> 数据库 -> 调用
@Configuration
public class QuartzConfig {
    // FactoryBean可简化Bean的实例化过程:
    // 1.通过FactoryBean封装Bean的实例化过程.
    // 2.将FactoryBean装配到Spring容器里.
    // 3.将FactoryBean注入给其他的Bean.
    // 4.该Bean得到的是FactoryBean所管理的对象实例.// 刷新帖子分数任务
    @Bean
    public JobDetailFactoryBean postScoreRefreshJobDetail() {
        JobDetailFactoryBean factoryBean = new JobDetailFactoryBean();
        factoryBean.setJobClass(PostScoreRefreshJob.class);
        factoryBean.setName("postScoreRefreshJob");
        factoryBean.setGroup("communityJobGroup");
        factoryBean.setDurability(true);
        factoryBean.setRequestsRecovery(true);
        return factoryBean;
    }

    @Bean
    public SimpleTriggerFactoryBean postScoreRefreshTrigger(JobDetail postScoreRefreshJobDetail) {
        SimpleTriggerFactoryBean factoryBean = new SimpleTriggerFactoryBean();
        factoryBean.setJobDetail(postScoreRefreshJobDetail);
        factoryBean.setName("postScoreRefreshTrigger");
        factoryBean.setGroup("communityTriggerGroup");
        factoryBean.setRepeatInterval(1000 * 60 * 5);
        factoryBean.setJobDataMap(new JobDataMap());
        return factoryBean;
    }
}
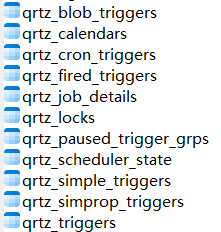
(7)数据库,需要执行
discussPostMapper
// orderMode 0-正常排序 1-帖子分数排序
List<DiscussPost> selectDiscussPosts(int userId, int offset, int limit, int orderMode);
HomeController
  @RequestMapping(path = "/index",method = RequestMethod.GET)
    public String getIndexPage(Model model, Page page, @RequestParam(name = "orderMode", defaultValue = "0") int orderMode){//获取首页
        // 方法调用前,SpringMVC会自动实例化Model和Page,并将Page注入Model.
        // 所以,在thymeleaf中可以直接访问Page对象中的数据.
        page.setRows(discussPostService.findDiscussPostRows(0));//获取总行数,以求总页数等
        //page.setPath("/index");//不同页复用链接
        page.setPath("/index?orderMode=" + orderMode);

        //List<DiscussPost> list=discussPostService.findDiscussPosts(0,page.getOffset(),page.getLimit());
        List<DiscussPost> list = discussPostService
                .findDiscussPosts(0, page.getOffset(), page.getLimit(), orderMode);
        //用于封装帖子列表和相应用户信息
        List<Map<String,Object>> discussPosts=new ArrayList<>();
        if(list!=null){
            for(DiscussPost post:list){
                Map<String,Object> map=new HashMap<>();
                map.put("post",post);
                User user=userService.findUserById(post.getUserId());
                map.put("user",user);

                //新增:点赞数量
                long likeCount=likeService.findEntityLikeCount(ENTITY_TYPE_POST, post.getId());//实体类型: 帖子
                map.put("likeCount",likeCount);

                discussPosts.add(map);
            }
        }
        //组装数据
        model.addAttribute("discussPosts",discussPosts);
        model.addAttribute("orderMode",orderMode);
        return "/index";
    }
index.html
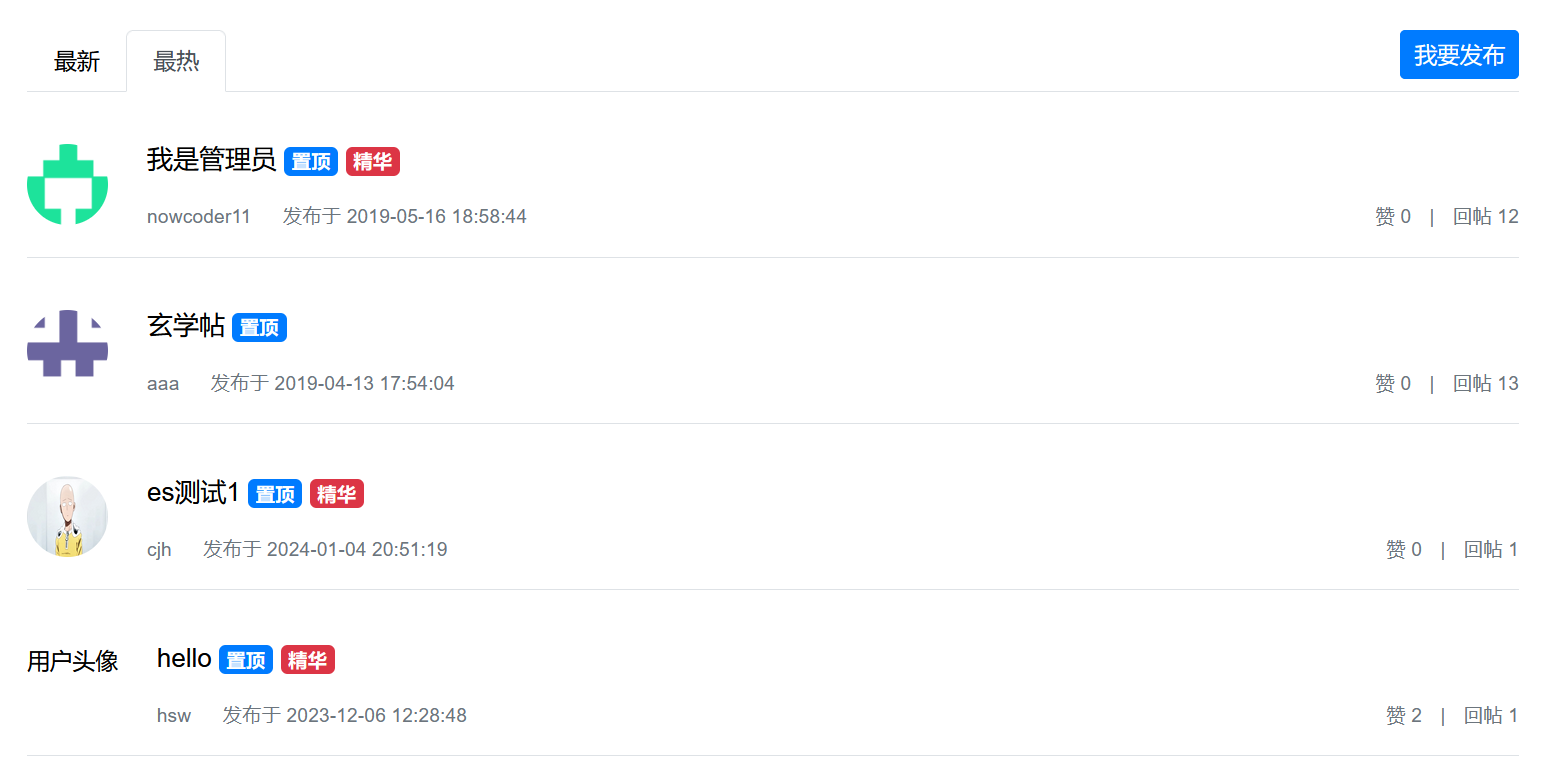
<ul class="nav nav-tabs mb-3">
    <li class="nav-item">
        <a th:class="|nav-link ${orderMode==0?'active':''}|" th:href="@{/index(orderMode=0)}">最新</a>
    </li>
    <li class="nav-item">
        <a th:class="|nav-link ${orderMode==1?'active':''}|" th:href="@{/index(orderMode=1)}">最热</a>
    </li>
</ul>
8.优化网站的性能
(1)引入依赖
<dependency>
       <groupId>com.github.ben-manes.caffeine</groupId>
       <artifactId>caffeine</artifactId>
       <version>2.7.0</version>
</dependency>
(2)application.properties中配置
# caffeine
caffeine.posts.max-size=15
caffeine.posts.expire-seconds=180
(3)优化discussPostService
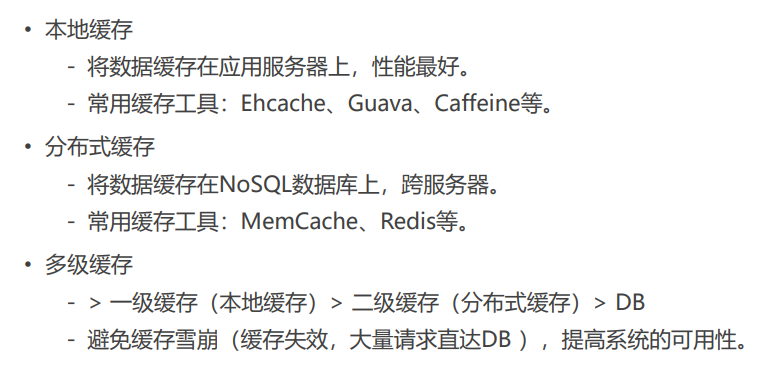
@Slf4j
@Service
public class DiscussPostService {
    @Autowired
    private DiscussPostMapper discussPostMapper;
    @Autowired
    private SensitiveFilter sensitiveFilter;

    @Value("${caffeine.posts.max-size}")
    private int maxSize;
    @Value("${caffeine.posts.expire-seconds}")
    private int expireSeconds;
    // Caffeine核心接口: Cache, LoadingCache, AsyncLoadingCache
    //LoadingCache是同步缓存,一般使用LoadingCache
    //AsyncLoadingCache是异步缓存,支持并发的取数据。
    //帖子列表缓存
    private LoadingCache<String,List<DiscussPost>> postListCache;
    //帖子总数缓存
    private LoadingCache<Integer,Integer> postRowsCache;

    @PostConstruct
    public void init(){
        //初始化帖子列表缓存
        //Caffeine
        postListCache= Caffeine.newBuilder()
                .maximumSize(maxSize)
                .expireAfterWrite(expireSeconds, TimeUnit.SECONDS)
                .build(new CacheLoader<String, List<DiscussPost>>() {
                    @Nullable
                    @Override
                    public List<DiscussPost> load(String key) throws Exception {
                        if (key == null || key.length() == 0) {
                            throw new IllegalArgumentException("参数错误!");
                        }

                        String[] params = key.split(":");
                        if (params == null || params.length != 2) {
                            throw new IllegalArgumentException("参数错误!");
                        }
                        int offset=Integer.parseInt(params[0]);
                        int limit=Integer.parseInt(params[1]);
                        //二级缓存redis->mysql
                        log.debug("load post list from DB");
                        return discussPostMapper.selectDiscussPosts(0,offset,limit,1);
                    }
                });
        //初始化帖子总数缓存
        postRowsCache=Caffeine.newBuilder()
                .maximumSize(maxSize)
                .expireAfterWrite(expireSeconds,TimeUnit.SECONDS)
                .build(new CacheLoader<Integer, Integer>() {
                    @Override
                    public @Nullable Integer load(Integer key) throws Exception {
                        log.debug("load post rows from DB.");
                        return discussPostMapper.selectDiscussPostRows(key);
                    }
                });
    }
    public List<DiscussPost> findDiscussPosts(int userId,int offset,int limit,int orderMode){
        if(userId==0&&orderMode==1){
            return postListCache.get(offset+":"+limit);
        }
        log.debug("load post list from DB");
        return discussPostMapper.selectDiscussPosts(userId,offset,limit,orderMode);
    }

    public int findDiscussPostRows(int userId) {
        if(userId==0){
            return postRowsCache.get(userId);
        }
        return discussPostMapper.selectDiscussPostRows(userId);
    }

    //插入帖子
    public int addDiscussPost(DiscussPost discussPost){
        if(discussPost==null){
            throw new IllegalArgumentException("参数不能为空");
        }
        //转义html标记
        discussPost.setTitle(HtmlUtils.htmlEscape(discussPost.getTitle()));
        discussPost.setContent(HtmlUtils.htmlEscape(discussPost.getContent()));
        //过滤敏感词
        discussPost.setTitle(sensitiveFilter.filter(discussPost.getTitle()));
        discussPost.setContent(sensitiveFilter.filter(discussPost.getContent()));
        return discussPostMapper.insertDiscussPost(discussPost);
    }
    //其他方法不变
}
(4)test
@RunWith(SpringRunner.class)
@SpringBootTest
@ContextConfiguration(classes = CommunityApplication.class)
public class CaffeineTests {
    @Autowired
    private DiscussPostService postService;
    @Test
    public void initDataForTest() {
        for (int i = 0; i < 300000; i++) {
            DiscussPost post = new DiscussPost();
            post.setUserId(111);
            post.setTitle("互联网求职暖春计划");
            post.setContent("今年的就业形势,确实不容乐观。过了个年,仿佛跳水一般,整个讨论区哀鸿遍野!19届真的没人要了吗?!18届被优化真的没有出路了吗?!大家的“哀嚎”与“悲惨遭遇”牵动了每日潜伏于讨论区的牛客小哥哥小姐姐们的心,于是牛客决定:是时候为大家做点什么了!为了帮助大家度过“寒冬”,牛客网特别联合60+家企业,开启互联网求职暖春计划,面向18届&19届,拯救0 offer!");
            post.setCreateTime(new Date());
            post.setScore(Math.random() * 2000);
            postService.addDiscussPost(post);
        }
    }

    @Test
    public void testCache() {
        System.out.println(postService.findDiscussPosts(0, 0, 10, 1));
        System.out.println(postService.findDiscussPosts(0, 0, 10, 1));
        System.out.println(postService.findDiscussPosts(0, 0, 10, 1));
        System.out.println(postService.findDiscussPosts(0, 0, 10, 0));
    }
}
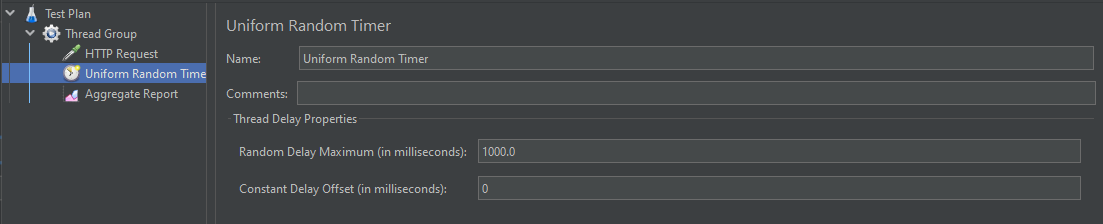
(5)使用压力测试工具Jmeter测试效果如下:
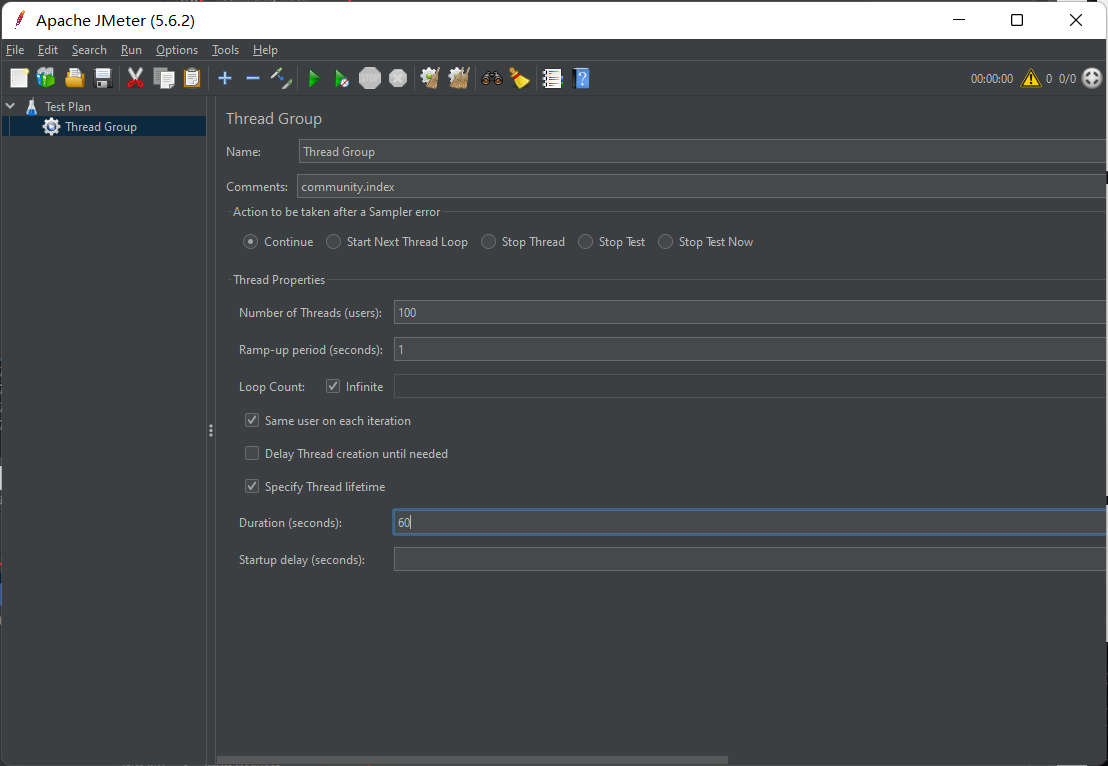
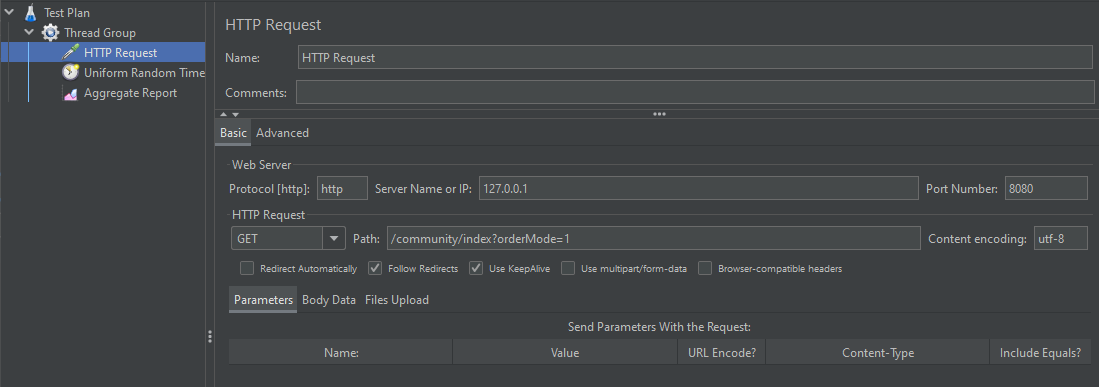
使用缓存每秒吞吐量为50左右。

未用缓存每秒吞吐量为200左右。

我这里只有1000数据,差距不是特别大,但是能看出使用缓存吞吐量更高。
我看别人测得的数据
3万条:用缓存9.5 不用缓存190


【推荐】国内首个AI IDE,深度理解中文开发场景,立即下载体验Trae
【推荐】编程新体验,更懂你的AI,立即体验豆包MarsCode编程助手
【推荐】抖音旗下AI助手豆包,你的智能百科全书,全免费不限次数
【推荐】轻量又高性能的 SSH 工具 IShell:AI 加持,快人一步
· 开源Multi-agent AI智能体框架aevatar.ai,欢迎大家贡献代码
· Manus重磅发布:全球首款通用AI代理技术深度解析与实战指南
· 被坑几百块钱后,我竟然真的恢复了删除的微信聊天记录!
· 没有Manus邀请码?试试免邀请码的MGX或者开源的OpenManus吧
· 园子的第一款AI主题卫衣上架——"HELLO! HOW CAN I ASSIST YOU TODAY