

6.Redis,一站式高性能存储方案
1.Redis入门
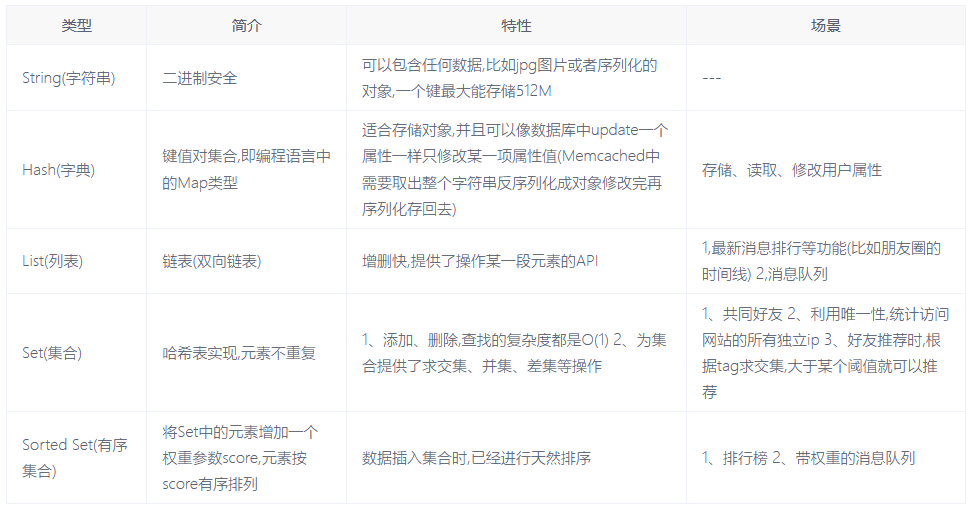
- Redis是一款基于键值对的NoSQL数据库,它的值支持多种数据结构:
字符串(strings)、哈希(hashes)、列表(lists)、集合(sets)、有序集合(sorted sets)等。 - Redis将所有的数据都存放在内存中,所以它的读写性能十分惊人。
同时,Redis还可以将内存中的数据以快照或日志的形式保存到硬盘上,以保证数据的安全性。 - Redis典型的应用场景包括:缓存、排行榜、计数器、社交网络、消息队列等。
reids默认有16个库,从0-15,可以使用select [index]切换
2.SpringBoot整合Redis
- 引入依赖
-
- spring-boot-starter-data-redis
- 配置Redis
-
- 配置数据库参数
- 编写配置类,构造RedisTemplate
- 访问Redis
-
- redisTemplate.opsForValue() String
- redisTemplate.opsForHash() Hash
- redisTemplate.opsForList() List
- redisTemplate.opsForSet() Set
- redisTemplate.opsForZSet() Zset
(1)引入依赖
<dependency>
    <groupId>org.springframework.boot</groupId>
    <artifactId>spring-boot-starter-data-redis</artifactId>
    <version>1.5.7.RELEASE</version>
</dependency>
(2)配置Redis
application.properties

#默认选用几号数据库
spring.redis.database=0
#redis所在ip地址
spring.redis.host=127.0.0.1
#端口号
spring.redis.port=6379
#密码 没有就不写这个选项
spring.redis.password=
#redis连接池选项 本次不需要
spring.redis.jedis.pool.max-active=8
spring.redis.jedis.pool.max-wait=-1
spring.redis.jedis.pool.max-idle=10
spring.redis.jedis.pool.min-idle=2
#超时时间
spring.redis.timeout=6000
(3)RedisTemplate配置
在config包下写一个redis配置类,第三方bean通常通过@Configuration @Bean配置
@Configuration
public class RedisConfig {
    public RedisTemplate<String,Object> redisTemplate(RedisConnectionFactory factory){
        //此处的factory是由LettuceConnectionConfiguration装配的 感兴趣可以去看看源码
        RedisTemplate<String,Object> template=new RedisTemplate<>();
        template.setConnectionFactory(factory);
        //将对象的状态信息转为存储或传输的形式需要序列化。
        //因为要进行网络传输 所以需要将其转化为流
        //redis还是nosql 其数据类型在Java中没有对应 所以将其序列化

        // 设置key的序列化方式
        template.setKeySerializer(RedisSerializer.string());
        // 设置value的序列化方式
        template.setValueSerializer(RedisSerializer.json());
        // 设置hash的key的序列化方式
        template.setHashKeySerializer(RedisSerializer.string());
        // 设置hash的value的序列化方式
        template.setHashValueSerializer(RedisSerializer.json());
        template.afterPropertiesSet();
        return template;
    }
}
在使用Spring-data-redis 中redisTemplate的 increment() 方法对redis中的缓存数据进行自增/自减操作时,出现了一个缓存数据格式错误或超出范围的异常,而数据本身是没有问题的
这是因为redis中默认存储的数据格式是使用JdkSerializationRedisSerializer序列化的,需通过反序列化才能得到正常的字符串然后进行操作,我们需要手动配置StringRedisSerializer来对数据进行序列化,就可以操作了
在redis的spring配置文件中配置
(4)访问Redis进行测试
Redis-server.exe闪退: 很可能是内存不足,可以先关闭几个电脑进程
@RunWith(SpringRunner.class)
@SpringBootTest
@ContextConfiguration(classes = CommunityApplication.class)
public class RedisTests {
    @Autowired
    private RedisTemplate redisTemplate;

    @Test
    public void testStrings() {
        String redisKey = "test:count";
        redisTemplate.opsForValue().set(redisKey, 1);
        System.out.println(redisTemplate.opsForValue().get(redisKey));
        System.out.println(redisTemplate.opsForValue().increment(redisKey));
        System.out.println(redisTemplate.opsForValue().decrement(redisKey));
    }

    @Test
    public void testHashes() {
        String redisKey = "test:user";
        redisTemplate.opsForHash().put(redisKey, "id", 1);
        redisTemplate.opsForHash().put(redisKey, "username", "zhangsan");
        System.out.println(redisTemplate.opsForHash().get(redisKey, "id"));
        System.out.println(redisTemplate.opsForHash().get(redisKey, "username"));
    }

    @Test
    public void testLists() {
        String redisKey = "test:ids";
        redisTemplate.opsForList().leftPush(redisKey, 101);
        redisTemplate.opsForList().leftPush(redisKey, 102);
        redisTemplate.opsForList().leftPush(redisKey, 103);
        System.out.println(redisTemplate.opsForList().size(redisKey));
        System.out.println(redisTemplate.opsForList().index(redisKey, 0));
        System.out.println(redisTemplate.opsForList().range(redisKey, 0, 2));
        System.out.println(redisTemplate.opsForList().leftPop(redisKey));
        System.out.println(redisTemplate.opsForList().leftPop(redisKey));
        System.out.println(redisTemplate.opsForList().leftPop(redisKey));
    }

    @Test
    public void testSets() {
        String redisKey = "test:teachers";
        redisTemplate.opsForSet().add(redisKey, "刘备", "关羽", "张飞", "诸葛亮", "赵云");
        System.out.println(redisTemplate.opsForSet().size(redisKey));
        System.out.println(redisTemplate.opsForSet().pop(redisKey));//随机移除并获取指定集合中一个或多个元素
        System.out.println(redisTemplate.opsForSet().members(redisKey));
    }

    @Test
    public void testSortedSets() {
        String redisKey = "test:students";
        redisTemplate.opsForZSet().add(redisKey, "唐僧", 80);
        redisTemplate.opsForZSet().add(redisKey, "悟空", 90);
        redisTemplate.opsForZSet().add(redisKey, "八戒", 50);
        redisTemplate.opsForZSet().add(redisKey, "沙僧", 70);
        redisTemplate.opsForZSet().add(redisKey, "白龙马", 60);
        System.out.println(redisTemplate.opsForZSet().zCard(redisKey));
        System.out.println(redisTemplate.opsForZSet().score(redisKey, "八戒"));
        System.out.println(redisTemplate.opsForZSet().reverseRank(redisKey, "八戒"));//从高到低排序
        System.out.println(redisTemplate.opsForZSet().reverseRange(redisKey, 0, 2));//从高到低排序
    }


    @Test
    public void testKeys() {
        redisTemplate.delete("test:user");
        System.out.println(redisTemplate.hasKey("test:user"));
        redisTemplate.expire("test:students", 10, TimeUnit.SECONDS);
    }

    // 批量发送命令,节约网络开销.
    @Test
    public void testBoundOperations() {
        String redisKey = "test:count";
        BoundValueOperations operations = redisTemplate.boundValueOps(redisKey);
        operations.increment();
        operations.increment();
        operations.increment();
        operations.increment();
        operations.increment();
        System.out.println(operations.get());
    }


    // 编程式事务(常用),对一段程序进行封装 达到效果
    @Test
    public void testTransaction() {
        Object result = redisTemplate.execute(new SessionCallback() {
            @Override
            public Object execute(RedisOperations redisOperations) throws DataAccessException {
                String redisKey = "text:tx";
                // 启用事务
                redisOperations.multi();
                redisOperations.opsForSet().add(redisKey, "zhangsan");
                redisOperations.opsForSet().add(redisKey, "lisi");
                redisOperations.opsForSet().add(redisKey, "wangwu");
                System.out.println(redisOperations.opsForSet().members(redisKey));
                // 提交事务
                return redisOperations.exec();
            }
        });
        System.out.println(result);
    }
}
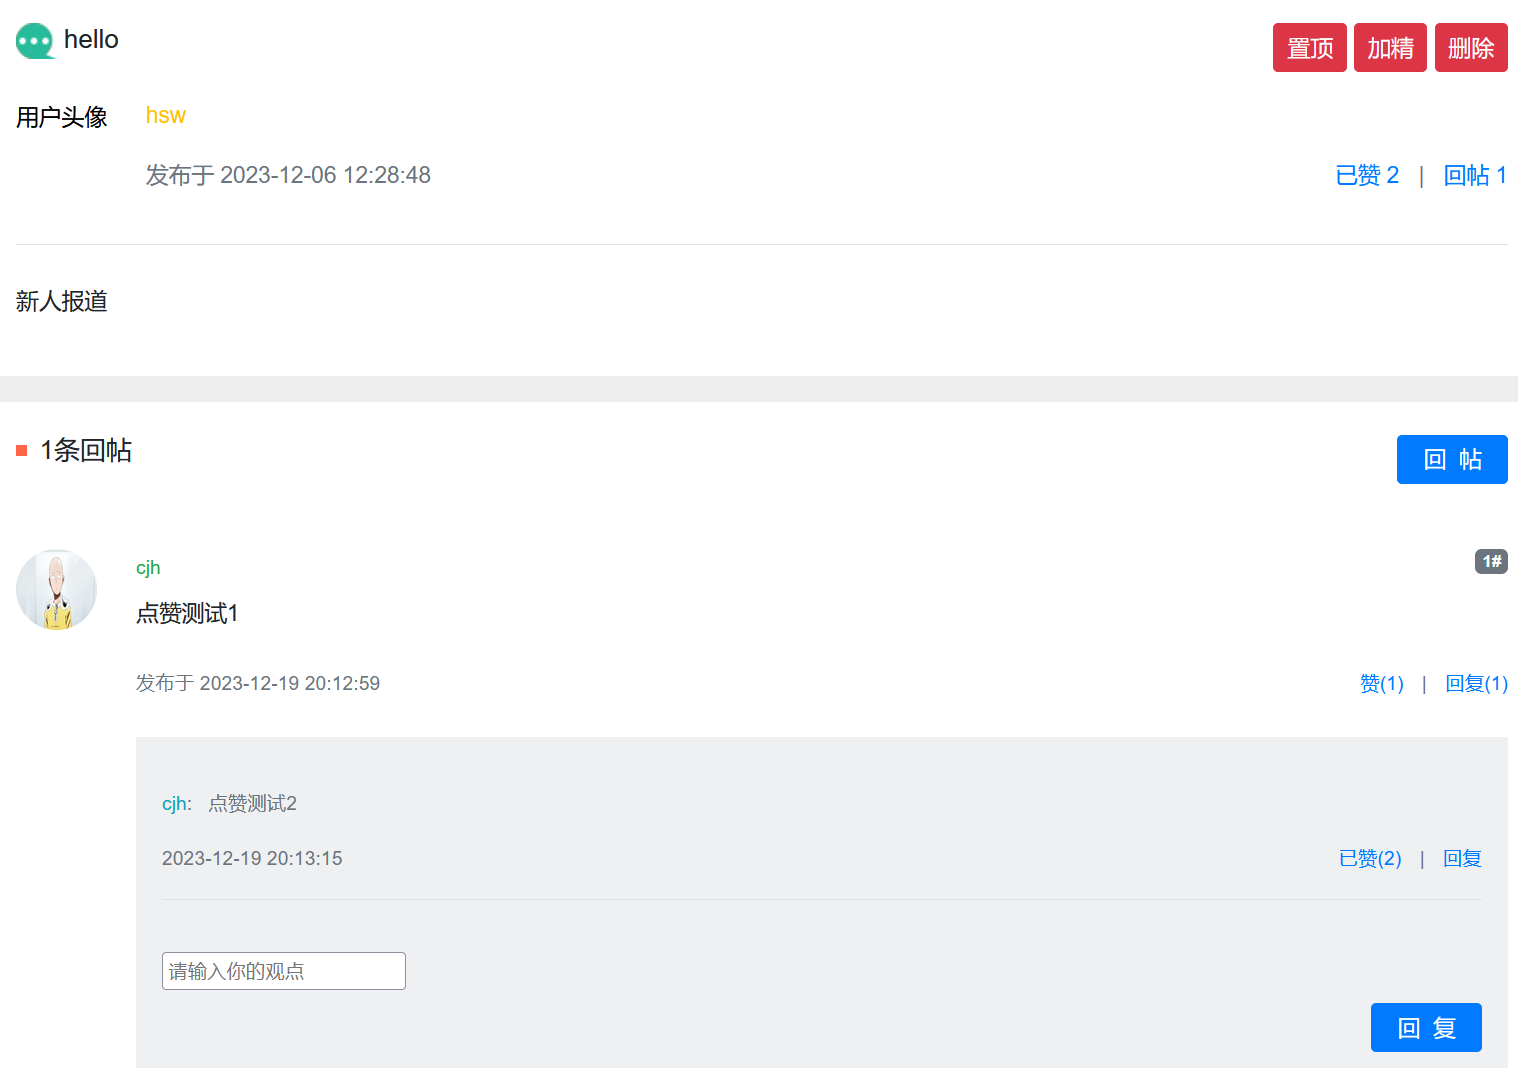
3.点赞
点赞之后需要立即刷新页面,推荐用redis做,速度较快
- 点赞
- 支持对帖子、评论点赞。
- 第1次点赞,第2次取消点赞。
- 首页点赞数量
- 统计帖子的点赞数量。
- 详情页点赞数量
- 统计点赞数量。
- 显示点赞状态。
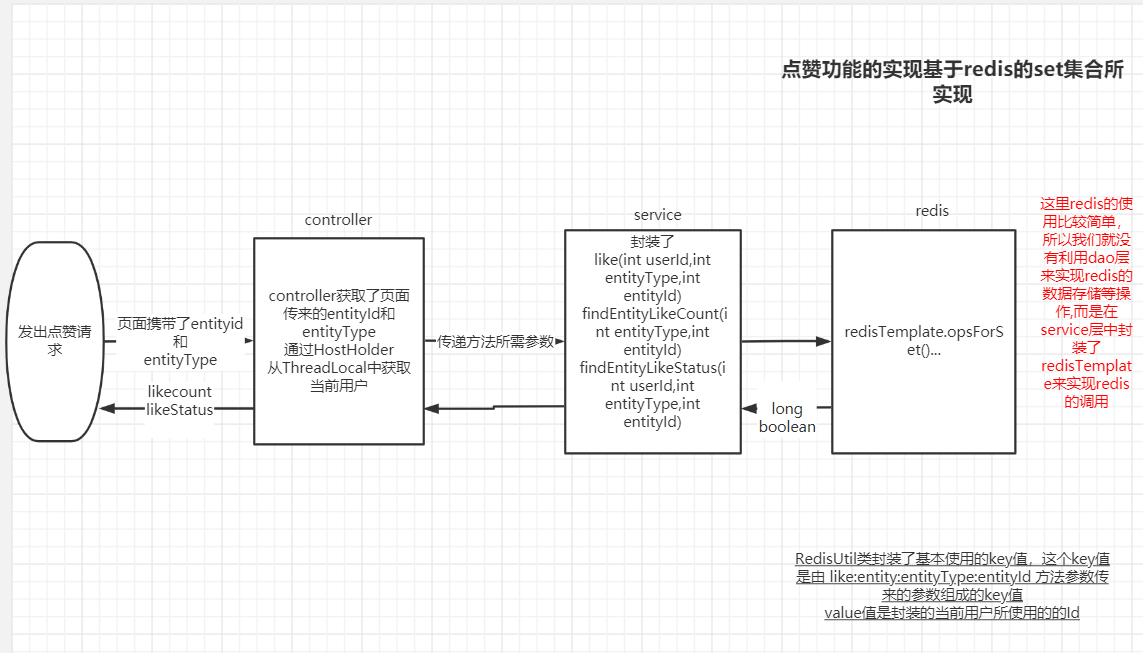
public class RedisKeyUtil {
    //key的分隔符
    private static final String SPLIT = ":";
    //点赞的前缀
    private static final String PREFIX_ENTITY_LIKE = "like:entity";

    // 某个实体的赞
    // like:entity:entityType:entityId -> set(userId)
    public static String getEntityLikeKey(int entityType, int entityId) {
        return PREFIX_ENTITY_LIKE + SPLIT + entityType + SPLIT + entityId;
    }
}
(1)service层:用redis做点赞功能,不写Dao层
点赞状态:第一次点,redis中没有点赞记录(点赞类型、用户),则添加到redis(点赞),如果有记录,则代表已点赞,这次是点反,则从redis中移除(取消点赞)
@Service
public class LikeService {
    @Autowired
    private RedisTemplate redisTemplate;

    //点赞
    public void like(int userId,int entityType,int entityId){ //点赞类型(帖子/评论/回复)//实体id(帖子/评论/回复)
        String entityLikeKey= RedisKeyUtil.getEntityLikeKey(entityType, entityId);
        boolean isMember=redisTemplate.opsForSet().isMember(entityLikeKey,userId);
        if(isMember){//第二次点赞:取消点赞
            redisTemplate.opsForSet().remove(entityLikeKey,userId);
        }else{//第一次点赞:添加点赞
            redisTemplate.opsForSet().add(entityLikeKey,userId);
        }
    }
    // 查询某实体点赞的数量
    public long findEntityLikeCount(int entityType,int entityId){
        String entityLikeKey=RedisKeyUtil.getEntityLikeKey(entityType,entityId);
        return redisTemplate.opsForSet().size(entityLikeKey);
    }

    // 查询某人对某实体的点赞状态
    public int findEntityLikeStatus(int userId,int entityType,int entityId){
        String entityLikeKey=RedisKeyUtil.getEntityLikeKey(entityType,entityId);
        return redisTemplate.opsForSet().isMember(entityLikeKey,userId)?1:0;
    }
}
(2)controller层
@Controller
public class LikeController {
    @Autowired
    private LikeService likeService;
    @Autowired
    private HostHolder hostHolder;

    @RequestMapping(path = "/like",method = RequestMethod.POST)
    @ResponseBody
    public String like(int entityType,int entityId){
        User user=hostHolder.getUser();

        //点赞
        likeService.like(user.getId(),entityType,entityId);
        //数量
        long likeCount=likeService.findEntityLikeCount(entityType,entityId);
        //状态
        int likeStatus=likeService.findEntityLikeStatus(user.getId(),entityType,entityId);

        //返回结果
        Map<String,Object> map=new HashMap<>();
        map.put("likeCount",likeCount);
        map.put("likeStatus",likeStatus);
        return CommunityUtil.getJSONString(0,null,map);
    }
}
(3)前端

- href的东西表名跳转的地方是找js的方法
- onclick里的like方法有三个参数
-
- this用来标志是哪里点的赞(帖子可以点赞,用户评论也可以点赞)
- 1表明是给帖子点赞
- post.id是帖子的id号
- 为了方便显示数据把 赞 这个字用< b >标签包围,11用< i >包围

评论点赞:
2表明给帖子评论点赞,其他同理

评论的回复点赞:
3表示给评论回复点赞

添加discuss.js:
function like(btn,entityType,entityId) {
    $.post(
        CONTEXT_PATH+"/like",
        {"entityType":entityType,"entityId":entityId},
        function (data) {
            /*转化成json*/
            data = $.parseJSON(data);
            if(data.code==0){
                $(btn).children("i").text(data.likeCount);
                $(btn).children("b").text(data.likeStatus==1?"已赞":"赞");
            }else{
                alert(data.msg);
            }
        }
    );
}
(4)controller层:点赞数量显示
首页: 在HomeController中getIndexPage()方法添加代码
//新增:点赞数量
long likeCount=likeService.findEntityLikeCount(ENTITY_TYPE_POST, post.getId());//ENTITY_TYPE_POST:实体类型: 帖子
map.put("likeCount",likeCount);
修改index.html
<div class="text-muted font-size-12">
    <u class="mr-3" th:utext="${map.user.username}">寒江雪</u> 发布于 <b th:text="${#dates.format(map.post.createTime,'yyyy-MM-dd HH:mm:ss')}">2019-04-15 15:32:18</b>
    <ul class="d-inline float-right">
        <li class="d-inline ml-2">赞 <span th:text="${map.likeCount}">11</span></li>
        <li class="d-inline ml-2">|</li>
        <li class="d-inline ml-2">回帖 <span th:text="${map.post.commentCount}">7</span></li>
    </ul>
</div>
帖子详情:在DiscussPostController中修改帖子、帖子的评论、评论的评论的点赞
 @RequestMapping(path = "/detail/{discussPostId}",method = RequestMethod.GET)
    public String getDiscussPost(@PathVariable("discussPostId")int discussPostId, Model model, Page page){
       //查看这个帖子
        DiscussPost discussPost=discussPostService.findDiscussPostById(discussPostId);
        model.addAttribute("post",discussPost);
        User user=userService.findUserById(discussPost.getUserId());
        model.addAttribute("user",user);

        //点赞数量
        long likeCount=likeService.findEntityLikeCount(ENTITY_TYPE_POST,discussPostId);
        model.addAttribute("likeCount",likeCount);
        //点赞状态
        //先判断是否登录
        int likeStatus=hostHolder.getUser()==null?0:likeService.findEntityLikeStatus(hostHolder.getUser().getId(),ENTITY_TYPE_POST,discussPostId);
        model.addAttribute("likeStatus",likeStatus);

        // 评论分页信息
        page.setLimit(5);
        page.setPath("/discuss/detail/" + discussPostId);
        page.setRows(discussPost.getCommentCount());////帖子相关字段中冗余存了一个commentcount

        //帖子的评论:称为--评论 ENTITY_TYPE_POST
        //评论的评论:称为--回复 ENTITY_TYPE_COMMENT
        // 评论列表
        List<Comment> commentList = commentService.findCommentsByEntity(
                ENTITY_TYPE_POST, discussPost.getId(), page.getOffset(), page.getLimit());
        // 评论显示vo列表
        List<Map<String, Object>> commentVoList = new ArrayList<>();
        if(commentList != null){
            for (Comment comment : commentList) {
                //评论Vo :Vo的意思是viewObject的意思 视图对象
                Map<String, Object> commentVo = new HashMap<>();
                commentVo.put("comment", comment);// 评论
                commentVo.put("user", userService.findUserById(comment.getUserId()));// 作者

                // 点赞数量
                likeCount = likeService.findEntityLikeCount(ENTITY_TYPE_COMMENT, comment.getId());
                commentVo.put("likeCount", likeCount);
                // 点赞状态
                likeStatus = hostHolder.getUser() == null ? 0 :
                        likeService.findEntityLikeStatus(hostHolder.getUser().getId(), ENTITY_TYPE_COMMENT, comment.getId());
                commentVo.put("likeStatus", likeStatus);

                // 回复列表
                List<Comment> replyList = commentService.findCommentsByEntity(ENTITY_TYPE_COMMENT, comment.getId(), 0, Integer.MAX_VALUE);

                // 回复显示vo列表
                List<Map<String, Object>> replyVoList = new ArrayList<>();
                if (replyList != null) {
                    for (Comment reply : replyList) {
                        Map<String, Object> replyVo = new HashMap<>();
                        replyVo.put("reply", reply);// 回复
                        replyVo.put("user", userService.findUserById(reply.getUserId()));// 作者
                        User target = reply.getTargetId() == 0 ? null : userService.findUserById(reply.getTargetId()); // 回复目标
                        replyVo.put("target", target);

                        // 点赞数量
                        likeCount = likeService.findEntityLikeCount(ENTITY_TYPE_COMMENT, reply.getId());
                        replyVo.put("likeCount", likeCount);
                        // 点赞状态
                        likeStatus = hostHolder.getUser() == null ? 0 :
                                likeService.findEntityLikeStatus(hostHolder.getUser().getId(), ENTITY_TYPE_COMMENT, reply.getId());
                        replyVo.put("likeStatus", likeStatus);

                        replyVoList.add(replyVo);
                    }
                }
                commentVo.put("replys", replyVoList);

                // 回复数量
                int replyCount = commentService.findCommentCount(ENTITY_TYPE_COMMENT, comment.getId());
                commentVo.put("replyCount", replyCount);
                commentVoList.add(commentVo);
            }
        }
        model.addAttribute("comments", commentVoList);
        return "/site/discuss-detail";
    }
前端前面已经修改过了。

4.我收到的赞
- 重构点赞功能
- 以用户为key,记录点赞数量
- increment(key),decrement(key)
- 开发个人主页
- 以用户为key,查询点赞数量
(1)在RedisKeyUtil中增加方法,得到某个用户的赞
 //某个用户的赞
public static String getUserLikeKey(int userId){
     return PREFIX_ENTITY_LIKE+SPLIT+userId;
}
(2)重构service层like()方法:需要记录点赞数量,在原先点赞的基础上加业务逻辑
在点赞方法中,获取被点赞帖子的用户id,增加点赞数量
public void like(int userId,int entityType,int entityId,int entityUserId){
        String entityLikeKey= RedisKeyUtil.getEntityLikeKey(entityType, entityId);//实体点赞Key
        String userLikeKey=RedisKeyUtil.getUserLikeKey(entityUserId);//用户点赞Key

        boolean isMember=redisTemplate.opsForSet().isMember(entityLikeKey,userId);
        if(isMember){//第二次点赞:取消点赞
            redisTemplate.opsForSet().remove(entityLikeKey,userId);
            //给该帖子的发出者减少点赞数量
            redisTemplate.opsForValue().decrement(userLikeKey);
        }else{//第一次点赞:添加点赞
            redisTemplate.opsForSet().add(entityLikeKey,userId);
            //给该帖子的发出者增加点赞数量
            redisTemplate.opsForValue().increment(userLikeKey);
        }
    }
因为需要两次更新操作,这里改进成:redis编程事务
- 使用MULTI开启一个事务
- 在开启事务的时候,每次操作的命令将会被插入到一个队列中,同时这个命令并不会被真的执行
- EXEC命令进行提交事务
可以将 Redis 中的事务理解为:Redis 事务提供了一种将多个命令请求打包的功能。然后,再按顺序执行打包的所有命令,并且不会被中途打断。

Redis 事务实际开发中使用的非常少,功能比较鸡肋,不要将其和我们平时理解的关系型数据库的事务混淆了。
除了不满足原子性和持久性之外,事务中的每条命令都会与 Redis 服务器进行网络交互,这是比较浪费资源的行为。明明一次批量执行多个命令就可以了,这种操作实在是看不懂。
因此,Redis 事务是不建议在日常开发中使用的。
//点赞
    public void like(int userId,int entityType,int entityId,int entityUserId){
        redisTemplate.execute(new SessionCallback() {
            @Override
            public Object execute(RedisOperations operations) throws DataAccessException {
                String entityLikeKey= RedisKeyUtil.getEntityLikeKey(entityType, entityId);//实体点赞Key
                String userLikeKey=RedisKeyUtil.getUserLikeKey(entityUserId);//用户点赞Key

                boolean isMember=redisTemplate.opsForSet().isMember(entityLikeKey,userId);
                // 启用事务
                operations.multi();
                if(isMember){//第二次点赞:取消点赞
                    operations.opsForSet().remove(entityLikeKey,userId);
                    //给该帖子的发出者减少点赞数量
                    operations.opsForValue().decrement(userLikeKey);
                }else{//第一次点赞:添加点赞
                    operations.opsForSet().add(entityLikeKey,userId);
                    //给该帖子的发出者增加点赞数量
                    operations.opsForValue().increment(userLikeKey);
                }
                return operations.exec();
            }
        });
    }
添加一个查询用户所得赞的业务
//查询某个用户获得的赞
    public int findUserLikeCount(int userId){
        String userLikeKey=RedisKeyUtil.getUserLikeKey(userId);
        Integer count = (Integer) redisTemplate.opsForValue().get(userLikeKey);
        return count == null ? 0 : count.intValue();
    }
修改LikeController中的like()
//增加一个参数: 实体发出者id
likeService.like(user.getId(),entityType,entityId,entityUserId);
discuss-detail页面

修改discuss.js中like方法
function like(btn, entityType, entityId,entityUserId) {
    $.post(
        CONTEXT_PATH + "/like",
        {"entityType":entityType,"entityId":entityId,"entityUserId":entityUserId},
        function(data) {
            data = $.parseJSON(data);
            if(data.code == 0) {
                $(btn).children("i").text(data.likeCount);
                $(btn).children("b").text(data.likeStatus==1?'已赞':"赞");
            } else {
                alert(data.msg);
            }
        }
    );
}
(3)开发个人主页
在UserController加方法
//个人主页
    @RequestMapping(path = "/profile/{userId}",method = RequestMethod.GET)
    public String getProfilePage(@PathVariable("userId")int userId, Model model){
        User user=userService.findUserById(userId);
        if(user==null){
            throw new RuntimeException("该用户不存在");
        }
        model.addAttribute("user",user);
        int likeCount=likeService.findUserLikeCount(userId);
        model.addAttribute("likeCount",likeCount);
        return "/site/profile";
    }
修改index.html中个人主页的链接
<div class="dropdown-menu" aria-labelledby="navbarDropdown">
     <a class="dropdown-item text-center" th:href="@{|/user/profile/${loginUser.id}|}">个人主页</a>
     <a class="dropdown-item text-center" th:href="@{/user/setting}">账号设置</a>
     <a class="dropdown-item text-center" th:href="@{/logout}">退出登录</a>
     <div class="dropdown-divider"></div>
     <span class="dropdown-item text-center text-secondary" th:utext="${loginUser.username}">nowcoder</span>
</div>
用户头像也需要加链接:
<a th:href="@{|/user/profile/@{map.user.id}|}">
     <img th:src="${map.user.headerUrl}" class="mr-4 rounded-circle" alt="用户头像" style="width:50px;height:50px;">
</a>
处理profile.html
5.关注、取消关注
- 需求
- 开发关注、取消关注功能。
- 统计用户的关注数、粉丝数。
- 关注
- 若A关注了B,则A是B的Follower(粉丝),B是A的Followee(目标)。
- 关注的目标可以是用户、帖子、题目等,在实现时将这些目标抽象为实体。
(1)修改RedisKeyUtil
添加两个方法
public class RedisKeyUtil {
    //key的分隔符
    private static final String SPLIT = ":";
    //点赞的前缀
    private static final String PREFIX_ENTITY_LIKE = "like:entity";
    private static final String PREFIX_USER_LIKE = "like:user";
    private static final String PREFIX_FOLLOWEE = "followee";
    private static final String PREFIX_FOLLOWER = "follower";
    // 某个实体的赞
    // like:entity:entityType:entityId -> set(userId)
    public static String getEntityLikeKey(int entityType, int entityId) {
        return PREFIX_ENTITY_LIKE + SPLIT + entityType + SPLIT + entityId;
    }
    //某个用户的赞
    public static String getUserLikeKey(int userId){
        return PREFIX_USER_LIKE+SPLIT+userId;
    }
    // 某个用户关注的实体
    //这里实体的可以为用户,帖子 等
    // followee:userId:entityType -> zset(entityId,now)
    public static String getFolloweeKey(int userId, int entityType) {
        return PREFIX_FOLLOWEE + SPLIT + userId + SPLIT + entityType;
    }
    // 某个实体拥有的粉丝
    // follower:entityType:entityId -> zset(userId,now)
    public static String getFollowerKey(int entityType, int entityId) {
        return PREFIX_FOLLOWER + SPLIT + entityType + SPLIT + entityId;
    }
}
(2)FollowService
@Service
public class FollowService {
    @Autowired
    private RedisTemplate redisTemplate;
    //关注
    public void follow(int userId,int entityType,int entityId){
        redisTemplate.execute(new SessionCallback() {
            @Override
            public Object execute(RedisOperations operations) throws DataAccessException {
                String followeeKey= RedisKeyUtil.getFolloweeKey(userId,entityType);// 某个用户关注的实体
                String followerKey=RedisKeyUtil.getFollowerKey(entityType,entityId);//某个实体的粉丝
                operations.multi();
                operations.opsForZSet().add(followeeKey,entityId,System.currentTimeMillis());//给user加了一个关注的实体entity
                operations.opsForZSet().add(followerKey,userId,System.currentTimeMillis());//给实体加了一个粉丝user
                return operations.exec();
            }
        });
    }
    //取消关注
    public void unfollow(int userId,int entityType,int entityId){
        redisTemplate.execute(new SessionCallback() {
            @Override
            public Object execute(RedisOperations operations) throws DataAccessException {
                String followeeKey= RedisKeyUtil.getFolloweeKey(userId,entityType);// 某个用户关注的实体
                String followerKey=RedisKeyUtil.getFollowerKey(entityType,entityId);//某个实体的粉丝
                operations.multi();
                operations.opsForZSet().remove(followeeKey,entityId);//给user减少了一个关注的实体entity
                operations.opsForZSet().remove(followerKey,userId);//给实体减少了一个粉丝user
                return operations.exec();
            }
        });
    }
    //查询关注的实体的数量
    public long findFolloweeCount(int userId, int entityType) {
        String followeeKey = RedisKeyUtil.getFolloweeKey(userId, entityType);
        return redisTemplate.opsForZSet().zCard(followeeKey);
    }
    //查询实体的粉丝数量
    public long findFollowerCount(int entityType,int entityId) {
        String followerKey = RedisKeyUtil.getFollowerKey(entityType, entityId);
        return redisTemplate.opsForZSet().zCard(followerKey);
    }
    //查询当前用户是否已经关注该实体
    public boolean hasFollowed(int userId,int entityType,int entityId){
        String followeeKey= RedisKeyUtil.getFolloweeKey(userId,entityType);
        return redisTemplate.opsForZSet().score(followeeKey,entityId)!=null;//时间是否存在
    }
}
(3)FollowController
@Controller
public class FollowController {
    @Autowired
    private FollowService followService;
    @Autowired
    private HostHolder hostHolder;

    @RequestMapping(path = "/follow",method = RequestMethod.POST)
    @ResponseBody
    public String follow(int entityType,int entityId){
        User user=hostHolder.getUser();
        followService.follow(user.getId(),entityType,entityId);//用户点关注
        return CommunityUtil.getJSONString(0,"已关注!");
    }
    @RequestMapping(path = "/unfollow",method = RequestMethod.POST)
    @ResponseBody
    public String unfollow(int entityType,int entityId){
        User user=hostHolder.getUser();
        followService.unfollow(user.getId(),entityType,entityId);//用户点关注
        return CommunityUtil.getJSONString(0,"已取消关注!");
    }
}
(4)UserController中加逻辑
//个人主页
    @RequestMapping(path = "/profile/{userId}",method = RequestMethod.GET)
    public String getProfilePage(@PathVariable("userId")int userId, Model model){
        User user=userService.findUserById(userId);
        if(user==null){
            throw new RuntimeException("该用户不存在");
        }
        model.addAttribute("user",user);
        int likeCount=likeService.findUserLikeCount(userId);
        model.addAttribute("likeCount",likeCount);

        // 关注数量
        long followeeCount = followService.findFolloweeCount(userId, ENTITY_TYPE_USER);//关注的实体是人
        model.addAttribute("followeeCount", followeeCount);
        // 粉丝数量
        long followerCount = followService.findFollowerCount(ENTITY_TYPE_USER, userId);
        model.addAttribute("followerCount", followerCount);
        // 是否已关注:当前用户对实体(用户)是否已关注
        boolean hasFollowed = false;
        if (hostHolder.getUser() != null) {
            hasFollowed = followService.hasFollowed(hostHolder.getUser().getId(), ENTITY_TYPE_USER, userId);
        }
        model.addAttribute("hasFollowed", hasFollowed);

        return "/site/profile";
    }
(5)修改profille.html
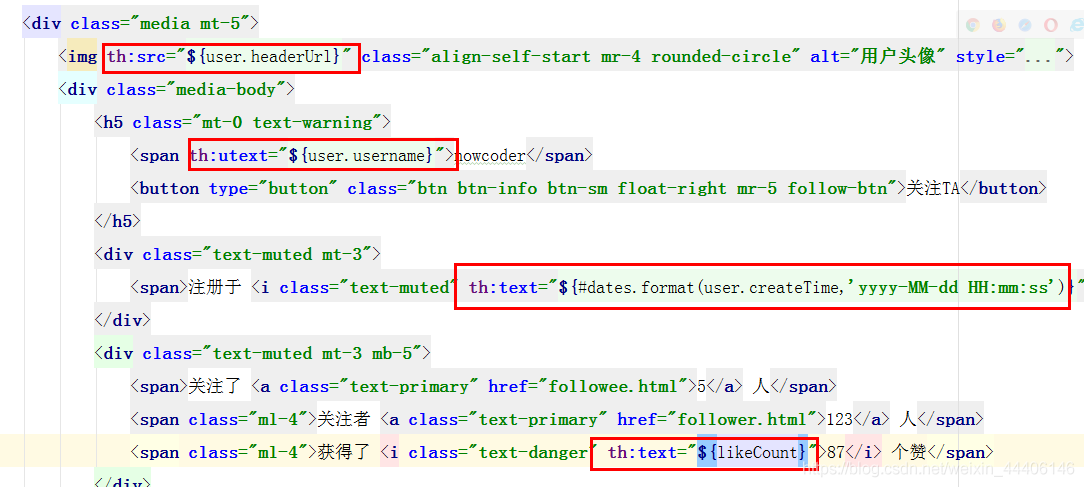
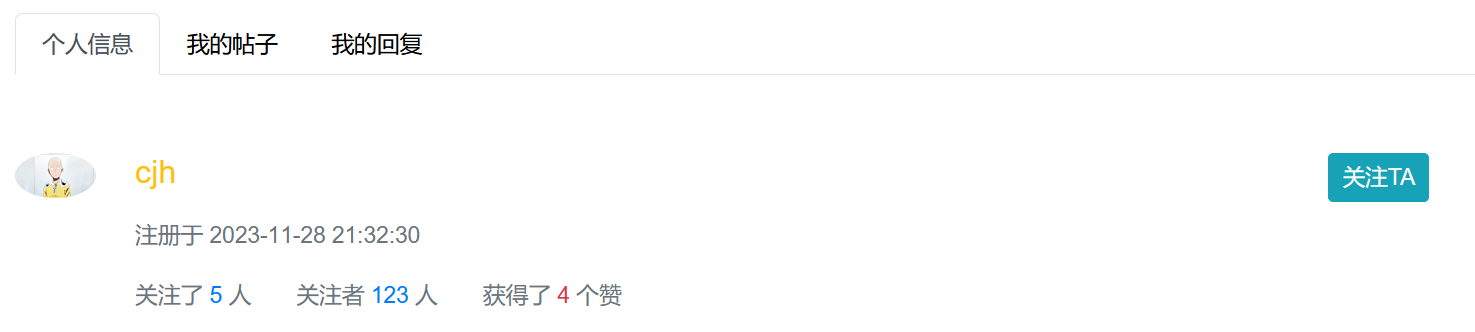
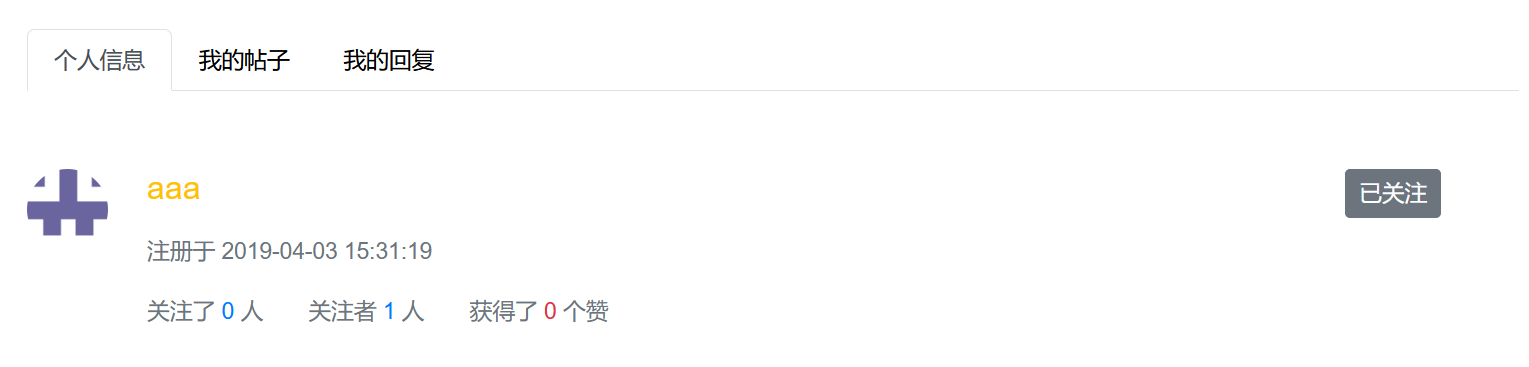
<div class="media mt-5">
    <img th:src="${user.headerUrl}" class="align-self-start mr-4 rounded-circle" alt="用户头像" style="width:50px;">
    <div class="media-body">
        <h5 class="mt-0 text-warning">
            <span th:utext="${user.username}">nowcoder</span>
            <input type="hidden" id="entityId" th:value="${user.id}">
            <button type="button" th:class="|btn ${hasFollowed?'btn-secondary':'btn-info'} btn-sm float-right mr-5 follow-btn|"
                    th:text="${hasFollowed?'已关注':'关注TA'}" th:if="${loginUser!=null&&loginUser.id!=user.id}">关注TA</button>
        </h5>
        <div class="text-muted mt-3">
            <span>注册于 <i class="text-muted" th:text="${#dates.format(user.createTime,'yyyy-MM-dd HH:mm:ss')}">2015-06-12 15:20:12</i></span>
        </div>
        <div class="text-muted mt-3 mb-5">
            <span>关注了 <a class="text-primary" href="followee.html" th:text="${followeeCount}">5</a> 人</span>
            <span class="ml-4">关注者 <a class="text-primary" href="follower.html" th:text="${followerCount}">123</a> 人</span>
            <span class="ml-4">获得了 <i class="text-danger" th:text="${likeCount}">87</i> 个赞</span>
        </div>
    </div>
</div>
修改profile.js
$(function(){
    $(".follow-btn").click(follow);
});
function follow() {
    var btn = this;
    if($(btn).hasClass("btn-info")) {
        // 关注TA
        $.post(
            CONTEXT_PATH + "/follow",
            {"entityType":3,"entityId":$(btn).prev().val()},
            function(data) {
                data = $.parseJSON(data);
                if(data.code == 0) {
                    window.location.reload();
                } else {
                    alert(data.msg);
                }
            }
        );
        // $(btn).text("已关注").removeClass("btn-info").addClass("btn-secondary");
    } else {
        // 取消关注
        $.post(
            CONTEXT_PATH + "/unfollow",
            {"entityType":3,"entityId":$(btn).prev().val()},
            function(data) {
                data = $.parseJSON(data);
                if(data.code == 0) {
                    window.location.reload();
                } else {
                    alert(data.msg);
                }
            }
        );
        //$(btn).text("关注TA").removeClass("btn-secondary").addClass("btn-info");
    }
}
进入首页
点击用户头像,进入用户个人主页,点击【关注TA】
aaa用户的【关注者加1】
6.关注列表、粉丝列表
- 业务层
- 查询某个用户关注的人,支持分页。【关注了x人】
- 查询某个用户的粉丝,支持分页。【关注者x人】
- 表现层
- 处理“查询关注的人”、“查询粉丝”请求。
- 编写“查询关注的人”、“查询粉丝”模板。
(1)FollowService添加方法
    //查询某用户关注的人 //分页
    public List<Map<String,Object>> findFollowees(int userId,int offset,int limit){
        String followeeKey=RedisKeyUtil.getFolloweeKey(userId,ENTITY_TYPE_USER);
        Set<Integer> targetIds=redisTemplate.opsForZSet().reverseRange(followeeKey,offset,offset+limit-1);//从高到低
        if(targetIds==null){
            return null;
        }
        List<Map<String,Object>> list=new ArrayList<>();
        for(Integer targetId:targetIds){
            Map<String,Object> map=new HashMap<>();
            User user = userService.findUserById(targetId);
            map.put("user", user);
            Double score = redisTemplate.opsForZSet().score(followeeKey, targetId);
            map.put("followTime", new Date(score.longValue()));
            list.add(map);
        }
        return list;
    }


    //查询某用户的粉丝
    public List<Map<String,Object>> findFollowers(int userId,int offset,int limit){
        String followerKey=RedisKeyUtil.getFollowerKey(ENTITY_TYPE_USER,userId);
        Set<Integer> targetIds=redisTemplate.opsForZSet().reverseRange(followerKey, offset, offset + limit - 1);
        if (targetIds == null) {
            return null;
        }
        List<Map<String, Object>> list = new ArrayList<>();
        for (Integer targetId : targetIds) {
            Map<String, Object> map = new HashMap<>();
            User user = userService.findUserById(targetId);
            map.put("user", user);
            Double score = redisTemplate.opsForZSet().score(followerKey, targetId);
            map.put("followTime", new Date(score.longValue()));
            list.add(map);
        }
        return list;
    }
(2)FollowController
    //找关注的人
    @RequestMapping(path = "/followees/{userId}",method = RequestMethod.GET)
    public String getFollowees(@PathVariable("userId")int userId, Page page, Model model){
        User user = userService.findUserById(userId);
        if (user == null) {
            throw new RuntimeException("该用户不存在!");
        }
        model.addAttribute("user", user);
        page.setLimit(5);
        page.setPath("/followees/" + userId);
        page.setRows((int) followService.findFolloweeCount(userId, ENTITY_TYPE_USER));
        //关注的人列表
        List<Map<String, Object>> userList = followService.findFollowees(userId, page.getOffset(), page.getLimit());
        if (userList != null) {
            for (Map<String, Object> map : userList) {
                User u = (User) map.get("user");
                map.put("hasFollowed", hasFollowed(u.getId()));//是否已关注
            }
        }
        model.addAttribute("users", userList);
        return "/site/followee";
    }

    //找粉丝
    @RequestMapping(path = "/followers/{userId}",method = RequestMethod.GET)
    public String getFollowers(@PathVariable("userId") int userId, Page page, Model model){
        User user=userService.findUserById(userId);
        if(user==null){
            throw new RuntimeException("该用户不存在!");
        }
        model.addAttribute("user",user);
        page.setLimit(5);
        page.setPath("/followers/" + userId);
        page.setRows((int) followService.findFollowerCount(ENTITY_TYPE_USER, userId));
        //粉丝列表(某userId用户的粉丝)
        List<Map<String,Object>> userList=followService.findFollowers(userId,page.getOffset(),page.getLimit());
        if (userList != null) {
            for (Map<String, Object> map : userList) {
                User u = (User) map.get("user");
                map.put("hasFollowed", hasFollowed(u.getId()));
            }
        }
        model.addAttribute("users",userList);
        return "/site/follower";
    }

    private boolean hasFollowed(int userId){//当前用户有没有关注userId用户
        if(hostHolder.getUser()==null){
            return false;
        }
        return followService.hasFollowed(hostHolder.getUser().getId(),ENTITY_TYPE_USER,userId);
    }
(3)修改profile.html
<div class="text-muted mt-3 mb-5">
      <span>关注了 <a class="text-primary" th:href="@{|/followees/${user.id}|}" th:text="${followeeCount}">5</a> 人</span>
      <span class="ml-4">关注者 <a class="text-primary" th:href="@{|/followers/${user.id}|}" th:text="${followerCount}">123</a> 人</span>
      <span class="ml-4">获得了 <i class="text-danger" th:text="${likeCount}">87</i> 个赞</span>
</div>
(4)增加follower.html、followee.html
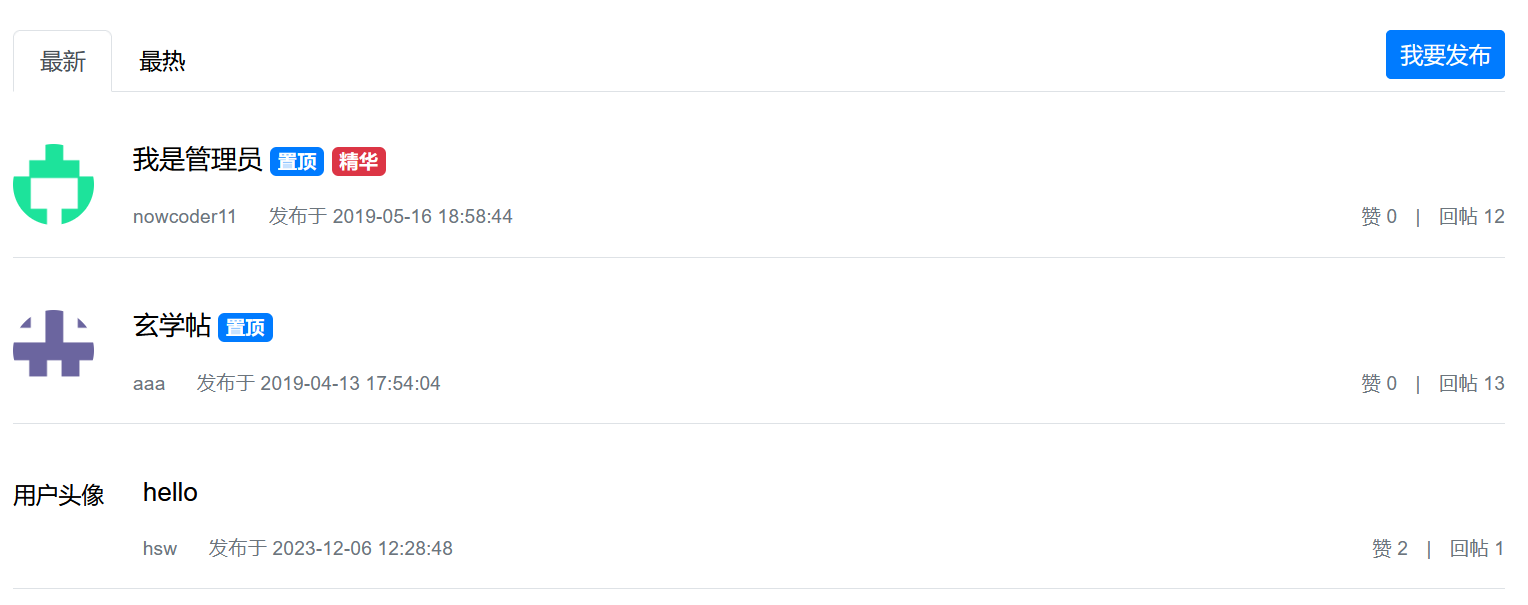
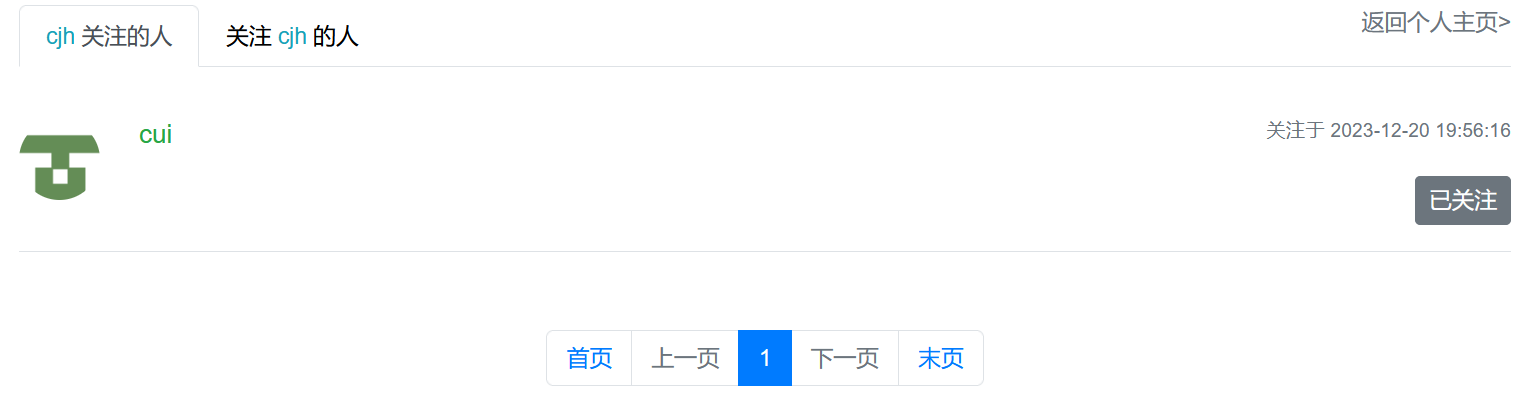
<!-- 内容 --> <div class="main"> <div class="container"> <div class="position-relative"> <!-- 选项 --> <ul class="nav nav-tabs mb-3"> <li class="nav-item"> <a class="nav-link position-relative active" th:href="@{|/followees/${user.id}|}"> <i class="text-info" th:utext="${user.username}">Nowcoder</i> 关注的人 </a> </li> <li class="nav-item"> <a class="nav-link position-relative" th:href="@{|/followers/${user.id}|}"> 关注 <i class="text-info" th:utext="${user.username}">Nowcoder</i> 的人 </a> </li> </ul> <a th:href="@{|/user/profile/${user.id}|}" class="text-muted position-absolute rt-0">返回个人主页></a> </div> <!-- 关注列表 --> <ul class="list-unstyled"> <li class="media pb-3 pt-3 mb-3 border-bottom position-relative" th:each="map:${users}"> <a th:href="@{|/user/profile/${map.user.id}|}"> <img th:src="${map.user.headerUrl}" class="mr-4 rounded-circle user-header" alt="用户头像" > </a> <div class="media-body"> <h6 class="mt-0 mb-3"> <span class="text-success" th:utext="${map.user.username}">落基山脉下的闲人</span> <span class="float-right text-muted font-size-12"> 关注于 <i th:text="${#dates.format(map.followTime,'yyyy-MM-dd HH:mm:ss')}">2019-04-28 14:13:25</i> </span> </h6> <div> <input type="hidden" id="entityId" th:value="${map.user.id}"> <button type="button" th:class="|btn ${map.hasFollowed?'btn-secondary':'btn-info'} btn-sm float-right follow-btn|" th:if="${loginUser!=null && loginUser.id!=map.user.id}" th:text="${map.hasFollowed?'已关注':'关注TA'}">关注TA</button> </div> </div> </li> </ul> <!-- 分页 --> <nav class="mt-5" th:replace="index::pagination"> <ul class="pagination justify-content-center"> <li class="page-item"><a class="page-link" href="#">首页</a></li> <li class="page-item disabled"><a class="page-link" href="#">上一页</a></li> <li class="page-item active"><a class="page-link" href="#">1</a></li> <li class="page-item"><a class="page-link" href="#">2</a></li> <li class="page-item"><a class="page-link" href="#">3</a></li> <li class="page-item"><a class="page-link" href="#">4</a></li> <li class="page-item"><a class="page-link" href="#">5</a></li> <li class="page-item"><a class="page-link" href="#">下一页</a></li> <li class="page-item"><a class="page-link" href="#">末页</a></li> </ul> </nav> </div> </div>
<!-- 内容 --> <div class="main"> <div class="container"> <div class="position-relative"> <!-- 选项 --> <ul class="nav nav-tabs mb-3"> <li class="nav-item"> <a class="nav-link position-relative" th:href="@{|/followees/${user.id}|}"> <i class="text-info" th:utext="${user.username}">Nowcoder</i> 关注的人 </a> </li> <li class="nav-item"> <a class="nav-link position-relative active" th:href="@{|/followers/${user.id}|}"> 关注 <i class="text-info" th:utext="${user.username}">Nowcoder</i> 的人 </a> </li> </ul> <a th:href="@{|/user/profile/${user.id}|}" class="text-muted position-absolute rt-0">返回个人主页></a> </div> <!-- 粉丝列表 --> <ul class="list-unstyled"> <li class="media pb-3 pt-3 mb-3 border-bottom position-relative" th:each="map:${users}"> <a th:href="@{|/user/profile/${map.user.id}|}"> <img th:src="${map.user.headerUrl}" class="mr-4 rounded-circle user-header" alt="用户头像" > </a> <div class="media-body"> <h6 class="mt-0 mb-3"> <span class="text-success" th:utext="${map.user.username}">落基山脉下的闲人</span> <span class="float-right text-muted font-size-12"> 关注于 <i th:text="${#dates.format(map.followTime,'yyyy-MM-dd HH:mm:ss')}">2019-04-28 14:13:25</i> </span> </h6> <div> <input type="hidden" id="entityId" th:value="${map.user.id}"> <button type="button" th:class="|btn ${map.hasFollowed?'btn-secondary':'btn-info'} btn-sm float-right follow-btn|" th:if="${loginUser!=null && loginUser.id!=map.user.id}" th:text="${map.hasFollowed?'已关注':'关注TA'}">关注TA</button> </div> </div> </li> </ul> <!-- 分页 --> <nav class="mt-5" th:replace="index::pagination"> <ul class="pagination justify-content-center"> <li class="page-item"><a class="page-link" href="#">首页</a></li> <li class="page-item disabled"><a class="page-link" href="#">上一页</a></li> <li class="page-item active"><a class="page-link" href="#">1</a></li> <li class="page-item"><a class="page-link" href="#">2</a></li> <li class="page-item"><a class="page-link" href="#">3</a></li> <li class="page-item"><a class="page-link" href="#">4</a></li> <li class="page-item"><a class="page-link" href="#">5</a></li> <li class="page-item"><a class="page-link" href="#">下一页</a></li> <li class="page-item"><a class="page-link" href="#">末页</a></li> </ul> </nav> </div> </div>
7.优化登录模块
-
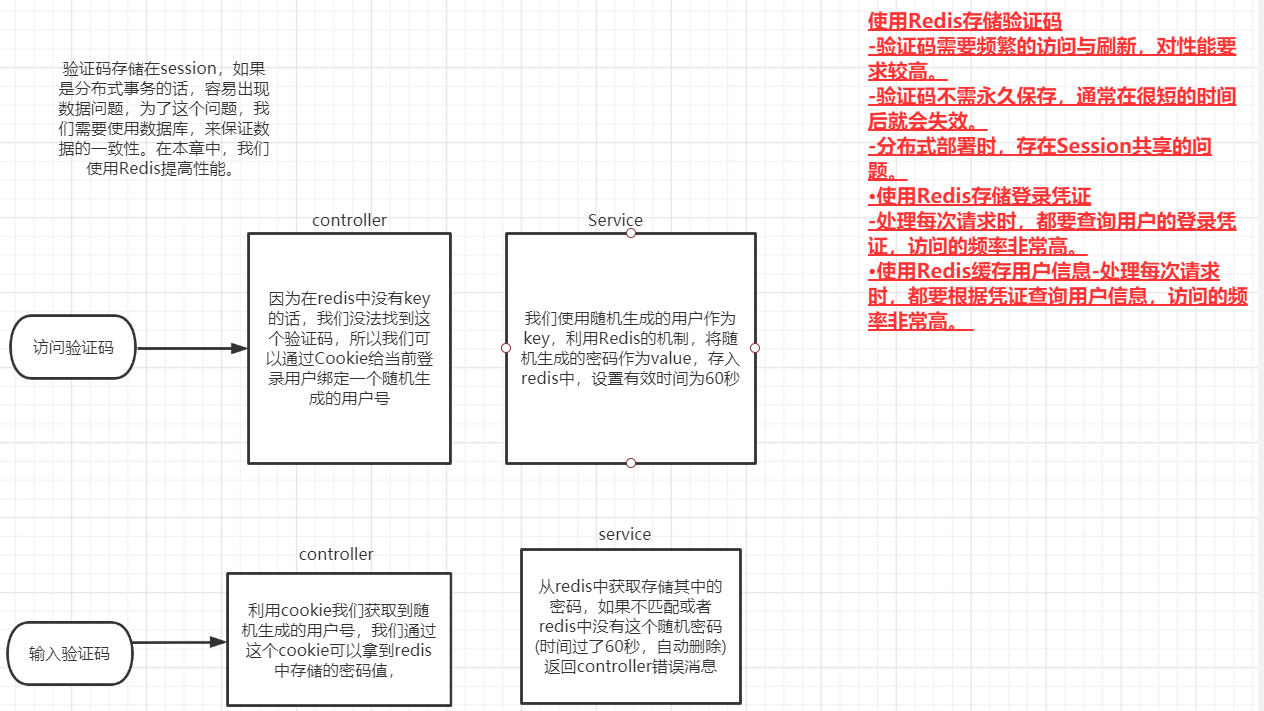
使用Redis存储验证码
- 验证码需要频繁的访问与刷新,对性能要求较高。
- 验证码不需永久保存,通常在很短的时间后就会失效。
- 分布式部署时,存在Session共享的问题。
-
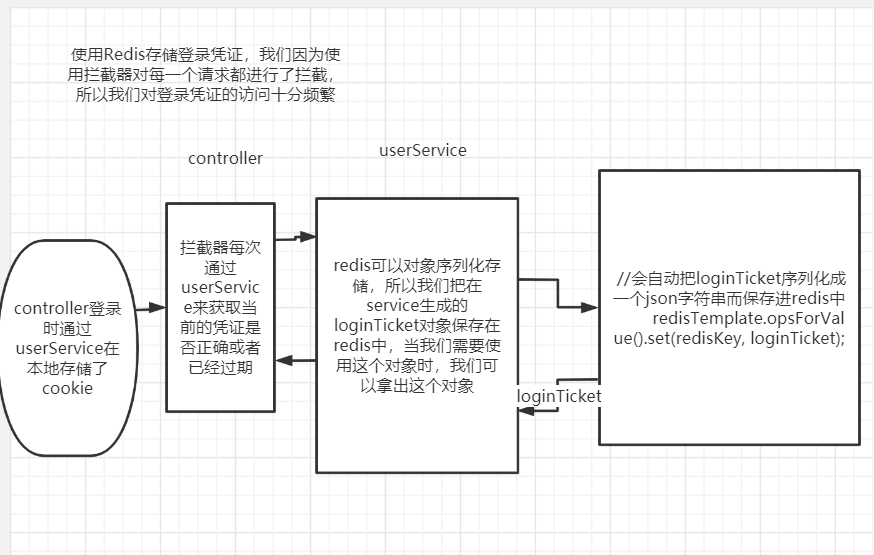
使用Redis存储登录凭证
- 处理每次请求时,都要查询用户的登录凭证,访问的频率非常高。
-
使用Redis缓存用户信息
- 处理每次请求时,都要根据凭证查询用户信息,访问的频率非常高。
使用Redis存储验证码
(1)修改RedisKeyUtil,新增验证码对应的Key
public class RedisKeyUtil {
    ...//点赞的前缀private static final String PREFIX_KAPTCHA = "kaptcha";
    private static final String PREFIX_TICKET = "ticket";
    private static final String PREFIX_USER = "user";
    ...//登录验证码
    public static String getKaptchaKey(String owner) {
        return PREFIX_KAPTCHA + SPLIT + owner;
    }
    //登录凭证
    public static String getTicketKey(String ticket) {
        return PREFIX_TICKET + SPLIT + ticket;
    }
    //用户
    public static String getUserKey(int userId) {
        return PREFIX_USER + SPLIT + userId;
    }
}
(2)优化验证码功能,以凭证为key,把验证码存入Redis
从redis中获取验证码,首先当客户端获取验证码时,先随机生成一个值,这个值作为是客户的登录凭证,我们将这个凭证设置时间为60秒,到时间自动删除。
修改LoginController中getKaptcha()方法
@RequestMapping(path = "/kaptcha",method = RequestMethod.GET)
    public void getKaptcha(HttpServletResponse response, HttpSession session){
        //生成验证码
        String text=kaptchaProducer.createText();
        BufferedImage image=kaptchaProducer.createImage(text);

        //验证码存入session
        //session.setAttribute("kaptcha",text);
        //存入redis
        String kaptchaOwner= CommunityUtil.generateUUID();//标识是谁在登陆
        Cookie cookie=new Cookie("kaptchaOwner",kaptchaOwner);
        cookie.setMaxAge(60);
        cookie.setPath(contextPath);
        response.addCookie(cookie);
        String rediskey= RedisKeyUtil.getKaptchaKey(kaptchaOwner);
        redisTemplate.opsForValue().set(rediskey,text,60, TimeUnit.SECONDS);

        //将图片输出给浏览器
        try {
            OutputStream os= response.getOutputStream();
            ImageIO.write(image,"png",os);
        } catch (IOException e) {
            logger.error("响应验证码失败:"+e.getMessage());
        }
    }
修改login()方法,从Cookie中获取凭证,验证验证码
@RequestMapping(path = "/login",method = RequestMethod.POST)
    public String login(String username,String password,String code,boolean rememberme,
                        Model model,/*HttpSession session*/@CookieValue("kaptchaOwner")String kaptchaOwner,HttpServletResponse response){
        //检查验证码
        //从session取
        //String kaptcha=(String)session.getAttribute("kaptcha");
        //从redis中取
        String kaptcha=null;
        if(StringUtils.isNotBlank(kaptchaOwner)){
            String redisKey=RedisKeyUtil.getKaptchaKey(kaptchaOwner);
            kaptcha= (String) redisTemplate.opsForValue().get(redisKey);
        }
        ...
}
使用Redis存储登录凭证
登录凭证有就在redis取,没有就在数据库取
(1) 修改RedisKeyUtil,新增ticket对应的Key
(2) 原有的Dao层LoginTicketMapper可以不用了(加注解@Deprecated表示不推荐使用),用redis存登录凭证
@Mapper
@Deprecated
public interface LoginTicketMapper {...}
(3)修改存储登录凭证的逻辑
    //5.登录逻辑
    public Map<String,Object> login(String username,String password,int expiredSeconds){
        ...
        //生成登陆凭证
        LoginTicket loginTicket=new LoginTicket();
        loginTicket.setUserId(user.getId());
        loginTicket.setTicket(CommunityUtil.generateUUID());//凭证
        loginTicket.setStatus(0);
        loginTicket.setExpired(new Date(System.currentTimeMillis()+expiredSeconds*1000));
        //loginTicketMapper.insertLoginTicket(loginTicket);
        //登录凭证存入redis
        String ticketKey= RedisKeyUtil.getTicketKey(loginTicket.getTicket());
        redisTemplate.opsForValue().set(ticketKey,loginTicket);
        map.put("ticket",loginTicket.getTicket());
        return map;
    }

    //登录退出
    public void logout(String ticket){
        loginTicketMapper.updateStatus(ticket,1);//修改该凭证的登陆状态
        //修改该凭证的登陆状态
        String ticketKey= RedisKeyUtil.getTicketKey(ticket);
        LoginTicket loginTicket=(LoginTicket) redisTemplate.opsForValue().get(ticketKey);
        loginTicket.setStatus(1);//修改状态
        redisTemplate.opsForValue().set(ticketKey,loginTicket);
    }

    //找到该登录凭证信息
    public LoginTicket findLoginTicket(String ticket){
        //return loginTicketMapper.selectByTicket(ticket);
        String ticketKey= RedisKeyUtil.getTicketKey(ticket);
        LoginTicket loginTicket=(LoginTicket) redisTemplate.opsForValue().get(ticketKey);
        return loginTicket;
    }
使用Redis缓存用户信息
查询用户的时候先从Redis中取,没有先从数据库中取然后存到redis中。用户状态变化时直接删除Redis中的数据。
(1)RedisKeyUtil中增加user的key
(2)在userSerVice中封装三个方法
    //在redis缓存用户信息
    // 1.优先从缓存中取值
    private User getCache(int userId) {
        String redisKey = RedisKeyUtil.getUserKey(userId);
        return (User) redisTemplate.opsForValue().get(redisKey);
    }

    // 2.取不到时初始化缓存数据
    private User initCache(int userId) {
        User user = userMapper.selectById(userId);
        String redisKey = RedisKeyUtil.getUserKey(userId);
        redisTemplate.opsForValue().set(redisKey, user, 3600, TimeUnit.SECONDS);
        return user;
    }

    // 3.数据变更时清除缓存数据
    private void clearCache(int userId) {
        String redisKey = RedisKeyUtil.getUserKey(userId);
        redisTemplate.delete(redisKey);
    }
(3)涉及到User查询(userMapper)的地方换成调用redis的这三个方法
    public User findUserById(int id){
        User user=getCache(id);
        if(user==null){
            user=initCache(id);//缓存里没有则去数据库取
        }
        return user;
        //return userMapper.selectById(id);
    }

    //账户设置:更新用户URL(上传头像后)
    public int updateHeader(int userId,String headerUrl){
        int rows=userMapper.updateHeader(userId,headerUrl);
        clearCache(userId);//用户变更直接删除缓存
        return rows;
        //return userMapper.updateHeader(userId,headerUrl);
    }
