5.开发社区核心功能
1.过滤敏感词
帖子发布之前,需要经过敏感词过滤步骤,这里需要编写一个敏感词过滤器
前缀树:
名称:Trie、字典树、查找树
特点:查找效率高,消耗内存大
应用:字符串检索、词频统计、字符串排序
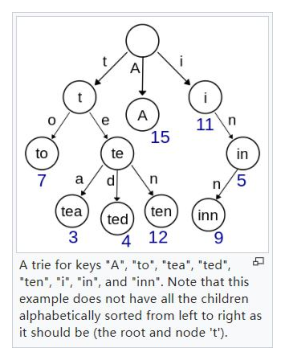
(1)定义前缀树
为方便处理,定义一个敏感词文件,resources目录下新建一个sensitive-words.txt文件

在util包下SensitiveFilter类中定义了内部类前缀树(因为不会被外界访问)
@Component
public class SensitiveFilter {
    private class TrieNode{
        private boolean isKeywordEnd=false;//关键词结束标识
        //子节点:key是下级字符,value是下级节点
        private Map<Character,TrieNode> subNodes=new HashMap<>();
        //添加子节点
        public void addSubNode(Character c,TrieNode node){
            subNodes.put(c,node);
        }
        //获取子节点
        public TrieNode getSubNode(Character c){
            return subNodes.get(c);
        }

        //是否是结束位置
        public boolean isKeywordEnd(){
            return isKeywordEnd;
        }
        public void setKeywordEnd(boolean keywordEnd){
            isKeywordEnd=keywordEnd;
        }
    }
}
(2)敏感词过滤器
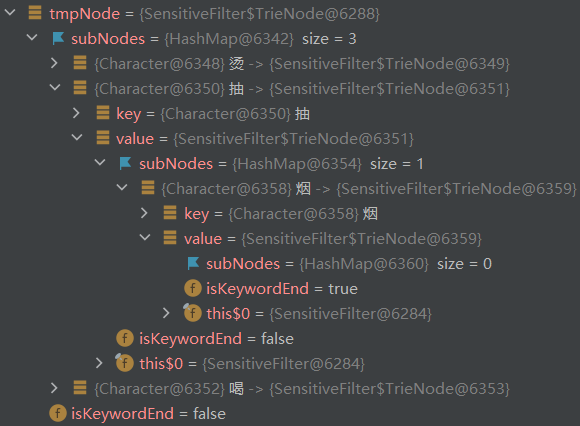
1)根据敏感词,初始化前缀树
@PostConstruct//在spring容器初始化的时候执行该方法,在项目中主要是在Servlet初始化之前加载一些缓存数据等。
    public void init(){
        try(InputStream is=this.getClass().getClassLoader().getResourceAsStream("sensitive-words.txt");
        BufferedReader reader=new BufferedReader(new InputStreamReader(is));){
            String keyword;
            while((keyword=reader.readLine())!=null){
                this.addkeyword(keyword);
            }
        }catch (IOException e){
            logger.error("加载敏感词文件失败!"+e.getMessage());
        }

    }

    //将一个敏感词添加到前缀树中
    private void addkeyword(String keyword){
        TrieNode tmpNode=root;
        for(int i=0;i<keyword.length();i++){
            char c=keyword.charAt(i);
            TrieNode subNode=tmpNode.getSubNode(c);
            if(subNode==null){
                //初始化子节点
                subNode=new TrieNode();
                tmpNode.addSubNode(c,subNode);
            }
            //指向子节点进入下一循环
            tmpNode=subNode;
            //设置结束标识
            if(i==keyword.length()-1){
                tmpNode.setKeywordEnd(true);
            }
        }
    }
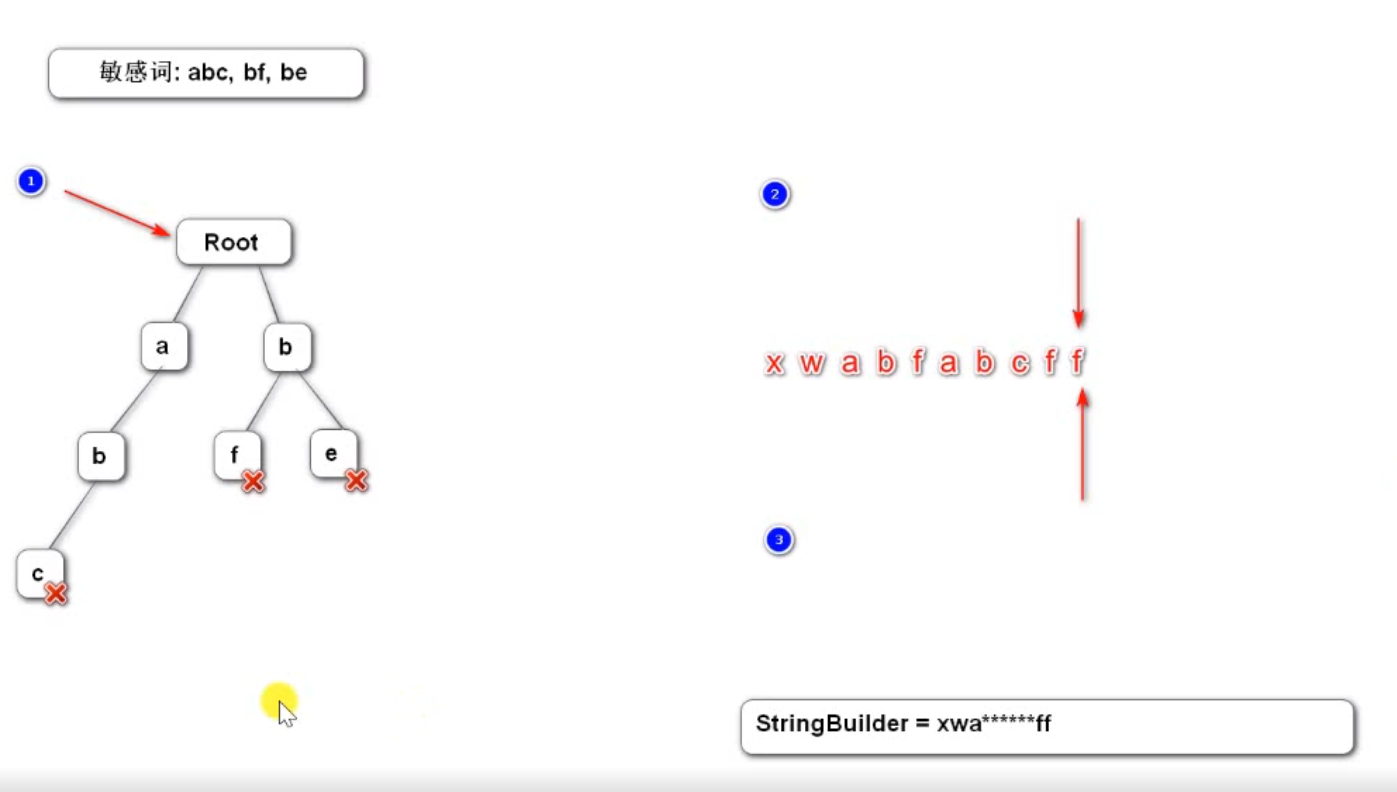
2)编写过滤敏感词方法
 //过滤敏感词
    public String filter(String text){
        if(StringUtils.isBlank(text)){
            return null;
        }
        //指针1 指向树
        TrieNode tmpNode=root;
        //指针2
        int begin=0;
        //指针3
        int position=0;
        //结果
        StringBuilder sb=new StringBuilder();
        while(position<text.length()){
            char c=text.charAt(position);
            //跳过符号
            if(isSysbol(c)){
                //若指针1处于根节点,将此符号计入结果,让指针2向下走一步
                if(tmpNode==root){
                    sb.append(c);
                    begin++;
                }
                //无论符号在开头或者中间指针3都向下走一步
                position++;
                continue;
            }
            //检查下级节点
            tmpNode =tmpNode.getSubNode(c);
            if(tmpNode==null){
                //以begin为开头的字符不是敏感词
                sb.append(text.charAt(begin));
                //进入下一个词的判断
                position = ++begin;
                tmpNode = root;
            }else if(tmpNode.isKeywordEnd()){
                //发现敏感词,将begin-position字符串替换掉
                sb.append(REPLACEMENT);
                begin = ++position;
                tmpNode = root;
            }else{
                //检查下一个字符
                position++;
            }
        }
        //将最后一批字符计入结果
        sb.append(text.substring(begin));
        return sb.toString();
    }

    //判断是否为符号
    public boolean isSysbol(Character c){
        return !CharUtils.isAsciiAlphanumeric(c)&&(c<0x2E80||c>0x9FFF);
    }
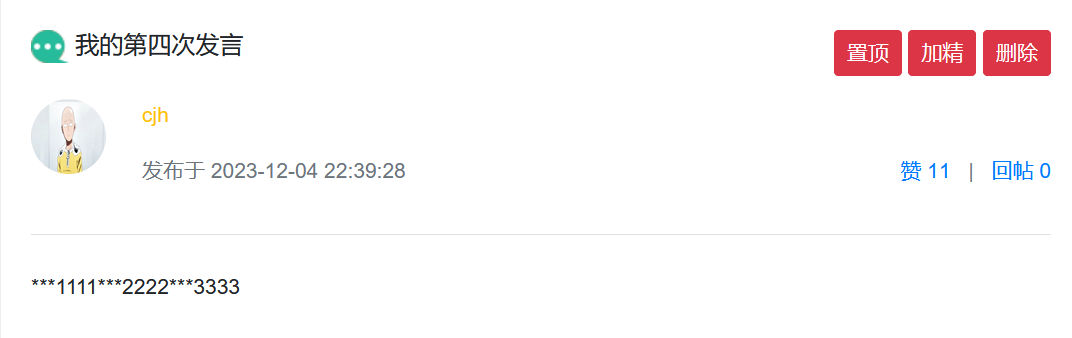
测试过滤器:
@RunWith(SpringRunner.class)
@SpringBootTest
@ContextConfiguration(classes = CommunityApplication.class)
public class SensitiveTests {

    @Autowired
    private SensitiveFilter sensitiveFilter;

    @Test
    public void testSensitiveFilter() {
        String text = "这里可以抽烟,可以喝酒,可以烫头,哈哈哈!";
        text = sensitiveFilter.filter(text);
        System.out.println(text);

        text = "这里可以☆抽☆烟☆,可以☆喝☆酒☆,可以☆烫☆头☆,哈哈哈!";
        text = sensitiveFilter.filter(text);
        System.out.println(text);
    }
}
//结果
这里可以***,可以***,可以***,哈哈哈!
这里可以☆***☆,可以☆***☆,可以☆***☆,哈哈哈!
2.发布帖子
AJAX(Asynchronous JavaScript and XML)
异步的JavaScript与XML,不是一门新技术,只是一个新的术语。
使用AJAX,网页能够将增量更新呈现在页面上,而不需要刷新整个页面。
虽然X代表XML,但目前JSON的使用比XML更加普遍。
https://developer.mozilla.org/zh-CN/docs/Web/Guide/AJAX
采用AJAX请求,实现发布帖子的功能。
(1)用jQuery发送AJAX请求的示例:
引入fastjson依赖
在CommunityUtil类中写封装成json的方法
public static String getJsonString(int code, String msg, Map<String,Object> map){}
在AlphaController中写一个实例controller
@RequestMapping(path = "/ajax",method = RequestMethod.POST)
    @ResponseBody
    public String testAjax(String name,String age){
        System.out.println(name);
        System.out.println(age);
        return CommunityUtil.getJsonString(0,"操作成功");
    }
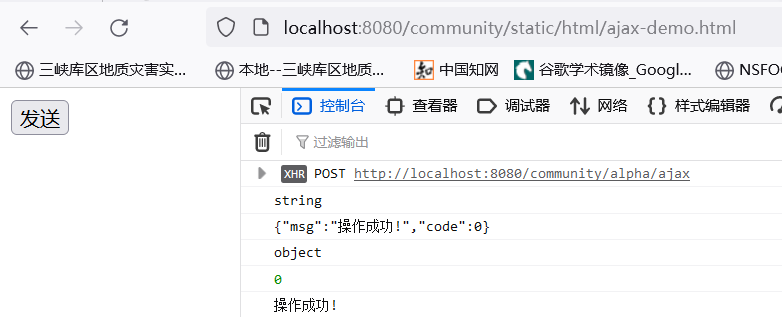
为了方便直接写一个静态的html测试:
静态页面 ajax-demo.html,用jQuery库发送异步请求,$.ajax $.post $.get都可以,参数有三个:访问路径、提交的数据JSONString类型、回调函数(输入是服务器返回值) 这里对应controller的return CommunityUtil.getJSONString(0, "操作成功!");。
<body>
        <input type="button" value="发送" onclick="send();">
</body>
<!--引入jQuery-->
<script src="https://code.jquery.com/jquery-3.3.1.min.js" crossorigin="anonymous"></script>
<script>
    function send() {
        $.post(//三个参数:访问路径、向服务器提交的数据(JS对象)、回调函数(匿名的)(服务器响应浏览器,浏览器把服务器给的数据data(是字符串)传给该方法
            "/community/alpha/ajax", //后端路径
            {"name":"张三","age":12}, //参数
            function(data) { //回调函数
                console.log(typeof(data))
                console.log(data)
               //$.parseJson 表明将传来的data数据转变为JSon对象
                data = $.parseJSON(data)
                console.log(typeof(data))
                console.log(data.code)
                console.log(data.msg)
            }
        );
    }
</script>
(2)实现发布帖子功能
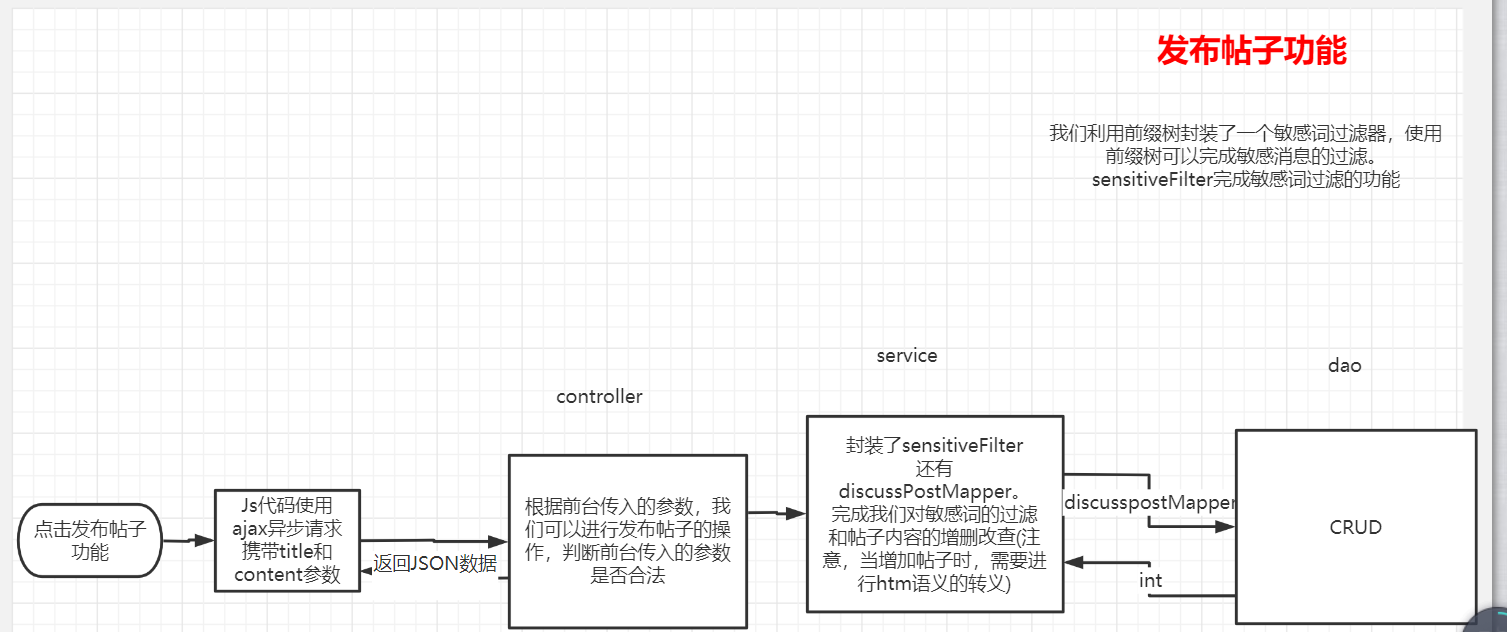
1)插入帖子的Dao(DiscussPostMapper)
int insertDiscussPost(DiscussPost discussPost);
<sql id="insertFields">
     user_id, title, content, type, status, create_time, comment_count, score
</sql>
<insert id="insertDiscussPost" parameterType="DiscussPost">
     insert into discuss_post (<include refid="insertFields"></include>)
     values (#{userId},#{title},#{content},#{type},#{status},#{createTime},#{commentCount},#{score});
</insert>
2)写Service层在DisscussPostService类中
@Autowired
SensitiveFilter sensitiveFilter;

//插入帖子
public int addDiscussPost(DiscussPost discussPost){
     if(discussPost==null){
        throw new IllegalArgumentException("参数不能为空");
     }
     //转义html标记
     discussPost.setTitle(HtmlUtils.htmlEscape(discussPost.getTitle()));
     discussPost.setContent(HtmlUtils.htmlEscape(discussPost.getContent()));
     //过滤敏感词
     discussPost.setTitle(sensitiveFilter.filter(discussPost.getTitle()));
     discussPost.setContent(sensitiveFilter.filter(discussPost.getContent()));
     return discussPostMapper.insertDiscussPost(discussPost);
}
3)写DiscussPostContrller类
@RestController
@RequestMapping("/discuss")
public class DiscussPostContrller {
    @Autowired
    private DiscussPostService discussPostService;

    @Autowired
    private HostHolder hostHolder;

    @RequestMapping(path = "/add",method = RequestMethod.POST)
    public String addDiscussPost(String title,String content){
        User user=hostHolder.getUser();//从threadlocals里获得当前登录的用户
        if(user==null){
            return CommunityUtil.getJSONString(403,"你还没有登录");
        }
        DiscussPost discussPost=new DiscussPost();
        discussPost.setUserId(user.getId());
        discussPost.setTitle(title);
        discussPost.setContent(content);
        discussPost.setCreateTime(new Date());
        discussPostService.addDiscussPost(discussPost);
        return CommunityUtil.getJSONString(0,"发布成功");
    }
}
4)改写js: index.js
$(function(){
    $("#publishBtn").click(publish);
});

function publish() {
    //把弹框隐藏
    $("#publishModal").modal("hide");

    // 获取标题和内容
    var title = $("#recipient-name").val();
    var content = $("#message-text").val();
    // 发送异步请求(POST)
    $.post(
        CONTEXT_PATH + "/discuss/add",
        {"title":title,"content":content},
        function(data) {
            data = $.parseJSON(data);
            // 在提示框中显示返回消息
            $("#hintBody").text(data.msg);
            // 显示提示框
            $("#hintModal").modal("show");
            // 2秒后,自动隐藏提示框
            setTimeout(function(){
                $("#hintModal").modal("hide");
                // 刷新页面
                if(data.code == 0) {
                    window.location.reload();
                }
            }, 2000);
        }
    );
}


index.html: “我要发布”,只有在登录时才能显示。th:if="${loginUser!=null}"
<button type="button" class="btn btn-primary btn-sm position-absolute rt-0" data-toggle="modal" data-target="#publishModal"
th:if="${loginUser!=null}">我要发布</button>
3.帖子详情
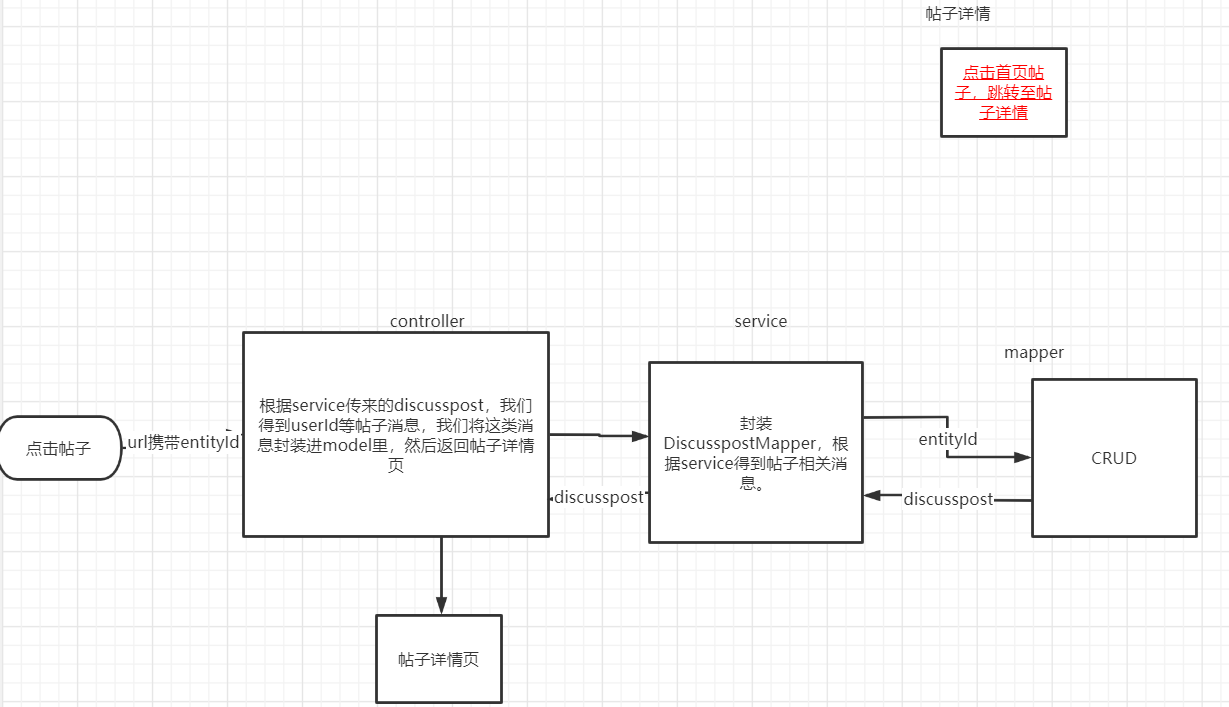
需求:点击帖子标题,跳转至帖子详情页面,可看到帖子内容
index.html
在帖子标题上增加访问详情页面的链接
discuss-detail.html
处理静态资源的访问路径
复用index.html的header区域
显示标题、作者、发布时间、帖子正文等内容
(1)Dao层,查询帖子信息
//查询帖子详情
DiscussPost selectDiscussPostById(int id);

<select id="selectDiscussPostById" resultType="DiscussPost">
        select <include refid="selectFields"></include>
        from discuss_post
        where id=#{id}
</select>
(2)Service层,封装帖子信息
//查询帖子详情
public DiscussPost findDiscussPostById(int id){
    return discussPostMapper.selectDiscussPostById(id);
}
(3)Controller层,跳转至该帖子详情链接
@Controller
@RequestMapping("/discuss")
public class DiscussPostContrller {
    @Autowired
    private DiscussPostService discussPostService;

    @Autowired
    private HostHolder hostHolder;

    @Autowired
    private UserService userService;

    @RequestMapping(path = "/add",method = RequestMethod.POST)
    @ResponseBody
    public String addDiscussPost(String title,String content){
        User user=hostHolder.getUser();//从threadlocals里获得当前登录的用户
        if(user==null){
            return CommunityUtil.getJSONString(403,"你还没有登录");
        }
        DiscussPost discussPost=new DiscussPost();
        discussPost.setUserId(user.getId());
        discussPost.setTitle(title);
        discussPost.setContent(content);
        discussPost.setCreateTime(new Date());
        discussPostService.addDiscussPost(discussPost);
        return CommunityUtil.getJSONString(0,"发布成功");
    }

    @RequestMapping(path = "/detail/{discussPostId}",method = RequestMethod.GET)
    public String getDiscussPost(@PathVariable("discussPostId")int discussPostId, Model model){
       //查看这个帖子
        DiscussPost discussPost=discussPostService.findDiscussPostById(discussPostId);
        if(discussPost!=null){
            model.addAttribute("post",discussPost);
            User user=userService.findUserById(discussPost.getUserId());
            model.addAttribute("user",user);
        }
        return "/site/discuss-detail";
    }
}
问题:如果注解用@RestController,页面直接不显示视图。
因为Controller返回字符串会走视图解析器,而RestController不会走视图解析器,Controller是可以成功存储值并取出来的,在使用RestController注解的时候,model是存储不进去的或者说是没有挂载到视图解析上,所以会取值为空。
(4)改写html
index.html:
<a href="#" th:utext="${map.post.title}">备战春招,面试刷题跟他复习,一个月全搞定!</a>
<a th:href="@{|/discuss/detail/${map.post.id}|}" th:utext="${map.post.title}">备战春招,面试刷题跟他复习,一个月全搞定!</a>
discuss-detail.html:
     <!-- 内容 -->
        <div class="main">
            <!-- 帖子详情 -->
            <div class="container">
                <!-- 标题 -->
                <h6 class="mb-4">
                    <img src="http://static.nowcoder.com/images/img/icons/ico-discuss.png"/>
                    <span th:utext="${post.title}">备战春招,面试刷题跟他复习,一个月全搞定!</span>
                    <div class="float-right">
                        <button type="button" class="btn btn-danger btn-sm">置顶</button>
                        <button type="button" class="btn btn-danger btn-sm">加精</button>
                        <button type="button" class="btn btn-danger btn-sm">删除</button>
                    </div>
                </h6>
                <!-- 作者 -->
                <div class="media pb-3 border-bottom">
                    <a href="profile.html">
                        <img th:src="${user.headerUrl}" class="align-self-start mr-4 rounded-circle user-header" alt="用户头像" >
                    </a>
                    <div class="media-body">
                        <div class="mt-0 text-warning" th:utext="${user.username}">寒江雪</div>
                        <div class="text-muted mt-3">
                            发布于 <b th:text="${#dates.format(post.createTime,'yyyy-MM-dd HH:mm:ss')}">2019-04-15 15:32:18</b>
                            <ul class="d-inline float-right">
                                <li class="d-inline ml-2"><a href="#" class="text-primary">赞 11</a></li>
                                <li class="d-inline ml-2">|</li>
                                <li class="d-inline ml-2"><a href="#replyform" class="text-primary">回帖 <i th:text="${post.commentCount}">7</i></a></li>
                            </ul>
                        </div>
                    </div>
                </div>
                <!-- 正文 -->
                <div class="mt-4 mb-3 content" th:utext="${post.content}">
                    金三银四的金三已经到了,你还沉浸在过年的喜悦中吗?
            ......
                </div>
            </div>
4.事务管理
事务:事务是由N步数据库操作序列组成的逻辑执行单元,这系列操作要么全执行,要么全放弃执行。
事务的特性(ACID)原子性(Atomicity):事务是应用中不可再分的最小执行体。
一致性(Consistency):事务执行的结果,须使数据从一个一致性状态,变为另一个一致性状态。
隔离性(Isolation):各个事务的执行互不干扰,任何事务的内部操作对其他的事务都是隔离的。
持久性(Durability):事务一旦提交,对数据所做的任何改变都要记录到永久存储器中。
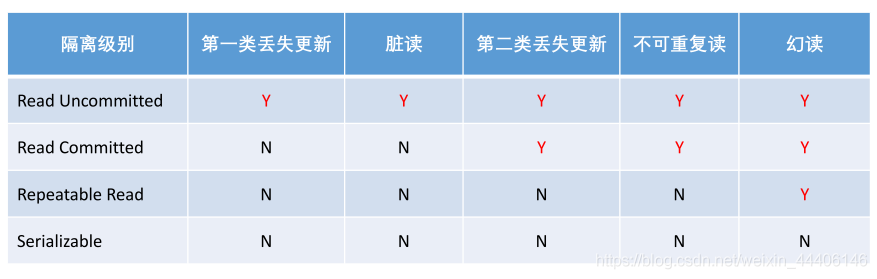
事务的隔离性
常见的并发异常
第一类丢失更新(某一个事务的回滚,导致另外一个事务已更新的数据丢失了)
第二类丢失更新(某一个事务的提交,导致另外一个事务已更新的数据丢失了)
脏读(某一个事务,读取了另外一个事务未提交的数据)
不可重复读(某一个事务,对同一个数据前后读取的结果不一致)
幻读(某一个事务,对同一个表前后查询到的行数不一致)
常见的隔离级别
Read Uncommitted:读取未提交的数据。
Read Committed:读取已提交的数据。
Repeatable Read:可重复读。
Serializable:串行化
Y 可能出现 N不会出现
实现机制:
悲观锁(数据库)
共享锁(S锁)
事务A对某数据加了共享锁后,其他事务只能对该数据加共享锁,但不能加排他锁。
排他锁(X锁)
事务A对某数据加了排他锁后,其他事务对该数据既不能加共享锁,也不能加排他锁。
乐观锁(自定义)
版本号、时间戳、CAS等
在更新数据前,检查版本号是否发生变化。若变化则取消本次更新,否则就更新数据(版本号+1)。
Spring事务管理
声明式事务
通过XML配置,声明某方法的事务特征。
通过注解,声明某方法的事务特征。
编程式事务
通过 TransactionTemplate 管理事务,并通过它执行数据库的操作。
(1)演示声明式事务
在AlphaService中写一个新方法加@Transaction注解
/**
     * 传播机制--两个不同的业务都有可能有不同隔离级别且可能一个业务使用了另一个业务,
     * 传播机制就是解决不同隔离隔离级别同时出现的情况。
     * Propagation.REQUIRED:支持当前事务,就是调用者事务,如果不存在那就创建新事务
     * Propagation.REQUIRES_NEW:创建一个事务,并且暂停当前事务(外部事务)
     * Propagation.NESTED:如果存在外部事务,那么就会嵌套在外部事务之中,A调B,B有独立提交和回滚的能力
     * 否则和REQUIRED一样。
     */
    @Transactional(isolation = Isolation.READ_COMMITTED,propagation = Propagation.REQUIRED)
    public Object save1(){
        //新增用户
        User user = new User();
        user.setUsername("hsw");
        user.setSalt(CommunityUtil.generateUUID().substring(0,5));
        user.setPassword(CommunityUtil.md5("123"+user.getSalt()));
        user.setEmail("hsw@qq.com");
        user.setHeaderUrl("http://image.nowcoder.com/head/99t.png");
        user.setCreateTime(new Date());
        userMapper.insertUser(user);

        //新增帖子
        DiscussPost post = new DiscussPost();
        post.setUserId(user.getId());
        post.setTitle("hello");
        post.setContent("新人报道");
        post.setCreateTime(new Date());
        discussPostMapper.insertDiscussPost(post);
        int i = 1/0;
        return "ok";
    }
@Transactional:
如果不用该注解,则在int i = 1/0;异常时,依然会插入user和discussPost数据,但是如果用了,发生异常就会回滚,不插入数据。
需要注意:
int i = 1/0;
}catch (Exception e){
System.out.println(e.getMessage());
}
@Transactional
public void save(){
    ...
    try {
        int x = 8 / 0;
    }catch (Exception e){
        System.out.println(e.getMessage());
        //手动回滚事务
     TransactionAspectSupport.currentTransactionStatus().setRollbackOnly();
    }
    return result;
}
(2)演示编程式事务
@Autowired
private TransactionTemplate transactionTemplate;
public Object save2(){
        transactionTemplate.setIsolationLevel(TransactionDefinition.ISOLATION_READ_COMMITTED);
        transactionTemplate.setPropagationBehavior(TransactionDefinition.PROPAGATION_REQUIRED);
        return transactionTemplate.execute(new TransactionCallback<Object>() {
            @Override
            public Object doInTransaction(TransactionStatus transactionStatus) {
                //新增用户
                User user = new User();
                user.setUsername("hsw");
                user.setSalt(CommunityUtil.generateUUID().substring(0,5));
                user.setPassword(CommunityUtil.md5("123"+user.getSalt()));
                user.setEmail("hsw@qq.com");
                user.setHeaderUrl("http://image.nowcoder.com/head/99t.png");
                user.setCreateTime(new Date());
                userMapper.insertUser(user);

                //新增帖子
                DiscussPost post = new DiscussPost();
                post.setUserId(user.getId());
                post.setTitle("hello");
                post.setContent("新人报道");
                post.setCreateTime(new Date());
                discussPostMapper.insertDiscussPost(post);
                int i = 1/0;
                return "ok";
            }
        });
    }
5.显示评论
数据层
根据实体查询一页评论数据。
根据实体查询评论的数量。
业务层
处理查询评论的业务。
处理查询评论数量的业务。
表现层
显示帖子详情数据时,同时显示该帖子所有的评论数据。
(1)实体类Comment
public class Comment {
    private int id;//这个评论发出的早晚顺序
    private int userId;//这个评论发出的用户
    private int entityType;//这个评论的类型(是属于帖子的评论,还是评论的评论,还是问题的评论)
    private int entityId;//这个评论的帖子是哪一个
    private int targetId;//记录评论指向的人
    private String content;//帖子的内容
    private int status;//这个评论的状态(状态 0为正常的 1为删除的或者是错误的)
    private Date createTime;//帖子创建时间
}
(2)Dao层
@Mapper
public interface CommentMapper {
    //entityType:评论类型 entityId:评论的是哪个帖子//查出帖子下所有该类型评论,分页
    List<Comment> selectCommentByEntity(int entityType,int entityId,int offset,int limit);
    int selectCountByEntity(int entityType,int entityId);
}
<?xml version="1.0" encoding="UTF-8"?>
<!DOCTYPE mapper PUBLIC "-//mybatis.org//DTD Mapper 3.0//EN" "http://mybatis.org/dtd/mybatis-3-mapper.dtd">
<mapper namespace="com.nowcoder.community.dao.CommentMapper">
    <sql id="selectFields">
        id, user_id, entity_type, entity_id, target_id, content, status, create_time
    </sql>
    <select id="selectCommentByEntity" resultType="Comment">
        select <include refid="selectFields"></include>
        from comment
        where status=0
            and entity_type= #{entityType}
            and entityId=#{entityId}
        order by create_time desc
        limit #{offset},#{limit}
    </select>

    <select id="selectCountByEntity" resultType="int">
        select count(id)
        from comment
        where status=0
        and entity_type= #{entityType}
        and entityId=#{entityId}
    </select>
</mapper>
(3)service层
@Service
public class CommentService {
    @Autowired
    private CommentMapper commentMapper;

    List<Comment> findCommentsByEntity(int entityType,int entityId,int offset,int limit){
        return commentMapper.selectCommentByEntity(entityType,entityId,offset,limit);
    }

    int findCommentCount(int entityType,int entityId){
        return commentMapper.selectCountByEntity(entityType,entityId);
    }
}
(4)controller层:DiscussPostController
帖子详情页:有评论、有回复
注入page、post、user、comments
    @RequestMapping(path = "/detail/{discussPostId}",method = RequestMethod.GET)
    public String getDiscussPost(@PathVariable("discussPostId")int discussPostId, Model model, Page page){
       //查看这个帖子
        DiscussPost discussPost=discussPostService.findDiscussPostById(discussPostId);
        model.addAttribute("post",discussPost);
        User user=userService.findUserById(discussPost.getUserId());
        model.addAttribute("user",user);

        // 评论分页信息
        page.setLimit(5);
        page.setPath("/discuss/detail/" + discussPostId);
        page.setRows(discussPost.getCommentCount());////帖子相关字段中冗余存了一个commentcount

        //帖子的评论:称为--评论 ENTITY_TYPE_POST
        //评论的评论:称为--回复 ENTITY_TYPE_COMMENT
        // 评论列表
        List<Comment> commentList = commentService.findCommentsByEntity(
                ENTITY_TYPE_POST, discussPost.getId(), page.getOffset(), page.getLimit());
        // 评论显示vo列表
        List<Map<String, Object>> commentVoList = new ArrayList<>();
        if(commentList != null){
            for (Comment comment : commentList) {
                //评论Vo :Vo的意思是viewObject的意思 视图对象
                Map<String, Object> commentVo = new HashMap<>();
                commentVo.put("comment", comment);// 评论
                commentVo.put("user", userService.findUserById(comment.getUserId()));// 作者

                // 回复列表
                List<Comment> replyList = commentService.findCommentsByEntity(
                        ENTITY_TYPE_COMMENT, comment.getId(), 0, Integer.MAX_VALUE);

                // 回复显示vo列表
                List<Map<String, Object>> replyVoList = new ArrayList<>();
                if (replyList != null) {
                    for (Comment reply : replyList) {
                        Map<String, Object> replyVo = new HashMap<>();
                        replyVo.put("reply", reply);// 回复
                        replyVo.put("user", userService.findUserById(reply.getUserId()));// 作者
                        User target = reply.getTargetId() == 0 ? null : userService.findUserById(reply.getTargetId()); // 回复目标
                        replyVo.put("target", target);
                        replyVoList.add(replyVo);
                    }
                }
                commentVo.put("replys", replyVoList);

                // 回复数量
                int replyCount = commentService.findCommentCount(ENTITY_TYPE_COMMENT, comment.getId());
                commentVo.put("replyCount", replyCount);
                commentVoList.add(commentVo);
            }
        }
        model.addAttribute("comments", commentVoList);
        return "/site/discuss-detail";
    }
}
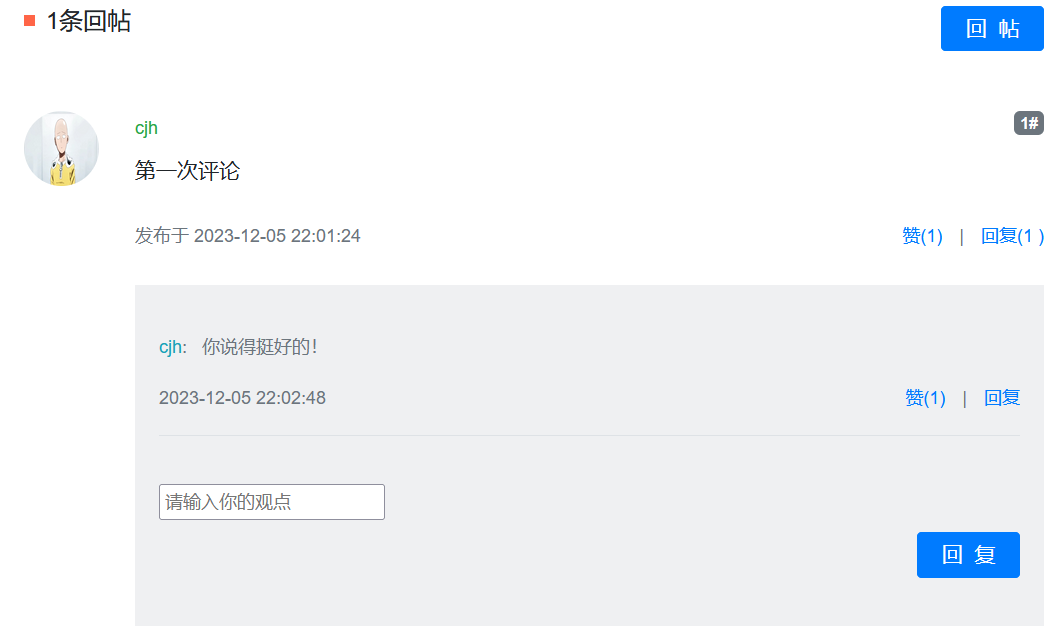
(5) 改写discuss-detail.html
头和分页都可以复用index.html的
th:utext="${post.title}"
th:src="${user.headerUrl}"
th:utext="${user.username}"
th:text="${#dates.format(post.createTime,'yyyy-MM-dd HH:mm:ss')}"
th:text="${post.commentCount}"
th:utext="${post.content}"
th:each="cvo:${comments}"
th:src="${cvo.user.headerUrl}"
th:utext="cvo.user.username"
th:text="${page.offset + cvoStat.count}"
th:utext="${cvo.comment.content}"
th:text="${#dates.format(cvo.comment.createTime,'yyyy-MM-dd HH:mm:ss')}"
th:text="${cvo.replyCount}"
th:each="rvo:${cvo.replys}"
th:if="${rvo.target==null}"
th:utext="${rvo.user.username}"
th:utext="${rvo.target.username}"
th:utext="${rvo.reply.content}"
th:text="${#dates.format(rvo.reply.createTime,'yyyy-MM-dd HH:mm:ss')}"
th:href="|#huifu-${rvoStat.count}|"
th:id="|huifu-${rvoStat.count}|"
6.添加评论
数据层
添加评论记录
修改帖子的评论数量
业务层
处理添加评论业务:先添加评论,再更新帖子的评论数量
表现层
处理添加评论数据的请求
(1)Dao层
//插入新评论
int insertComment(Comment comment);

//更新评论数量 //commentCount:新行数
int updateCommentCount(int id,int commentCount);

<insert id="selectCountByEntity" parameterType="Comment">
      insert into comment(<include refid="insertFields"></include>)
      values (#{userId},#{entityType},#{entityId},#{targetId},#{content},#{status},#{createTime})
</insert>

<update id="updateCommentCount">
    update discuss_post set comment_count=#{commentCount}
    where id=#{id}
</update>
(2) 业务层
先添加评论,再更新帖子的评论数量
DiscussPostService:
public int updateCommentCount(int id, int commentCount) {
    return discussPostMapper.updateCommentCount(id, commentCount);
}
CommentService:
事务管理,声明式配置(整个),编程式(部分),这里采用声明式配置。@Transactional(隔离级别、传播机制)
判空
添加评论
内容过滤(标签、敏感词)
存到数据库comment表中,返回增加成功行数rows
更新评论数量
查数据库comment表中帖子数量
帖子数量更新到discuss_post表中
  @Transactional(isolation = Isolation.READ_COMMITTED,propagation = Propagation.REQUIRED)
    public int addComment(Comment comment){
        if(comment==null){
            throw new IllegalArgumentException("参数不为空!");
        }
        //添加评论,内容过滤
        comment.setContent(HtmlUtils.htmlEscape(comment.getContent()));
        comment.setContent(sensitiveFilter.filter(comment.getContent()));
        int rows=commentMapper.insertComment(comment);//返回增加行数
        //更新帖子评论数量
        if(comment.getEntityType()==ENTITY_TYPE_POST){//如果是评论
            //此时的count已经是新数量了
            int count=commentMapper.selectCountByEntity(comment.getEntityType(),comment.getEntityId());
            //更新数量为count
            discussPostService.updateCommentCount(comment.getEntityId(),count);
        }
        return rows;
    }
(3)controller
@Controller
@RequestMapping("/comment")
public class CommentController {
    @Autowired
    private CommentService commentService;
    @Autowired
    private HostHolder hostHolder;

    @RequestMapping(path = "/add/{discussPostId}",method = RequestMethod.POST)
    public String addComment(@PathVariable("discussPostId")int discussPostId, Comment comment){
        //添加评论
        User user=hostHolder.getUser();
        if(user==null){
            return "redirect:/login";//CommunityUtil.getJSONString(403,"你还没有登录");
        }
        comment.setUserId(hostHolder.getUser().getId());
        comment.setStatus(0);
        comment.setCreateTime(new Date());
        commentService.addComment(comment);
        //刷新 帖子详情 页面
        return "redirect:/discuss/detail/"+discussPostId;
    }
}
(4) 改写html
discuss-detail.html,三个表单要提交(回帖,回复评论,回复评论下的特定人)
<form class="replyform" method="post" th:action="@{|/comment/add/${post.id}|}">
name="content"
<input type="hidden" name="entityType" value="2">
<input type="hidden" name="entityId" th:value="${cvo.comment.id}">
<input type="hidden" name="targetId" th:value="${rvo.user.id}">
<button type="submit"
回帖:
<!-- 回帖输入 --> <div class="container mt-3"> <form class="replyform" method="post" th:action="@{|/comment/add/${post.id}|}"> <p class="mt-3"> <a name="replyform"></a> <textarea placeholder="在这里畅所欲言你的看法吧!" name="content"></textarea> <input type="hidden" name="entityType" value="1"> <input type="hidden" name="entityId" th:value="${post.id}"> </p> <p class="text-right"> <button type="submit" class="btn btn-primary btn-sm"> 回 帖 </button> </p> </form> </div>
回复评论:
<!-- 回复输入框 --> <li class="pb-3 pt-3"> <form method="post" th:action="@{|/comment/add/${post.id}|}"> <div> <input type="text" class="input-size" name="content" placeholder="请输入你的观点"/> <input type="hidden" name="entityType" value="2"> <input type="hidden" name="entityId" th:value="${cvo.comment.id}"> </div> <div class="text-right mt-2"> <button type="submit" class="btn btn-primary btn-sm" onclick="#"> 回 复 </button> </div> </form> </li>
评论下回复,回复某人:
<div th:id="|huifu-${rvoStat.count}|" class="mt-4 collapse"> <form method="post" th:action="@{|/comment/add/${post.id}|}">> <div> <input type="text" class="input-size" name="content" th:placeholder="|回复${rvo.user.username}|"/> <input type="hidden" name="entityType" value="2"> <input type="hidden" name="entityId" th:value="${cvo.comment.id}"> <input type="hidden" name="targetId" th:value="${rvo.user.id}"> </div> <div class="text-right mt-2"> <button type="submit" class="btn btn-primary btn-sm" onclick="#"> 回 复 </button> </div> </form> </div>
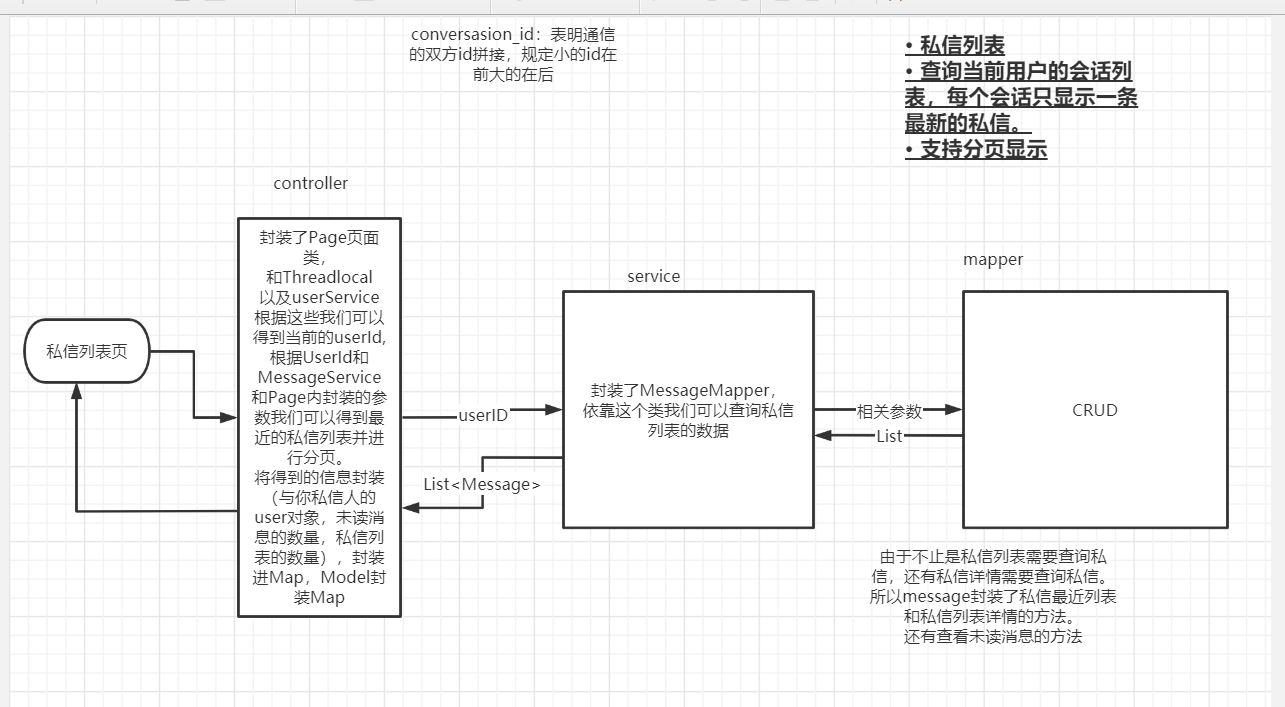
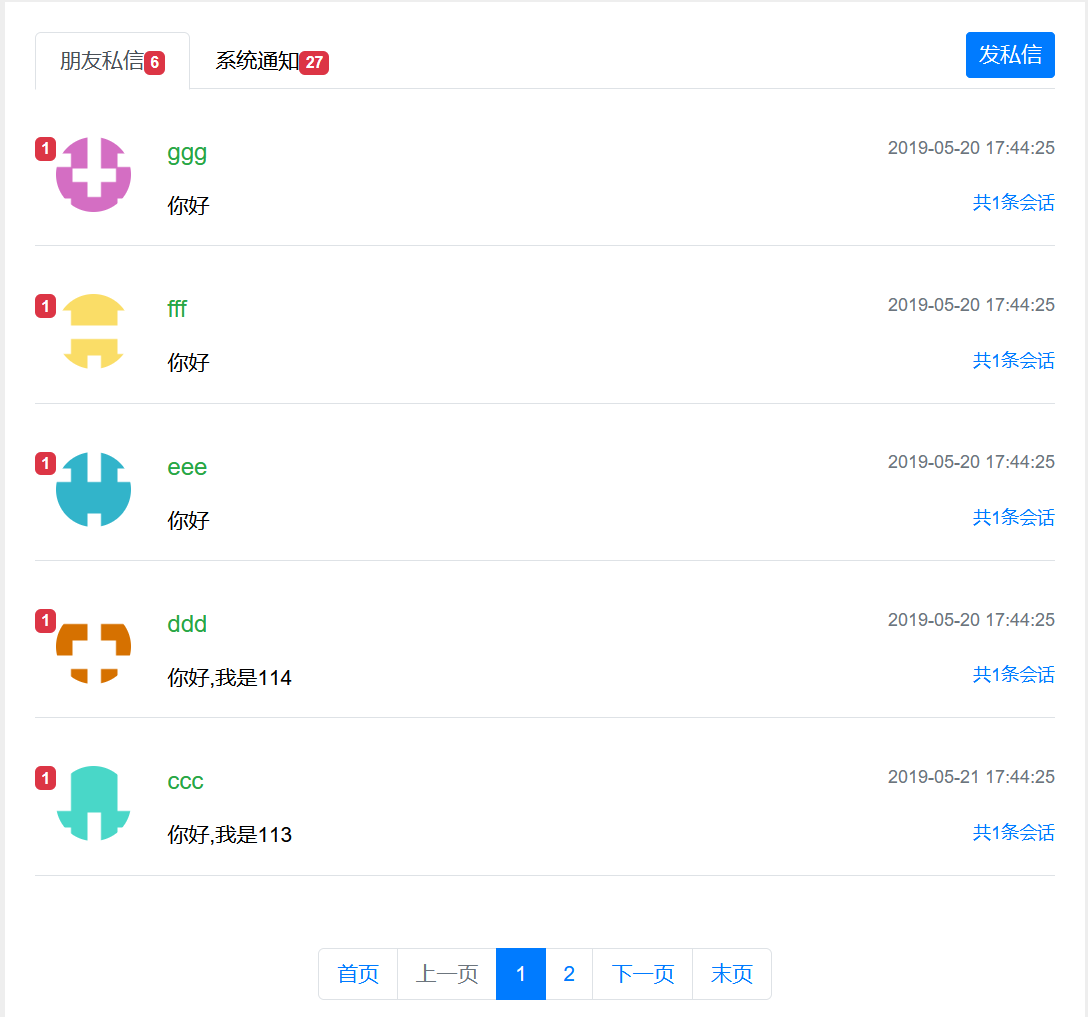
7.私信列表
- 私信列表
- 查询当前用户的会话列表, 每个会话只显示一条最新的私信。(最新私信组成会话列表)
- 支持分页显示。
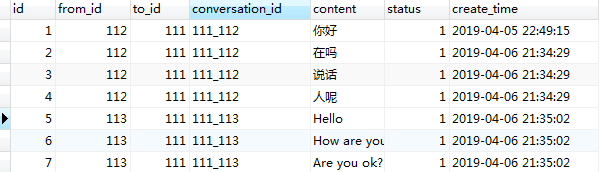
数据库的设计,私信相当于一个对话功能,那么两个人就组成一个对话.
from_id:1(系统通知) 其他(发送者)to_id:接收者
converstaion_id:会话id, 把id小的拼接在前面。
status:0未读、1已读、2已删除
(1)实体类
@Data
public class Message {
    private int id;
    private int fromId;//from_id=1是系统通知
    private int toId;
    private String conversationId;//通信的双方id拼接,规定小的id在前大的在后,同一个会话的私信都是同一个对话id
    private String content;
    private int status;//消息状态:0未读、1已读,2已删除
    private Date createTime;//找到会话最新时间的私信
}
(2)写mapper
@Mapper
public interface MessageMapper {
    //会话列表
    List<Message> selectConversations(int userId, int offset, int limit);
    //分页
    //当前用户的会话数量 / 行数=页数
    int selectConversationCount(int userId);
    //当前会话的私信列表
    List<Message> selectLetters(String conversationId,int offset,int limit);
    //当前会话的私信数量
    int selectLetterCount(String conversationId);
    //未读私信数量
    int selectLetterUnreadCount(int userId,String conversationId);
}
<mapper namespace="com.nowcoder.community.dao.MessageMapper">
    <sql id="selectFields">
        id,from_id,to_id,conversation_id,content,status,create_time
    </sql>

    <!--会话列表== 每个会话的最新私信 组合-->
    <!--status=2为已删除,from_id=1是系统通知-->
    <select id="selectConversations" resultType="Message">
        select <include refid="selectFields"></include>
        from message
        where id in(
            select max(id) from message
            where `status` !=2
                and from_id!=1
                and (from_id=#{userId} or to_id=#{userId})
                group by conversation_id
        )
        order by id desc
        limit #{offset},#{limit}
    </select>

    <select id="selectConversationCount" resultType="int">
        select count(m.maxid)
        from (
            select max(id) as maxid
            from message
            where `status` !=2
                and from_id!=1
                and (from_id=#{userId} or to_id=#{userId})
            group by conversation_id
        )as m
    </select>

    <!--当前会话的私信列表-->
    <select id="selectLetters" resultType="Message">
        select <include refid="selectFields"></include>
        from message
        where `status` !=2
            and from_id!=1
            and conversation_id=#{converstaionId}
        order by id desc
        limit #{offset},#{limit}
    </select>
    <!--当前会话的私信数量-->
    <select id="selectLetterCount" resultType="int">
        select count(id)
        from message
        where `status` !=2
        and from_id!=1
        and conversation_id=#{converstaionId}
    </select>
    <!--每个会话 未读消息数量-->
    <select id="selectLetterUnreadCount" resultType="int">
        select count(id)
        from message
        where `status` = 0
        and from_id!=1
        and to_id=#{userId}
        <if test="conversationId!=null">
            and conversation_id=#{conversationId}
        </if>
    </select>

</mapper>
(3)service
@Service
public class MessageService {
    @Autowired
    private MessageMapper messageMapper;
    public List<Message> findConversations(int userId, int offset, int limit) {
        return messageMapper.selectConversations(userId, offset, limit);
    }
    public int findConversationCount(int userId) {
        return messageMapper.selectConversationCount(userId);
    }
    public List<Message> findLetters(String conversationId, int offset, int limit) {
        return messageMapper.selectLetters(conversationId, offset, limit);
    }
    public int findLetterCount(String conversationId) {
        return messageMapper.selectLetterCount(conversationId);
    }
    public int findLetterUnreadCount(int userId, String conversationId) {
        return messageMapper.selectLetterUnreadCount(userId, conversationId);
    }
}
(4)controller
//要加载私信列表,从hostholder获取当前用户。将会话和私信内容,未读数量等封装到List<map<>>里。
@Controller
public class MessageController {
    @Autowired
    private HostHolder hostHolder;
    @Autowired
    private MessageService messageService;
    @Autowired
    private UserService userService;
    //私信列表
    @RequestMapping(path = "/letter/list",method = RequestMethod.GET)
    public String getLetterList(Model model, Page page){
        User user=hostHolder.getUser();
        page.setPath("/letter/list");
        page.setLimit(5);//行数
        page.setRows(messageService.findConversationCount(user.getId()));//总数量
        //会话列表(每个会话的最新消息组成)
        List<Message> conversationList=messageService.findConversations(user.getId(),page.getOffset(),page.getLimit());
        List<Map<String,Object>> conversations=new ArrayList<>();
        if(conversationList!=null){
            for(Message message:conversationList){//每个对话框
                Map<String,Object> map=new HashMap<>();
                map.put("conversation",message);//最新消息
                map.put("letterCount",messageService.findLetterCount(message.getConversationId()));//私信消息数
                map.put("unreadCount",messageService.findLetterUnreadCount(user.getId(), message.getConversationId()));//未读消息
                //拿到对话对方的userId
                int targetId=  user.getId()==message.getFromId()? message.getToId() : message.getFromId();
                map.put("target",userService.findUserById(targetId)); //对方名称
                conversations.add(map);
            }
        }
        model.addAttribute("conversations",conversations);
        //用户所有未读数量
        int letterUnreadCount=messageService.findLetterUnreadCount(user.getId(),null);
        model.addAttribute("letterUnreadCount",letterUnreadCount);
        return "/site/letter";
    }

    //私信详情
}
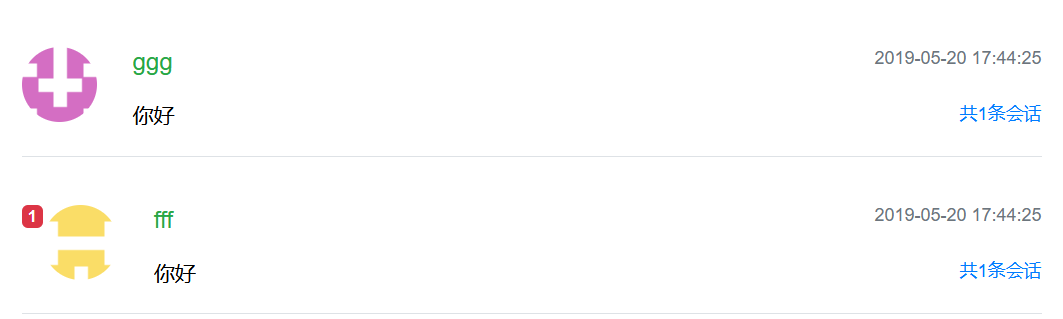
(5)处理视图
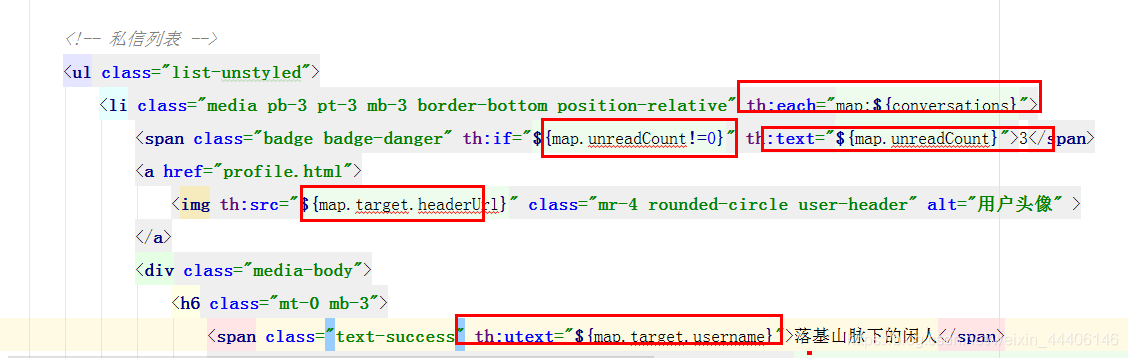
结果如下:
八、私信详情
-
私信详情
- 查询某个会话所包含的私信。
- 支持分页显示。
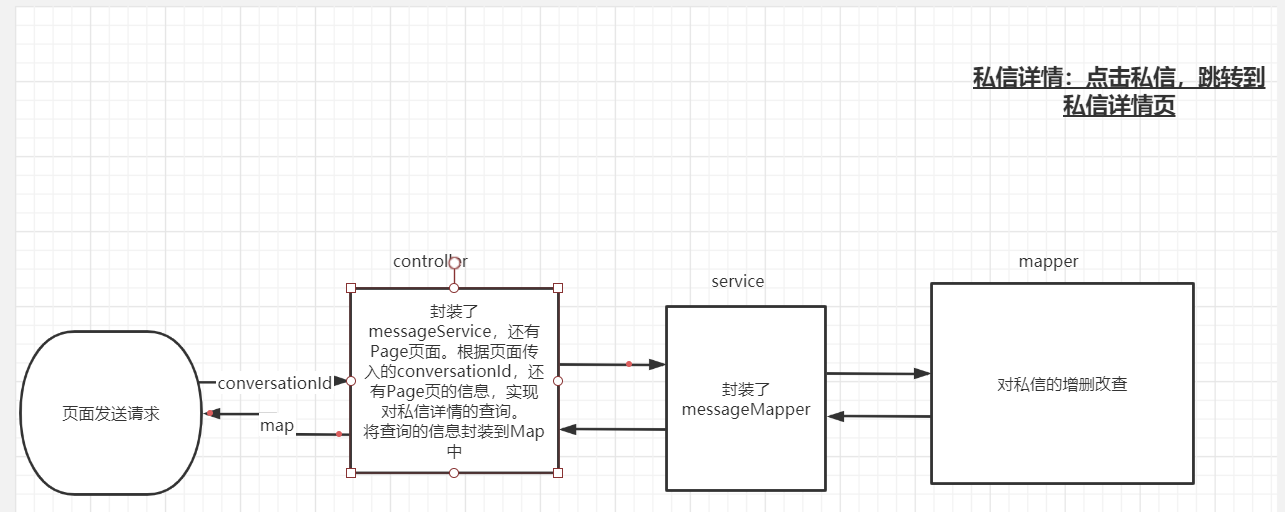
(1)在MessageController中增加一个方法
//私信详情
    @RequestMapping(path = "/letter/detail/{conversationId}",method = RequestMethod.GET)
    public String getLetterDetail(@PathVariable("conversationId")String conversationId,Page page,Model model){
        User user=hostHolder.getUser();
        page.setPath("/letter/detail/"+conversationId);
        page.setLimit(5);//行数
        page.setRows(messageService.findLetterCount(conversationId));//当前会话消息总数量
        //消息列表
        List<Message> lettersList=messageService.findLetters(conversationId,page.getOffset(),page.getLimit());
        List<Map<String,Object>> letters=new ArrayList<>();
        if(lettersList!=null){
            for(Message message:lettersList){//每个对话框
                Map<String,Object> map=new HashMap<>();
                map.put("letter",message);//最新消息
                map.put("fromUser",userService.findUserById(message.getFromId()));//发送者
                letters.add(map);
            }
        }
        model.addAttribute("letters",letters);
        //判断和谁对话//要”给TA私信“
        User target = getLetterTarget(conversationId);
        model.addAttribute("target",target);
        return "/site/letter-detail";
    }
    private User getLetterTarget(String conversationId){
        User user = hostHolder.getUser();
        String[] ids = conversationId.split("_");
        int id1 = Integer.parseInt(ids[0]);
        int id2 = Integer.parseInt(ids[1]);
        return user.getId()==id1?userService.findUserById(id2):userService.findUserById(id1);
    }
(2)修改前端
<!-- 私信列表 --> <ul class="list-unstyled mt-4"> <li class="media pb-3 pt-3 mb-2" th:each="map:${letters}"> <a href="profile.html"> <img th:src="${map.fromUser.headerUrl}" class="mr-4 rounded-circle user-header" alt="用户头像" > </a> <div class="toast show d-lg-block" role="alert" aria-live="assertive" aria-atomic="true"> <div class="toast-header"> <strong class="mr-auto" th:utext="${map.fromUser.username}">落基山脉下的闲人</strong> <small th:text="${#dates.format(map.letter.createTime,'yyyy-MM-dd HH:mm:ss')}">2019-04-25 15:49:32</small> <button type="button" class="ml-2 mb-1 close" data-dismiss="toast" aria-label="Close"> <span aria-hidden="true">×</span> </button> </div> <div class="toast-body" th:utext="${map.letter.content}"> 君不见, 黄河之水天上来, 奔流到海不复回! </div> </div> </li> </ul>
九、发送私信
- 发送私信
- 采用异步的方式发送私信。
- 发送成功后刷新私信列表。

(1)Dao层,需要添加该条私信
//增加私信
int insertMessage(Message message);

<sql id="insertFields">
     from_id,to_id,conversation_id,content,status,create_time
</sql>

<insert id="insertMessage" parameterType="Message" keyProperty="id">
     insert into message(<include refid="insertFields"></include>)
     values(#{fromId},#{toId},#{conversationId},#{content},#{status},#{createTime})
</insert>
(2)service层
 public int addMessage(Message message){
    //消息过滤
    message.setContent(HtmlUtils.htmlEscape(message.getContent()));
    message.setContent(sensitiveFilter.filter(message.getContent()));
    return messageMapper.insertMessage(message);
}
(3)controller层:获取前端两个用户参数,添加消息,然后通过service传来的结果判断消息是否发送成功,再刷新页面
  //发送私信
    @RequestMapping(path = "/letter/send",method = RequestMethod.POST)
    @ResponseBody
    public String sendLetter(String toName,String content){//发送的目标用户、消息内容
        User target=userService.findUserByName(toName);
        if(target==null){
            return CommunityUtil.getJSONString(1,"目标用户不存在");
        }
        Message message=new Message();
        message.setFromId(hostHolder.getUser().getId());
        message.setToId(target.getId());
        String conversationId=message.getFromId()< message.getToId()?message.getFromId()+"_"+ message.getToId():message.getToId()+"_"+message.getFromId();
        message.setConversationId(conversationId);
        message.setContent(content);
        message.setCreateTime(new Date());
        messageService.addMessage(message);
        return CommunityUtil.getJSONString(0);
    }
(4)修改前端letter.js【发送按钮逻辑】
function send_letter() {
    $("#sendModal").modal("hide");
    var toName = $("#recipient-name").val();
    var content = $("#message-text").val();
    $.post(
        CONTEXT_PATH + "/letter/send",
        {"toName":toName,"content":content},
        function(data) {
            data = $.parseJSON(data);
            if(data.code == 0) {
                $("#hintBody").text("发送成功!");
            } else {
                $("#hintBody").text(data.msg);
            }

            $("#hintModal").modal("show");
            setTimeout(function(){
                $("#hintModal").modal("hide");
                location.reload();
            }, 2000);
        }
    );
}
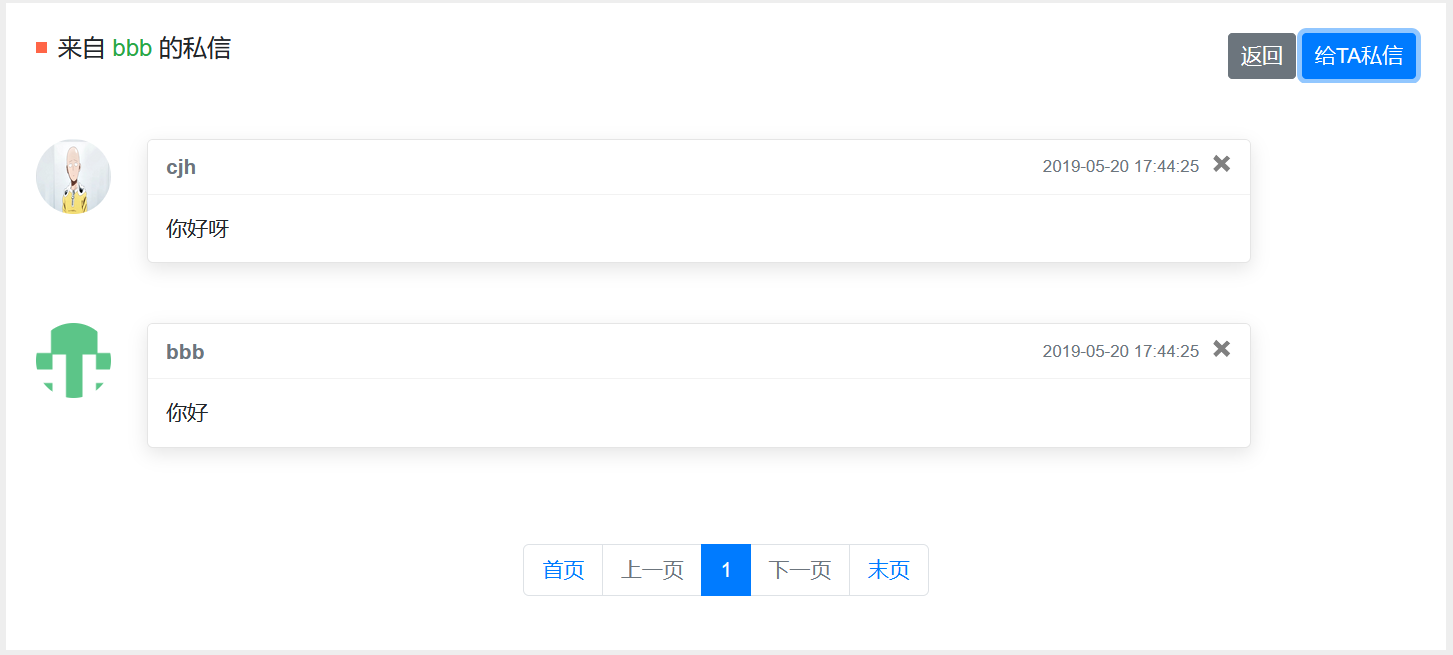
设置已读
- 访问私信详情时, 将显示的私信设置为已读状态。
(1)Dao层:修改消息status 1为已读
//修改状态为已读(一系列消息都需要改状态)
int updateStatus(List<Integer> ids,int status);

<update id="updateStatus">
      update message
      set status=#{status}
      where id in
      <foreach collection="ids" item="id" open="(" separator="," close=")">
          #{id}
      </foreach>
</update>
(2)service层
//读了消息之后改状态
public int readMessage(List<Integer> ids){
     return messageMapper.updateStatus(ids,1);
}
(3)controller
//找到所有未读消息id
public List<Integer> getLetterIds(List<Message> letterList){
     List<Integer> ids=new ArrayList<>();
     if(letterList!=null){
          for(Message message:letterList){
              if(hostHolder.getUser().getId()==message.getToId()&&message.getStatus()==0){//未读消息
                  ids.add(message.getId());
              }
          }
     }
     return ids;
}
在MessageController中getLetterDetail() 私信详情方法中添加
 //找到未读消息
List<Integer> ids=getLetterIds(lettersList);
if(!ids.isEmpty()){
     messageService.readMessage(ids);//改为已读
}
私信详情页面【返回】按钮
<script>
    function back() {
        location.href = CONTEXT_PATH + "/letter/list";
    }
</script>
效果如下:
十、统一处理异常
- @ControllerAdvice
- 用于修饰类,表示该类是Controller的全局配置类。
- 在此类中,可以对Controller进行如下三种全局配置:异常处理方案、绑定数据方案、绑定参数方案。
- @ExceptionHandler
- 用于修饰方法,该方法会在Controller出现异常后被调用,用于处理捕获到的异常。
- @ModelAttribute
- 用于修饰方法,该方法会在Controller方法执行前被调用,用于为Model对象绑定参数。
- @DataBinder
- 用于修饰方法,该方法会在Controller方法执行前被调用,用于绑定参数的转换器。
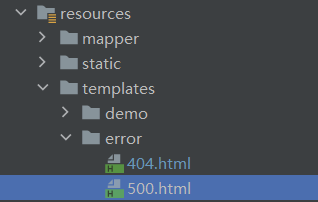
(1)报错页面放到如下目录,当报错时会显示相关用户友好页面(记得改404和505的页面)
(2)写一个跳转处理页面的controller,这里在HomeController中
@RequestMapping(path = "/error",method = RequestMethod.GET)
public String getErrorMessage(){
     return "/error/500";
}
(3)在controller包下新建advice包,创建处理异常类
// 是Controller全局配置类,不用对任何Controller再做配置,可以统一做Controller的全局配置。@ControllerAdvice用来修饰类。
// 异常处理方案@ExceptionHandler、绑定数据方案@ModelAttribute、绑定参数方案@DataBinder. 他们都用来修饰方法。
@ControllerAdvice(annotations = Controller.class)// 限定注解@Controller,否则组件扫描所有的bean
public class ExceptionAdvice {
    private static final Logger logger= LoggerFactory.getLogger(ExceptionAdvice.class);

    @ExceptionHandler({Exception.class})// 处理哪些异常?Exception是所有异常的父类,所有异常都处理
    // 有异常controller会传过来Exception
    public void handleException(Exception e, HttpServletRequest request, HttpServletResponse response) throws IOException {
        //记录日志
        logger.error("服务器发生异常:"+e.getMessage());//异常的概括
        for (StackTraceElement element:e.getStackTrace()){//把异常所有栈的信息都记录下来
            logger.error(element.toString());
        }

        //响应浏览器
        //要看是什么请求,想要服务器返回网页html/异步请求JSON(xml).从请求的消息头获取。
        String xRequestedWith = request.getHeader("x-requested-with");
        if("XMLHttpRequest".equals(xRequestedWith)){// 异步请求
            response.setContentType("application/plain;charset=utf-8");
            PrintWriter writer = response.getWriter();// 输出流
            writer.write(CommunityUtil.getJSONString(1,"服务器异常!"));// 输出JSON字符串
        }else{// 请求html,重定向到错误页面
            response.sendRedirect(request.getContextPath()+"/error");
        }
    }
}
这里是怎么确定是404还是500的
十一、统一记录日志
全局异常控制日志
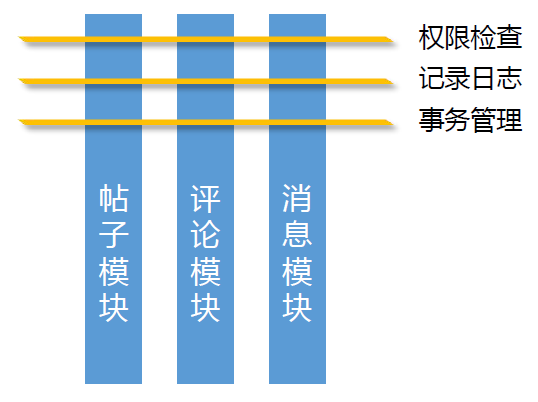
需求:
- 帖子模块
- 评论模块
- 消息模块
AOP的概念:
- Aspect Oriented Programing,即面向方面(切面)编程。
- AOP是一种编程思想,是对OOP的补充,可以进一步提高编程的效率。
AOP的实现
- AspectJ
- AspectJ是语言级的实现,它扩展了Java语言,定义了AOP语法。
- AspectJ在编译期织入代码,它有一个专门的编译器,用来生成遵守Java字节码规范的class文件。
- Spring AOP
- Spring AOP使用纯Java实现,它不需要专门的编译过程,也不需要特殊的类装载器。
- Spring AOP在运行时通过代理的方式织入代码,只支持方法类型的连接点。
- Spring支持对AspectJ的集成。
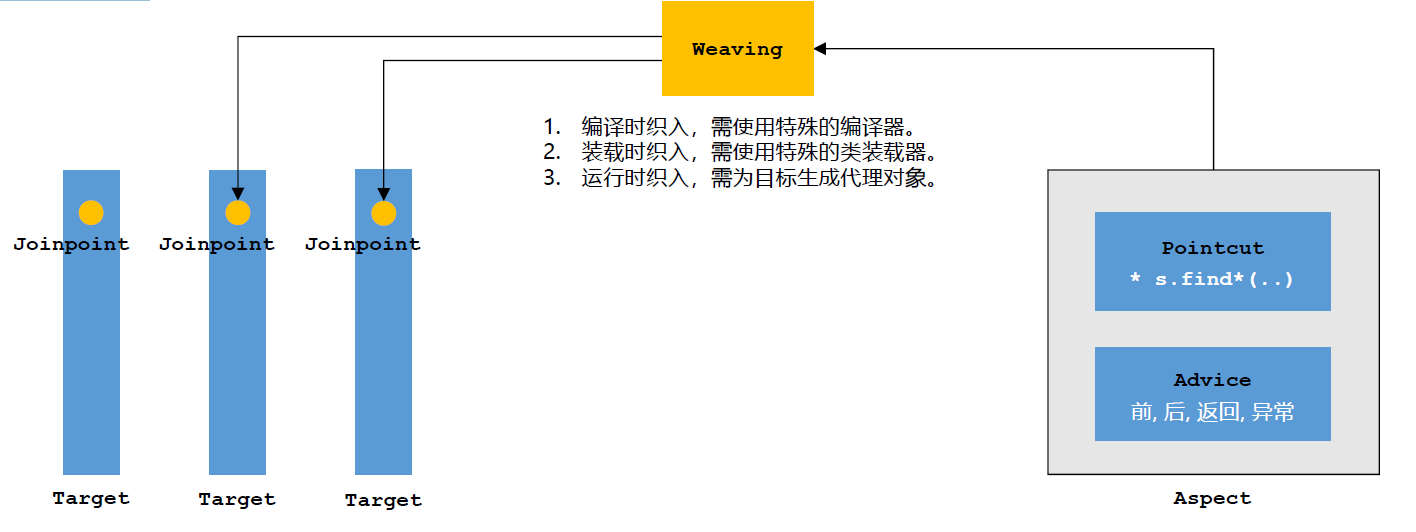
- Target:已处理完业务逻辑的代码为目标对象
- Joinpoint:目标对象上有很多地方能被织入代码叫连接点
- Pointcut:切点声明到底织入到哪些位置
- Advice:通知声明到底要处理什么样的逻辑
Spring AOP
- JDK动态代理
- Java提供的动态代理技术,可以在运行时创建接口的代理实例。
- Spring AOP默认采用此种方式,在接口的代理实例中织入代码。
- CGLib动态代理
- 采用底层的字节码技术,在运行时创建子类代理实例。
- 当目标对象不存在接口时,Spring AOP会采用此种方式,在子类实例中织入代码。
AOP,即面向切面编程,切面是一个一个组件。业务Bean是一个一个target。我们要先声明切点的位置,再通知要做什么事。只需要对切面组件编程即可,不需要再进到业务Bean中去改,提升了编程效率。
框架为切面提供了织入的功能,有编译时(运行快)、类装载、运行时织入(满足特殊要求,所有条件都知道,慢一些)。
Aspect切面:
- 注解
@Component @Aspect - 声明切点的位置
@Pointcut(切点的位置:返回值 包.类.方法.参数) pointcut() - 通知具体逻辑,5个注解
@Before @After AfterReturning @AfterThrowing @Around
Target: 是业务Bean
AOP实现有两种:
AspectJ和Spring AOP。一般用后者即可。它是运行时织入,通过代理的方式,只在方法处有连接点。
Spring AOP 有两种动态代理方式:
为什么要代理:在织入切面代码时,不在原来的实例中织入,而是在代理对象中织入。调用时也是调用代理对象,而不是调用原始对象。容器调用对象,如果有AOP作用,就调用代理对象。
JDK动态代理(自带的)和CGLib动态代理(第三方)。前者生成接口的实现类,在代理实例中织入,要求必须有业务接口;后者在业务不存在接口时,创建子类实例以实现代理、
(1)导入依赖
<dependency>
      <groupId>org.springframework.boot</groupId>
      <artifactId>spring-boot-starter-aop</artifactId>
      <version>2.7.10</version>
</dependency>
(2)写切面(切点、通知)
使用演示:
@Component
@Aspect
public class AlphaAspect {
    //切点:返回值 包 类 方法 参数
    @Pointcut("execution(* com.nowcoder.community.service.*.*(..))")
    public void pointcut(){}

    //通知:连接点前、后、返回值、抛异常、环绕
    @Before("pointcut()")
    public void before(){
        System.out.println("before");
    }
    @After("pointcut()")
    public void after(){
        System.out.println("after");
    }
    @AfterReturning("pointcut()")
    public void afterReturning(){
        System.out.println("afterReturning");
    }
    @AfterThrowing("pointcut()")
    public void afterThrowing(){
        System.out.println("afterThrowing");
    }

    @Around("pointcut()")
    public Object around(ProceedingJoinPoint joinPoint) throws Throwable{//参数:连接点
        System.out.println("around before");
        Object obj=joinPoint.proceed();//连接点调用目标组件的方法,返回目标组件的返回值
        System.out.println("around after");
        return obj;
    }
}
(3)处理业务
统一记录日志:
@Component
@Aspect
public class ServiceLogAspect {
    private static final Logger logger= LoggerFactory.getLogger(ServiceLogAspect.class);
    @Pointcut("execution(* com.nowcoder.community.service.*.*(..))")
    public void pointcut(){}

    @Before("pointcut()")
    public void before(JoinPoint joinPoint){
        //用户{1.2.3.4},在{xxxx},访问了{com.hsw.community.service.xxx}
        ServletRequestAttributes requestAttributes= (ServletRequestAttributes) RequestContextHolder.getRequestAttributes();
        HttpServletRequest request=requestAttributes.getRequest();
        String ip=request.getRemoteHost();
        String now=new SimpleDateFormat("yyyy-mm-dd HH:mm:ss").format(new Date());
        String TypeName=joinPoint.getSignature().getDeclaringTypeName();//类名
        String methodName=joinPoint.getSignature().getName();//方法名
        String target=TypeName+"."+methodName;
        logger.info(String.format("用户[%s],在[%s],访问了[%s]",ip,now,target));
    }
    //用户[127.0.0.1],在[2023-29-19 17:29:30],访问了[com.nowcoder.community.service.UserService.findUserById]
}
Spring AOP
- JDK动态代理
- Java提供的动态代理技术,可以在运行时创建接口的代理实例。
- Spring AOP默认采用此种方式,在接口的代理实例中织入代码。
- CGLib动态代理
- 采用底层的字节码技术,在运行时创建子类代理实例。
- 当目标对象不存在接口时,Spring AOP会采用此种方式,在子类实例中织入代码。

 浙公网安备 33010602011771号