2.Spring、SpringMVC、MyBatis、Git入门、项目调试技巧
1.Spring入门
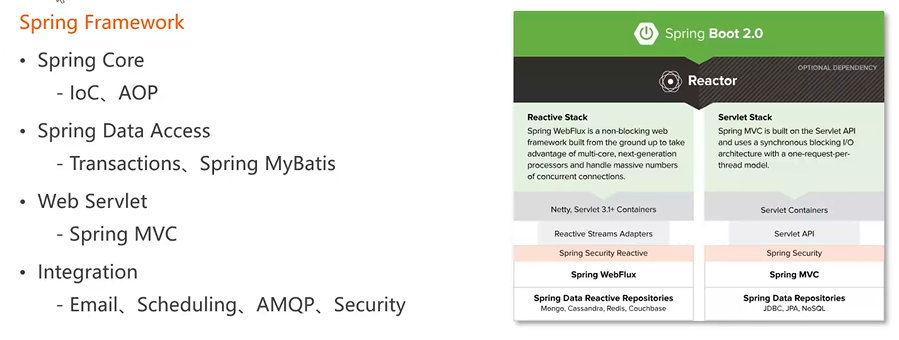
Spring核心思想
数据管理:事务、整合数据库
web
集成:邮件、定时任务、消息队列、安全控制
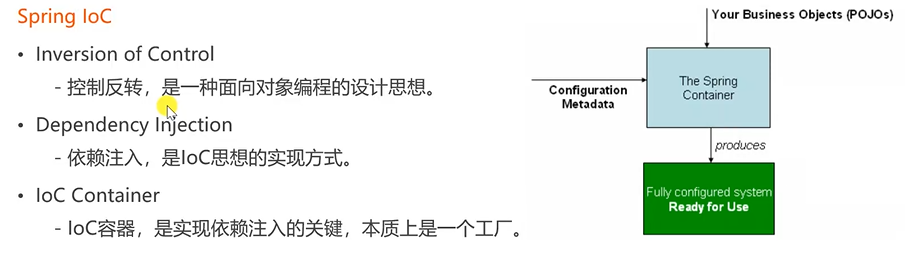
管理bean:给bean,给配置(知道关系)

启动类做两件事:
1.启动tomcat
2.自动创建Spring容器,自动扫描某些包下的某些bean,让bean装配到容器中
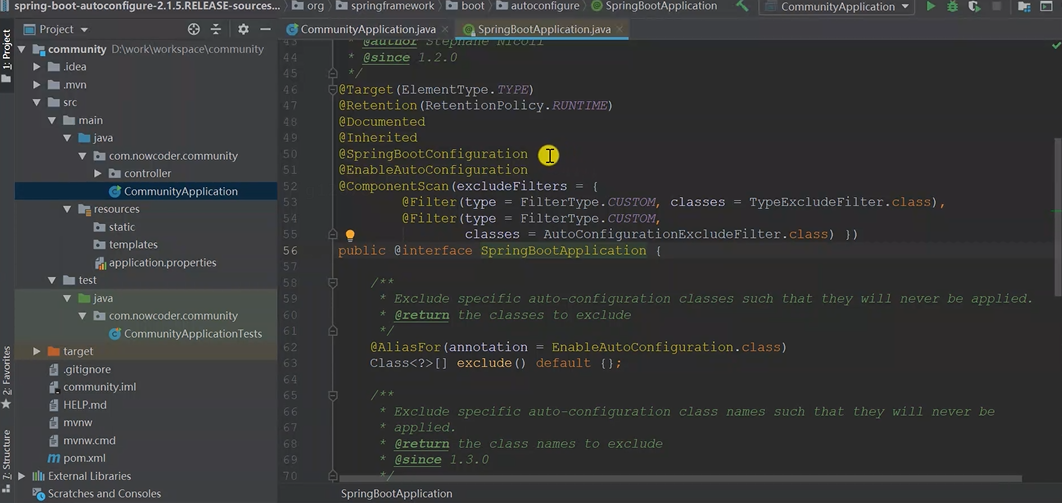
@SpringBootConfiguration  说明这个类是配置类
@EnableAutoConfiguration  开启自动装配
@ComponentScan  一般扫描配置类所在的包以及子包下的bean

bean注解:(语义区别)
@Component
@Controller
@Service
@Repository
四个都可以加到类上,使其被识别成bean,最好按照语义区别使用
底层内容:
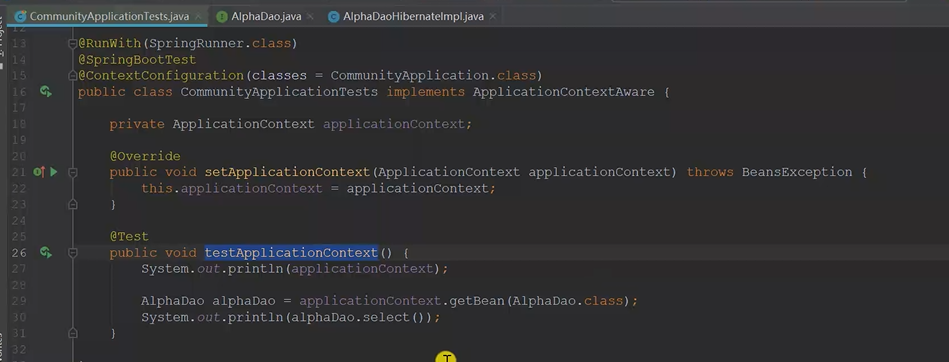
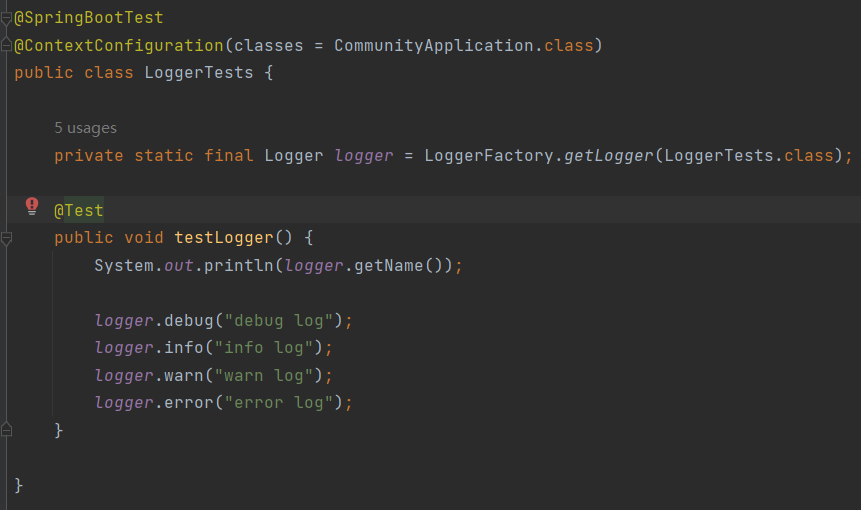
在测试类中启用CommunityApplictaion为配置类:@ContextConfiguration
实现Spring容器,要实现ApplicationContextAware接口,重写setApplictaionContext()方法,拿到的ApplictionContext其实就是容器(BeanFactory的子接口)
可以用application.getBean()获取bean
自己写的Bean:Controller、Service、Repository、Component
第三方bean:
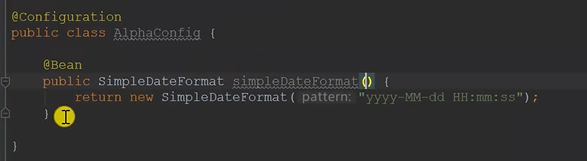
应用层面:DI注入
由于AlphaDao接口有多个实现类(hibrenate和mysbatis),通过使用@Qualifier("alphaHibrenate")注解,告知Spring要注入AlphaHibrenate实现类的对象。 使用@Qualifier注解可以精确地指定要注入的特定实现类,从而解决依赖注入时的歧义性问题。
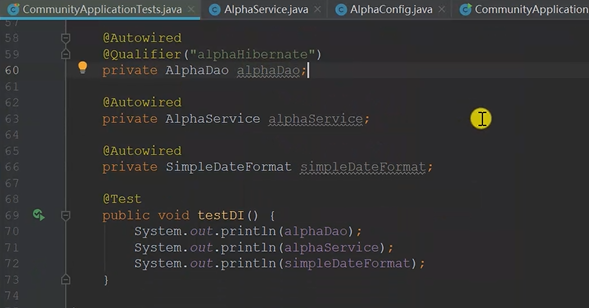
 @Autowired 可以写在set method, constructor
 qualifier can refer default name
 bean可以装配所有bean
2.SpringMVC入门:

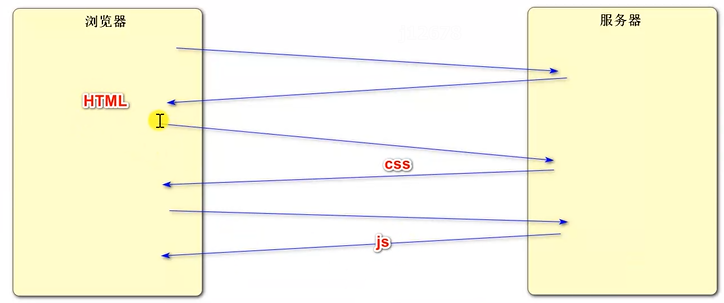
html依赖了多少文件,比如css,js,后续还会发送请求以获取,组成网页
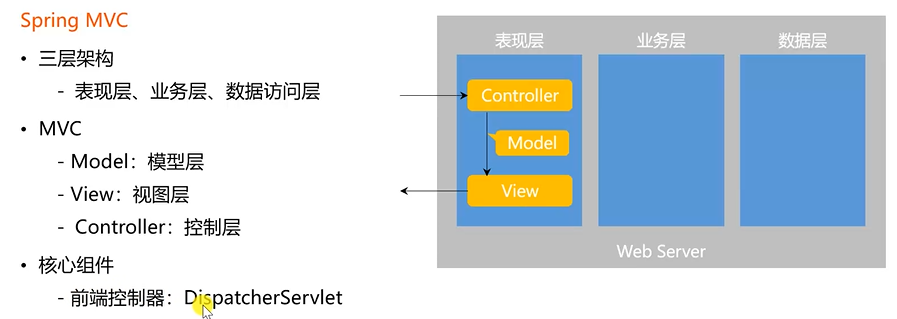
MVC是一种设计模式,都作用在表现层 Model:模型层(数据层) Controller将调用service等得到的数据封装到Model,传给view
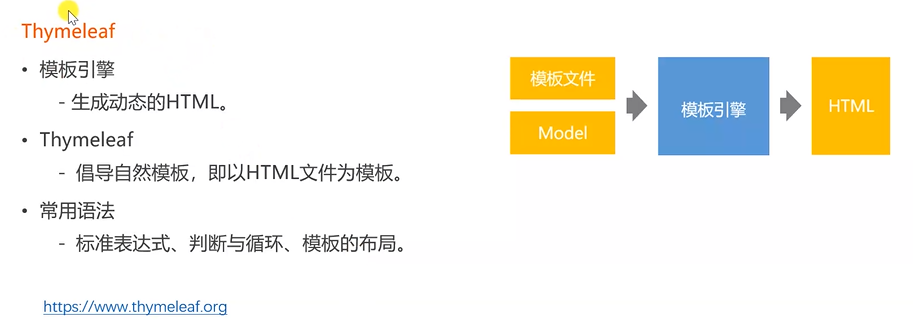
利用model+模板文件,生成view
底层处理请求和响应:
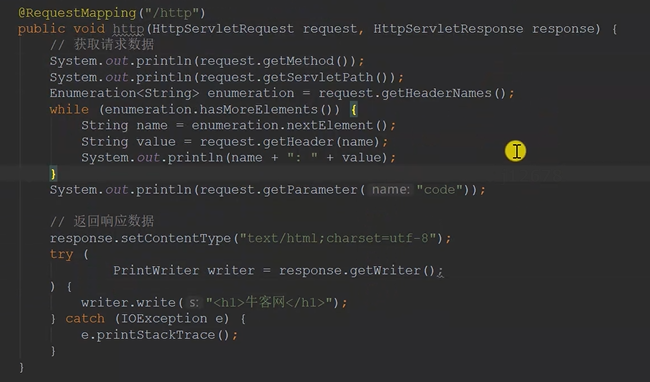
应用级处理请求:
两种参数方式:@RequestParam(指定参数名称) @PathVariable(路径中/)


post请求:
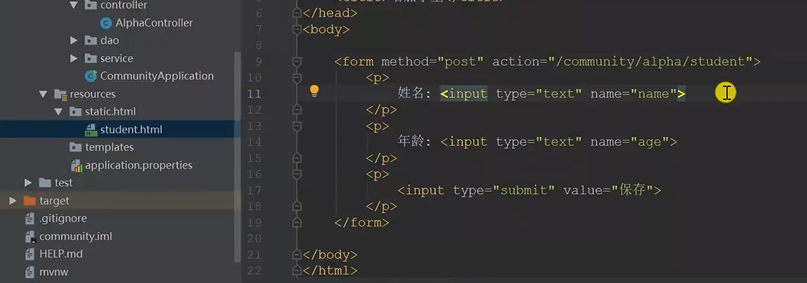
提交路径:action(和方法路径一致)

post请求接收参数:
(1)form表单提交,直接传参接收(参数名称和html中一致)
(2)字符串或json等形式,httpServletRequest
应用级响应处理:(两种方式)
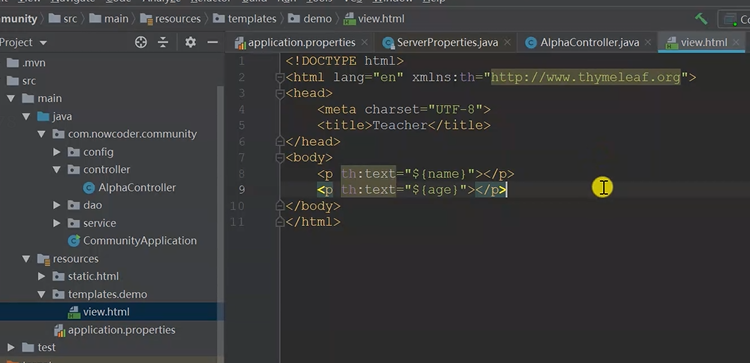
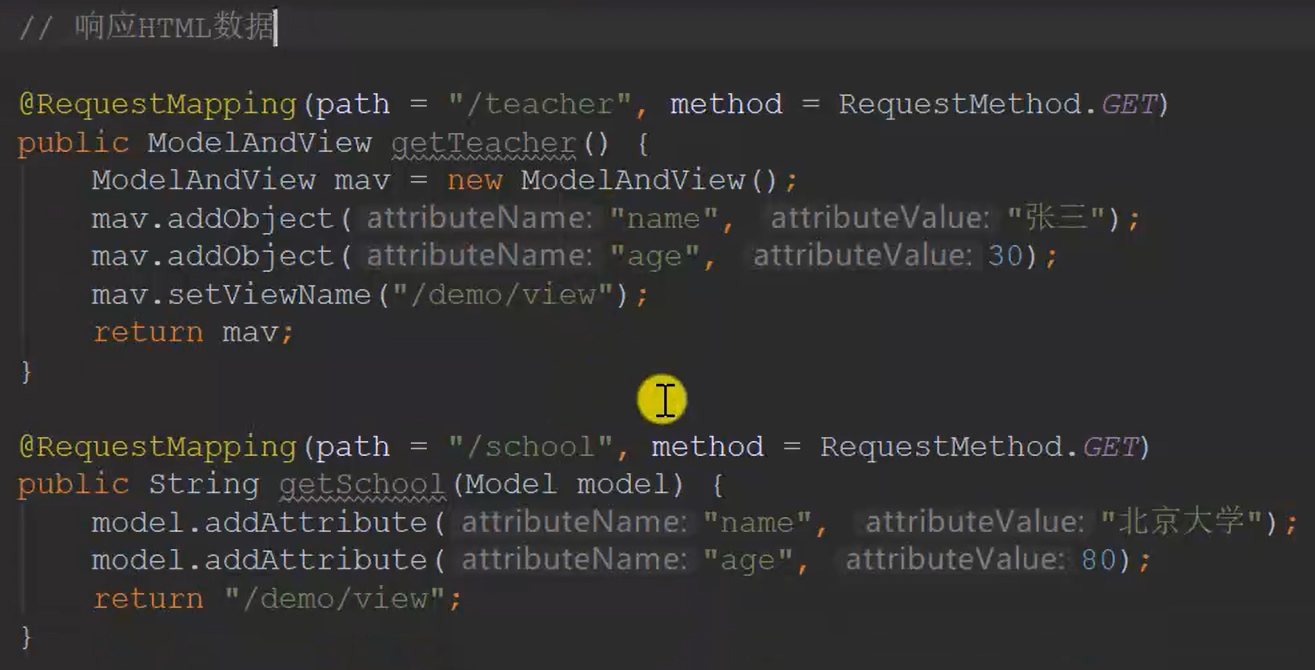
声明html是个模板文件,ModelAndViewModelAndView对象可以手动实例化,但在使用时通常可以直接返回对象而无需显式实例化。
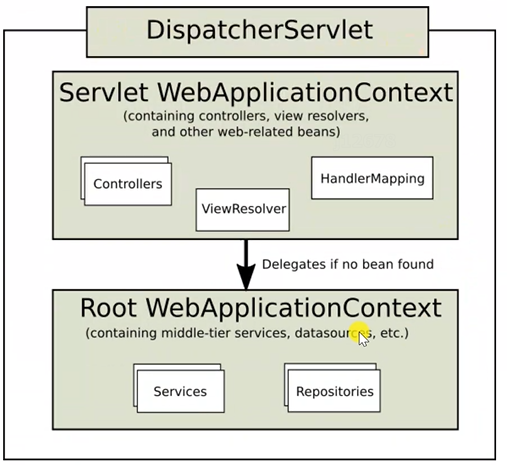
DispatcherServlet检测到代码中的Model自动创建Model对象
(model:mav) + (模板:/demo/view)---> view
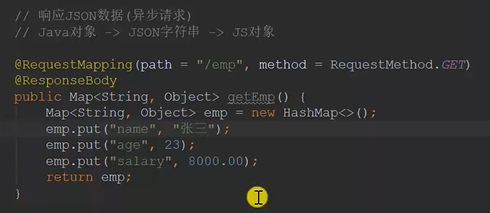
响应json,基本在异步请求(比如用户注册时,如果有重名会有红字提示,但是整个页面没变)中使用。
json是一种很好的跨语言转换形式,@ResponseBody Map<String,Object> :自动转json返回给浏览器
目前基本用:
@RestController是一个组合注解,它包含了@Controller和@ResponseBody两个注解的功能。
用@RestController标记的类表示这是一个RESTful风格的控制器,它可以处理HTTP请求并返回JSON格式的响应。 @RestController注解在处理请求时,会自动将方法的返回值转换为JSON格式的响应体,并返回给客户端。
/static 静态资源 /templates 动态数据
ModelAndViewModelAndView对象可以手动实例化,但在使用时通常可以直接返回对象而无需显式实例化。
DispatcherServlet检测到代码中的Model自动创建Model对象
3.MyBatis入门
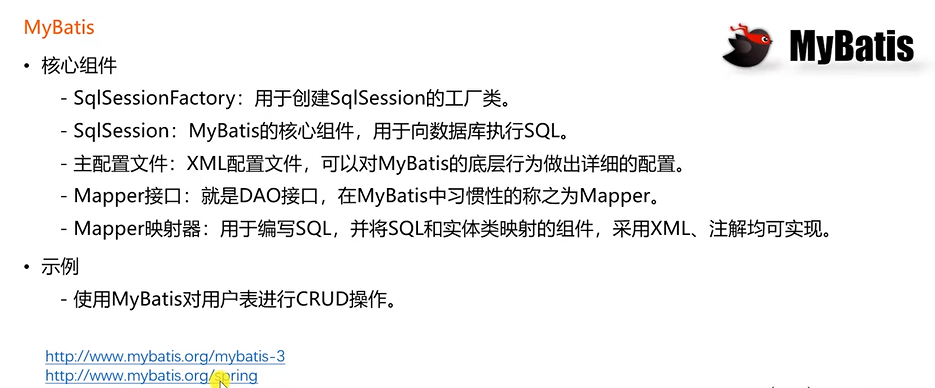
前三个组件是核心,但都被整合
后两个组件开发要写
mapper接口可以用@Respository注解,也可以用@Mapper
mapper:
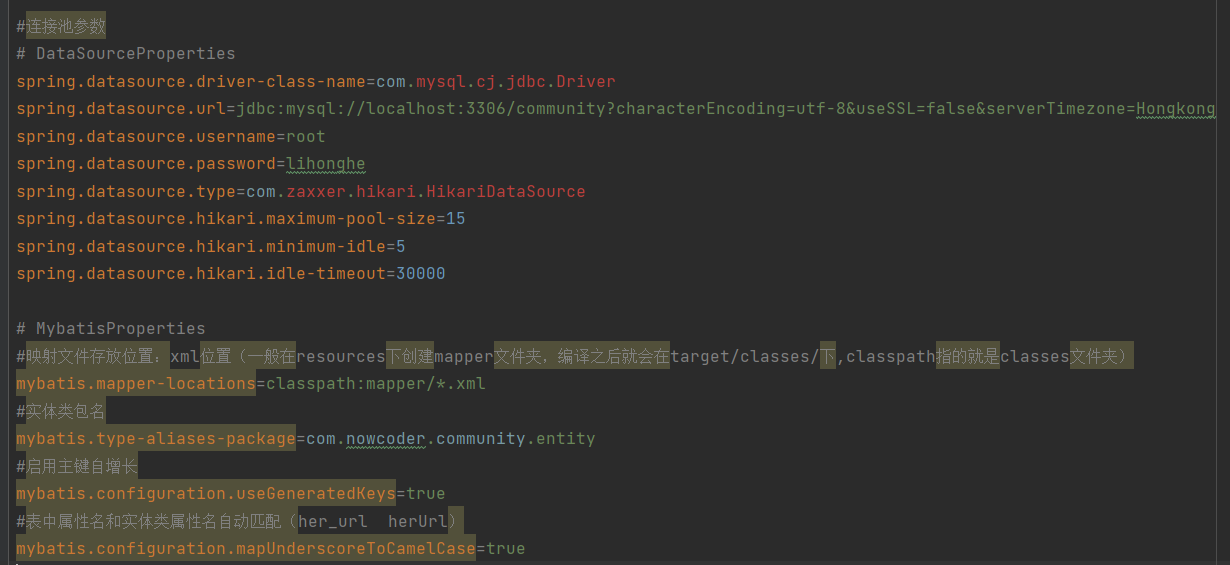
映射文件存放位置:xml位置(一般在resources下创建mapper文件夹,编译之后就会在target/classes/下,classpath指的就是classes文件夹)
#mapper标签的namespace属性,用于声明该配置文件所对应的接口
<mapper namespace="com.nowcoder.community.dao.UserMapper">
#sql标签用于定义可以复用的SQL片段
<sql id="insertFields"> username, password, salt, email, type, status, activation_code, header_url, create_time </sql>
<sql id="selectFields"> id, username, password, salt, email, type, status, activation_code, header_url, create_time </sql>

#在select标签上,可以利用resultType属性声明返回值类型,id为方法名
<select id="selectById" resultType="User">  #这里因为在application.properties里配置了实体类的包名,所以直接写User即可
  select <include refid="selectFields"/> from user where id = #{id} </select>
<select id="selectByName" resultType="User">
  select <include refid="selectFields"/> from user where username = #{username} </select>
<select id="selectByEmail" resultType="User">
  select <include refid="selectFields"/> from user where email = #{email}</select>

<insert id="insertUser" parameterType="User" keyProperty="id">
  insert into user ( <include refid="insertFields"/> ) values(#{username}, #{password}, #{salt}, #{email}, #{type}, #{status}, #{activationCode}, #{headerUrl}, #{createTime}) </insert>
<update id="updateStatus"> update user set status = #{status} where id = #{id} </update>
<update id="updateHeader"> update user set header_url = #{headerUrl} where id = #{id} </update>
<update id="updatePassword"> update user set password = #{password} where id = #{id} </update>
</mapper>
${value},#{参数名}
${}是拼接符,传入的内容拼接在sql中且不进行jdbc类型的转换
#{}是占位符,通过#{}可以设置值并自动进行java和jdbc的类型转换
4.项目调试技巧

响应状态码:
200 OK
302 重定向
404 路径错误
500 服务器处理错误(代码)
断点调试:
F9直接跳到下一个断点

可以在application.xml里定义日志级别和日志存放路径
也可以配置logback-spring.xml,把debug、info、warn、error各个级别的分别存到不同文件下
trace < debug < info < warn < error
5.版本控制


提交规范参考
1.feature或feat:新功能
2.fix:修复bug
3.docs:文档添加、修改,如README, CHANGELOG。
4.style:格式(不影响代码运行的变动,如格式化,缩进等)
5.refactor:重构(即不是新增功能,也不是修改bug的代码变动)
6.test:增加测试
7.chore:构建过程或辅助工具的变动(如package.sh)
8.deps:依赖变更(比如guava版本变更)
9.revert:撤销以前的commit(必须写清楚)
10.log:增加、调整log输出等
11.perf:性能优化
12.config:配置文件修改(如第三方接口url调整)
13.remove:移除
14.experience:体验优化
15.ui:纯粹CSS样式变动,不影响功能代码
16.other:其他原因,如上述不能覆盖,才用。如:合并代码,解决代码冲突等
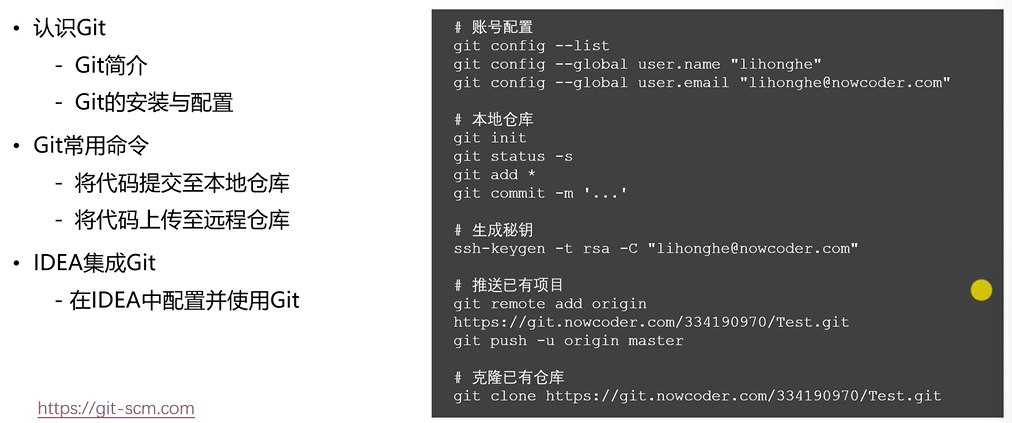
在IDEA中配置Git步骤:
1.setting-->version control--->git--->选取git.exe路径
2.选中项目根目录,最上方工具栏选中VCS--->impoart into version control-->create git respository
Git命令:
初始化本地仓库:
#关联远程仓库
git remote add origin <远程仓库URL>

#在当前目录新建一个版本仓库
git init

#新建⼀个目录,将其初始化为Git仓库,等价于[mkdir + cd + git init]
git init [project-name]

#克隆、下载一个仓库
git clone [url]
如:git clone https://github.com/jquery/jquery.git
把文件添加到暂存区:
#添加指定⽂文件到暂存区,.或*代表当前⽬录的所有文件。
git add file1.txt
git add file2.txt file3.txt
git add *.txt
git add .
git add *
git add src/ #目录
提交至本地仓库:
git commit -m 'add : 新增readme.txt'
git commit [file1] [file2] ... -m [message]
推送到远程仓库:
git push <远程主机名> <本地分支名>:<远程分支名>
省略远程分支则补推送到远程同名分支;无同名分支则重建;
省略本地分支则表示删除指定的远程分支(即推送一个空分支,等同于git push origin --delete master)
git push origin master
#-u,push的同时设置远程跟踪分支
git push -u origin master
#可以简写为:
git push

#推送所有分支到远程仓库
git push [remoteName] --all

#强行推送当前分支到远程仓库,即使有冲突
git push [remoteName] --force
或
git push [remoteName] -f

#推送所有分支到远程仓库,一般在仓库迁移时用的多
git push [remote] --all
拉取远程仓库的更新:
#下载远程仓库的所有变动,但不会自动merge
git fetch [remoteName]
可简写为:
git fetch

#取回远程仓库的变化,并与本地分支合并。相当于git fetch和git merge。
git pull [remoteName] [branch]
可简写为:
git pull

#在实际使用中,git fetch更安全一些。因为在merge前,
我们可以查看更新情况,然后再决定是否合并。
git pull origin next
等效于:
git fetch origin
git merge origin/next

 浙公网安备 33010602011771号