springboot 实现接口灰度发布
前言
对灰度发布有所了解的同学应该知道,灰度发布的目的之一,就是能够根据业务规则的调整,交互上呈现不同的形式,举例来说,当前有2个版本,V1.0和V2.0 ,那么可能表现的形式大概有下面几种:
V1.0,界面上的交互形态为A,V2.0版本界面上的交互形式为B;
某个交互,针对同一个接口A来说,V1.0,请求接口A,要求的返回值包括5个字段;V2.0,请求接口A,要求返回值包括10个字段;
某个交互,在V1.0和V2.0中,将使用不同的接口;
…
实际情况可能会更复杂,在微服务广泛使用的今天,一般的思路是,通过一个获取配置的接口,前端拿到所有的参数配置,根据参数配置的不同,具体实现思路如下:
比如V1版本下,某个配置的值为1,这时候使用A交互;如果要使用交互B,只需要更改配置中心这个值为2,则前端就可以将交互切位B;
或者说,交互不变,但是交互的处理逻辑更复杂了,于是原来的接口无法再满足要求,这时候,可以重新提供一个接口,同样通过配置参数的不同来控制;
于是,从后端接口层面来说,一个比较常用也是通用的处理方式是,通过配置接口来达到切换交互,或者说达到灰度发布的目的,灰度发布的核心本质也正在于通过某种方式从一种数据形态切换到另一种形态;
最小化改造方式
上面聊到了通过配置参数接口来达到灰度的目的,事实上,在一些规模较小的项目中,并没有接入分布式配置中心的情况下,可能上面的解决办法并不是一个很好的方式;
举例来说,灰度要达到的目的是,V1.0 的 获取用户列表的接口返回的是本月新增的用户,而V2.0要求返回最近2个月注册的用户,而且接口地址不变,最多就是在参数上面允许适当变更,即做到前端最小化改动;
这个需求,乍然一想,觉得很是不可思议,一个controller类里面,两个同样的接口映射路径肯定不行的啊,比如看下面这个例子,
@RestController
public class UserController {

    @Autowired
    private UserService userService;

    @GetMapping("/list")
    public Object getUserLists1(){
        return userService.getUserLists1();
    }

    @GetMapping("/list")
    public Object getUserLists2(){
        return userService.getUserLists2();
    }

}
当前请求接口时,直接报错了,这个错误想必大家都能理解吧,我就不过多做解释了

springmvc接口请求原理
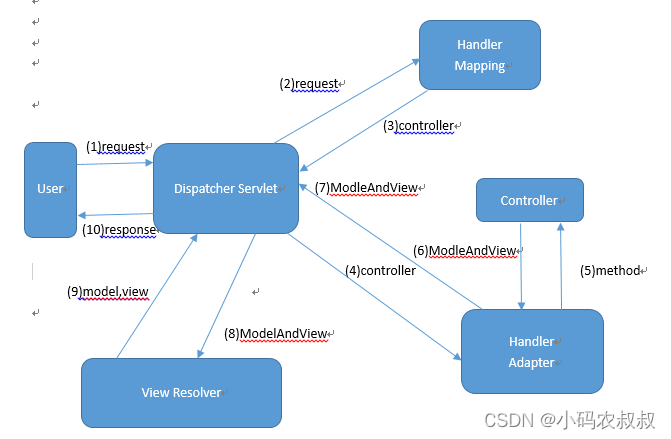
下面贴出一张关于springmvc接口请求原理的流程图,即一个请求最终到达某个具体的controller时经历的一个完整的过程,相信有个SSM开发或者springboot开发经验的同学对这个图应该不陌生;

从大的分类上,主要包括下面几个核心处理组件:
Dispatcher Servlet ,请求分发器,收到请求调用处理器映射器HandlerMapping;
HandlerMapping,HandlerAdapter,处理器映射器和处理器适配器,根据请求的url地址,定位到具体的controller中的具体的处理方法;
View Resolver,视图解析器 ,解析接口的返回数据并返回具体View给Dispatcher Servlet ;
在上面这几个组件中,需要重点关注这个叫做 HandlerMapping 的组件,为了实现上文谈到的灰度发布功能,就需要好好研究下HandlerMapping的原理;
HandlerMapping简介
HandlerMapping在这个SpringMVC体系结构中有着举足轻重的地位,充当着url和Controller之间映射关系配置的角色,主要有三部分组成:
HandlerMapping 映射注册;
根据url获取对应的处理器;
拦截器注册
在springmvc中,其核心类为 RequestMappingHandlerMapping ,该类中的囊括了与请求映射处理相关的所有实现,举例来说,
match(HttpServletRequest request, String pattern) ,通过里面的match方法,可以将request中的请求路径与规则路径做匹配;
registerHandlerMethod,注册处理器;
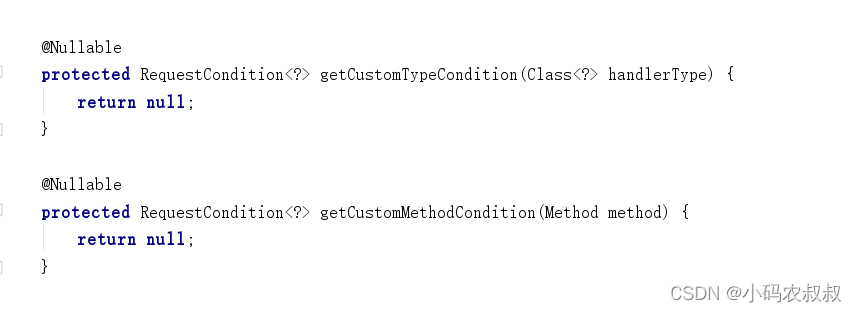
在该类中,我们注意到这样两个如下的方法,但是其方法内部无任何的实现逻辑,对spring源码稍有了解的同学应该知道,这个肯定是spring框架对于该类预留出来的可供开发中扩展的方法,而这两个方法就是用于实现本次需求的两个核心方法;
我们注意到两个方法的返回值均为RequestCondition,即请求条件的对象,从上面了解到HandlerMapping 是在容器初始化执行,那么一定有一个时机,只要客户端重写了HandlerMapping的这两个方法内部的逻辑,就可以通过解析handleType的参数,达到通过某种参数条件,满足本文的最小化前端改造的需求;
关于RequestCondition几点补充:
RequestCondition是Spring MVC对一个请求匹配条件的概念建模;
实现类可能是针对以下情况之一:路径匹配,头部匹配,请求参数匹配,可产生MIME匹配,可消费MIME匹配,请求方法匹配,或者是以上各种情况的匹配条件的一个组合;
RequestCondition接口定义
public interface RequestCondition<T> {
    //和另外一个请求匹配条件合并,具体合并逻辑由实现类提供
    T combine(T var1);

    // 检查当前请求匹配条件和指定请求request是否匹配,如果不匹配返回null,
    // 如果匹配,生成一个新的请求匹配条件,该新的请求匹配条件是当前请求匹配条件
    // 针对指定请求request的剪裁。
    // 举个例子来讲,如果当前请求匹配条件是一个路径匹配条件,包含多个路径匹配模板,
    // 并且其中有些模板和指定请求request匹配,那么返回的新建的请求匹配条件将仅仅
    // 包含和指定请求request匹配的那些路径模板。
    @Nullable
    T getMatchingCondition(HttpServletRequest var1);

    // 针对指定的请求对象request比较两个请求匹配条件。
    // 该方法假定被比较的两个请求匹配条件都是针对该请求对象request调用了
    // #getMatchingCondition方法得到的,这样才能确保对它们的比较
    // 是针对同一个请求对象request,这样的比较才有意义(最终用来确定谁是
    // 更匹配的条件)。
    int compareTo(T var1, HttpServletRequest var2);
}
由接口源代码可以看出,接口RequestCondition是一个泛型接口。事实上,它的泛型参数T通常也会是一个RequestCondition对象,搞清这一点就能和上面的HandlerMapping中的两个即将要重写的方法就能产生联系了;
代码实现过程
1、添加一个自定义注解用于标注接口类以及接口方法
通过上面的分析,我们了解到可以通过HandlerMapping 中的getCustomTypeCondition方法和getCustomMethodCondition方法,读取到接口类或者接口方法中的元信息,比如接口路径,注解,方法名称等,
怎样才能实现前端的最小化改造呢?主要思路是,通过参数控制的形式,比如前端不用改动原来的接口地址,只需传入不同的参数即可满足要求,于是可以通过自定义注解的形式,给不同的方法添加注解,通过封装注解参数为RequestCondition的方式来实现;
import java.lang.annotation.*;

@Documented
@Target({ElementType.TYPE,ElementType.METHOD})
@Retention(RetentionPolicy.RUNTIME)
public @interface ApiVersion {

    //具体版本号
    double value();

}
2、自定义HandleMapping
新增一个类,继承RequestMappingHandlerMapping,重写里面的两个方法,封装成RequestCondition提供后续调用;
import org.springframework.core.annotation.AnnotationUtils;
import org.springframework.web.servlet.mvc.condition.RequestCondition;
import org.springframework.web.servlet.mvc.method.annotation.RequestMappingHandlerMapping;

import java.lang.reflect.Method;

/**
 * 支持使用多版本的控制器
 */
public class ApiVersionHandleMapping extends RequestMappingHandlerMapping {

    /**
     * 容器初始化执行
     * 所有controller都会使用该方法
     * @param handlerType
     * @return
     */
    @Override
    protected RequestCondition<?> getCustomTypeCondition(Class<?> handlerType) {
        ApiVersion apiVersion = AnnotationUtils.getAnnotation(handlerType, ApiVersion.class);
        return new ApiVersionRequestCondition(apiVersion != null ? apiVersion.value() : 1.0);
    }

    /**
     * 容器初始化时执行
     * @param method
     * @return
     */
    @Override
    protected RequestCondition<?> getCustomMethodCondition(Method method) {
        ApiVersion apiVersion = AnnotationUtils.getAnnotation(method, ApiVersion.class);
        if(apiVersion == null){
            apiVersion = AnnotationUtils.getAnnotation(method.getDeclaringClass(), ApiVersion.class);
        }
        return new ApiVersionRequestCondition(apiVersion != null ? apiVersion.value() : 1.0);
    }
}
3、自定义封装RequestCondition
封装子自定义的RequestCondition逻辑,该类会在客户端请求接口时,根据入参进行一系列的与真正的执行接口进行匹配的逻辑操作,比如,默认情况下,如果请求URL中不传入任何参数,将返回默认的 V1.0的接口;
import org.apache.commons.lang.StringUtils;
import org.springframework.web.servlet.mvc.condition.RequestCondition;

import javax.servlet.http.HttpServletRequest;

public class ApiVersionRequestCondition implements RequestCondition<ApiVersionRequestCondition> {

    private double apiVersion = 1.0;

    private static final String VERSION_NAME = "api-version";

    public double getApiVersion() {
        return apiVersion;
    }

    public ApiVersionRequestCondition(double apiVersion){
        this.apiVersion=apiVersion;
    }

    @Override
    public ApiVersionRequestCondition combine(ApiVersionRequestCondition method) {
        return method;
    }

    @Override
    public int compareTo(ApiVersionRequestCondition other, HttpServletRequest request) {
        return Double.compare(other.getApiVersion(),this.getApiVersion());
    }

    @Override
    public ApiVersionRequestCondition getMatchingCondition(HttpServletRequest request) {

        double reqVersionDouble = 1.0;

        String reqVersion = request.getHeader(VERSION_NAME);
        if(StringUtils.isEmpty(reqVersion)){
            reqVersion = request.getParameter(VERSION_NAME);
        }

        if(!StringUtils.isEmpty(reqVersion)){
            reqVersionDouble = Double.parseDouble(reqVersion);
        }

        if(this.getApiVersion() == reqVersionDouble){
            return this;
        }
        return null;
    }
}
4、注册自定义的 ApiVersionHandleMapping
import org.springframework.boot.autoconfigure.web.servlet.WebMvcRegistrations;
import org.springframework.web.servlet.mvc.method.annotation.RequestMappingHandlerMapping;

public class ApiVersionMappingRegister implements WebMvcRegistrations {

    @Override
    public RequestMappingHandlerMapping getRequestMappingHandlerMapping() {
        return new ApiVersionHandleMapping();
    }
}
import org.springframework.boot.autoconfigure.web.servlet.WebMvcRegistrations;
import org.springframework.context.annotation.Bean;
import org.springframework.context.annotation.Configuration;

@Configuration
public class BaseConfiguration {

    @Bean
    public WebMvcRegistrations getWebMvcRegistrations(){
        return new ApiVersionMappingRegister();
    }

}
5、接口测试
对本文开篇的接口做简单的改造,添加自定义注解
import com.congge.configs.ApiVersion;
import com.congge.service.UserService;
import org.springframework.beans.factory.annotation.Autowired;
import org.springframework.web.bind.annotation.GetMapping;
import org.springframework.web.bind.annotation.RestController;

@RestController
@ApiVersion(3.0)
public class UserController {

    @Autowired
    private UserService userService;

    @GetMapping("/list")
    @ApiVersion(1.0)
    public Object getUserLists1(){
        return userService.getUserLists1();
    }

    @GetMapping("/list")
    @ApiVersion(2.0)
    public Object getUserLists2(){
        return userService.getUserLists2();
    }
}
启动项目后,做如下接口测试:
1、不添加任何参数,默认不加任何参数,将请求V1版本的接口

2、接口请求中添加 api-version = 2.0 ,将请求到V2对应的接口

通过以上的演示,我们基本上实现了一个基于 springboot 实现接口多版本控制的接口灰度发布的功能。
本文来自博客园,作者:小陈子博客,转载请注明原文链接:https://www.cnblogs.com/cj8357475/p/16011572.html


