
[root@www ~l]#cd /usr/local/nginx-1.6.2/
[root@www nginx-1.6.2]#./configure --with-http_stub_status_module
[root@www nginx-1.6.2]#make && make install
[root@www nginx-1.6.2]# cd conf
[root@www nginx-1.6.2]# vim nginx.conf
location = /nginx_status{
stub_status on;
access_log off;
allow 116.62.113.20;
}
-------------------------------------------------------------------------------------------------------------------
[root@www sbin]./nginx -V
nginx version: nginx/1.6.2
built by gcc 4.4.7 20120313 (Red Hat 4.4.7-18) (GCC)
configure arguments: --with-http_stub_status_module
-------------------------------------------------------------------------------------
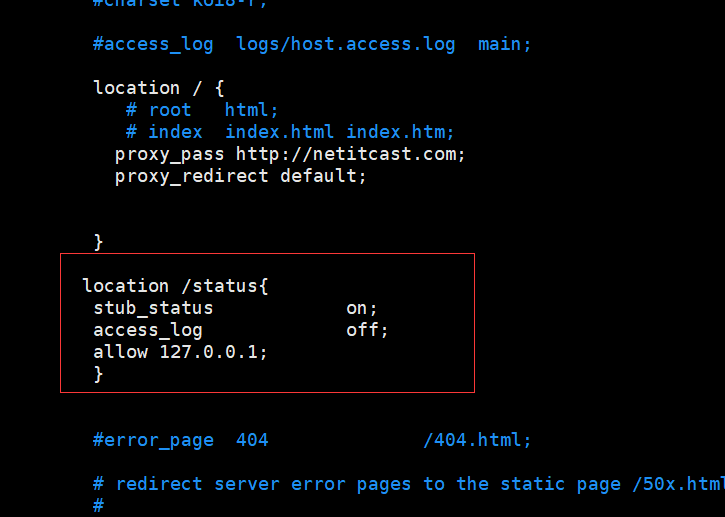
location /status{
stub_status on;
access_log off;
allow 127.0.0.1;
# deny all;
}
注意缩进是一个空格
[root@xutao conf]# /usr/local/nginx/sbin/nginx 打开
[root@xutao conf]# ps -ef|grep nginx
[root@xutao conf]# /usr/local/nginx/sbin/nginx -s reload 重启
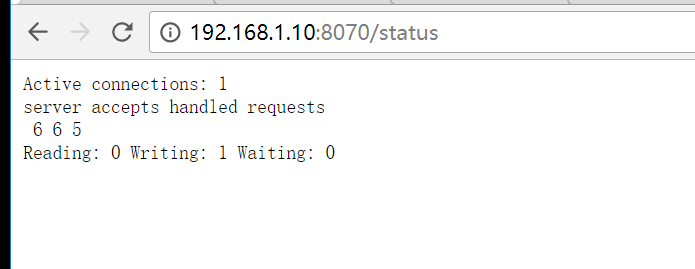
输入你的ip和端口/status
---------------------------------------------------------------------------------------------------------------------------------------------------------------------------------------------------------------------------
http://nginx.org/en/docs/http/ngx_http_stub_status_module.html 地址访问学习
该ngx_http_stub_status_module模块提供对基本状态信息的访问。
默认情况下不构建此模块,应使用--with-http_stub_status_module 配置参数启用它 。
示例配置
location = / basic_status {
    stub_status;
}
此配置创建一个简单的网页,其基本状态数据可能如下所示:
活跃连接:291
服务器接受处理的请求
 16630948 16630948 31070465
阅读:6写作:179等待:106
指令
| 句法: | stub_status; |
|---|---|
| 默认: | - |
| 语境: | server, location |
可从周围位置访问基本状态信息。
在1.7.5之前的版本中,指令语法需要任意参数,例如“ stub_status on”。
数据
提供以下状态信息:
Active connections- 当前活动客户端连接数,包括
Waiting连接数。 accepts- 已接受的客户端连接总数。
handled- 处理的连接总数。通常,参数值与
accepts除非已达到某些资源限制(例如, worker_connections限制)相同。 requests- 客户端请求的总数。
Reading- nginx正在读取请求标头的当前连接数。
Writing- nginx将响应写回客户端的当前连接数。
Waiting- 当前等待请求的空闲客户端连接数。
嵌入式变量
该ngx_http_stub_status_module模块支持以下嵌入变量(1.3.14):
$connections_active- 与
Active connections价值相同; $connections_reading- 与
Reading价值相同; $connections_writing- 与
Writing价值相同; $connections_waiting- 与
Waiting价值相同。 - ------------------------------------------------------------------------------------------------------------------------------------------
-
ngxtop实时解析nginx访问日志,并且将处理结果输出到终端,功能类似于系统命令top,所以这个软件起名ngxtop。有了ngxtop,你可以实时了解到当前nginx的访问状况,再也不需要tail日志看屏幕刷新。
1. 安装ngxtop
1.1 源码安装
123456# wget https://github.com/lebinh/ngxtop/archive/master.zip -O ngxtop-master.zip# unzip ngxtop-master.zip# cd ngxtop-master# python setup.py install...省略....Finished processing dependencies for ngxtop==0.0.1//看到如上输出表示安装成功,安装过程需要网络支持
1.2 ngxtop安装
1pip install ngxtop2. ngxtop使用详解
123456789101112131415161718192021222324252627282930313233343536373839404142434445464748495051525354555657# ngxtop --helpngxtop - ad-hoc query for nginx access log.Usage:ngxtop [options]ngxtop [options] (print|top|avg|sum) <var> ...ngxtop infongxtop [options] query <query> ...Options:-l <file>, --access-log <file> 需要分析的访问日志-f <format>, --log-format <format> log_format指令指定的日志格式 [默认: combined]--no-follow ngxtop default behavior is to ignore current lines in logand only watch for new lines as they are written to the access log.Use this flag to tell ngxtop to process the current content of the access log instead.-t <seconds>, --interval <seconds> report interval when running in follow mode [default: 2.0]-g <var>, --group-by <var> 根据变量分组 [默认: request_path]-w <var>, --having <expr> having clause [default: 1]-o <var>, --order-by <var> 排序 [默认: count]-n <number>, --limit <number> 显示的条数 [default: 10]-a <exp> ..., --a <exp> ... add exp (must be aggregation exp: sum, avg, min, max, etc.) into output-v, --verbose 更多的输出-d, --debug print every line and parsed record-h, --help 当前帮助信息.--version 输出版本信息.高级选项:-c <file>, --config <file> 运行ngxtop解析nginx配置文件-i <filter-expression>, --filter <filter-expression> filter in, records satisfied given expression are processed.-p <filter-expression>, --pre-filter <filter-expression> in-filter expression to check in pre-parsing phase.范例:All examples read nginx config file for access log location and format.If you want to specify the access log file and / or log format, use the -f and -a options."top" like view of nginx requests$ ngxtop404前十的请求$ ngxtop top request_path --filter 'status == 404'总流量前十的请求$ ngxtop --order-by 'avg(bytes_sent) * count'访问量前十的ip地址$ ngxtop --group-by remote_addr输出400以上状态吗的请求以及请求来源$ ngxtop -i 'status >= 400' print request status http_refererAverage body bytes sent of 200 responses of requested path begin with 'foo':$ ngxtop avg bytes_sent --filter 'status == 200 and request_path.startswith("foo")'使用common日志格式分析远程服务器Apache访问日志$ ssh remote tail -f /var/log/apache2/access.log | ngxtop -f common3. ngxtop实例
3.1 实时状态
1# ngxtop -c /usr/local/nginx-1.5.2/conf/nginx.conf")
ngxtop
3.2 访问量前十的IP
1# ngxtop -c /usr/local/nginx-1.5.2/conf/nginx.conf top remote_addr")
ngxtop
4. 注意事项
4.1 ngxtop单条命令无法执行
123# ngxtopError: Access log file or format was not set and nginxconfig file cannot be detected. Perhaps nginx is not in your PATH?意识说nginx执行文件要加到PATH路径中,
方法一:软连接1# ln -s /usr/local/nginx-1.5.2/sbin/nginx /sbin/方法二:修改环境变量
1234# vim /etc/profileexport PATH=$PATH:/usr/local/nginx-1.5.2/sbin# source /etc/profile方法三:指定配置文件
1# ngxtop -c /usr/local/nginx-1.5.2/conf/nginx.conf4.2 虚拟主机配置文件必须在nginx.conf主配置中
一般情况下,我们会将虚拟主机单独写到一个配置文件中,然后nginx.conf做个include。例如我们站点www.ttlsa.com
配置文件:/usr/local/nginx-1.5.2/conf/vhost/www.ttlsa.com.conf
再nginx.conf的http段中添加include vhost/*.conf这种情况下ngxtop不支持,必须要保证所有配置都在nginx.conf中才行。不知道是否我哪里理解不对,如果是的话,知道的兄弟留言告知。本人在此感激不尽。
5. 结束
ngxtop非常实用,值得推荐。
项目地址:https://github.com/lebinh/ngxtop
--------------------------------------------------------------------------------------------------------------------------------------------------------
1.安装ngix
修改yum源
[root@localhost local]# cat /etc/yum.repos.d/nginx.repo
[nginx]
name=nginx repo
baseurl=http://nginx.org/packages/centos/7/$basearch/
gpgcheck=0
enabled=1
安装:yum install nginx -y
添加状态监控:
location = /nginx_status {
stub_status on;
access_log off;
allow 127.0.0.1;
deny all;
}2.安装php
yum install php php-gd php-soap php-mbstring php-xmlrpc php-dom php-fpm -y3.nginx整合php-fpm
修改/etc/php-fpm.d/www.conf文件中的user和group,与nginx.conf中的user一致。
user = nginx
group = nginx4.启动php-fpm服务
systemctl start php-fpm5.修改nginx的配置
location ~ \.php$ {
root /usr/share/nginx/html;
fastcgi_pass 127.0.0.1:9000;
fastcgi_index index.php;
fastcgi_param SCRIPT_FILENAME $document_root/$fastcgi_script_name;
include fastcgi_params;
}6.重启nginx
nginx -s reload7.编写index.php
[root@localhost php]# pwd
/usr/share/nginx/html
[root@localhost php]# cat index.php
<?php phpinfo(); ?>8.打开浏览器访问:http://10.110.3.80/index.php
9.安装rddtool相关依赖
yum install perl rrdtool perl-libwww-perl libwww-perl perl-rrdtool -y
10.安装nginx-rdd
wget http://soft.vpser.net/status/nginx-rrd/nginx-rrd-0.1.4.tgz
tar zxvf nginx-rrd-0.1.4.tgz
cd nginx-rrd-0.1.4
cp usr/sbin/* /usr/sbin #复制主程序文件到 /usr/sbin 下
cp etc/nginx-rrd.conf /etc #复制配置文件到 /etc 下
cp html/index.php /usr/share/nginx/html/11. 修改配置vi /etc/nginx-rrd.conf
RRD_DIR="/usr/share/nginx/html/nginx-rrd";
WWW_DIR="/usr/share/nginx/html/";13. 新建定时任务
[root@localhost html]# crontab -l
* * * * * /bin/sh /usr/sbin/nginx-collect
*/1 * * * * /bin/sh /usr/sbin/nginx-graph
查看任务:
tail -f /var/log/cron14. ab压测:
安装ab压测工具:yum -y install httpd-tools
ab -n 10000 -c 10 http://127.0.0.1/index.html
")
")

 浙公网安备 33010602011771号