
vue-quill-editor富文本编辑器使用(带图片上传至七牛云,后端为django)
vue-quill-editor富文本编辑器使用(带图片上传至七牛云,后端为django)
1.安装vue-quill-editor
npm install vue-quill-editor -S
2.引入到项目中
有两种挂载方式: 全局挂载 和 在组件中挂载,根据自己的项目需求选择,一般用到富文本编辑都是在某一个项目中,这里只写在项目中挂载的方式
import { quillEditor } from 'vue-quill-editor'

import 'quill/dist/quill.core.css'
import 'quill/dist/quill.snow.css'
import 'quill/dist/quill.bubble.css'

export default {
  components: {
    quillEditor
  }
}
3.在对应的页面组件中写
<quill-editor
    v-model="content"
    ref="myQuillEditor"
    :options="editorOption"
    @blur="onEditorBlur($event)"
    @focus="onEditorFocus($event)"
    @change="onEditorChange($event)"
    @ready="onEditorReady($event)">
</quill-editor>
// 失去焦点事件
  onEditorBlur(quill) {
    console.log('editor blur!', quill)
  },
// 获得焦点事件
  onEditorFocus(quill) {
    console.log('editor focus!', quill)
  },
// 准备富文本编辑器
  onEditorReady(quill) {
    console.log('editor ready!', quill)
  },
// 内容改变事件
// html就是文本框中的内容
  onEditorChange({ quill, html, text }) {
    console.log('editor change!', quill, html, text)
    this.content = html
  },
4.配置option
export default {
    data() {
    	return {
            // 富文本编辑器配置
              editorOption: {
                modules: {
                  toolbar: [
                    ['bold', 'italic', 'underline', 'strike'], // 加粗 斜体 下划线 删除线
                    ['blockquote', 'code-block'], // 引用  代码块
                    [{ header: 1 }, { header: 2 }], // 1、2 级标题
                    [{ list: 'ordered' }, { list: 'bullet' }], // 有序、无序列表
                    [{ script: 'sub' }, { script: 'super' }], // 上标/下标
                    [{ indent: '-1' }, { indent: '+1' }], // 缩进
                    [{ direction: 'rtl' }], // 文本方向
                    [{ size: ['12', '14', '16', '18', '20', '22', '24', '28', '32', '36'] }], // 字体大小
                    [{ header: [1, 2, 3, 4, 5, 6] }], // 标题
                    [{ color: [] }, { background: [] }], // 字体颜色、字体背景颜色
                    // [{ font: ['songti'] }], // 字体种类
                    [{ align: [] }], // 对齐方式
                    ['clean'], // 清除文本格式
                    ['image', 'video'] // 链接、图片、视频
                  ]
                },
                placeholder: '请输入正文'
              },
        }
    }
}
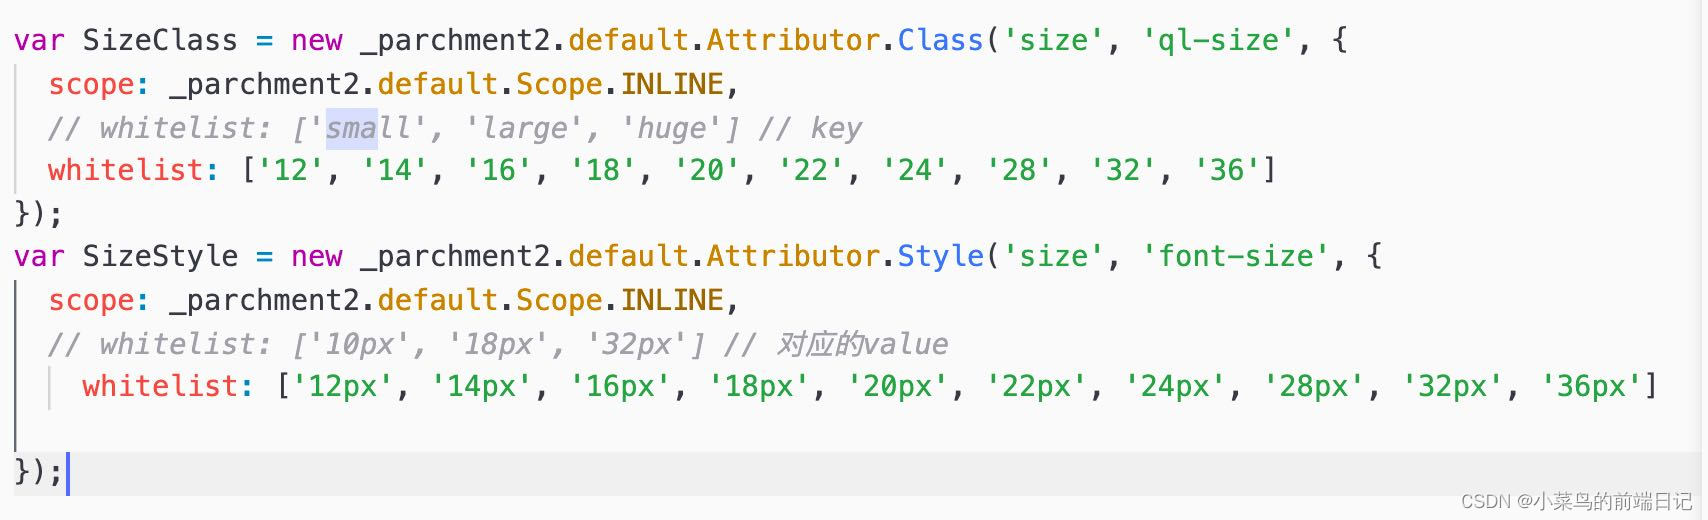
4.1 找到node_modules里的quill/dist/quill.js
4.2 在文件中搜索small,快速找到,然后修改成你想要的数据,这里简单,直接贴图
4.3 修改完js之后,需要修改一下css文件 ,这样你设置的才生效,在同级目录下找到quill.snow.css文件,在最后写入
/*这个是字号数字对应的显示的内容,vertical-align根据个人需要加不加,因为我页面那个字与其他对不齐*/
.ql-snow .ql-picker.ql-size .ql-picker-label[data-value="12"]::before,
.ql-snow .ql-picker.ql-size .ql-picker-item[data-value="12"]::before {
  content: '12px';
  vertical-align: top;
}
.ql-snow .ql-picker.ql-size .ql-picker-label[data-value="14"]::before,
.ql-snow .ql-picker.ql-size .ql-picker-item[data-value="14"]::before {
  content: '14px';
  vertical-align: top;
}
.ql-snow .ql-picker.ql-size .ql-picker-label[data-value="16"]::before,
.ql-snow .ql-picker.ql-size .ql-picker-item[data-value="16"]::before {
  content: '16px';
  vertical-align: top;
}
.ql-snow .ql-picker.ql-size .ql-picker-label[data-value="18"]::before,
.ql-snow .ql-picker.ql-size .ql-picker-item[data-value="18"]::before {
  content: '18px';
  vertical-align: top;
}
.ql-snow .ql-picker.ql-size .ql-picker-label[data-value="20"]::before,
.ql-snow .ql-picker.ql-size .ql-picker-item[data-value="20"]::before {
  content: '20px';
  vertical-align: top;
}
.ql-snow .ql-picker.ql-size .ql-picker-label[data-value="22"]::before,
.ql-snow .ql-picker.ql-size .ql-picker-item[data-value="22"]::before {
  content: '22px';
  vertical-align: top;
}
.ql-snow .ql-picker.ql-size .ql-picker-label[data-value="24"]::before,
.ql-snow .ql-picker.ql-size .ql-picker-item[data-value="24"]::before {
  content: '24px';
  vertical-align: top;
}
.ql-snow .ql-picker.ql-size .ql-picker-label[data-value="28"]::before,
.ql-snow .ql-picker.ql-size .ql-picker-item[data-value="28"]::before {
  content: '28px';
  vertical-align: top;
}
.ql-snow .ql-picker.ql-size .ql-picker-label[data-value="32"]::before,
.ql-snow .ql-picker.ql-size .ql-picker-item[data-value="32"]::before {
  content: '32px';
  vertical-align: top;
}
.ql-snow .ql-picker.ql-size .ql-picker-label[data-value="36"]::before,
.ql-snow .ql-picker.ql-size .ql-picker-item[data-value="36"]::before {
  content: '36px';
  vertical-align: top;
}


/* 这个是字号数字对应的px值*/
.ql-editor .ql-size-12 {
  font-size: 12px;
}
.ql-editor .ql-size-14 {
  font-size: 14px;
}
.ql-editor .ql-size-16 {
  font-size: 16px;
}
.ql-editor .ql-size-18 {
  font-size: 18px;
}
.ql-editor .ql-size-20 {
  font-size: 20px;
}
.ql-editor .ql-size-22 {
  font-size: 22px;
}
.ql-editor .ql-size-24 {
  font-size: 24px;
}
.ql-editor .ql-size-28 {
  font-size: 28px;
}
.ql-editor .ql-size-32 {
  font-size: 32px;
}
.ql-editor .ql-size-36 {
  font-size: 36px;
}

/*选择字号富文本字的大小*/
.ql-snow .ql-picker.ql-size .ql-picker-item[data-value="12"]::before {
  font-size: 12px;
}
.ql-snow .ql-picker.ql-size .ql-picker-item[data-value="14"]::before {
  font-size: 14px;
}
.ql-snow .ql-picker.ql-size .ql-picker-item[data-value="16"]::before {
  font-size: 16px;
}
.ql-snow .ql-picker.ql-size .ql-picker-item[data-value="18"]::before {
  font-size: 18px;
}
.ql-snow .ql-picker.ql-size .ql-picker-item[data-value="20"]::before {
  font-size: 20px;
}
.ql-snow .ql-picker.ql-size .ql-picker-item[data-value="22"]::before {
  font-size: 22px;
}
.ql-snow .ql-picker.ql-size .ql-picker-item[data-value="24"]::before {
  font-size: 24px;
}
.ql-snow .ql-picker.ql-size .ql-picker-item[data-value="28"]::before {
  font-size: 28px;
}
.ql-snow .ql-picker.ql-size .ql-picker-item[data-value="32"]::before {
  font-size: 32px;
}
.ql-snow .ql-picker.ql-size .ql-picker-item[data-value="36"]::before {
  font-size: 36px;
}
富文本里面的下拉框默认是不滚动的,想要滚动效果,加上下面的css
/*加上height和滚动属性就可以,滚动条样式是系统默认样式,可能不同*/
.ql-toolbar.ql-snow .ql-picker.ql-expanded .ql-picker-options {
  border-color: #ccc;
  height: 125px;
  overflow: auto;
}
5.给工具栏鼠标悬停加上中文释义
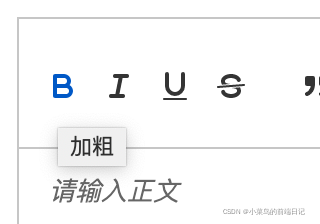
先定义一个数组,把所有的工具放在里面
// toolbar标题
const titleConfig = [
  { Choice: '.ql-insertMetric', title: '跳转配置' },
  { Choice: '.ql-bold', title: '加粗' },
  { Choice: '.ql-italic', title: '斜体' },
  { Choice: '.ql-underline', title: '下划线' },
  { Choice: '.ql-header', title: '段落格式' },
  { Choice: '.ql-strike', title: '删除线' },
  { Choice: '.ql-blockquote', title: '块引用' },
  { Choice: '.ql-code', title: '插入代码' },
  { Choice: '.ql-code-block', title: '插入代码段' },
  { Choice: '.ql-font', title: '字体' },
  { Choice: '.ql-size', title: '字体大小' },
  { Choice: '.ql-list[value="ordered"]', title: '编号列表' },
  { Choice: '.ql-list[value="bullet"]', title: '项目列表' },
  { Choice: '.ql-direction', title: '文本方向' },
  { Choice: '.ql-header[value="1"]', title: 'h1' },
  { Choice: '.ql-header[value="2"]', title: 'h2' },
  { Choice: '.ql-align', title: '对齐方式' },
  { Choice: '.ql-color', title: '字体颜色' },
  { Choice: '.ql-background', title: '背景颜色' },
  { Choice: '.ql-image', title: '图像' },
  { Choice: '.ql-video', title: '视频' },
  { Choice: '.ql-link', title: '添加链接' },
  { Choice: '.ql-formula', title: '插入公式' },
  { Choice: '.ql-clean', title: '清除字体格式' },
  { Choice: '.ql-script[value="sub"]', title: '下标' },
  { Choice: '.ql-script[value="super"]', title: '上标' },
  { Choice: '.ql-indent[value="-1"]', title: '向左缩进' },
  { Choice: '.ql-indent[value="+1"]', title: '向右缩进' },
  { Choice: '.ql-header .ql-picker-label', title: '标题大小' },
  { Choice: '.ql-header .ql-picker-item[data-value="1"]', title: '标题一' },
  { Choice: '.ql-header .ql-picker-item[data-value="2"]', title: '标题二' },
  { Choice: '.ql-header .ql-picker-item[data-value="3"]', title: '标题三' },
  { Choice: '.ql-header .ql-picker-item[data-value="4"]', title: '标题四' },
  { Choice: '.ql-header .ql-picker-item[data-value="5"]', title: '标题五' },
  { Choice: '.ql-header .ql-picker-item[data-value="6"]', title: '标题六' },
  { Choice: '.ql-header .ql-picker-item:last-child', title: '标准' },
  { Choice: '.ql-size .ql-picker-item[data-value="small"]', title: '小号' },
  { Choice: '.ql-size .ql-picker-item[data-value="large"]', title: '大号' },
  { Choice: '.ql-size .ql-picker-item[data-value="huge"]', title: '超大号' },
  { Choice: '.ql-size .ql-picker-item:nth-child(2)', title: '标准' },
  { Choice: '.ql-align .ql-picker-item:first-child', title: '居左对齐' },
  { Choice: '.ql-align .ql-picker-item[data-value="center"]', title: '居中对齐' },
  { Choice: '.ql-align .ql-picker-item[data-value="right"]', title: '居右对齐' },
  { Choice: '.ql-align .ql-picker-item[data-value="justify"]', title: '两端对齐' }
]
然后在function中循环,找到元素,添加title,至于放在那个function根据具体情况看,反正得是在页面上已经渲染好元素之后,不然会获取不到元素,可以直接放在@ready的函数里面
for (let item of titleConfig) {
        let tip = document.querySelector('.quill-editor ' + item.Choice)
        if (!tip) continue
        tip.setAttribute('title', item.title)
}
5.1 最终整合
	@ready的函数里


	// 准备富文本编辑器
    onEditorReady(quill) {
      // toolbar标题
      const titleConfig = [
        {Choice: '.ql-insertMetric', title: '跳转配置'},
        {Choice: '.ql-bold', title: '加粗'},
        {Choice: '.ql-italic', title: '斜体'},
        {Choice: '.ql-underline', title: '下划线'},
        {Choice: '.ql-header', title: '段落格式'},
        {Choice: '.ql-strike', title: '删除线'},
        {Choice: '.ql-blockquote', title: '块引用'},
        {Choice: '.ql-code', title: '插入代码'},
        {Choice: '.ql-code-block', title: '插入代码段'},
        {Choice: '.ql-font', title: '字体'},
        {Choice: '.ql-size', title: '字体大小'},
        {Choice: '.ql-list[value="ordered"]', title: '编号列表'},
        {Choice: '.ql-list[value="bullet"]', title: '项目列表'},
        {Choice: '.ql-direction', title: '文本方向'},
        {Choice: '.ql-header[value="1"]', title: 'h1'},
        {Choice: '.ql-header[value="2"]', title: 'h2'},
        {Choice: '.ql-align', title: '对齐方式'},
        {Choice: '.ql-color', title: '字体颜色'},
        {Choice: '.ql-background', title: '背景颜色'},
        {Choice: '.ql-image', title: '图像'},
        {Choice: '.ql-video', title: '视频'},
        {Choice: '.ql-link', title: '添加链接'},
        {Choice: '.ql-formula', title: '插入公式'},
        {Choice: '.ql-clean', title: '清除字体格式'},
        {Choice: '.ql-script[value="sub"]', title: '下标'},
        {Choice: '.ql-script[value="super"]', title: '上标'},
        {Choice: '.ql-indent[value="-1"]', title: '向左缩进'},
        {Choice: '.ql-indent[value="+1"]', title: '向右缩进'},
        {Choice: '.ql-header .ql-picker-label', title: '标题大小'},
        {Choice: '.ql-header .ql-picker-item[data-value="1"]', title: '标题一'},
        {Choice: '.ql-header .ql-picker-item[data-value="2"]', title: '标题二'},
        {Choice: '.ql-header .ql-picker-item[data-value="3"]', title: '标题三'},
        {Choice: '.ql-header .ql-picker-item[data-value="4"]', title: '标题四'},
        {Choice: '.ql-header .ql-picker-item[data-value="5"]', title: '标题五'},
        {Choice: '.ql-header .ql-picker-item[data-value="6"]', title: '标题六'},
        {Choice: '.ql-header .ql-picker-item:last-child', title: '标准'},
        {Choice: '.ql-size .ql-picker-item[data-value="small"]', title: '小号'},
        {Choice: '.ql-size .ql-picker-item[data-value="large"]', title: '大号'},
        {Choice: '.ql-size .ql-picker-item[data-value="huge"]', title: '超大号'},
        {Choice: '.ql-size .ql-picker-item:nth-child(2)', title: '标准'},
        {Choice: '.ql-align .ql-picker-item:first-child', title: '居左对齐'},
        {Choice: '.ql-align .ql-picker-item[data-value="center"]', title: '居中对齐'},
        {Choice: '.ql-align .ql-picker-item[data-value="right"]', title: '居右对齐'},
        {Choice: '.ql-align .ql-picker-item[data-value="justify"]', title: '两端对齐'}
      ]
      for (let item of titleConfig) {
        let tip = document.querySelector('.quill-editor ' + item.Choice)
        if (!tip) continue
        tip.setAttribute('title', item.title)
      }
      console.log('editor ready!', quill)
    },
6.图片上传七牛云
一般会遇到需要上传图片的操作,图片肯定不能只是保存到本地,这个根据项目需求,我是放在七牛云上。
添加一个上传组件,并隐藏起来,以免影响页面:
    <el-upload class="avatar-uploader" :action="uploadUrl" name="img" :show-file-list="false"
               :on-success="uploadSuccess" :before-upload="beforeUpload">
    </el-upload>


// action:上传的地址
// name: 上传后的名字,django通过.get(name) 来获取对应的文件
// on-success:上传成功后调用
在option中配置上传操作,之前的option就耀稍作修改
 editorOption: {
        modules: {
          toolbar: {
            container: [
              ['bold', 'italic', 'underline', 'strike'], // 加粗 斜体 下划线 删除线
              ['blockquote', 'code-block'], // 引用  代码块
              [{ header: 1 }, { header: 2 }], // 1、2 级标题
              [{ list: 'ordered' }, { list: 'bullet' }], // 有序、无序列表
              [{ script: 'sub' }, { script: 'super' }], // 上标/下标
              [{ indent: '-1' }, { indent: '+1' }], // 缩进
              [{ direction: 'rtl' }], // 文本方向
              [{ size: ['12', '14', '16', '18', '20', '22', '24', '28', '32', '36'] }], // 字体大小
              [{ header: [1, 2, 3, 4, 5, 6] }], // 标题
              [{ color: [] }, { background: [] }], // 字体颜色、字体背景颜色
              // [{ font: ['songti'] }], // 字体种类
              [{ align: [] }], // 对齐方式
              ['clean'], // 清除文本格式
              ['image', 'video'] // 链接、图片、视频
            ],
            handlers: {
              'image': function (value) {
                if (value) { // value === true
                  document.querySelector('.avatar-uploader input').click()
                } else {
                  this.quill.format('image', false)
                }
              }
            }
          }
        },
        placeholder: '请输入正文'
      }
点击富文本上的上传图片,就会触发这里的handlers,将操作引到upload的函数上,在这个函数里面需要做的操作是,将图片上传到七牛云,并拿到返回的在线链接,然后将图片链接插入到页面对应位置上。这里我的上传是自己封装了函数。
    beforeUpload(file) {},
    // 上传成功时触发
    uploadSuccess(res) {
      // 获取富文本组件实例
      let quill = this.$refs.myQuillEditor.quill
      // 如果上传成功
      if (res) {
        // 获取光标所在位置
        let length = quill.getSelection().index;
        // 插入图片,res为服务器返回的图片链接地址
        quill.insertEmbed(length, 'image', res.url)
        // 调整光标到最后
        quill.setSelection(length + 1)
      } else {
        // 提示信息,需引入Message
        this.$message.error('图片插入失败!')
      }
    }
6.1 django后端代码(自己配置个路由即可)
from django.shortcuts import render
from rest_framework.viewsets import ViewSet
from OfficialWebsite.utils.APIResponse import APIResponse
from django.conf import settings
# nextid为生成器,每次生成一个不重复的数组id
from OfficialWebsite.utils.common import nextid

'''
    导入七牛云
    pip install qiniu
'''
from qiniu import Auth, put_data

# Create your views here.

'''
    七牛云
'''


class Qiniu(ViewSet):
    '''
        返回七牛云外链地址
    '''

    # http://127.0.0.1:8000/qiniu/imageurl/
    def create(self, request):
        # 前端上传的图片
        file = request.FILES.get('img')
        # 重构文件名,防止七牛云覆盖
        file.name = file.name.split('.')[0] + '_' + str(nextid.__next__()) + '.' + file.name.split('.')[1]

        # 构建鉴权对象
        q = Auth(settings.ACCESS_KEY, settings.SECRET_KEY_)

        # 要上传的空间
        bucket_name = 'mifangvideo'

        # 上传后保存的文件名
        key = 'article/' + file.name  # 保存到对应的文件夹下

        # 生成上传 Token,可以指定过期时间等
        token = q.upload_token(bucket_name, key=key, expires=3600)

        # 上传文件
        ret, info = put_data(up_token=token, key=key, data=file)
        # ret:{'hash': 'FlX6xkJxKqvJ1OTXiSbjZLVgFXEY', 'key': 'article/1.jpg'}

        # 生成外链地址
        url = settings.QINIU_URL + ret['key']
        return APIResponse(url=url)
7.全部代码(以及说明需要修改的部分)
7.1 vue
<template>
  <div class="article">
    <quill-editor
        v-model="content"
        ref="myQuillEditor"
        :options="editorOption"
        @blur="onEditorBlur($event)"
        @focus="onEditorFocus($event)"
        @change="onEditorChange($event)"
        @ready="onEditorReady($event)">
    </quill-editor>
    <!-- 图片上传组件辅助-->
    <el-upload class="avatar-uploader" :action="uploadUrl" name="img" :show-file-list="false"
               :on-success="uploadSuccess" :before-upload="beforeUpload">
    </el-upload>
  </div>
</template>

<script>
import {quillEditor} from 'vue-quill-editor'

import 'quill/dist/quill.core.css'
import 'quill/dist/quill.snow.css'
import 'quill/dist/quill.bubble.css'

export default {
  name: "adminarticle",
  components: {
    quillEditor
  },
  methods: {
    // 失去焦点事件
    onEditorBlur(quill) {
      // console.log('editor blur!', quill)
    },
    // 获得焦点事件
    onEditorFocus(quill) {
      // console.log('editor focus!', quill)
    },
    // 准备富文本编辑器
    onEditorReady(quill) {
      // toolbar标题
      const titleConfig = [
        {Choice: '.ql-insertMetric', title: '跳转配置'},
        {Choice: '.ql-bold', title: '加粗'},
        {Choice: '.ql-italic', title: '斜体'},
        {Choice: '.ql-underline', title: '下划线'},
        {Choice: '.ql-header', title: '段落格式'},
        {Choice: '.ql-strike', title: '删除线'},
        {Choice: '.ql-blockquote', title: '块引用'},
        {Choice: '.ql-code', title: '插入代码'},
        {Choice: '.ql-code-block', title: '插入代码段'},
        {Choice: '.ql-font', title: '字体'},
        {Choice: '.ql-size', title: '字体大小'},
        {Choice: '.ql-list[value="ordered"]', title: '编号列表'},
        {Choice: '.ql-list[value="bullet"]', title: '项目列表'},
        {Choice: '.ql-direction', title: '文本方向'},
        {Choice: '.ql-header[value="1"]', title: 'h1'},
        {Choice: '.ql-header[value="2"]', title: 'h2'},
        {Choice: '.ql-align', title: '对齐方式'},
        {Choice: '.ql-color', title: '字体颜色'},
        {Choice: '.ql-background', title: '背景颜色'},
        {Choice: '.ql-image', title: '图像'},
        {Choice: '.ql-video', title: '视频'},
        {Choice: '.ql-link', title: '添加链接'},
        {Choice: '.ql-formula', title: '插入公式'},
        {Choice: '.ql-clean', title: '清除字体格式'},
        {Choice: '.ql-script[value="sub"]', title: '下标'},
        {Choice: '.ql-script[value="super"]', title: '上标'},
        {Choice: '.ql-indent[value="-1"]', title: '向左缩进'},
        {Choice: '.ql-indent[value="+1"]', title: '向右缩进'},
        {Choice: '.ql-header .ql-picker-label', title: '标题大小'},
        {Choice: '.ql-header .ql-picker-item[data-value="1"]', title: '标题一'},
        {Choice: '.ql-header .ql-picker-item[data-value="2"]', title: '标题二'},
        {Choice: '.ql-header .ql-picker-item[data-value="3"]', title: '标题三'},
        {Choice: '.ql-header .ql-picker-item[data-value="4"]', title: '标题四'},
        {Choice: '.ql-header .ql-picker-item[data-value="5"]', title: '标题五'},
        {Choice: '.ql-header .ql-picker-item[data-value="6"]', title: '标题六'},
        {Choice: '.ql-header .ql-picker-item:last-child', title: '标准'},
        {Choice: '.ql-size .ql-picker-item[data-value="small"]', title: '小号'},
        {Choice: '.ql-size .ql-picker-item[data-value="large"]', title: '大号'},
        {Choice: '.ql-size .ql-picker-item[data-value="huge"]', title: '超大号'},
        {Choice: '.ql-size .ql-picker-item:nth-child(2)', title: '标准'},
        {Choice: '.ql-align .ql-picker-item:first-child', title: '居左对齐'},
        {Choice: '.ql-align .ql-picker-item[data-value="center"]', title: '居中对齐'},
        {Choice: '.ql-align .ql-picker-item[data-value="right"]', title: '居右对齐'},
        {Choice: '.ql-align .ql-picker-item[data-value="justify"]', title: '两端对齐'}
      ]
      for (let item of titleConfig) {
        let tip = document.querySelector('.quill-editor ' + item.Choice)
        if (!tip) continue
        tip.setAttribute('title', item.title)
      }
      console.log('editor ready!', quill)
    },
    // 内容改变事件
    onEditorChange({quill, html, text}) {
      // console.log('editor change!', quill, html, text)
      console.log(html)
      this.content = html
    },
    beforeUpload(file) {
    },
    // 上传成功时触发
    uploadSuccess(res) {
      // 获取富文本组件实例
      let quill = this.$refs.myQuillEditor.quill
      // 如果上传成功
      if (res) {
        // 获取光标所在位置
        let length = quill.getSelection().index;
        // 插入图片,res为服务器返回的图片链接地址
        quill.insertEmbed(length, 'image', res.url)
        // 调整光标到最后
        quill.setSelection(length + 1)
      } else {
        // 提示信息,需引入Message
        this.$message.error('图片插入失败!')
      }
    }

  },
  data() {
    return {
      content: '',
      fileUpload: null,
      // 后端地址
      uploadUrl: this.$URL + 'qiniu/imageurl/',
      // 富文本编辑器配置
      editorOption: {
        modules: {
          toolbar: {
            container: [
              ['bold', 'italic', 'underline', 'strike'], // 加粗 斜体 下划线 删除线
              ['blockquote', 'code-block'], // 引用  代码块
              [{header: 1}, {header: 2}], // 1、2 级标题
              [{list: 'ordered'}, {list: 'bullet'}], // 有序、无序列表
              [{script: 'sub'}, {script: 'super'}], // 上标/下标
              [{indent: '-1'}, {indent: '+1'}], // 缩进
              [{direction: 'rtl'}], // 文本方向
              [{size: ['12', '14', '16', '18', '20', '22', '24', '28', '32', '36']}], // 字体大小
              [{header: [1, 2, 3, 4, 5, 6]}], // 标题
              [{color: []}, {background: []}], // 字体颜色、字体背景颜色
              // [{ font: ['songti'] }], // 字体种类
              [{align: []}], // 对齐方式
              ['clean'], // 清除文本格式
              ['image', 'video'] // 链接、图片、视频
            ],
            handlers: {
              'image': function (value) {
                if (value) { // value === true
                  document.querySelector('.avatar-uploader input').click()
                } else {
                  this.quill.format('image', false)
                }
              }
            }
          }
        },
        placeholder: '请输入正文'
      }
    }
  }
}
</script>

<style scoped>

</style>
需要修改地方有:
1.data(){
    return {
         uploadUrl:修改成自己的后端地址
    }
  }
7.2 django
from django.shortcuts import render
from rest_framework.viewsets import ViewSet
from OfficialWebsite.utils.APIResponse import APIResponse
from django.conf import settings
# nextid为生成器,每次生成一个不重复的数组id
from OfficialWebsite.utils.common import nextid

'''
    导入七牛云
    pip install qiniu
'''
from qiniu import Auth, put_data

# Create your views here.

'''
    七牛云
'''


class Qiniu(ViewSet):
    '''
        返回七牛云外链地址
    '''

    # http://127.0.0.1:8000/qiniu/imageurl/
    def create(self, request):
        # 前端上传的图片
        file = request.FILES.get('img')
        # 重构文件名,防止七牛云覆盖
        file.name = file.name.split('.')[0] + '_' + str(nextid.__next__()) + '.' + file.name.split('.')[1]

        # 构建鉴权对象
        q = Auth(settings.ACCESS_KEY, settings.SECRET_KEY_)

        # 要上传的空间
        bucket_name = 'mifangvideo'

        # 上传后保存的文件名
        key = 'article/' + file.name  # 保存到对应的文件夹下

        # 生成上传 Token,可以指定过期时间等
        token = q.upload_token(bucket_name, key=key, expires=3600)

        # 上传文件
        ret, info = put_data(up_token=token, key=key, data=file)
        # ret:{'hash': 'FlX6xkJxKqvJ1OTXiSbjZLVgFXEY', 'key': 'article/1.jpg'}

        # 生成外链地址
        url = settings.QINIU_URL + ret['key']
        return APIResponse(url=url)


    '''
    	1.settings.ACCESS_KEY和settings.SECRET_KEY_需要修改成自己的ACCESS_KEY和SECRET_KEY,怎么找百度吧

    	2.bucket_name 改为自己的bucket_name

    	3.settings.QINIU_URL改成自己的外链域名

    	4.自己在写一个生成器,只需要能返回不重复id即可,这个只是为了防止覆盖了

    '''
8.展示
无需引入editor组件,只需要从接口中取出富文本的html格式内容,存入数据库后,在需要显示的地方取出,用v-html 展示
<template>
  <div class="article">
    <el-col :span="24">
      <div class="ql-container ql-snow">
        <div class="ql-editor" v-html="content"></div>
      </div>
      <!-- <editor v-html="form.content" style="background-color:white"></editor> -->
    </el-col>
  </div>
</template>

<script>
import Quill from 'quill'
import 'quill/dist/quill.snow.css'

export default {
  name: "article",
  data() {
    return {
      content: '',
    }
  },
  mounted() {
    let pk = this.$route.params.pk
    this.$axios.get(this.$URL + 'article/article/' + pk + '/').then(res => {
      this.content = res.data.data.content
    })
  }
}
</script>

<style scoped>

</style>
即可显示内容。
本文作者:春游去动物园
本文链接:https://www.cnblogs.com/chunyouqudongwuyuan/p/16952902.html
版权声明:本作品采用知识共享署名-非商业性使用-禁止演绎 2.5 中国大陆许可协议进行许可。


【推荐】国内首个AI IDE,深度理解中文开发场景,立即下载体验Trae
【推荐】编程新体验,更懂你的AI,立即体验豆包MarsCode编程助手
【推荐】抖音旗下AI助手豆包,你的智能百科全书,全免费不限次数
【推荐】轻量又高性能的 SSH 工具 IShell:AI 加持,快人一步
· 震惊!C++程序真的从main开始吗?99%的程序员都答错了
· 单元测试从入门到精通
· 【硬核科普】Trae如何「偷看」你的代码?零基础破解AI编程运行原理
· 上周热点回顾(3.3-3.9)
· winform 绘制太阳,地球,月球 运作规律